Advertisement
Quick Links
Thank you for purchasing the
Please read the instructions carefully to ensure safe operation of this product.
PLEASE READ this sheet prior to assembly to familiarise yourself with the various
stages of construction.
HEAVY PRODUCT: Please assemble in the room / position where the product will be
used.
Carefully open the pack supplied and check the contents against the parts and fittings
check list. Do not destroy any of the packaging until you are certain that you have all
the necessary parts for the assembly.
CAUTION: There are small components used in the construction of this unit. These
loose items should be kept away from young children whilst assembling your unit to
avoid the danger of choking.
Tools Required
ASSEMBLY INSTRUCTIONS
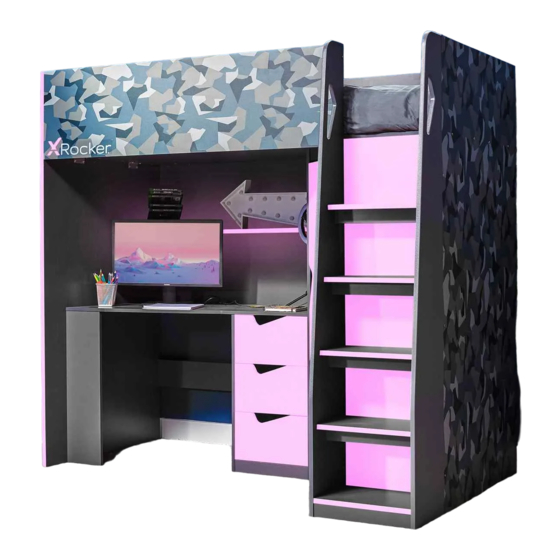
HIDEOUT CAMO GAMING BUNK BED WITH DESK.
Size: 195.5 x 96 x 185cm (L x W x H)
2 Person assembly.
3 Person assembly
recommend.
x 3
Page 1 of 31
FOR PARTS & TECHNICAL
SUPPORT VISIT:
www.xrockeruk.com/pages/support
2 HOURS
Set Up
Advertisement

Related Manuals for XROCKER HIDEOUT CAMO GAMING BUNK BED WITH DESK 2021058


Summary of Contents for XROCKER HIDEOUT CAMO GAMING BUNK BED WITH DESK 2021058
- Page 1 ASSEMBLY INSTRUCTIONS HIDEOUT CAMO GAMING BUNK BED WITH DESK. Thank you for purchasing the Please read the instructions carefully to ensure safe operation of this product. FOR PARTS & TECHNICAL SUPPORT VISIT: www.xrockeruk.com/pages/support Size: 195.5 x 96 x 185cm (L x W x H) PLEASE READ this sheet prior to assembly to familiarise yourself with the various stages of construction.
- Page 2 ASSEMBLY INSTRUCTIONS BS EN747-1:2012+A1:2015 SAFETY WARNING AND GENERAL NOTES : IMPORTANT – READ CAREFULLY – RETAIN THESE INSTRUCTION FOR FUTURE REFERENCE. PLEASE READ this sheet prior to assembly to familiarise yourself with the various stage of construction. Do Not destroy any of the packing until you are certain that you have all the necessary parts for assembly. CAUTION: There are small components used in the construction of this unit.
- Page 3 PARTS AND FITTINGS CHECK LIST Part List Please check the pack contents before assembling the product. If any components are missing, please contact your retailer. The fittings pack contains small items that should be kept away from small children. × 3 Left Panel Ladder Steps Support Wardrobe Shelf...
- Page 4 Fittings (to scale) Code Item Quantity Cam Lock (Ø7x39mm) Cam Bolt (Ø14.5x11.5mm) Wood DoweI (Ø8x30mm) Screw (Ø3.5x14mm) Screw (Ø5x40mm) Bolt (Ø5x60mm) Screw (Ø6x10mm) (Ø9.5x9mm) CAM Lock (Ø7x45mm) Screw (Ø3x16mm) Wood Dowel (Ø8x50mm) Fitting s (Not to scale) Magnetic Door Stopper Door Stopper Metal Plate Hanging Rail Holder...
- Page 5 Fittings (Not to scale) Metal Joint Plate (Backboard) Desk Shelf Support Pin Wardrobe Door Panel Hinges Metal Joint Plate Wardrobe Door Hinges Allen Key Paper Sticker 1 set (For Screw Hole Cover) Bed Base Ventilation Cover Drawer Base Runner Sets ( L+R) Cabinet Runner Sets ( L+R) General Hints &...
- Page 6 STEP 1 For this step: Tools required Z(R) Z(R) Z(R) Z(R) Z(L) Fittings required D x18 Z(L) Z(L) Cabinet Runner Sets (L+R) Z(L) Z x3 STEP 2 For this step: Tools required Fittings required A x9 Page 6 of 31...
- Page 7 STEP 3 For this step: Tools required Fittings required A x10 D x4 H x5 N x2 STEP 4 For this step: Tools required Fittings required B x9 C x7 Page 7 of 31...
- Page 8 STEP 5 For this step: Tools required Fittings required B x8 C x11 STEP 6 For this step: Tools required Fittings required B x2 C x2 Page 8 of 31...
- Page 9 STEP 7 Fittings required F x5 V x1 STEP 8 For this step: Tools required Fittings required D x8 O x2 S x1 Page 9 of 31...
- Page 10 STEP 9 For this step: Tools required Fittings required A x4 G x8 H x8 T x4 STEP 10 For this step: Tools required Fittings required A x4 B x4 C x1 Page 10 of 31...
- Page 11 STEP 11 For this step: Tools required Fittings required A x4 H x5 STEP 12 For this step: Tools required Fittings required B x4 C x4 H x2 Page 11 of 31...
- Page 12 STEP 13 For this step: Tools required Fittings required A x4 STEP 14 For this step: Tools required Fittings required B x4 C x3 F x2 V x1 Page 12 of 31...
- Page 13 STEP 15 For this step: Second builder to hold the bed platform (6) in place Tools required while the other parts are being assembled. Fittings required B x4 C x4 STEP 16 Second builder to hold the bed platform (6) in place while the other parts are being assembled.
- Page 14 STEP 17 For this step: Tools required Second builder to hold the bed platform (6) in place while the other parts are being assembled. Fittings required G x4 STEP 18 For this step: Second builder to hold the bed platform (6) in Tools required place while the other parts are being...
- Page 15 STEP 19 Fittings required C x9 F x13 V x1 STEP 20 For this step: Tools required Fittings required G x4 Page 15 of 31...
- Page 16 STEP 21 For this step: Tools required Fittings required H x4 STEP 22 For this step: Tools required Fittings required C x4 F x4 H x4 V x1 Page 16 of 31...
- Page 17 STEP 23 Fittings required F x4 V x1 STEP 24 For this step: Tools required Fittings required G x8 H x4 T x4 Page 17 of 31...
- Page 18 STEP 25 Fittings required C x2 F x2 V x1 STEP 26 For this step: Tools required Fittings required G x8 Page 18 of 31...
- Page 19 STEP 27 For this step: Tools required Fittings required H x5 STEP 28 For this step: Tools required Fittings required A x20 Page 19 of 31...
- Page 20 STEP 29 For this step: Tools required Fittings required B x10 C x9 STEP 30 × 4 14 13 Fittings required C x20 Page 20 of 31...
- Page 21 STEP 31 For this step: Tools required Fittings required B x10 C x9 STEP 32 For this step: Tools required Fittings required C x2 I x7 K x2 Page 21 of 31...
- Page 22 STEP 33 For this step: Tools required Fittings required B x7 Page 22 of 31...
- Page 23 STEP 34 Fittings required F x7 V x1 Page 23 of 31...
- Page 24 STEP 35 For this step: Tools required Fittings required D x4 O x2 S x1 STEP 36 For this step: Tools required Fittings required D x4 Page 24 of 31...
- Page 25 STEP 37 For this step: Tools required Fittings required D x8 M x1 U x3 STEP 38 For this step: Tools required Fittings required D x8 L x1 Page 25 of 31...
- Page 26 STEP 39 Page 26 of 31...
- Page 27 STEP 40 For this step: Tools required iii. Fittings required A x12 B x12 Y(L) D x18 E x12 Y(R) Y(R) Drawer Base Runner Sets ( L+R) Y x3 Page 27 of 31...
- Page 28 STEP 41 STEP 42 Adjustable shelf height PIN pilot holes for TV / Monitor sizes 24’’ 27’’ 32’’ Fittings required P x1 R x4 Page 28 of 31...
- Page 29 STEP 43 For this step: Tools required Fittings required J x45 Q x10 (Optional) W x1set Page 29 of 31...
- Page 30 STEP 44 ×2 ×5 ×4 ×5 ×2 ×2 Fittings required (Optional) W x1set STEP 45 Fittings required X x8 Page 30 of 31...
- Page 31 Assembly Completed HIDEOUT CAMO GAMING BUNK BED WITH DESK Your is now completely assembled. Periodically check to ensure that the components are in their proper position, free from damage. Also, please ensure the connectors are tight and secure. Keep instructions for future reference Page 31 of 31...
Need help?
Do you have a question about the HIDEOUT CAMO GAMING BUNK BED WITH DESK 2021058 and is the answer not in the manual?
Questions and answers