
Subscribe to Our Youtube Channel
Related Manuals for Korg Elec Tribe EA-1


Summary of Contents for Korg Elec Tribe EA-1
- Page 1 Thank you purchasing the Korg ELECTRIBE·A EA-1. In order to enjoy long and trouble-free use, please read this manual carefully and use the instrument correctly.
- Page 2 • Be careful not to let metal objects get into the equipment. If something does slip into the equipment, unplug the AC adaptor from the wall outlet. Then contact your nearest Korg dealer or the store where the equipment was purchased.
-
Page 3: Table Of Contents
Contents 1. Introduction ... 6 Main features... 6 About the data you create on the EA-1 ...6 Make connections and play! ... 7 Example connections ... 7 Preparing to play ...7 2. Front and rear panel ... 8 Common section ... 8 Synthesizer section ... - Page 4 Playing a pattern (Pattern Play) ...22 The timing at which patterns will change ... 22 Playing from the beginning of a pattern (Reset & Play) ... 22 About the tempo when the pattern is changed ... 22 Selecting a pattern ... 23 Creating a pattern...
- Page 5 Specifying the pitch of each pattern ... 36 Editing a song ... 36 Inserting a pattern at a specified position (Insert Pattern) ... 36 Deleting a pattern from a specified position (Delete Pattern) ... 37 Changing the pattern for a specific position ...37 Recording knob movements or your performance in a song (Event Recording) ...
-
Page 6: Introduction
1.Introduction 1. Introduction Thank you for purchasing the Electribe·A EA-1. The Electribe·A EA-1 is a unique and easy-to-use synthesizer that uses DSP synthesis technology to help anyone from beginners to hard-core users to produce truly original sounds and phrases. By using the front panel knobs and keys, you can create analog synthesizer sounds intuitively, and easily create phrases using these sounds. -
Page 7: Make Connections And Play
Make connections and play! Example connections Power switch Preparing to play Be sure to turn off the power before making connections. Careless operation may damage your speaker system or cause malfunctions. 1. Connect the included AC adapter to the DC 9V jack, and plug the adapter into an AC outlet. As shown in the above diagram, hook the AC adapter cable around the adapter cable holder. -
Page 8: Front And Rear Panel
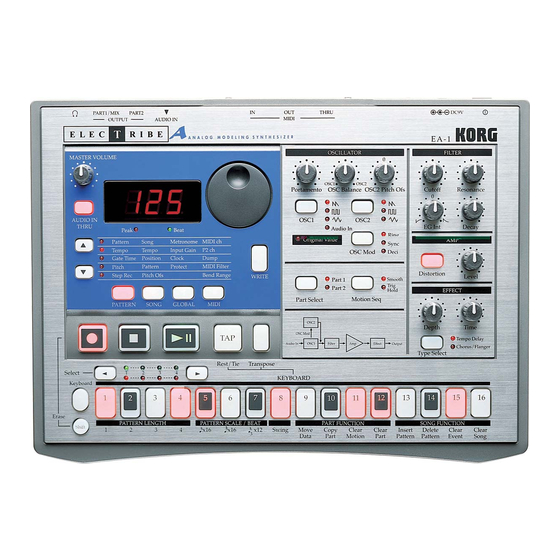
2.Front and rear panel 2. Front and rear panel The controls and other parts of the EA-1 can be broadly grouped as shown in the diagram. Common section 1. MASTER VOLUME This knob adjusts the volume that is output from the Part output jacks and the head- phone jack. -
Page 9: Synthesizer Section
Synthesizer section 1. OSCILLATOR This produces the basic waveform. • Portamento This smoothly connects changes in pitch. • OSC Balance (oscillator balance) Adjust the level balance of the two oscilla- tors. • OSC2 Pitch Offset (oscillator 2 pitch offset) Adjust the pitch difference between OSC1 and OSC2. -
Page 10: Sequence Control Section
2.Front and rear panel Sequence Control section 1. Rec key Use this key to record phrases and movements of the knobs etc. If you press this key during recording, record- ing will end, and playback will continue. 2. Stop/Cancel key This key stops playback of a pattern or song, or cancels an operation. -
Page 11: Connector Section
5. Shift key This key is used in conjunction with other keys. When held down, it gives an additional function to another key. Shift + Play/Pause key:Playback from the beginning of the pattern. Shift + Rec key:During playback, erase triggers from the pattern. Shift + Step keys:Execute the function shown below each step key. -
Page 12: Basic Operation (Quick Start)
3. Basic operation (Quick Start) 3. Basic operation (Quick Start) Conceptual diagram of the EA-1 On the EA-1, a song consists mainly of Patterns (which consist of Parts and delay set- tings) and event data (refer to p.37 "Recording knob movements or your performance in a song (Event Recording)"). -
Page 13: Listening To Patterns
Listening to Patterns 1. Press the Pattern mode key to enter Pattern mode (the key will light). 2. Use the cursor [L][M] keys to make the parameter select LEDs indicate Pattern (top). 3. Rotate the dial to select the desired pattern (A01...A64, b01...b64, C01...C64, d01...d64). -
Page 14: Striking Keys To Play Sounds (Keyboard Function)
3. Basic operation (Quick Start) Striking keys to play sounds (Keyboard function) 1. Turn on the Keyboard function key (the key will light). 2. Use the step keys as a keyboard. 3. You can use the Part Select key to switch the part that you play. -
Page 15: Playing The Sound Of A Part Along With A Song Or Pattern
Playing the sound of a part along with a song or pattern 1. Turn on the Keyboard function key, and press the step keys to play the sound. 2. In Song mode or Pattern mode, press the Play/Pause key to begin playback. Use the Part Select key to select the part that you wish to play. -
Page 16: Realtime Recording (Using The Keyboard Function To Create A Phrase)
3. Basic operation (Quick Start) In the following pages we will explain how to perform Realtime Recording and Step Recording. For details on Event Editing, refer to Event Editing (p.28) in "Pattern mode." • Realtime recording (using the Keyboard function to create a phrase) If you wish to listen to the metronome as you record, refer to p.39 "Metro- nome settings."... -
Page 17: Saving A Pattern That You Create
6. Press the Rec key to enter recording mode. At this time, press- ing the PLAY key will not start playback. 7. Use the step keys to input the pitch for each note of the phrase. (The target step will automatically advance by one step each time you do so.) 8. -
Page 18: Using A Motion Sequence
3. Basic operation (Quick Start) Using a Motion Sequence What is a Motion Sequence? For each part, you can record the changes you make to the synth parameters using the knobs, and loop them for playback. The looped data for the knob movements is called a Motion Sequence (refer to p.29 "Recording a motion sequence"). -
Page 19: Connecting Various Sources To The Audio Input
Connecting various sources to the audio input Let's try connecting various types of audio device (radio, or MD or CD player) or tone generator to the audio input jack. Try out various types of sounds or music. Depending on the content, you may discover unexpectedly interesting results. -
Page 20: Playing With Pattern Set
3. Basic operation (Quick Start) Playing with Pattern Set What is Pattern Set? Pattern Set is a function that lets you register a favorite pattern to each of the sixteen step keys, and use the step keys to switch patterns. You can use this function to play a performance simply by selecting patterns one after the other. -
Page 21: Synchronized Playback With The Er-1
Synchronized playback with the ER-1 By synchronizing the Electribe EA-1 and ER-1 you can enjoy even greater performance possibilities. Here's how you can make the ER-1 playback in synchronization with the tempo of the EA-1. Use a MIDI cable to connect the MIDI OUT connector of the EA-1 to the MIDI IN connector of the ER-1. -
Page 22: Pattern Mode
4.Pattern mode 4. Pattern mode In this mode you can play patterns, or edit them to make new patterns. Press the Pattern mode key to enter Pattern mode. 256 patterns A01...D64 Pattern (A01) Phrase patterns (maximum 64 steps) Parts Synthesizer 1 (Synth Parameter, Effects, Step Step... -
Page 23: Selecting A Pattern
Selecting a pattern You can use the Part Select key to switch the part that will be edited or played using the Keyboard function. When you select a Part, the LED for that part will light, and you can edit it in the Synthesizer section, or edit a phrase pattern. At this time if the Keyboard function key is off (dark), the step keys will indicate the trigger locations (refer to p.28) of the phrase pattern for that part. -
Page 24: Filter
4.Pattern mode OSC2 Pitch Ofs (OSC2 pitch offset) Specify the pitch of OSC2 relative to the pitch of OSC1. The pitch of OSC2 can be adjusted in the range of –1 octave to 4 octaves from the pitch of OSC1. The pitch of OSC1 will be the pitch that sounds when you use the keyboard function or the pitch specified for a phrase pattern. -
Page 25: Amp
Resonance This parameter adds character to the sound by boosting the region around the cutoff frequency. If you raise the reso- nance and turn the Cutoff knob (or adjust EG Int and De- cay), you will hear the typical "meow-ing" sound typical of analog synthesizers. -
Page 26: Length, Scale/Beat Settings
4.Pattern mode Length, Scale/Beat settings You can set the length (the length of the entire pattern) and the basic beat (time signature).The Length and Scale/Beat you specify here will affect the correspondence between step keys and note values, and the maximum number of steps as shown in the following diagram. -
Page 27: Creating A Phrase Pattern
Creating a phrase pattern There are three ways to create a phrase pattern. Realtime recording Use the Keyboard function to play the step keys at the exact timing you wish to record them. Step recording Use the Keyboard function to specify the pitch of the note for each target step to create the phrase. - Page 28 4.Pattern mode Changing the pitch Pitch 1. Turn off the Keyboard function key (the key will go dark). 2. Use the cursor keys to make the parameter select LEDs indi- cate Pitch. 3. Use the Part select key to select the part that you wish to edit. 4.
-
Page 29: Motion Sequence
Motion sequence Playing a motion sequence A motion sequence can be played back in one of the following two ways, and you can select the playback method indepen- dently for each part. Smooth:Knob values will be connected smoothly, and the sound will change smoothly. -
Page 30: Transposing A Phrase (Transpose)
4.Pattern mode Transposing a phrase (Transpose) Transpose This operation lets you transpose a phrase. 1. While you continue pressing the Transpose key, the display will indicate the current transposition status. 2. While holding down the Transpose key, rotate the dial to trans- pose the phrase in semitone steps. -
Page 31: Copying A Part (Copy Part)
Copying a part (Copy Part) You can copy the sound settings and phrase pattern data (in- cluding motion sequence) from a selected part to another part. 1. If the pattern is playing, press the Stop/Cancel key to stop playback. 2. Press the Part key to select the copy destination part (the LED will light). -
Page 32: Pattern Set
4.Pattern mode Pattern Set Pattern Set is a function that lets you assign your favorite pat- terns to each of the sixteen step keys, and switch them at the touch of a key. During playback, you can successively switch patterns to per- form a song. -
Page 33: Saving A Pattern (Write)
Saving a pattern (Write) If you wish to keep the pattern data that you create, you must perform this Write operation. When you perform the Write op- eration, "Data Copy within a pattern" (p.31) will occur auto- matically, depending on the pattern length. If you intentionally want to discard your edits and revert to the original pattern data, simply select a different pattern without Writing. -
Page 34: Song Mode
5.Song mode 5. Song mode A song consists of patterns arranged in the desired order of play- back. You can create and save up to sixteen songs in the internal memory of the EA-1. In addition to pattern playback, songs can also record phrases and knob movements. -
Page 35: Creating A Song
Creating a song Creating a song from scratch Here's how to create a song by placing patterns in the desired order. If you switch to a different song while editing a song, your edited data will be lost. If you wish to keep the edited song, you must perform the Write operation to save the song data. -
Page 36: Specifying The Pitch Of Each Pattern
5.Song mode Specifying the pitch of each pattern Pitch Offset This function offsets the pitch of the pattern at the specified position within the song. Pitch Offset simply offsets the pitch within the song. It does not affect the pitch data of the pattern itself. 1. -
Page 37: Deleting A Pattern From A Specified Position (Delete Pattern)
Deleting a pattern from a specified position (Delete Pattern) You can delete a pattern from a specified position, and subse- quent patterns will be moved forward (toward the beginning of the song). Delete the pattern at position 5 Before Pattern D01 Pattern A10 Pattern B01 Pattern A01... -
Page 38: Recording Knob Movements Or Your Performance In A Song (Event Recording)
5.Song mode Recording knob movements or your performance in a song (Event Recording) In addition to placing patterns in a desired playback order, Song mode also lets you record your realtime performance on the step keys using the Keyboard function, and knob movements you perform. -
Page 39: Global Mode
6. Global mode In Global mode you can set parameters such as Metronome or Protect. Press the Global mode key to enter Global mode. To execute Global mode, press a different mode key. The settings you make in Global mode will be cancelled if you turn off the power without Writing. -
Page 40: Synchronizing An External Midi Device To The Ea-1 As Master (Int)
6.Global mode Synchronizing an external MIDI device to the EA-1 as master (int) 1. Use a MIDI cable to connect the MIDI OUT connector of the EA-1 to the MIDI IN connector of the external MIDI device (sequencer or synthesizer etc.). 2. -
Page 41: Midi Mode
4. Transmit the data dump from the external MIDI device. Details on data dumps are provided in the MIDI implementa- tion chart of the EA-1. Consult your local Korg distributor for more information on MIDI implementation Do not touch the keys of the EA-1 while a data dump is in progress. -
Page 42: Midi Filter Settings
7.MIDI mode MIDI filter settings Here you can select the types of MIDI message that will be trans- mitted and received. For each character "PCE" in the display, select "O" if you want that type of message to be transmitted and received, or select "- "... -
Page 43: Appendices
8. Appendices About MIDI 1. MIDI channels Similarly to a television, data can be received when the channel of the receiving device matches the channel on which the data is being transmitted. The transmit/receive channel of the EA-1 is set by the MIDI channel setting in MIDI mode. -
Page 44: Troubleshooting
- When an Inquiry Message Request [F0, 7E, nn, 06, 01, F7] is received, the EA-1 will transmit an Inquiry Message [F0, 7E, nn, 06, 02, (nine bytes), F7] that means "I am a Korg EA-1 and my system version is ..."... -
Page 45: Error Messages
Error messages Er.1 Data could not be written. When writing a song to a different song num- Er.2 ber, the maximum number of recordable events was exceeded. Use the Clear Event operation to erase unwanted events from the song. Protect was turned "on" for the memory into Er.9 which you attempted to write data. -
Page 46: Example Sounds
8.Data Example sounds Saw Bass Detuned Saw Sync Lead 5th Pad Sub Bass Distortion Lead/Bass Ring Mod Deep Flange Octave Bass Pulse Width Mod Decimator Beam... -
Page 47: Blank Chart
8.Data Blank Chart When you have created a sound that you like, you can store the knob and key locations in this page. -
Page 48: Index
8.Data Index Distortion ------------------ 9, 25 Level ------------------------ 9, 25 Audio In ----------------- 8, 19, 39 AUDIO IN THRU ------ 8, 19, 39 Beat --------------------------- 8, 26 Beat LED -------------------------- 8 Bend Range -------------------- 42 Blank chart --------------------- 47 Checking ------------------- 29, 38 Motion Sequence ----------- 29 Song Event ------------------ 38 Chorus/Flanger... - Page 49 Pitch Offset --------------------- 36 Pitch Shift ----------------------- 30 Play Motion Sequence ------ 18, 29 Pattern ------------------- 13, 22 Pattern set -------------- 20, 32 Song ---------------------- 13, 34 Portamento ------------------ 9, 23 Position --------------------- 34, 35 Protect --------------------------- 40 Realtime Recording ----- 15, 27 Recording Event -------------------------- 37 Step ----------------------- 15, 27...
-
Page 50: Pattern Name List
Drum’n’Bass 170 B64 Jump Up 2 Drum’n’Bass 166 S08...S16: Blank S04: Bass Burn S05: Macrocaustic All Patterns and All Songs - ©1999 KORG Inc. All rights reserved. C Bank No. Pattern Name Style Tempo C01 DNB Chord Seq1 Drum’n’Bass 166 C02 DNB Chord Seq2 Drum’n’Bass 166... -
Page 51: Midi Implementation Chart
*1: Sent but not received when Global mode Clock is "Int."When set to "Ext," received but not sent. *2: In addition to Korg exclusive messages, also responds to Inquiry messages. Mode 2: OMNI ON, MONO Mode 4: OMNI OFF, MONO 1999.2.3... - Page 52 KORG products are manufactured under strict specifications and voltages required by each country. These products are warranted by the KORG distributor only in each country. Any KORG product not sold with a warranty card or carrying a serial number disqualifies the product sold from the manufacturer’s/distributor’s warranty and liability. This requirement is for your own protection and safety.
Need help?
Do you have a question about the Elec Tribe EA-1 and is the answer not in the manual?
Questions and answers