Advertisement
Available languages
Available languages
Quick Links
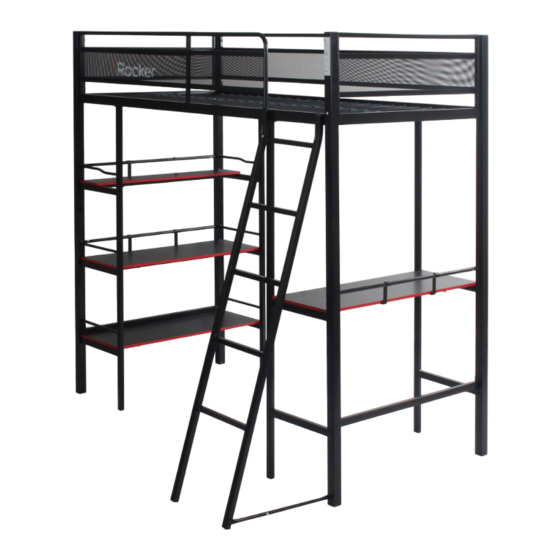
FORTRESS GAMING BUNK BED
I MPORTANT - READ CAREFULLY - RETAIN FOR FUTURE REFERENCE
2112101
Dimensions
NEED HELP?
Width -77.6in
EMAIL:SUPPORT@XROCKERGAMING.COM
Depth - 59.1in
BESOIN D'AIDE?
Height - 72in
COURRIEL:SUPPORT@XROCKERGAMING.COM
NECESITAS AYUDA?
CORREO ELECTR NICO:SUPPORT@XROCKERGAMING.COM
IMPORTANT: You must keep your original retail receipt as proof of purchase.
1
SXJ00-20210318
Advertisement

Related Manuals for XROCKER 2112101


Summary of Contents for XROCKER 2112101
- Page 1 FORTRESS GAMING BUNK BED I MPORTANT - READ CAREFULLY - RETAIN FOR FUTURE REFERENCE 2112101 Dimensions NEED HELP? Width -77.6in EMAIL:SUPPORT@XROCKERGAMING.COM Depth - 59.1in BESOIN D'AIDE? Height - 72in COURRIEL:SUPPORT@XROCKERGAMING.COM NECESITAS AYUDA? CORREO ELECTR NICO:SUPPORT@XROCKERGAMING.COM IMPORTANT: You must keep your original retail receipt as proof of purchase.
- Page 2 Safety and Care Advice Read Before Beginning Assembly Call 866-969-2603 if you need assistance. Work in a spacious area and near where the unit will be used, preferably on a carpet, or use a piece of the cardboard packaging to protect your floor and product. Recommended # of people needed for assembly: 2 (however it is always better to have an extra hand).
- Page 3 Safety and Care Advice WARNINGS Follow the information on the warnings appearing on the upper bunk end structure and on the carton. Do not remove warning label from bed. Always use the recommended size mattresses or mattress supports, or both, to help prevent the likelihood of entrapment or falls.
- Page 4 Safety and Care Advice Avant de commencer l'assemblage Si vous avez besoin d'aide, appelez notre num ro de service 866-969-2603. Travaillez dans un endroit spacieux et pr s du lieu o l'unit sera utilis e, pr f rablement sur un tapis, ou sur un morceau de l'emballage, afin de prot ger le plancher et le produit.
- Page 5 Safety and Care Advice Avertissements Suivre les informations indiqu es sur les avertissements paraissant au bout de la structure du lit superpos et sur la bo te. Ne pas enlever l' tiquette d'avertissement du lit. Utilisez toujours la dimension recommand e de matelas, ou de support de matelas, ou les deux pour aider pr venir les risques possibles de coin age ou de chute.
- Page 6 Safety and Care Advice Lea antes de comenzar a ensamblar Llame a nuestro n mero 866-969-2603 si necesita asistencia. Trabaje en un rea espaciosa y cerca de donde su producto ser utilizado, preferiblemente sobre una alfombra o utilice el cart n del empaque para proteger su piso y su producto. El n mero de personas recomendadas para el montaje de este producto es: 2 (sin embargo es recomendable contar con ayuda adicional).
- Page 7 Safety and Care Advice Precauc ones Siga la informaci n sobre las advertencias que aparecen en el extremo superior de la litera y en el empaque. No quite la etiqueta de advertencia de la cama. Utilice siempre el colch n del tama o recomendado, el soporte del colch n recomendado, o ambos, para ayudar a prevenir la probabilidad de quedar atrapado o de ca das.
- Page 8 Components - Panels Please check you have all the panels listed below PARTS...
- Page 9 Components - Panels Please check you have all the panels listed below Post 04 x 1 Post 01 x 1 Post 02 x 1 Post 03 x 1 Front Guard Rail x 1 7 Right Guard Rail x 1 Left Guard Rail x 1 Side Rail x 2 Plastic Plug x 48 Rear Guard Rail x 1...
- Page 10 Components - Panels Please check you have all the panels listed below Bracket 02 x 6 22 Ladder x 1 Ladder Connector Bar x 1 Shelf 01 x 1 Shelf 02 x 3 Connector Bar x 3 Shelf Support 01 x 1 56 Shelf Support 02 x 3...
- Page 11 Components - Fittings Please check you have all the panels listed below Note: The quantities below are the correct amount to complete the assembly. In some cases more fittings may be supplied are required. 27mm M6 Bolt x 16 55mm M6 Bolt x 6 35mm M6 Bolt x 16 10mm M6 Bolt x 6 25mm M8 Bolt x 2...
- Page 12 Assembly Instructions Step Attach Left Guard Rail Warning label on 7a must be Post 01 and Post 02 oriented on the same side as with the side rail holes Attach Connector Bar to Post 01 and Post 02 with Attach Side Rail to Post and Post 02 with...
- Page 13 Assembly Instructions Step Warning label on 7 must Attach Right Guard Rail be oriented on the same to Post 03 and Post 04 with side as the side rail holes Attach Connector Bar Post 03 and Post 04 with Attach Side Rail to Post and Post 04 with...
- Page 14 Assembly Instructions Step Attach Rear Guard Rail to Post 02 and Post 03 with N B H I Attach Front Guard Rail N B H to Post 01 with and Post 04 with N G J K L M6 Metal M6 Spring Washer Washer...
- Page 15 Assembly Instructions Step Attach Shelf Support 01 /Shelf Support 02 x2 to Post 01 and Post 02 with Attach Shelf Support 02 to Support 03 and Post with M6 X 27mm CX16...
- Page 16 Assembly Instructions Step a:Secure the Slats x24 to Rear Guard Rail Front Guard Rail b:Secure the Plastic Plug x48 to Rear Guard Rail and Front Guard Rail...
- Page 17 Assembly Instructions Step Secure Slat Spacer to Slats x24 .
- Page 18 Assembly Instructions Step Attach Shelf 01 to Shelf Support 01 with Attach Shelf 02 X3 to Shelf Support 02 X3 with M6 X 19mm NX16...
- Page 19 Assembly Instructions Step Attach Bracket 02 X2 to Shlef 01 and Connector with Attach Bracket 02 X4 to Shlef 02 X2 and Connector Bar x2 with M6 X 10mm...
- Page 20 Assembly Instructions Step Attach Ladder to Front Guard Rail with M6 X 35mm...
- Page 21 Assembly Instructions Step Attach Ladder Connector to Ladder Post 04 with M6 X 19mm...
- Page 22 Assembly Instructions Step Assembly is complete 100%...
Need help?
Do you have a question about the 2112101 and is the answer not in the manual?
Questions and answers