
Subscribe to Our Youtube Channel
Related Manuals for Sherwood RD-7505


Summary of Contents for Sherwood RD-7505
- Page 1 7505(A) cover_cover.qxp 2010-10-14 오전 10:25 페이지 1 All manuals and user guides at all-guides.com OPERATING INSTRUCTIONS RD-7505 AUDIO / VIDEO RECEIVER...
-
Page 2: Important Safety Instructions
RD-7505(A)_ENG_101115_RD-7505(A)_ENG 2010-11-16 오전 10:36 페이지 2 All manuals and user guides at all-guides.com IMPORTANT SAFETY INSTRUCTIONS 1. Read these instructions. 12. Use only with the cart, stand, tripod, bracket, or table 2. Keep these instructions. specified by the manufacturer, or sold with the 3. -
Page 3: Introduction
RD-7505(A)_ENG_101115_RD-7505(A)_ENG 2010-11-16 오전 10:36 페이지 3 All manuals and user guides at all-guides.com Introduction READ THIS BEFORE OPERATING YOUR UNIT This symbol is intended to alert the user to the presence of uninsulated "dangerous voltage" within the product's enclosure that may be of sufficient magnitude to constitute a risk of electric shock to persons. -
Page 4: Table Of Contents
RD-7505(A)_ENG_101115_RD-7505(A)_ENG 2010-11-16 오전 10:36 페이지 4 All manuals and user guides at all-guides.com CONTENTS IMPORTANT SAFETY INSTRUCTIONS Introduction • READ THIS BEFORE OPERATING YOUR UNIT System Connections Front Panel Controls Remote Controls • REMOTE CONTROL OPERATION RANGE • LOADING BATTERIES Operations •... -
Page 5: System Connections
RD-7505(A)_ENG_101115_RD-7505(A)_ENG 2010-11-16 오전 10:36 페이지 5 All manuals and user guides at all-guides.com System Connections • Please be certain that this unit is unplugged from the AC outlet before making any connections. • Since different components often have different terminal names, carefully read the operating instructions of the component connected. - Page 6 BD player, DVD player, etc. • You can connect Apple iPod to this receiver via Sherwood iPod dock. If Sherwood iPod dock is connected to DIGILINK-i jack for system control, you should connect its video and audio jacks to the “VIDEO 2” jacks of this receiver. Because, when you control your iPod with the unit’s remote control, the VIDEO 2/iPod is automatically selected as an input source and the...
- Page 7 RD-7505(A)_ENG_101115_RD-7505(A)_ENG 2010-11-16 오전 10:36 페이지 7 All manuals and user guides at all-guides.com Continued ■HDMI (High Definition Multimedia Interface) connection : (*) • You can connect the source component (DVD player, etc.) to the display component (TV, projector, etc.) through this receiver with using a commercially available HDMI cord.
- Page 8 • To emphasize the deep bass sounds, connect a powered subwoofer. SUBWOOFER PREOUT CONNECTING FOR SYSTEM CONTROL • Connect this jack to the DIGILINK-i jack of Sherwood iPod dock that allows you to control the iPod with the unit’s remote control. DIGILINK-i...
- Page 9 RD-7505(A)_ENG_101115_RD-7505(A)_ENG 2010-11-16 오전 10:36 페이지 9 All manuals and user guides at all-guides.com CONNECTING SPEAkERS • Be sure to connect speakers firmly and correctly according to the channel(left and right) and the polarity(+ and -). If the connections are faulty, no sound...
- Page 10 RD-7505(A)_ENG_101115_RD-7505(A)_ENG 2010-11-16 오전 10:36 페이지 10 All manuals and user guides at all-guides.com Continued ■ Connecting speaker wire 1. Strip away approx. 10 mm 2. Loosen by turning the 3. Insert the bare part of the 4. Tighten by turning it...
- Page 11 RD-7505(A)_ENG_101115_RD-7505(A)_ENG 2010-11-16 오전 10:36 페이지 11 All manuals and user guides at all-guides.com CONNECTING ROOM 2 OUT JACkS OR ROOM 2 SPEAkER TERMINALS • ROOM 2 playback feature allows you to play a different program source in another room as well as one source in the main room at the same time.
- Page 12 RD-7505(A)_ENG_101115_RD-7505(A)_ENG 2010-11-16 오전 10:36 페이지 12 All manuals and user guides at all-guides.com CONNECTING SIRIUS CONNECTOR (only for North America) • Connect the SIRIUS connector to the Sirius Connect SiriusConnect Home Tuner Home Tuner kit (sold separately). • Position the Home Tuner antenna near a south-facing window to receive the best signal.
-
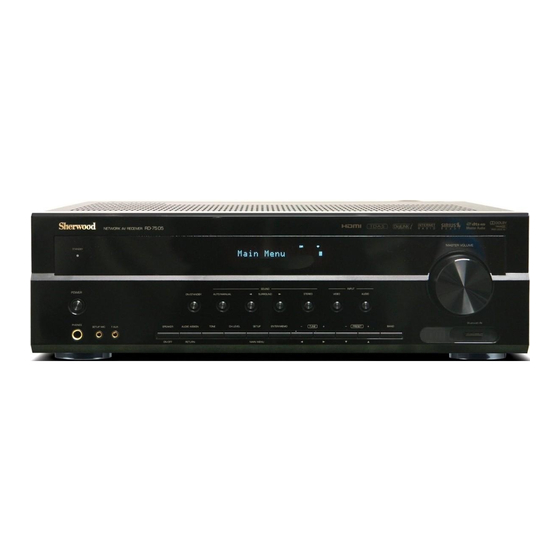
Page 13: Front Panel Controls
RD-7505(A)_ENG_101115_RD-7505(A)_ENG 2010-11-16 오전 10:36 페이지 13 All manuals and user guides at all-guides.com Front Panel Controls RD-7505 AUDIO / VIDEO RECEIVER MASTER VOLUME STANDBY SOUND INPUT POWER AUTO / MANUAL STEREO AUDIO ON / STANDBY SURROUND VIDEO Bluetooth IN PHONES SETUP MIC F.AUX... - Page 14 (For information on Sherwood Audio Receiver BT-R7, contact your dealer.) • The luetooth word mark and logos are registered trademarks owned by Bluetooth SIG, Inc. and any use of such marks by Sherwood Corporation is under license. Other trademarks and trade names are those of their respective owners.
-
Page 15: Remote Controls
RD-7505(A)_ENG_101115_RD-7505(A)_ENG 2010-11-16 오전 10:36 페이지 15 All manuals and user guides at all-guides.com Remote Controls CURSOR CONTROL( , , , ), ENTER buttons ROOM 2 button NETWORK CONTROL buttons ■ Note: • The NETWORK CONTROL buttons are not available for this receiver. -
Page 16: Remote Control Operation Range
RD-7505(A)_ENG_101115_RD-7505(A)_ENG 2010-11-16 오전 10:36 페이지 16 All manuals and user guides at all-guides.com REMOTE CONTROL OPERATION RANGE AUDIO / VIDEO RECEIVER RD-7505 MASTER VOLUME STANDBY SOUND INPUT POWER ON / STANDBY AUTO / MANUAL SURROUND STEREO VIDEO AUDIO Bluetooth IN... -
Page 17: Operations
RD-7505(A)_ENG_101115_RD-7505(A)_ENG 2010-11-16 오전 10:36 페이지 17 All manuals and user guides at all-guides.com Operations ■Note : Before operating this receiver, first set this unit as desired for optimum performance, doing the system setup procedures. (For details, refer to "System Setup" on page 36.) - Page 18 RD-7505(A)_ENG_101115_RD-7505(A)_ENG 2010-11-16 오전 10:36 페이지 18 All manuals and user guides at all-guides.com Adjusting the tone (bass and treble) Operate the selected component for playback. Enter the tone mode. • When playing back the program sources with surround sound, refer to “ENJOYING SURROUND SOUND” on page 21.
-
Page 19: Surround Sound
RD-7505(A)_ENG_101115_RD-7505(A)_ENG 2010-11-16 오전 10:36 페이지 19 All manuals and user guides at all-guides.com SURROUND SOUND • This receiver incorporates a sophisticated Digital Signal Processor that allows you to create optimum sound quality and sound atmosphere in your personal Home Theater. - Page 20 RD-7505(A)_ENG_101115_RD-7505(A)_ENG 2010-11-16 오전 10:36 페이지 20 All manuals and user guides at all-guides.com ■Classic • The following modes apply conventional 2-channel signals such as digital PCM or analog stereo signals to high This mode provides the acoustic effects of a large concert performance Digital Signal Processor to recreate sound hall for classical music.
-
Page 21: Enjoying Surround Sound
RD-7505(A)_ENG_101115_RD-7505(A)_ENG 2010-11-16 오전 10:36 페이지 21 All manuals and user guides at all-guides.com ENJOYING SURROUND SOUND ■Note: Before surround playback, first perform the speaker setup procedure, etc. on the SETUP menu for optimum performance. (For details, refer to "SETTING THE SPEAKER / ROOM EQ" on page 42.) Depending on how to select a surround mode, select the auto surround mode or the manual surround mode. - Page 22 RD-7505(A)_ENG_101115_RD-7505(A)_ENG 2010-11-16 오전 10:36 페이지 22 All manuals and user guides at all-guides.com Continued ■To cancel the surround mode for stereo operation • Depending on the signal format which is being input, either the STEREO stereo mode or the 2CH downmix mode is selected.
- Page 23 RD-7505(A)_ENG_101115_RD-7505(A)_ENG 2010-11-16 오전 10:36 페이지 23 All manuals and user guides at all-guides.com Continue Adjusting each channel level with test tone ■When selecting the "DRC (Dynamic Range Compression)" • The volume level of each channel can be adjusted easily • This function compresses the dynamic range of with the test tone function.
- Page 24 RD-7505(A)_ENG_101115_RD-7505(A)_ENG 2010-11-16 오전 10:36 페이지 24 All manuals and user guides at all-guides.com Adjusting the current channel level • After adjusting each channel level with test tone, adjust the channel levels either according to the program sources or to suit your tastes.
- Page 25 RD-7505(A)_ENG_101115_RD-7505(A)_ENG 2010-11-16 오전 10:36 페이지 25 All manuals and user guides at all-guides.com Recalling the memorized channel levels Memorizing the adjusted channel levels • You can memorize the adjusted channel levels into preset memory("REF 1", "REF 2") and recall the memorized Press the CHANNEL LEVEL button.
-
Page 26: Listening To Radio Broadcasts
RD-7505(A)_ENG_101115_RD-7505(A)_ENG 2010-11-16 오전 10:36 페이지 26 All manuals and user guides at all-guides.com LISTENING TO RADIO BROADCASTS Auto tuning Manual tuning • Manual tuning is useful when you already know the Select the desired band. frequency of the desired station. - Page 27 RD-7505(A)_ENG_101115_RD-7505(A)_ENG 2010-11-16 오전 10:36 페이지 27 All manuals and user guides at all-guides.com Manual presetting Tuning to preset stations • You can store up to 30 preferred stations in the memory. • After selecting the tuner as an input source, select the desired preset number.
-
Page 28: Listening To Sirius Satellite Radio
RD-7505(A)_ENG_101115_RD-7505(A)_ENG 2010-11-16 오전 10:36 페이지 28 All manuals and user guides at all-guides.com SIRIUS Satellite Radio (only for North America) • This receiver is a SIRIUS Satellite Radio Ready ® receiver. You can receive SIRIUS ® Satellite Radio by connecting to the SiriusConnect Home Tuner kit (sold separately) and subscribing the SIRIUS service. - Page 29 RD-7505(A)_ENG_101115_RD-7505(A)_ENG 2010-11-16 오전 10:36 페이지 29 All manuals and user guides at all-guides.com Direct search While displaying a category name, select the desired category, then press the ENTER button. • You can select a SIRIUS Satellite Radio channel directly by entering its number.
- Page 30 RD-7505(A)_ENG_101115_RD-7505(A)_ENG 2010-11-16 오전 10:36 페이지 30 All manuals and user guides at all-guides.com ■Tuning in the previously locked channels. Displaying SIRIUS information ① Tune in the channels to which the parental lock is applied by performing direct search only. • You can display SIRIUS information such as channel •...
- Page 31 RD-7505(A)_ENG_101115_RD-7505(A)_ENG 2010-11-16 오전 10:36 페이지 31 All manuals and user guides at all-guides.com ■When selecting the ALL CHANNEL SkIP CLEAR SIRIUS setup • When some channels are skipped during channel search, you can reset the skipped channels by performing this In the SIRIUS mode, press and hold down the procedure.
- Page 32 RD-7505(A)_ENG_101115_RD-7505(A)_ENG 2010-11-16 오전 10:36 페이지 32 All manuals and user guides at all-guides.com ■When selecting the PARENTAL LOCk Set the selected channel as desired. • You can lock the channels that you do not want to receive or unlock the previously locked channels.
-
Page 33: Recording
RD-7505(A)_ENG_101115_RD-7505(A)_ENG 2010-11-16 오전 10:36 페이지 33 All manuals and user guides at all-guides.com RECORDING • The digital signals from the coaxial, optical digital input or HDMI IN can be heard but cannot be recorded. • When recording the analog signals from CD, AUX, F.AUX, BT, VIDEO 2~3, be sure to select the analog input. -
Page 34: Other Functions
RD-7505(A)_ENG_101115_RD-7505(A)_ENG 2010-11-16 오전 10:36 페이지 34 All manuals and user guides at all-guides.com OTHER FUNCTIONS Operating the sleep timer • The sleep timer allows the system to continue to operate for a specified period of time before automatically shutting off. -
Page 35: Confirming The Hdmi Function
RD-7505(A)_ENG_101115_RD-7505(A)_ENG 2010-11-16 오전 10:36 페이지 35 All manuals and user guides at all-guides.com CONFIRMING THE HDMI FUNCTION To use the HDMI control functions properly, it is recommend to confirm the HDMI control functions usable with each connected component by performing the following operations. -
Page 36: System Setup
RD-7505(A)_ENG_101115_RD-7505(A)_ENG 2010-11-16 오전 10:36 페이지 36 All manuals and user guides at all-guides.com System Setup SETUP ENTER / MEMO PRESET TUNE MAIN MENU Turn the setup menu on. Confirm your selection. • When selecting "SYSTEM", see "SETTING THE SYSTEM" on page 38. - Page 37 RD-7505(A)_ENG_101115_RD-7505(A)_ENG 2010-11-16 오전 10:36 페이지 37 All manuals and user guides at all-guides.com ■Setup menu flow • The setup menu flow is as follows : AMP : S.BACK / F.H / ROOM 2 / BI AMP SW M : NORM / SW +...
-
Page 38: Setting The System
RD-7505(A)_ENG_101115_RD-7505(A)_ENG 2010-11-16 오전 10:36 페이지 38 All manuals and user guides at all-guides.com SETTING THE SYSTEM AMP : S.BACK / F.H / ROOM 2 / BI AMP SW M : NORM / SW + TONE : OFF / ON BASS : 0 / - 10 ~ + 10... - Page 39 RD-7505(A)_ENG_101115_RD-7505(A)_ENG 2010-11-16 오전 10:36 페이지 39 All manuals and user guides at all-guides.com When selecting the TONE OFF : To listen to a program source without the tone effect. ("DIR" lights up.) ↕ ON : To adjust the tone for your taste. ("DIR" goes off.) ■When the TONE is set to ON to adjust the tone (bass and treble)
-
Page 40: Setting The Input
RD-7505(A)_ENG_101115_RD-7505(A)_ENG 2010-11-16 오전 10:36 페이지 40 All manuals and user guides at all-guides.com SETTING THE INPUT VID 1 CFG A.MODE : AT / HD / DG / AN AUD : OPT1 / OPT 2 / COX 1 / COX 2 / - - -... - Page 41 RD-7505(A)_ENG_101115_RD-7505(A)_ENG 2010-11-16 오전 10:36 페이지 41 All manuals and user guides at all-guides.com When selecting the AUDIO MODE • You can select the audio input signal to be played. ■Notes : • Be sure to set the AUDIO MODE to the audio input which is connected and assigned to the selected input source.
-
Page 42: Setting The Speaker / Room Eq
RD-7505(A)_ENG_101115_RD-7505(A)_ENG 2010-11-16 오전 10:36 페이지 42 All manuals and user guides at all-guides.com SETTING THE SPEAKER / ROOM EQ • After you have installed this receiver and connected all the components, you should adjust the speaker settings for the optimum sound acoustics according to your environment and speaker layout. - Page 43 RD-7505(A)_ENG_101115_RD-7505(A)_ENG 2010-11-16 오전 10:36 페이지 43 All manuals and user guides at all-guides.com Continued Place the microphone on a flat level surface at the listening position. • If possible, use a tripod, etc. to attach the microphone at the same height as your ears would be when you are seated in your listening position.
- Page 44 RD-7505(A)_ENG_101115_RD-7505(A)_ENG 2010-11-16 오전 10:36 페이지 44 All manuals and user guides at all-guides.com When selecting the ROOM EQ • The room EQ is a kind of room equalizer for your speakers. According to the acoustic characteristics of your room measured by the auto setup, the room EQ automatically adjusts the frequency response of your speakers.
- Page 45 RD-7505(A)_ENG_101115_RD-7505(A)_ENG 2010-11-16 오전 10:36 페이지 45 All manuals and user guides at all-guides.com When selecting the CONFIGURATION Press the CURSOR UP(▲)/DOWN(▼) buttons to select the "CONFIG", then press the ENTER button. Press the CURSOR LEFT(◀)/ RIGHT(▶) buttons to set the selected speaker as desired.
- Page 46 RD-7505(A)_ENG_101115_RD-7505(A)_ENG 2010-11-16 오전 10:36 페이지 46 All manuals and user guides at all-guides.com When selecting the CROSSOVER • When speakers are set to "SMALL", be sure to set their crossover frequency correctly according to their frequency characteristics. ■Note : • Even though performing the AUTO SETUP procedure, you should set the CROSSOVER manually when speakers are set to “SMALL”.
- Page 47 RD-7505(A)_ENG_101115_RD-7505(A)_ENG 2010-11-16 오전 10:36 페이지 47 All manuals and user guides at all-guides.com When selecting the DISTANCE Press the CURSOR UP(▲)/DOWN(▼) buttons to select the “DISTANCE”, then press the ENTER button. Press the CURSOR UP(▲)/DOWN(▼) buttons to select the desired item.
-
Page 48: Setting The Ch Level
RD-7505(A)_ENG_101115_RD-7505(A)_ENG 2010-11-16 오전 10:36 페이지 48 All manuals and user guides at all-guides.com SETTING THE CH LEVEL MODE : CAL / REF 1 / REF 2 L : 0 dB / -15 ~ + 15 C : 0 dB / -15 ~ + 15... - Page 49 RD-7505(A)_ENG_101115_RD-7505(A)_ENG 2010-11-16 오전 10:36 페이지 49 All manuals and user guides at all-guides.com Memorizing the adjusted channel levels Recalling the memorized channel levels • You can memorize the adjusted channel levels into preset Press the CURSOR UP(▲)/DOWN(▼) buttons memory("REF 1", "REF 2") and recall the memorized whenever you want.
-
Page 50: Setting The Multi Room
RD-7505(A)_ENG_101115_RD-7505(A)_ENG 2010-11-16 오전 10:36 페이지 50 All manuals and user guides at all-guides.com SETTING THE MULTI ROOM • The ROOM 2 function allows enjoying one source in the main room and playing another in a different room at the same time. -
Page 51: Setting The Parameter
RD-7505(A)_ENG_101115_RD-7505(A)_ENG 2010-11-16 오전 10:36 페이지 51 All manuals and user guides at all-guides.com SETTING THE PARAMETER PANO : OFF / ON C.WIDTH : 3 / 0 ~ 7 DIMEN : 0 / -3 ~ +3 DRC DD DRC : OFF / MID / MAX... - Page 52 RD-7505(A)_ENG_101115_RD-7505(A)_ENG 2010-11-16 오전 10:36 페이지 52 All manuals and user guides at all-guides.com When selecting “H.GAIN” When selecting “DRC DD”, “DRC THD” • You can adjust the front height channel level as desired. • This function compresses the dynamic range of previously ■Note:...
-
Page 53: Setting The Hdmi
RD-7505(A)_ENG_101115_RD-7505(A)_ENG 2010-11-16 오전 10:36 페이지 53 All manuals and user guides at all-guides.com SETTING THE HDMI HDMI SETUP HDMI : AMP / THRU CEC : OFF / ON POWER : OFF / ON RETURN • HDMI(HDMI AUDIO OUT) : To output the digital audio signals from the HDMI MONITOR OUT connector. - Page 54 RD-7505(A)_ENG_101115_RD-7505(A)_ENG 2010-11-16 오전 10:36 페이지 54 All manuals and user guides at all-guides.com When selecting the POWER CONTROL • The Power control function allows the power status of this unit to be interlocked with the power ON/OFF and start of playback of the connected components.
-
Page 55: Troubleshooting Guide
RD-7505(A)_ENG_101115_RD-7505(A)_ENG 2010-11-16 오전 10:36 페이지 55 All manuals and user guides at all-guides.com Troubleshooting Guide If a fault occurs, run through the table below before taking your receiver for repair. If the fault persists, attempt to solve it by switching the receiver off and on again. If this fails to resolve the situation, consult your dealer. -
Page 56: Specifications
RD-7505(A)_ENG_101115_RD-7505(A)_ENG 2010-11-16 오전 10:36 페이지 56 All manuals and user guides at all-guides.com Specifications ■AMPLIFIER SECTION • Power output, stereo mode, 6 Ω, THD 0.1 %, 40 Hz~20 kHz | 2× 80 W • Total harmonic distortion at -3 dB, 6 Ω, 1 kHz | 0.02%... - Page 57 7505(A) cover_cover.qxp 2010-10-14 오전 10:25 페이지 2 All manuals and user guides at all-guides.com RD-7505 AUDIO / VIDEO RECEIVER 5707-00000-482-0S...
Need help?
Do you have a question about the RD-7505 and is the answer not in the manual?
Questions and answers
Как сделать сброс до заводских настроек!