
Related Manuals for ARDES AR6440VD


Summary of Contents for ARDES AR6440VD
- Page 1 FORNO A VAPORE, MULTIFUNZIONE AR6440VD STEAM OVEN, MULTIFUNCION ISTRUZIONI PER L’USO INSTRUCTIONS FOR USE 1 / 44...
-
Page 2: Table Of Contents
IT ..........................3 AVVERTENZE ....................... 3 DESCRIZIONE DEL PRODOTTO ................8 ISTRUZIONI D’USO....................9 PANNELLO DI CONTROLLO ................9 DISPLAY ......................10 RIEMPIRE IL SERBATOIO e TIPI DI ACQUA ..........12 PRIMA DI UTILIZZARE L’APPARECCHIO ............12 UTILIZZO DELL’APPARECCHIO ..............14 MODALITÀ DI FUNZIONAMENTO ..............17 PULIZIA E MANUTENZIONE ................21 RISOLUZIONE DEI PROBLEMI ................22 EFFICIENZA ENERGETICA .................23... -
Page 3: Avvertenze
AVVERTENZE Attenzione: leggere attentamente avvertenze contenute nel seguente libretto in quanto forniscono importanti indicazioni riguardanti la sicurezza di installazione, d’uso e di manutenzione. Istruzioni importanti conservare ulteriori consultazioni. - L’apparecchio può essere utilizzato da bambini di età non inferiore a 8 anni e da persone con ridotte capacità... - Page 4 - Posizionare l’apparecchio con la sua parte posteriore contro una parete. - Lasciare minimo 10 cm di spazio attorno a tutte le altre pareti per consentirne un’adeguata ventilazione di raffreddamento. - Non posizionare oggetti sopra all’apparecchio. - Per evitare surriscaldamenti, l’apparecchio non deve essere installato...
- Page 5 adeguate in base al cibo e alla ricetta da preparare. - Fare attenzione durante l’inserimento e la rimozione degli accessori - ATTENZIONE! L’apparecchio e le sue parti accessibili si scaldano durante l’uso. - ATTENZIONE! toccare elementi riscaldanti all’interno del forno. ATTENZIONE: VAPORE CALDO Un flusso di vapore caldo o di aria calda viene emesso attraverso la...
- Page 6 - Se il cavo di alimentazione dovesse essere danneggiato, deve essere sostituito solamente presso i centri di assistenza autorizzati dal costruttore in modo da prevenire ogni rischio. - L’apparecchio è stato costruito e concepito per funzionare in ambienti domestici come FORNO DA CUCINA pertanto ogni altro uso è...
- Page 7 Nel caso vi sia un guasto o un funzionamento anomalo dell’apparecchio staccare immediatamente la spina, non manometterlo e rivolgersi ad un centro assistenza autorizzato. Nel qualcaso si decida di non utilizzare più questo tipo di apparecchio, è opportuno renderlo inoperante, tagliando il cavo di alimentazione, ovviamente dopo averlo disinserito dalla presa di corrente.
-
Page 8: Descrizione Del Prodotto
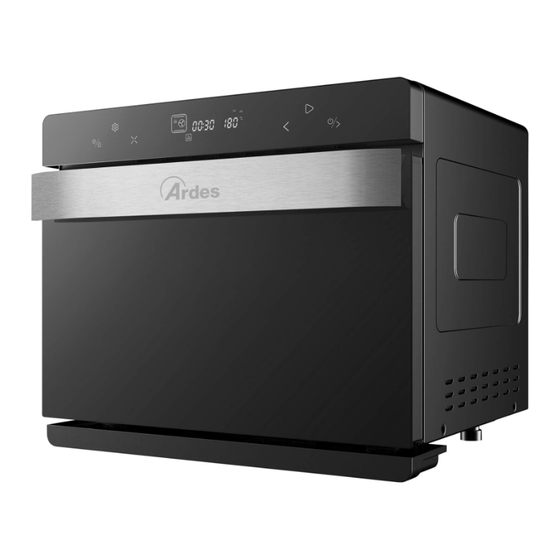
DESCRIZIONE DEL PRODOTTO Pannello di controllo con comandi Maniglia TOUCH Porta Girarrosto Vaschetta di raccolta dell’acqua Pinza per girarrosto 10. Corpo principale Griglia 11. Interruttore della porta Teglia 12. Guanto Serbatoio dell’acqua 8 / 44... -
Page 9: Istruzioni D'uso
ISTRUZIONI D’USO PANNELLO DI CONTROLLO Icona Descrizione della funzione Tasto Illuminazione / sicurezza bambini: Premere una volta per attivare o disattivare l’illuminazione interna; Note: - La lampadina si accende per 3 minuti dopo la fine della cottura; - La lampadina si accende per 3 minuti dopo l’apertura della porta;... -
Page 10: Display
DISPLAY Indicazioni (A) Funzione Descrizione Ore (00-24) : Minuti (00-59) Tempo Visualizza il tempo mancante alla fine della cottura o all’avvio ritardato Temperatura Regolabile da 30 a 230°C Spia funzione Si accende quando l’avvio ritardato è AVVIO impostato RITARDATO Modifica tempo e Si illumina mentre vengono modificati i temperatura parametri durante il funzionamento o... - Page 11 Modalità (B) Funzione Descrizione Lievitazione Pre- Riscaldamento Preparazione yogurt Questo menu contiene 9 programmi di Friggitrice ad aria cottura Essicatore frutti, Questo menu contiene 9 programmi per tostatura frutta essiccare differenti tipi di frutta e per secca tostare diversi tipi di frutta secca Questo menu contiene 9 programmi per Cottura a vapore differenti tipi di cibo...
-
Page 12: Riempire Il Serbatoio E Tipi Di Acqua
RIEMPIRE IL SERBATOIO e TIPI DI ACQUA Per riempire il serbatoio (6): Aprire la porta del forno; Estrarre il serbatoio (6); Aprire il tappo e riempire il serbatoio con acqua fredda e pulita, facendo attenzione a non superare il livello MAX; Chiudere il tappo e reinserire il serbatoio nell’apposita sede TIPI DI ACQUA Utilizzare acqua potabile, a basso contenuto di calcare (di durezza non superiore a 8... - Page 13 Usare i tasti per selezionare la funzione DIY di riscaldamento intenso , quindi premere il tasto ENTER Impostare il tempo: Utilizzare i tasti per selezionare le ore di funzionamento “0”, quindi premere il tasto Utilizzare i tasti per selezionare i minuti di funzionamento “30”, quindi premere il tasto ENTER Impostare la temperatura di riscaldamento superiore: Utilizzare...
-
Page 14: Utilizzo Dell'apparecchio
Usare i tasti per selezionare la funzione DIY vapore , quindi premere il tasto ENTER Impostare il tempo: Utilizzare i tasti per selezionare le ore di funzionamento “0”, quindi premere il tasto Utilizzare i tasti per selezionare i minuti di funzionamento “30”, quindi premere il tasto ENTER Impostare la temperatura: Utilizzare... - Page 15 Utilizzare i tasti per impostare le ore di avvio ritardato e confermare con il tasto Utilizzare i tasti per impostare i minuti di avvio ritardato e confermare con il tasto Premere i tasti per selezionare una delle modalità di funzionamento: Premere il tasto ENTER per confermare;...
- Page 16 PAUSA: premere il tasto per interrompere momentaneamente la cottura (il tempo lampeggerà); premere nuovamente il tasto riprendere il funzionamento. Nota: il funzionamento si arresta momentaneamente anche ogni volta che viene aperta la porta e riprende dopo averla richiusa. ILLUMINAZIONE: premere una volta il tasto per accendere o spegnere l’illuminazione interna;...
-
Page 17: Modalità Di Funzionamento
La spia lampeggerà per ricordare all’utente di: rimuovere il serbatoio (6); attendere alcuni secondi per permettere all’apparecchio di drenare l’acqua dell’evaporatore; asciugare lo scomparto (dopo che si è raffrreddato) svuotare il contenuto della vaschetta dell’acqua (9). Lasciare raffreddare l’apparecchio. 10. Pulire il forno e gli accessori come indicato nel paragrafo PULIZIA E MANUTENZIONE. - Page 18 Patatine fritte 0:13 Crostini 0:14 Mini pizza 0:18 Bacon 0:15 Essicatore frutta / Tostatura della frutta secca Include 9 programmi pre-impostati: Tempo Temp. Prog. Cibo Funzioni (hh:mm) (°C) Banana essicata 6:00 Mela essicata 6:00 Riscaldamento Uva passa 7:00 posteriore termoventilato Kiwi essicato 6:00 Limone essicato...
- Page 19 Riscaldamento Salmone arrosto 0:20 sopra + sotto Riscaldamento Cosce di pollo arrosto 0:26 sopra Riscaldamento Costardella arrosto 0:20 sopra + sotto Riscaldamento Patate arrosto 0:13 posteriore termoventilato Riscaldamento Gambero arrosto 0:15 posteriore termoventilato Riscaldamento Salsicce arrosto 0:10 sopra + sotto Cottura al forno Include 9 programmi pre-impostati: Tempo...
- Page 20 Cottura sopra + sotto 0:05 – 3:59 100 – 230 Cottura da sopra ventilata 0:05 – 3:59 100 – 230 (Riscaldamento sopra + Ventilazione) Cottura termoventilata 0:05 – 3:59 100 – 230 (Riscaldamento posteriore termoventilato) Cottura a vapore ad alta temperatura (Riscaldamento posteriore ventilato + 0:05 –...
-
Page 21: Pulizia E Manutenzione
Lo scomparto conterrà molta acqua, rimuoverla con l’aiuto di una spugna pulita. Svuotare la vaschetta di raccolta dell’acqua (9). Pulire il forno ed il serbatoio come indicato nel paragrafo PULIZIA E MANUTENZIONE. PULIZIA E MANUTENZIONE Disinserire la spina dalla presa di corrente prima di effettuare qualsiasi operazione di pulizia e manutenzione. -
Page 22: Risoluzione Dei Problemi
Per la sostituzione della lampadina interna, rivolgersi ad un centro assistenza autorizzato. RISOLUZIONE DEI PROBLEMI Errore Possibili cause Soluzioni Circuito aperto del sensore Interrompere il funzionamento, di temperatura superiore aprire la porta, lasciare raffreddare Cortocircuito del sensore di il forno per 10 minuti e riprovare a temperatura superiore farlo funzionare. -
Page 23: Efficienza Energetica
SCHEDA PER FORNI PER USO DOMESTICO - REGOLAMENTO (UE) N. 65/2014 , 66/2014 Unità di Valore Simbolo misura Nome fornitore o Marchio ARDES Identificativo del modello AR6440VD Indice di efficienza energetica 94,1 cavity Classe di efficienza energetica Consumo energetico, ciclo in modo convenzionale 0,64 kWh/ciclo... -
Page 24: Garanzia
GARANZIA Condizioni La garanzia ha validità 24 mesi dalla data d’acquisto. La presente garanzia è valida solo se viene correttamente compilata ed accompagnata dallo scontrino fiscale che ne prova la data di acquisto. L’apparecchio deve essere consegnato esclusivamente presso un nostro Centro Assistenza autorizzato. -
Page 25: Warnings
WARNINGS Attention: read this booklet carefully it contains important instructions for a safe installation, use and maintenance. Important instructions to be kept for future reference. - This appliance can be used by children aged from 8 years and above and persons with reduced physical, sensory... - Page 26 - The appliance must never be operated by means of an external timer or with a separate remote control system. - Before using the appliance for the first time, clean it and wash the accessories as specified in section MAINTENANCE. - A steam cleaner has not to be used.
- Page 27 - WARNING: care should be taken to avoid touching heating elements. WARNING: HOT STEAM A high temperature steam or high temperature airflow will released when you open its door during after cooking operation of the product. A safe distance shall be maintained when the door of the product is opened to avoid the scalding yourself.
- Page 28 - IMPORTANT: please keep water of water tank more than Minimum scale, During working, water tank should be put in oven all time. After removing the packaging, check the appliance for any signs of damage. In case of visible damage, do not use it and contact a qualified technician. Do not leave parts of the packaging within the reach of children.
-
Page 29: Product Description
Appliance surfaces are hot during and after use! Do not touch hot surfaces. Use handles or Knobs. This appliance has a tempered, safety glass door. This glass is stronger than ordinary glass and more resistant to breakage. However, tempered glass could break. If the door has a scratch or nick, contact us or our customer service. -
Page 30: Instructions For Use
INSTRUCTIONS FOR USE CONTROL PANEL Icon Function description Oven lamp / child lock key: Touch it once to switch on or switch off the inner lamp; Note: - Oven lamp will be ON for three minutes after the work is over;... -
Page 31: Display
DISPLAY Indicator light Function Description Time Hours (00-24) : Minutes (00-59) It shows the time left to the end of program or to the delayed start Temperature Adjustable from 30 to 230°C DELAYED It lights on when delayed start is set START Changing the time It lights on while changing time and... -
Page 32: Fill The Tank And Type Of Water
Mode (B) Function Description Ferment Preheat Making yogurt This menu contains 9 programs and Air fryer recipes This menu contains 9 programs and Dry fruit recipes for different fruits and bake and bake nuts different nuts This menu contains 9 programs and Steam menu recipes for different food This menu contains 9 programs for... -
Page 33: First Use
FIRST USE Before using this oven, please ensure that you have read the instruction manual fully and have become familiar with important safeguards. WARNING: Before using the appliance for the first time, clean it and wash the accessories in as specified in MAINTENANCE section. It is necessary to do two trial runs of your oven to eliminate any protective substance on the heating elements. - Page 34 Use these keys to adjust the temperature to “230 °C”, then press the ENTER key The oven will start working. At the end of the program, the appliance will “BEEP” 10 times and the display will show “End”. The fan will stay on for about 3 minutes. Switch of the appliance by pressing the ON/OFF key and let it cool down.
-
Page 35: Operating Instructions
The fan will stay on for about 3 minutes. Note: If there is no operation within five minutes, the system will automatically return to the standby interface The icon will blink to remind the user to: Remove the tank (6) and empy it; Wait few second to allow the oven to drain the residual water from the evaporator;... - Page 36 PARAMETERS: A) Functions B) hours C) minutes D) temperature D1) top heater D2) bottom heater E) Preset program (see “Mode of operation”) When last parameter has been confirmed, the oven will start working. Note: if DELAYED START has been set, the display will show alternately the set parameters and the time left to the start of working WHILE WORKING The display will show the set parameters and the time left to the end of cooking.
-
Page 37: Operation Modes
During steam cooking, if the water level on the tank is lower than the MIN level marked, the cooking will stop, the oven will BEEP and the icon will blink. To resume cooking, remove the tank (6), fill it with water, place it in its site and close the door. - Page 38 Making Yogurt Temp. Function Time (hh.mm) (°C) Default settings 8:00 Steam Air fryer This menu contains 9 preset programs: Time Temp. Prog. Food Function (hh:mm) (°C) Pork chops 0:20 Chicken wings 0:23 Chicken Kabobs 0:18 Onion Meatballs 0:18 Back heater Pita Chips 0:07 convection...
- Page 39 Steam Eggs 0:16 Steam Chicken 0:30 Steam Papaya 0:35 Steam Potatoes 0:50 “Roast” menu This menu contains 9 preset programs: Time Temp. Prog. Food Function (hh:mm) (°C) Top heater + Roast Chicken 0:45 Rotisserie Top heater + Bottom Roast Steak 0:12 heater Back heater...
- Page 40 DIY fuction modes This menu contains 9 adjustable function modes: Time Temp. Mode Description (hh:mm) (°C) Steam 0:05 – 6:59 50 – 110 Strengthening heating (Back heater convection + top heater + 0:05 – 3:59 100 – 230 bottom heater) Top heater 0:05 –...
-
Page 41: Cleaning And Maintenance
Push the tank (6) in its site and close the oven door; Select the descaling function and press the ENTER key to start working; When there are still 20 minutes to the end of the program, the program will stop and the oven will “BEEP”. The user is reminded to perform the following operations: Remove the tank (6) and wait few second to allow the oven to drain the residual water from the evaporator;... -
Page 42: Troubleshooting
The descaling icon will blink. Note: user can also start the descaling function automatically, before reaching 100 hours. Follow the descaling function description in the “OPERATION MODES” section. Inner light The inner lamp must be only be replaced at service centres authorised by the manufacturer. -
Page 43: Energy Efficiency
ENERGY EFFICIENCY FICHE FOR DOMESTIC OVENS - REGULTATIONS (EU) 65/2014 , 66/2014 Value Symbol Unit Supplier's name or trademark ARDES Model identification AR6440VD Energy Efficiency Index 94,1 cavity Energy efficiency class Energy consuption, cycle in conventional mode 0,64 kWh/cycle electric cavity... -
Page 44: Guarantee
Poly Pool S.p.A. Via Sottocorna, 21/B 24020 Parre (Bergamo) - Italy Tel. +39 035 4104000 r.a. - Fax +39 035 702716 http://www.ardes.it - e-mail:polypool@polypool.it MADE IN CHINA AR6440VD.26112020 44 / 44...
Need help?
Do you have a question about the AR6440VD and is the answer not in the manual?
Questions and answers