
Related Manuals for K&K Sound Pure Mini


Summary of Contents for K&K Sound Pure Mini
- Page 1 T H E P U R E P I C K U P ™ Installation Manual Pure Mini for Steel String Acoustic Guitar...
- Page 2 Thank you for choosing the K&K Pure Mini! This manual describes the installation for pin bridges and pinless bridges. For pin bridge guitars, a jig installation can be used (jig is included with product). The jig allows you to place the pickups very accurately.
-
Page 3: Table Of Contents
DISCLAIMER Following the pickup installation instructions is mandatory. Installation or removal of this product is at your own risk. In no event will K&K Sound Systems Inc. be liable to you or whomever you select for doing this installation or removal in your place, for any damages arising from your use of, or, the inability to use these products. -
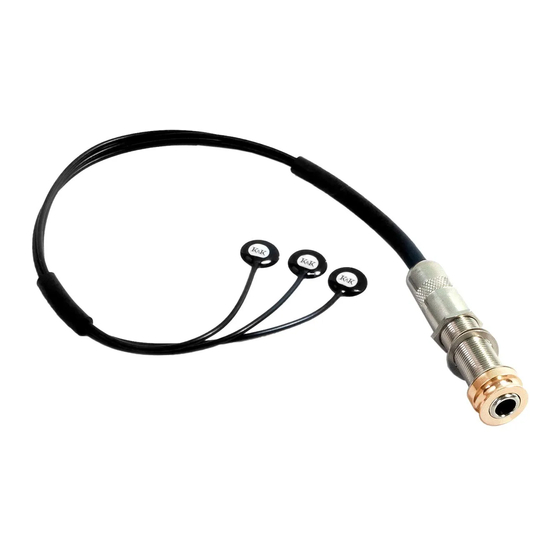
Page 4: Package Contents
1. PACKAGE CONTENTS • 3 transducers with cable harness and endpin jack. The Pure Mini uses 3 identical transducers. It does not matter in which position (high e/b string, g/d string, low e/a string) you install them. • Manual •... -
Page 5: Superglue Vs. "Peel-And-Stick" Installation
• Flashlight and small handheld mirror for visual check • Fine sandpaper or razorblade (if residue on bridge plate surface or if not smooth and level) FOR PINLESS BRIDGES ONLY Same tools/supplies as above, plus: • Double-sided carpet tape or similar •... -
Page 6: Preparation
Please note that removing a superglued pickup may damage the pickup, plus handling these sharp tools could result in personal injury. Please read and understand the section on removing superglued pickups towards the end of this manual. 4. PREPARATION (FOR ALL GUITARS) •... - Page 7 of endpin is currently installed in your guitar. It may be a simple type, which is held in place by a single screw. Or it may be a standard ¼” tapered endpin, either press-fit or glued in. The glued in type is the most difficult one to deal with and we recommend looking for professional assistance.
-
Page 8: Jig Installation For Pin Bridges
5.1 JIG INSTALLATION FOR PIN BRIDGES 1. Please remove the protective foil from both sides of the jig before starting. The jig itself is clear and the protective foil peels off easily. 2. The white pin needs to be inserted into the round hole, point first (see photo below for proper orientation). - Page 9 4. With the included putty, form a small ball and stick it on top of the jig, above the point where the saddle and high E string intersect. (Note: On the high E string we place the pickup directly under the high E string, for the G/D string pickup and A/E string pickup we place it between the strings.) Make...
- Page 10 We recommend that you do a test run without using the glue at this point to practice finding the right position for the jig inside the guitar. 6. Hold the tip of the white pin between your thumb and forefinger. The golden part of the pickup should be facing up and away from the palm of your hand.
- Page 11 8. Guide the white pin up through the high E string hole from the inside and secure the jig by moving the golf tee to the G string hole from the outside and finding the oblong hole in the jig. This will align the jig exactly as was done in step 3, during the practice run.
- Page 12 10. Once the pickup is in place, apply pressure to the jig/ pickup while you slowly count to 30 to allow the glue to set. Release the pressure, but leave the jig in place for another 5-10 minutes to allow the glue to cure before continuing.
- Page 13 13. Here is how the finished result will look inside the guitar. You can use a mirror and flashlight to check that the position of the pickups is correct. Tip: The sliding tube along the pickup cable can now be slid about 1-2 inches from the pickup heads to keep the cables together.
-
Page 14: Installation For Pinless Bridges
5.2 INSTALLATION FOR PINLESS BRIDGES PREPARATION • Installation on pinless bridges requires you to drill two 1/16” reference holes in each end of the saddle- slot. If the guitar already has a hole in the saddle- slot for an under-saddle pickup you can use this hole. - Page 15 PRACTICE • Before you actually superglue the pickups into your guitar, you should perform some practice runs without using the superglue gel. This is important for learning the correct movements and getting the feel. • Find out which hand feels more natural doing the installation procedure and put on a latex glove.
- Page 16 • The center pickup should only be installed when the two outer pickups are glued in place. These 2 pickups need to be used as guides for the installation of the center transducer. This means you should practice with the center pickup only after the 2 outer pickups are installed.
-
Page 17: Important Superglue Info
6. IMPORTANT SUPERGLUE INFORMATION Please read and follow the safety instruction for the superglue gel. Make sure not to get superglue on your fingers or on your guitar! It is a good idea to cover the entire guitar top with fabric or paper, just leaving an opening for the sound hole. -
Page 18: Installing The Endpin Jack
7. INSTALLING THE ENDPIN JACK • Unscrew the endpin jack’s strap button. • Remove the outer nut and washer. • Determine the thickness of your guitar’s end block and set the endblock thickness adjustment nut accordingly. You may have to back off the screw cap. -
Page 19: Removing Superglued Pickups
8. REMOVING SUPERGLUED PICKUPS Removal is at your own risk. It might result in destruction of the pickup and/or personal injury. We STRONGLY recommend you consult an experienced luthier. A luthier should be able to remove the pickups by using a scraper blade wedged between bridge plate and pickup discs from the pinhole side. -
Page 20: Troubleshooting
bend the pickups while you are doing this. Some fine scratches in the metal will not hurt the performance. To test the pickups, plug the pickups into an amp. (If you have a Trinity System you can plug a mono guitar cable into the endpin and you will hear the pickups only.) Hold one pickup at a time about 3/4”... - Page 21 may result in the pickup only being partially bonded to the bridge plate due to insufficient coverage. One indicator of good glue coverage is to see “oozed out glue” around the entire edge of the transducer. We recommend you carefully remove the system and re- install.
- Page 22 an acoustic amp is to get a K&K preamp. It may still be necessary to turn down the bass control on the amplifier. Phase issue: Use a preamp with a phase switch like the K&K Pure XLR Preamp. With properly adjusted phase, you will achieve 30-40% more volume before feedback.
- Page 23 pickups in general. For this reason, we recommend placing the high string pickup directly under the high E string, which generally helps a great deal. Acoustically, these guitars sound fine and balanced, the phenomenon affects only the bridge plate. It may be corrected by adding a fourth transducer beyond the X brace on the high string side.
- Page 24 92798 Cape Arago Highway Coos Bay, OR 97420 | USA Phone (541) 888-3517 Toll-free 1-800-867-6863 kksound.com...
Need help?
Do you have a question about the Pure Mini and is the answer not in the manual?
Questions and answers