Next Level Racing ELITE Series Instruction Manual
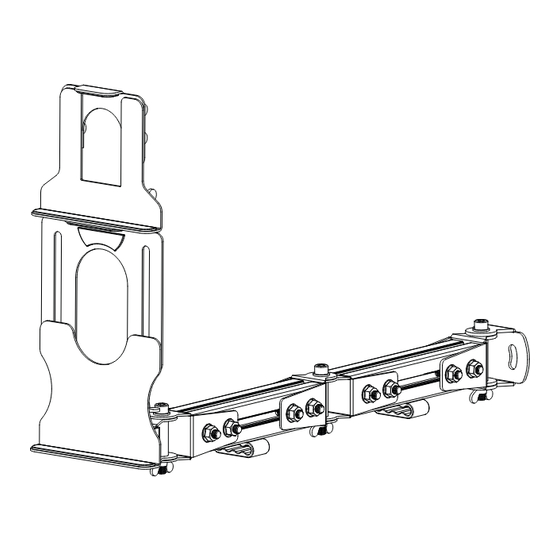
Tablet & button box mount
Hide thumbs
Also See for ELITE Series:
- User manual ,
- Instruction manual (31 pages) ,
- Instructions manual (28 pages)

Related Manuals for Next Level Racing ELITE Series


Summary of Contents for Next Level Racing ELITE Series
- Page 1 T A K E R A C I N G T O T H E N E X T L E V E L® Video Instruction: bit.ly/nlrbuild ELITE SERIES TABLET & BUTTON BOX MOUNT INSTRUCTION MANUAL...
- Page 2 T O T H E N E X T L E V E L® instruction booklet to fully optimize your product. N E X T L E V E L R A C I N G . C O M ASSEMBLY VIDEO bit.ly/nlrbuild @next_level_racing @nextlevelracingOfficial @nextlvlracing Next Level Racing FOLLOW support@nextlevelracing.com...
- Page 3 Video Instruction: bit.ly/nlrbuild support@nextlevelracing.com PRE-RACE IN THE CHECKS *NOT TO SCALE WARNING • Please do not use power tools for assembly as over tightening can damage parts. • If in doubt consult the installation video or contact us on support@nextlevelracing.com •...
- Page 4 Video Instruction: bit.ly/nlrbuild support@nextlevelracing.com PARTS: PARTS: • • 4x M8 60mm Bolts Through Holes Through Holes • • 2x Aluminium Extrusions • • 4x M8 Washers • • 2x Cable Management Clips • • 4x M8 Flange Nuts Install 1x NLR Cable Management Clip into the bottom channel of both Aluminium Extrusions. Bolt through and secure with M8 Bolts, Washers and Flange Nuts.
- Page 5 Video Instruction: bit.ly/nlrbuild support@nextlevelracing.com support@nextlevelracing.com PARTS: PARTS: • • 4x M8 60mm Bolts • • 1x M8 60mm Bolts • • 1x M8 Washer • • 4x M8 Washers • • 1x M8 Wing Nut • • 4x M8 Flange Nuts NOTE: Replace the Wing Nut with a Flange Nut for a fixed setup.
- Page 6 Video Instruction: bit.ly/nlrbuild support@nextlevelracing.com support@nextlevelracing.com PARTS: PARTS: • • 1x M8 70mm Bolt • • 1x M8 60mm Bolt • • 1x M8 Washer • • 1x M8 Washer • • 1x M8 Wing Nut • • 1x M8 Wing Nut •...
- Page 7 Video Instruction: bit.ly/nlrbuild support@nextlevelracing.com support@nextlevelracing.com PARTS: PARTS: OPTIONAL BUTTON BOX SETUP “A” • • 1x Button Box Top Clamp • • 2x M8 Wing Nuts (SMART PHONE COMPATIBLE) Tabs • • 1x Button Box Bottom Clamp Rear View • • 2x M8 Wing Nuts Flip the Button Box Top Clamp upside down (the tab should be facing down as shown in the picture) A) Align the holes on the pre-assembled Tablet Holder with the pressed studs on the pre-assembled and align the slots with the pressed studs on the Button Box Bottom Clamp.
-
Page 8: Arm Angle Adjustment
ARM ANGLE ADJUSTMENT Install 2 x T-Nuts into the outside channels of the Left or Right Vertical Upright of your Elite Series Loosen the Wing Nuts in the joints of the arm to adjust the angle of each section to the desired Cockpit. - Page 9 Video Instruction: bit.ly/nlrbuild support@nextlevelracing.com support@nextlevelracing.com PARTS: PARTS: CLAMP HEIGHT ADJUSTMENT • • NIL • • 1x M8 60mm Bolt (TO LOCK ELECTRONICS IN PLACE) NOTE: Replace the Wing Nut with a Flange Nut for a fixed setup. • • 1x M8 Washer SUITED FOR BUTTON BOXES OR PHONES •...
- Page 10 Video Instruction: bit.ly/nlrbuild support@nextlevelracing.com PARTS: PARTS: OPTIONAL 3M TAPE MOUNT FRONT/ SIDE MOUNT CONFIGURATION • • 2x M6 16mm Head Bolts • • NIL NOTES: - Ensure the Wheel Deck surface is clean and free of any contaminants and residue. - Recommended drying time of 72 hours for 3M Tape before attaching any electronics.
- Page 11 Video Instruction: bit.ly/nlrbuild support@nextlevelracing.com PARTS: PARTS: • • 1x External Swivel Bracket • • 1 x Swivel Bracket (“ESB” Sticker Label) • • 1x Main Swivel Bracket (“MSB” Sticker Label) NOTE: NOTE: Follow the stickers on the parts to Follow the stickers on the parts to avoid misplacement of the brackets.
- Page 12 Video Instruction: bit.ly/nlrbuild support@nextlevelracing.com PARTS: PARTS: • • 1x Tablet Top Clamp • • 2x M8 Wing Nuts Tabs • • 1x Tablet Bottom Clamp • • 2x M8 Wing Nuts A) Align the slots on the Tablet Top Clamp (the tabs should be at the top, as shown in the picture) A) Align the holes on the pre-assembled Tablet Holder with the pressed studs on the pre-assembled Button Box Holder.
- Page 13 NOTE: Install T-Nuts suited for your cockpit extrusion profile. Install 2 x T-Nuts into the outside channels of the uprights of your Elite Series Loosen the Wing Nuts in the joints of the arm to adjust the angle of each section to your Cockpit.
- Page 14 Video Instruction: bit.ly/nlrbuild support@nextlevelracing.com support@nextlevelracing.com support@nextlevelracing.com NOTES WARNING Please do not use power tools for assembly as over tightening can damage parts. If in doubt consult the installation video or contact us on support@nextlevelracing.com T-Nuts can not be installed mid channel. Must be installed from the ends of extrusion. Plan the placement of cable management clips at the start of your build.
- Page 15 Étape 11 - Reportez-vous à l’image. Alignez une entretoise de canon de 36 mm entre les deux supports de l’étape 10. Vissez à travers et fixez avec un boulon M8, une rondelle et un écrou à oreilles. Pièces : 1x Étape 10 - Reportez-vous à l’image. Installez 2 x écrous en T dans les canaux extérieurs des montants de votre cockpit Elite Series. Pièces : 2x écrous en T. REMARQUE : installez des écrous en T adaptés à votre boulon M8 60 mm, 1x rondelle M8, 1x écrou papillon M8, 1x entretoise de canon 36 mm.
- Page 16 Stap 10 – Raadpleeg de afbeelding. Lijn de gaten in de connectorbeugel voor tabletmontage uit met de gaten in de externe draaibeugel (ESB). Onderdelen: 1x verbindingsbeugel voor tabletmontage. Stap 10 – Raadpleeg de afbeelding. Installeer 2 x T-Nuts in de buitenste kanalen van de staanders van uw Elite Series Cockpit. Onderdelen: 2x T-moeren. OPMERKING: Installeer T-moeren die geschikt zijn voor Stap 11 –...
- Page 17 NEXT LEVEL RACING® MONTAGGIO TABLET E BUTTON BOX SERIE ELITE – MANUALE DI ISTRUZIONI Passaggio 17: fare riferimento all’immagine. A) Allineare i fori sulla staffa girevole con i dadi a T precedentemente installati al punto 16. B) Avvitare e fissare utilizzando bulloni e rondelle M8. Parti: 2 bulloni M8 da 16 Il tuo viaggio in Sim Racing inizia qui.
- Page 18 NEXT LEVEL RACING® MONTAJE EN TABLETA Y CAJA DE BOTONES SERIE ELITE - MANUAL DE INSTRUCCIONES Paso 17: consulte la imagen. A) Alinee los orificios del soporte giratorio con las tuercas en T instaladas previamente en el paso 16. B) Atornille y asegure con pernos y arandelas M8. Piezas: 2x pernos M8 de 16 Tu viaje con Sim Racing comienza aquí.
- Page 19 M8 70mm Schraube, 1x M8 Unterlegscheibe, 1x M8 Flügelmutter, 1x 43mm Laufabstandshalter. HINWEIS: Ersetzen Sie die Flügelmutter durch eine Flanschmutter für eine feste Einrichtung. Schritt 10 – Siehe Bild. Installieren Sie 2 x T-Muttern in den äußeren Kanälen der Pfosten Ihres Elite Series Cockpits. Teile: 2x T-Muttern. HINWEIS: Installieren Sie T-Muttern, die für Ihr Cockpit-Extrusionsprofil Schritt 10 –...
- Page 20 Video Instruction: bit.ly/nlrbuild support@nextlevelracing.com NEXTLEVELRACING® エリートシリーズタブレット&ボタンボックスマウント–取扱説明書 ステップ17–画像を参照してください。 A) スイベルブラケットの穴を手順16で前に取り付けたTナットに合わせます。 B) M8ボルトとワッシャーを使用してボルトで固定します。 部品:2x M8 16mmボルト、 2xM8ワッシャー。 あなたのシミュレーションレーシングの旅はここから始まります。 あなたがレースを始めたいと思っていることを私たちは知っています !指示に従って時間をかけて、 このガイドに従って製品を組み立ててください。 取扱説明 ステップ18–画像を参照してください。 アーム角度調整。 アームのジョイントにある蝶ナットを緩めて、 各セクションの角度を目的の位置に調整します。 最終的に必要な構成になったら、 蝶ナットを締めます。 書に従って製品を完全に最適化することで、 成功への準備を整えることができます。 組み立てビデオの場合は、 QRコードをスキャンします。 bit.ly/nlrbuild。 ステップ19–画像を参照してください。 クランプ角度調整。 タブレットマウントコネクタブラケットの蝶ナットを緩めます。 希望の角度に調整し、 ウィングナットを締めて所定の位置に固定します。 ステップ20–画像を参照してください。 クランプの高さ調整 (電子機器を所定の位置にロックするため) 。 クランプの裏側にある蝶ナットを緩めます。 タブレットまたはボタンボックスを所定の位置に置きます。 電子機器に対し 警告...
- Page 21 Etapa 10 - Consulte a imagem. Alinhe os orifícios do suporte do conector de montagem do tablet com os orifícios do suporte giratório externo (ESB). Peças: 1x suporte de conector de montagem em tablet. Etapa 10 - Consulte a imagem. Instale 2 x T-Nuts nos canais externos dos montantes do seu Cockpit Elite Series. Peças: 2x T-Nuts. NOTA: Instale porcas em T adequadas para o perfil de extrusão da sua cabine.
- Page 22 болт M8 70 мм, 1 шайба M8, 1 барашковая гайка M8, 1 распорная втулка для ствола 43 мм. ПРИМЕЧАНИЕ. Замените барашковую гайку гайкой с фланцем для фиксированной установки. Шаг 10 - Обратитесь к изображению. Установите 2 тройниковые гайки во внешние каналы стоек кабины экипажа Elite Series. Детали: 2x T-гайки. ПРИМЕЧАНИЕ. Установите Т-образные гайки, Шаг...
- Page 23 NEXT LEVEL RACING® ELITE SERİSİ TABLET & BUTON KUTUSU MONTAJ – KULLANIM KILAVUZU Adım 17 – Resme bakın. A) Döner Braket üzerindeki delikleri Adım 16’da önceden takılmış olan T-Somunlarla hizalayın. B) Cıvatalayın ve M8 Cıvataları ve Pulları kullanarak sabitleyin. Parçalar: 2x M8 16mm Cıvata, 2x Sim Yarış...
- Page 24 Prošroubujte a zajistěte pomocí šroubu M8, podložky a křídlové matice. Části: 1x šroub M8 60mm, 1x podložka M8, 1x křídlová matice M8, 1x rozpěrka hlavně 43mm. Poznámka: Vyměňte křídlovou matici za přírubovou matici pro pevné nastavení. Krok 16 – viz obrázek. Nainstalujte 2 x T-matice do vnějších kanálů levého nebo pravého svislého sloupku vašeho kokpitu Elite Series. Díly: 2x T-matice. POZNÁMKA: Nainstalujte T-matice vhodné pro profil vytlačování kokpitu.
- Page 25 1x nakrętka skrzydełkowa M8, 1x 43mm przekładka lufy. UWAGA: Wymień nakrętkę skrzydełkową na nakrętkę kołnierzową, aby uzyskać stałą konfigurację. Krok 10 – Zobacz obraz. Zainstaluj 2 x nakrętki teowe w zewnętrznych kanałach wsporników kokpitu Elite Series. Części: 2x nakrętki teowe. UWAGA: Zainstaluj nakrętki teowe dostosowane do profilu profilu Krok 10 –...
- Page 26 مادختساب نمآو ماكحإب اهطب ر ا .يحوللاM8 Bolt ، وWasher ، وWing Nut. 1 :ءازجألاx M8 60mm Bolt ، 1x M8 Washer ، 1x M8 Wing Nut ، 1x 43mm .تباث دادعإل ةفش ةلوماصب حانجلا ةلوماص لدبتسا :ةظحالم .لصاف ليمرب 2 تيبثتب مق .ةروصلا ىلإ عوجرلا - 61 ةوطخلاx T-Nuts ةدايقلا ةرمقل رسيألا وأ نميألا يسأرلا يدوماعلل ةيج ر اخلا تاونقلا يفElite Series. 2 :ءازجألاx T-Nuts. تيبثتب مق :ةظحالمT-Nuts .كب صاخلا ةدايقلا ةرمق قثب فلمل بسانملا...
- Page 27 步骤 06 – 参考图片。将两个挤压组件对齐内部旋转支架 (ISB) 上的孔与外部旋转支架 (ESB) 上的孔。 步骤 10 – 参考图像。将 2 个 T 形螺母安装到 Elite Series Cockpit 立柱的外部通道中。零件:2 个 T 形螺母。注意:安装适合您的驾驶舱挤压型材的 T 形螺母。 步骤 07 – 参考图片。在步骤 06 中的两个支架之间对齐 36 毫米桶形垫片。使用 M8 螺栓、垫圈和螺母螺栓穿过。过去:1 个 M8 60 毫米螺栓、1 个 M8 垫圈、1 个 M8 翼形螺母、1 步骤...
- Page 28 support@nextlevelracing.com support@nextlevelracing.com...
Need help?
Do you have a question about the ELITE Series and is the answer not in the manual?
Questions and answers