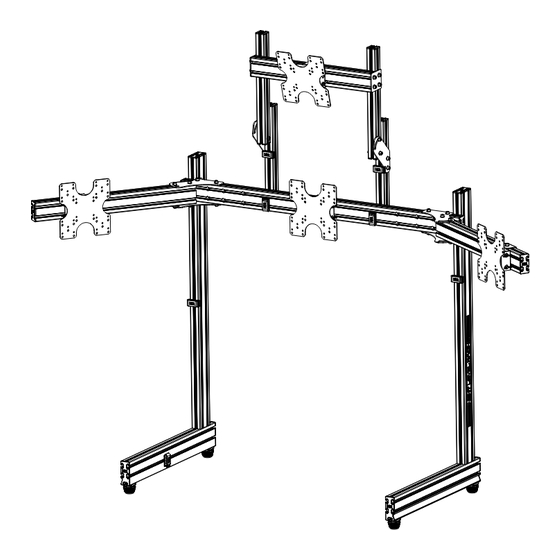
Download Print this page

Next Level Racing ELITE Series Instruction Manual

Hide thumbs Also See for ELITE Series:

Advertisement

Quick Links

T A K E R A C I N G T O T H E N E X T L E V E L
Video Instruction: bit.ly/nlrbuild
ELITE SERIES
MONITOR
STAND
INSTRUCTION MANUAL
SINGLE | TRIPLE | OVERHEAD

Advertisement

loading

Summary of Contents for Next Level Racing ELITE Series

  • Page 1 T A K E R A C I N G T O T H E N E X T L E V E L Video Instruction: bit.ly/nlrbuild ELITE SERIES MONITOR STAND INSTRUCTION MANUAL SINGLE | TRIPLE | OVERHEAD...
  • Page 2 T O T H E N E X T L E V E L instruction booklet to fully optimize your product. N E X T L E V E L R A C I N G . C O M ASSEMBLY VIDEO bit.ly/nlrbuild @next_level_racing @nextlevelracingOfficial @nextlvlracing Next Level Racing FOLLOW support@nextlevelracing.com...
  • Page 3 Video Instruction: bit.ly/nlrbuild support@nextlevelracing.com PRE-RACE IN THE CHECKS Allen keys 2 x Base members 100x40 SINGLE MONITOR STAND WARNING & ASSEMBLY TIPS • Please do not use power tools for assembly as over tightening can damage your frame 18 x T-nut •...
  • Page 4 Video Instruction: bit.ly/nlrbuild support@nextlevelracing.com IN THE IN THE TRIPLE MONITOR STAND OVERHEAD MONITOR STAND 2 x outer arms 1 x Overhead cross member 40x80 2 x Overhead vertical member 40x40 2 x Overhead angle member 40x40 2 x cable clip 10 x M8 12mm wingbolt 2 x Vesa mount 2 x Angle bracket...
  • Page 5 Video Instruction: bit.ly/nlrbuild support@nextlevelracing.com IN THE COMPLETE MONITOR SETUP 1 x Upper cross member 80x40 2 x outer arms 80x40 2 x overhead angle plate 4 x vesa mount 4 x 85mm bolt 10 x M8 40mm bolt 20 x M8 12mm wingbolt 16 x M6 15mm bolt 50 x T-nut 16 x M5 15mm bolt...
  • Page 6 2 X 40X100 LEFT END CAP 4 X T-NUT 2 X 40X100 RIGHT END CAP TIPS: TIPS: The Next Level Racing logo is on REPEAT ON the outside. The T-nuts are to be Left and right end caps are best OTHER SIDE...
  • Page 7 Video Instruction: bit.ly/nlrbuild support@nextlevelracing.com PARTS: PARTS: PARTS: Parts List here 10 X T-NUT 4 X M8 40MM BOLT 4 X M8 WASHER TIPS: TIPS: Text for hints and tips for building TIPS: this step Red dots indicate general T-nut positioning You may find it easier to add the Countersunk holes in cross member washers into the channel prior to...
  • Page 8 Video Instruction: bit.ly/nlrbuild support@nextlevelracing.com PARTS: PARTS: PARTS: Parts List here 4 X M8 12MM WINGBOLT 2 X M8 16MM BOLT 4 X M8 WASHER 2 X M8 WASHER TIPS: TIPS: Text for hints and tips for building TIPS: this step Do not over tighten the wingbolts Don’t forget to check all the bolts on the frame are tight before installing...
  • Page 9 Video Instruction: bit.ly/nlrbuild support@nextlevelracing.com PARTS: PARTS: PARTS: PARTS: Parts List here Parts List here TIPS: TIPS: TIPS: Text for hints and tips for building Text for hints and tips for building this step this step Add cable clips where desired Main text descrition for step here The Single Monitor Stand is now complete Main text descrition for step here...
  • Page 10 Video Instruction: bit.ly/nlrbuild support@nextlevelracing.com PARTS: PARTS: PARTS: Parts List here 1 X ANGLE BRACKET 2 X M8 100MM BOLTS 2 X M8 WASHER TIPS: 2 X M8 FLANGE NUT Text for hints and tips for building this step TIPS: Outer arm shown in (A) has a pre- drilled hole all the way through.
  • Page 11 Video Instruction: bit.ly/nlrbuild support@nextlevelracing.com PARTS: PARTS: PARTS: PARTS: Parts List here Parts List here 4 X M8 16MM BOLT 4 X M8 WASHER TIPS: TIPS: 4 X T-NUT Text for hints and tips for building Text for hints and tips for building TIPS: this step this step...
  • Page 12 Video Instruction: bit.ly/nlrbuild support@nextlevelracing.com PARTS: 4 X M8 40MM BOLT 4 X M8 WASHER TIPS: Overhead vertical members are the shorter 40x40 parts TRIPLE MONITOR STAND IS COMPLETE. TO ADD THE OVERHEAD PLEASE CONTINUE Bolt through machined recess on the Overhead Vertical members into the upper cross member using T-Nuts previously installed on step 04a PARTS: 4 X T-NUT...
  • Page 13 Video Instruction: bit.ly/nlrbuild support@nextlevelracing.com PARTS: PARTS: 4 X M8 16MM BOLT 4 X M8 16MM BOLT 4 X M8 WASHER 4 X M8 WASHER 2 X SQUARE PLATE TIPS: Do not fully tighten as height will be adjusted later Bolt the square plates to the overhead angle members using T-Nuts previously installed Bolt the overhead angle plates into T-Nuts previously installed in step 18 in step 20a (2) PARTS:...
  • Page 14 Video Instruction: bit.ly/nlrbuild support@nextlevelracing.com PARTS: PARTS: 2 X M8 40MM BOLT 2 X M8 16MM BOLT 2 X M8 WASHER 2 X M8 WASHER 2 X M8 FLANGE NUT TIPS: Get a friend to help you hold the monitor in place whilst securing Refer to 7b for vesa mount assembly Bolt through the pre-drilled hole on the overhead angle members into the overhead angle plates Attach your screen to the overhead cross member bolt through vesa bracket into T-nuts previously...
  • Page 15 Video Instruction: bit.ly/nlrbuild support@nextlevelracing.com ASSISTANCE ASSEMBLY VIDEO Main text descrition for step here The overhead monitor setup is now complete bit.ly/nlrbuild If you require further support with your product please contact our friendly team at: support@nextlevelracing.com OVERHEAD MONITOR STAND IS COMPLETE.
  • Page 16 3b. Raadpleeg de afbeelding. Installeer 2 x T-Nuts in het binnenkanaal en herhaal aan de andere kant. (Rode stippen verwijzen naar plaatsing van de T-moer). TIPS: Het Next Level Racing-logo staat aan de buitenkant.
  • Page 17 3b. Fare riferimento all’immagine. Installare 2 dadi a T nel canale interno e ripetere sull’altro lato. (I punti rossi si riferiscono al posizionamento del dado a T). SUGGERIMENTI: il logo Next Level Racing è all’esterno.
  • Page 18 3b. Bitte beziehen Sie sich auf das Bild. Installieren Sie 2 x T-Muttern im Innenkanal und wiederholen Sie dies auf der anderen Seite. (Rote Punkte beziehen sich auf die Platzierung der T-Mutter). TIPPS: Das Next Level Racing-Logo befindet sich außen.
  • Page 19 3b. Por favor, consulte a imagem. Instale 2 x T-Nuts no canal interno e repita no outro lado. (Os pontos vermelhos referem-se à colocação da porca em T). DICAS: O logotipo da Next Level Racing está do lado de fora.
  • Page 20 4a. Lütfen resme bakın. Çapraz elemana gösterildiği gibi 10 x T-Somunu takın. İPUÇLARI: Kırmızı noktalar, genel T-somun konumlandırmasını gösterir Çapraz elemandaki havşa delikleri traversin ön tarafında, T-somunlar arka tarafa takılıdır 3b. Пожалуйста, обратитесь к изображению. Установите 2 Т-образные гайки во внутренний канал и повторите с другой стороны. (Красные точки относятся к размещению Т-образной гайки). СОВЕТЫ: логотип Next Level Racing находится снаружи. Т-образные гайки...
  • Page 21 3b. Proszę odnieść się do obrazu. Zainstaluj 2 x nakrętki teowe w wewnętrznym kanale i powtórz po drugiej stronie. (Czerwone kropki odnoszą się do umieszczenia nakrętki teowej). WSKAZÓWKI: Logo Next Level Racing znajduje się na zewnątrz. Nakrętki teowe należy zamontow-...
  • Page 22 3 ‫ 2 تيبثتب مق .ةروصلا ىلإ عوجرلا ىجري .أ‬x T-Nuts ‫.رخآلا بناجلا ىلع كلذ رركو ةيمامألا ةانقلا يف‬ 3 ‫ 2 تيبثتب مق .ةروصلا ىلإ عوجرلا ىجري .ب‬x T-Nuts ‫ عضو ىلإ ءارمحلا طاقنلا ريشت( .رخآلا بناجلا ىلع اهرركو ةيلخادلا ةانقلا يف‬T-Nut). ‫ راعش :حئاصن‬Next Level Racing ‫ ليماوص تيبثت متي .جراخلا يف دوجوم‬T ‫بناجلا ىلع‬...
  • Page 23 support@nextlevelracing.com NOTES support@nextlevelracing.com...

This manual is also suitable for:

SingleTripleOverhead