Table of Contents
Advertisement
Available languages
Available languages
Advertisement
Chapters
Table of Contents

Related Manuals for Sena OUTRUSH R


Summary of Contents for Sena OUTRUSH R
- Page 1 BENUTZERHANDBUCH 1.1.0 GERMAN...
- Page 2 VERNETZT FAHREN Lauschen Sie Ihrer Lieblingsmusik, unterhalten Sie sich über die Sprechanlage mit Ihren Freunden, folgen Sie den Richtungsanweisungen Ihres GPS-Systems und vieles mehr – mit dem OUTRUSH R-Bluetooth -Helm ist das alles kein ® Problem. Da Bluetooth -Funktionen und HD ® Intercom integriert sind, erleben Sie Technologie in seiner kompaktesten und befreiendsten Form.
- Page 3 1. Aktualisieren Sie dieses Produkt kostenlos auf die neueste Firmware, um vollumfänglich von den neuen verbesserten Funktionen des Produkts zu profitieren. Unter sena.com erfahren Sie, wie Sie das Produkt aktualisieren. 2. Folgen Sie Sena auf Facebook, YouTube, Twitter und Instagram, um immer die neuesten Informationen zu unseren Produkten, hilfreiche Tipps und andere Ankündigungen zu Sena-...
-
Page 4: Table Of Contents
Wangenpolsterung anbringen 1.4.10 Innenpolsterung herausnehmen 1.4.11 Innenpolsterung anbringen 1.4.12 Sonnenblende abnehmen 1.4.13 Sonnenblende anbringen Helmüberprüfung vor der Fahrt 1.5.1 Außenseite überprüfen 1.5.2 Kinnriemen überprüfen ERSTE SCHRITTE: BLUETOOTH-SYSTEM 22 Herunterladbare Sena-Software 2.1.1 Sena Utility-App 2.1.2 Sena Device Manager Ein- und Ausschalten Laden... - Page 5 Überprüfung des Akkuladezustands Lautstärkeregelung BLUETOOTH-SYSTEM MIT ANDEREN BLUETOOTH-GERÄTEN KOPPELN Koppeln mit einem Mobiltelefon 3.1.1 Erste Kopplung des Bluetooth-Systems 3.1.2 Kopplung, wenn der OUTRUSH R ausgeschaltet 3.1.3 Kopplung, wenn das OUTRUSH R eingeschaltet Kopplung des zweiten Handys – zweites Mobiltelefon, GPS und SR10 Kopplung des GPS Für fortgeschrittene Benutzer: Kopplung unter Verwendung eines bestimmten Profils –...
- Page 6 Mehrweg-Sprechanlage 6.3.1 Gespräch über die Drei-Wege- Konferenzsprechanlage beginnen 6.3.2 Gespräch über die Vier-Wege- Konferenzsprechanlage beginnen 6.3.3 Mehrwege-Gespräch über die Sprechanlage beenden DREI-WEGE-TELEFONKONFERENZ MIT TEILNEHMER ÜBER DIE SPRECHANLAGE KOMMUNIKATION IN DER GRUPPE UNIVERSAL INTERCOM 10. FUNKTIONSPRIORITÄT UND FIRMWARE-AKTUALISIERUNGEN 10.1 Funktionspriorität 10.2 Firmware-Aktualisierung 11.
- Page 7 11.2.8 HD Voice (standardmäßig aktiviert) 11.2.9 HD-Sprechanlage (standardmäßig aktiviert) 11.2.10 VOX-Empfindlichkeit (standardmäßig: 3) 11.2.11 Sprachansagen (standardmäßig aktiviert) 11.2.12 Mithörton (standardmäßig deaktiviert) 11.2.13 Advanced Noise Control™ (standardmäßig aktiviert) 11.2.14 Audio Multitasking™ (standardmäßig deaktiviert) 11.2.15 Hintergrundlautstärke (standardmäßig Stufe 5) 51 12. FEHLERSUCHE 12.1 Reset bei Fehlfunktion 12.2 Zurücksetzen 13.
-
Page 8: Informationen Zum Bluetooth-Helm Outrush R
Änderungen am Inhalt dieses Benutzerhandbuchs zum Helm sind ohne Benachrichtigung vorbehalten. Die Abbildungen weichen u. U. vom tatsächlichen Produkt ab. Die Urheberrechte des Benutzerhandbuchs liegen bei Sena Technologies, Inc. Die Vervielfältigung und das Kopieren des Benutzerhandbuchs ohne entsprechende Berechtigung sind strengstens untersagt. -
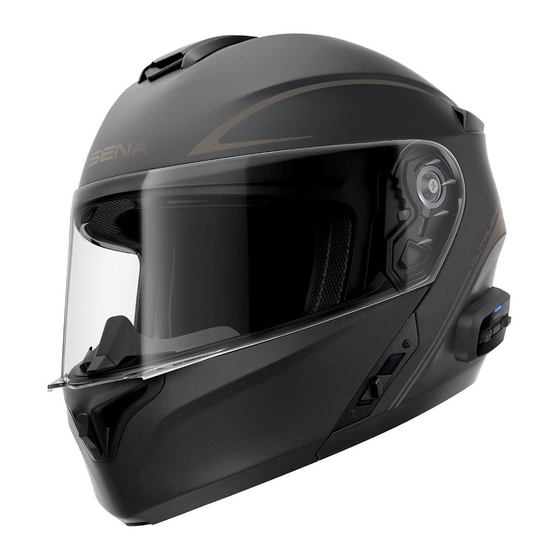
Page 9: Produktdetails
INFORMATIONEN ZUM BLUETOOTH-HELM OUTRUSH R 1.2 Produktdetails Nr. Name Nr. Name Visierblende Mikrofon Sonnenblende Hebel für Sonnenblende Atemschutz Taste für Bluetooth-System Lüftungsöffnung im Kinnschutz Visierraster Kinnschutz Hintere Lüftungsöffnung Kinnschutzhebel Schale Lautsprecher Obere Lüftungsöffnung Kinnriemen... -
Page 10: Taste Für Bluetooth-System
INFORMATIONEN ZUM BLUETOOTH-HELM OUTRUSH R Nr. Name Riemenversteller Kinnriemen Druckschließe 1.2.1 Taste für Bluetooth-System Nr. Name Taste (+) Mittlere Taste Status-LED Taste (-) Lade-LED Anschluss für Gleichstrom-Ladegerät und zur Firmware-Aktualisierung Reset-Taste bei Fehlfunktion... -
Page 11: Abnehmbare Innenteile
INFORMATIONEN ZUM BLUETOOTH-HELM OUTRUSH R 1.2.2 Abnehmbare Innenteile Innenpolsterung Wangenpolsterung (R) Wangenpolsterung (L) 1.3 Lieferumfang Helm Helmtasche USB-Lade- und Aufsätze für das Reflektoren (4)* Datenkabel (USB-C) Bügel-Mikrofon (2) * Nur in Europa im Lieferumfang enthalten... -
Page 12: Tragen Des Helms
INFORMATIONEN ZUM BLUETOOTH-HELM OUTRUSH R 1.4 Tragen des Helms 1.4.1 Helm aufsetzen 1. Lockern Sie den Kinnriemen mithilfe des Rückhaltesystems. 2. Halten Sie den Helm mit Ihrer Hand offen und ziehen Sie ihn über den Kopf. 3. Ziehen Sie den Kinnriemen so fest zu, dass er gut sitzt, aber keine Schmerzen verursacht. -
Page 13: Visierblende Abnehmen
INFORMATIONEN ZUM BLUETOOTH-HELM OUTRUSH R 1.4.3 Visierblende abnehmen 1. Schieben Sie die Visierblende so weit wie möglich auf. 2. Ziehen Sie die Visierblende nach außen, während Sie den Hebel des Visierrasters nach oben drücken. 3. Wiederholen Sie Schritt 2 auf der anderen Seite. -
Page 14: Visierblende Anbringen
INFORMATIONEN ZUM BLUETOOTH-HELM OUTRUSH R 1.4.4 Visierblende anbringen Riegel A Riegel C Riegel D Riegel B 1. Richten Sie die Riegel A, B, C und D wie auf der Abbildung oben gezeigt am Visierraster aus. 2. Setzen Sie die Riegel A bis D ins Visierraster ein, während Sie den Hebel des Visierrasters nach unten drücken. -
Page 15: Kinnschutz Öffnen
INFORMATIONEN ZUM BLUETOOTH-HELM OUTRUSH R 1.4.5 Kinnschutz öffnen Ziehen Sie den Kinnschutzhebel nach außen und heben Sie den Kinnschutz so weit wie möglich an. Hinweis: Der Kinnschutz bleibt oben, wenn Sie den Hebel der Kinnschutzsperre an der linken Seite des Helms nach oben drücken. -
Page 16: Atemschutz Entfernen
INFORMATIONEN ZUM BLUETOOTH-HELM OUTRUSH R 1.4.6 Atemschutz entfernen Ziehen Sie den Atemschutz nach innen vom Kinnschutz ab, um ihn zu entfernen. 1.4.7 Atemschutz anbringen Setzen Sie die 3 Noppen des Atemschutzes in die entsprechenden Aussparungen ein. -
Page 17: Wangenpolsterung Abnehmen
INFORMATIONEN ZUM BLUETOOTH-HELM OUTRUSH R 1.4.8 Wangenpolsterung abnehmen 1. Öffnen Sie die 3 Druckknöpfe, mit der die Wangenpolsterung und der Helm verbunden sind. 2. Gehen Sie auf der anderen Seite genauso vor. 1.4.9 Wangenpolsterung anbringen 1. Ziehen Sie den Kinnriemen durch das Loch in der Wangenpolsterung und befestigen Sie die Wangenpolsterung mithilfe der 3 Druckknöpfe. -
Page 18: Innenpolsterung Herausnehmen
INFORMATIONEN ZUM BLUETOOTH-HELM OUTRUSH R 1.4.10 Innenpolsterung herausnehmen 1. Öffnen Sie den Druckknopf der Innenpolsterung neben dem Kinnschutz. 2. Ziehen Sie die Innenpolsterung von der Rückwand des Helms nach vorne. 3. Ziehen Sie den vorderen Teil der Innenpolsterung vom vorderen Teil des Helms ab. -
Page 19: Innenpolsterung Anbringen
INFORMATIONEN ZUM BLUETOOTH-HELM OUTRUSH R 1.4.11 Innenpolsterung anbringen 1. Setzen Sie die 3 Noppen der Innenpolsterung in die entsprechenden Aussparungen im vorderen Teil des Helms ein. 2. Schieben Sie die Plastikplatte der Innenpolsterung zwischen Schale und EPS. 3. Drücken Sie den Druckknopf der Innenpolsterung neben dem Kinnschutz fest. -
Page 20: Sonnenblende Abnehmen
INFORMATIONEN ZUM BLUETOOTH-HELM OUTRUSH R 1.4.12 Sonnenblende abnehmen 1. Schieben Sie den Hebel für die Sonnenblende in die Richtung, die auf der Abbildung oben gezeigt wird, damit sich die Sonnenblende senkt. 2. Ziehen Sie eine Seite der Blende in die Richtung weg, die auf der Abbildung oben gezeigt wird. -
Page 21: Helmüberprüfung Vor Der Fahrt
INFORMATIONEN ZUM BLUETOOTH-HELM OUTRUSH R 1.5 Helmüberprüfung vor der Fahrt 1.5.1 Außenseite überprüfen Untersuchen Sie den Helm regelmäßig auf Schäden. Kleine, oberflächliche Kratzer beeinträchtigen die Schutzwirkung des Helms nicht. Falls der Helm schwerwiegender beschädigt ist (Risse, Dellen, abblätternde Farbe usw.), sollte er nicht mehr verwendet werden. -
Page 22: Erste Schritte: Bluetooth-System
- iOS: App Store > Sena Utility 2.1.2 Sena Device Manager Mit dem Sena Device Manager können Sie die Firmware aktualisieren und die Einstellungen direkt an Ihrem PC konfigurieren. Den Sena Device Manager können Sie unter folgender Adresse herunterladen: sena.com. -
Page 23: Laden
Bluetooth-System wird während des Ladens automatisch ausgeschaltet. Es kann auch ein USB-Ladegerät eines anderen • Anbieters zum Laden von Sena-Produkten verwendet werden, wenn es entweder eine FCC-, CE-, IC- Zulassung hat oder die Zulassung einer lokalen Genehmigungsbehörde, die von Sena akzeptiert wird. -
Page 24: Überprüfung Des Akkuladezustands
ERSTE SCHRITTE: BLUETOOTH-SYSTEM 2.4 Überprüfung des Akkuladezustands Beim Einschalten des Bluetooth-Systems zeigt die rote LED durch schnelles Blinken den Akkuladezustand an. Blinkt 4 Mal = hoch, 70 ~ 100 % Blinkt 3 Mal = mittel, 30 ~ 70 % Blinkt 2 Mal = niedrig, 0 ~ 30 % 2.5 Lautstärkeregelung Sie können die Lautstärke über die Taste (+) erhöhen und über die Taste (-) senken. -
Page 25: Bluetooth-System Mit Anderen Bluetooth-Geräten Koppeln
Reichweite befinden. Das Bluetooth-System kann mit mehreren Bluetooth-Geräten verbunden werden, etwa mit einem Mobiltelefon, einem MP3-Player, einem GPS-Gerät oder dem Funkgerätadapter Sena SR10. Verwenden Sie hierfür die Funktion Koppeln mit einem Mobiltelefon oder Kopplung des zweiten Handys. Das Bluetooth-System kann zudem mit einem anderen Sena-Headset oder -Bluetooth-Systemen gekoppelt werden. -
Page 26: Kopplung, Wenn Der Outrush R Ausgeschaltet Ist
BLUETOOTH-SYSTEM MIT ANDEREN BLUETOOTH-GERÄTEN KOPPELN 2. Aktivieren Sie den Bluetooth-Kopplungsmodus Ihres Mobiltelefons und wählen Sie dann in der Liste der erkannten Geräte den Eintrag Sena OUTRUSH R aus. 3. Falls Sie zur Eingabe einer PIN aufgefordert werden, geben Sie „0000“ ein. -
Page 27: Kopplung Des Zweiten Handys - Zweites Mobiltelefon, Gps Und Sr10
„Kopplung des zweiten Handys“ hören. 3. Aktivieren Sie den Bluetooth-Kopplungsmodus Ihres Mobiltelefons und wählen Sie dann in der Liste der erkannten Geräte den Eintrag Sena OUTRUSH R aus. 4. Falls Sie zur Eingabe einer PIN aufgefordert werden, geben Sie „0000“ ein. -
Page 28: Für Fortgeschrittene Benutzer: Kopplung
2. Drücken Sie die Taste (+), bis Sie die Sprachansage „Medienkopplung“ hören. 3. Aktivieren Sie den Bluetooth-Kopplungsmodus Ihres Mobiltelefons und wählen Sie dann in der Liste der erkannten Geräte den Eintrag Sena OUTRUSH R aus. 4. Falls Sie zur Eingabe einer PIN aufgefordert werden, geben Sie „0000“ ein. 3.4.2 Freisprechprofil (nur Anrufe) 1. -
Page 29: Verwenden Eines Mobiltelefons
Halten Sie im Standby-Modus die mittlere Taste 3 Sekunden lang gedrückt, um die Sprachwahlfunktion Ihres Mobiltelefons zu aktivieren. 4.2 Kurzwahl 4.2.1 Kurzwahlnummern zuweisen Die Kurzwahl-Voreinstellungen werden im Einstellungsmenü zugewiesen, das sich über den Sena Device Manager oder die Sena Utility-App aufrufen lässt. -
Page 30: Kurzwahlnummern Verwenden
VERWENDEN EINES MOBILTELEFONS 4.2.2 Kurzwahlnummern verwenden 1. Halten Sie die Taste (+) 3 Sekunden lang gedrückt, bis Sie die Sprachansage „Kurzwahl“ hören. 2. Drücken Sie die Taste (+) oder die Taste (-), um durch die Menüs zu navigieren. Es werden Sprachansagen für die einzelnen Menüpunkte ausgegeben. -
Page 31: Stereo-Musik
5. STEREO-MUSIK 5.1 Bluetooth-Stereo-Musik Musik wiedergeben/pausieren • Halten Sie die mittlere Taste 1 Sekunde lang gedrückt, bis Sie einen Doppel-Piepton hören. Nächster/vorheriger Titel • Halten Sie die Taste (+) oder die Taste (-) 1 Sekunde lang gedrückt, bis Sie einen Piepton hören. 5.2 Musik teilen Sie können mit einem Gesprächsteilnehmer über Bluetooth gemeinsam Stereo-Musik hören, während Sie ein Gespräch... - Page 32 STEREO-MUSIK Hinweis: 1. Sowohl Sie als auch der Gesprächsteilnehmer können die Musikwiedergabe fernsteuern und beispielsweise zum nächsten oder vorherigen Titel wechseln. 2. Wenn Sie Ihr Mobiltelefon verwenden oder eine Sprachanweisung des Navigationsgeräts ausgegeben wird, wird Musik teilen angehalten. 3. Musik teilen wird beendet, wenn mit dem Bluetooth- System eine Mehrwege-Kommunikation über die Sprechanlage begonnen wird.
-
Page 33: Bluetooth-Sprechanlage
6. BLUETOOTH-SPRECHANLAGE 6.1 Kopplung der Sprechanlage Es können bis zu drei andere Benutzer für Bluetooth- Kommunikationen über die Sprechanlage mit dem Bluetooth- System gekoppelt werden. Gesprächsteilnehmer Gesprächsteilnehmer Gesprächsteilnehmer B C D 1. Halten Sie die mittlere Taste der Bluetooth-Systems A und B 5 Sekunden lang gedrückt, bis die roten LEDs der beiden Geräte schnell blinken und Sie die Sprachansage „Gegensprechanlage koppeln“... - Page 34 BLUETOOTH-SPRECHANLAGE Drücken Sie die mittlere Taste. 3. Wiederholen Sie die Schritte 1 und 2, um die Kopplung mit Gesprächsteilnehmern C und D durchzuführen. 4. Das Koppeln der Sprechanlage wird nach dem Prinzip Der Letzte wird zuerst bedient durchgeführt. Wurde ein Bluetooth-System also zur Kommunikation über die Sprechanlage mit mehreren Bluetooth-Systemen gekoppelt, wird das zuletzt gekoppelte Bluetooth-System als erster Gesprächsteilnehmer verwendet.
-
Page 35: Zwei-Wege-Sprechanlage
BLUETOOTH-SPRECHANLAGE 6.2 Zwei-Wege-Sprechanlage Gehen Sie wie folgt vor, um mit einem beliebigen Gesprächsteilnehmer eine Kommunikation über die Sprechanlage zu beginnen: Drücken Sie die mittlere Taste einmal, um ein Gespräch mit dem ersten Gesprächsteilnehmer zu beginnen. Drücken Sie sie zweimal, um ein Gespräch mit dem zweiten Gesprächsteilnehmer zu beginnen, und dreimal, um ein Gespräch mit dem dritten Gesprächsteilnehmer zu beginnen. - Page 36 BLUETOOTH-SPRECHANLAGE 6.3.1 Gespräch über die Drei-Wege- Konferenzsprechanlage beginnen Sie (A) können ein Gespräch über die Drei-Wege- Konferenzsprechanlage mit zwei Gesprächsteilnehmern (B und C) beginnen, indem Sie zwei Verbindungen gleichzeitig herstellen. 1. Sie (A) müssen mit zwei Gesprächsteilnehmern (B und C) gekoppelt sein, um ein Gespräch über die Drei-Wege- Konferenzsprechanlage führen zu können.
- Page 37 BLUETOOTH-SPRECHANLAGE 3. Sie (A) können den zweiten Gesprächsteilnehmer (C) durch zweimaliges Drücken der mittleren Taste anrufen. Alternativ kann der zweite Gesprächsteilnehmer (C) auch Sie (A) via Sprechanlage anrufen und so dem Gespräch beitreten. Gesprächs- Gesprächs- teilnehmer B teilnehmer C 6.3.2 Gespräch über die Vier-Wege- Konferenzsprechanlage beginnen Wenn bereits drei Gesprächsteilnehmer verbunden sind, kann ein neuer Teilnehmer (D) der Konferenz beitreten,...
- Page 38 BLUETOOTH-SPRECHANLAGE 6.3.3 Mehrwege-Gespräch über die Sprechanlage beenden Sie können die Konferenzsprechanlage entweder vollständig beenden oder lediglich die Sprechanlagenverbindung für einen der aktiven Gesprächsteilnehmer trennen. 1. Halten Sie die mittlere Taste 3 Sekunde lang gedrückt, bis Sie einen Piepton hören, um alle Verbindungen zur Sprechanlage zu trennen.
- Page 39 DREI-WEGE-TELEFONKONFERENZ MIT TEILNEHMER ÜBER DIE SPRECHANLAGE Sie können eine Drei-Wege-Telefonkonferenz führen, indem Sie einem Mobiltelefongespräch einen Gesprächsteilnehmer hinzufügen. 1. Drücken Sie während eines Mobiltelefongesprächs die mittlere Taste einmal, zweimal oder dreimal, um einen Gesprächsteilnehmer zum Gespräch einzuladen. 2. Zum Beenden der Kommunikation über die Sprechanlage während einer Telefonkonferenz drücken Sie die mittlere Taste einmal, zweimal oder dreimal.
- Page 40 8. KOMMUNIKATION IN DER GRUPPE Mit Group Intercom können Sie im Handumdrehen ein Mehrwege-Gespräch über die Konferenzsprechanlage mit den drei zuletzt gekoppelten Bluetooth-Systemen einrichten. 1. Koppeln Sie die Gegensprechanlage mit bis zu 3 Bluetooth- Systemen, die an Group Intercom teilnehmen sollen. 2.
- Page 41 Sprechanlage mit Personen führen, die Bluetooth-Headsets eines anderen Herstellers verwenden. Das Bluetooth-Headset eines anderen Herstellers kann mit dem Bluetooth-System von Sena verbunden werden, wenn es das Bluetooth- Freisprechprofil (Hands-Free Profile, HFP) unterstützt. Das Bluetooth-System lässt sich nur mit einem Headset eines anderen Herstellers gleichzeitig verbinden.
- Page 42 UNIVERSAL INTERCOM Beispiel für die Drei-Wege-Kommunikation über Universal Intercom Headset eines Sena-Bluetooth- anderen Herstellers System Beispiel für die Vier-Wege-Kommunikation über Universal Intercom Sena- Bluetooth-System Headset eines Headset eines anderen Herstellers anderen Herstellers Hinweis: Die Mehrwege-Kommunikation über Universal Intercom wird von Bluetooth-Headsets eines anderen...
- Page 43 Reihenfolge der Priorität wie folgt geändert: (höchstes) Mobiltelefon Bluetooth-Stereo-Musik Sprechanlage (niedrigstes) Musik mit Bluetooth-Stereo-Musik teilen 10.2 Firmware-Aktualisierung Das Bluetooth-System unterstützt Firmware-Aktualisierungen. Sie können die Firmware über den Sena Device Manager aktualisieren. Die neueste Software finden Sie auf der Sena- Website zu Bluetooth www.sena.com.
- Page 44 11. KONFIGURATION 11.1 Konfigurationseinstellungen für das Bluetooth-System 1. Zum Aufrufen des Konfigurationsmenüs halten Sie die mittlere Taste 15 Sekunden lang gedrückt, bis Sie die Sprachansage „Konfiguration“ hören. 2. Drücken Sie die Taste (+) oder die Taste (-), um durch die Menüs zu navigieren. Sie hören Sprachansagen für jeden Menüpunkt.
- Page 45 Fernsteuerung, wenn der Kopplungsmodus aktiv ist. 11.2 Software-Konfiguration Die Einstellungen für das Bluetooth-System können über den Sena Device Manager oder die Sena Utility-App geändert werden. 11.2.1 Kurzwahl Weisen Sie Kurzwahlnummern zu, um Anrufe schnell tätigen zu können.
- Page 46 KONFIGURATION 11.2.3 Audioquellpriorität (Standard: Sprechanlage) Mit der Audioquellenpriorität können Sie für die Sprechanlage und für Musik von einem Smartphone eine unterschiedliche Priorität festlegen (das gilt auch für die Sprachanweisungen und Mitteilungen der GPS-Anwendung). Wenn die Sprechanlage als Audioquellpriorität festgelegt ist, wird Ihre Musik bei einer Kommunikation über die Sprechanlage unterbrochen.
- Page 47 KONFIGURATION 11.2.6 VOX-Telefon (standardmäßig aktiviert) Ist diese Funktion aktiviert, können Sie eingehende Anrufe einfach per Sprachbefehl annehmen. Wenn durch einen Klingelton ein eingehender Anruf signalisiert wird, können Sie den Anruf entgegennehmen, indem Sie einen Sprachbefehl (beispielsweise „Hallo“) verwenden oder auf das Mikrofon pusten.
- Page 48 KONFIGURATION 11.2.8 HD Voice (standardmäßig aktiviert) Mit HD Voice können Sie während eines Telefonanrufs in erstklassiger Qualität kommunizieren. Durch diese Funktion wird die Audioqualität gesteigert, sodass sie bei Telefonanrufen brillant und klar ist. Wenn diese Funktion deaktiviert ist, werden Kommunikationen über die Sprechanlage durch eingehende Anrufe unterbrochen und Sie hören die Audiowiedergabe des SR10 während einer Kommunikation über die Sprechanlage nicht mehr.
- Page 49 KONFIGURATION 11.2.10 VOX-Empfindlichkeit (standardmäßig: 3) Die VOX-Empfindlichkeit kann je nach vorhandener Umgebung verändert werden. Stufe 5 ist die Einstellung mit der höchsten Empfindlichkeit, Stufe 1 die mit der niedrigsten. 11.2.11 Sprachansagen (standardmäßig aktiviert) Sie können die Sprachansagen in den Softwarekonfigurationseinstellungen deaktivieren, die folgenden Sprachansagen bleiben jedoch immer aktiv.
- Page 50 Die Lautstärke der Audiowiedergabe im Vordergrund kann über das Bluetooth-System geregelt werden. Die Intensität der Hintergrundaudiowiedergabe lässt sich über die Sena Utility-App einstellen. HD-Intercom und die Audioquellenpriorität werden vorübergehend deaktiviert, wenn Audio Multitasking aktiviert wird. Kombinationsübersicht Vordergrund/Hintergrund...
- Page 51 KONFIGURATION A. Die Sprachansagen des GPS-Geräts werden auch während Telefonaten ausgegeben. Die Lautstärke beider Audioquellen lässt sich über das Bluetooth-System regeln. B. Die Sprachanweisungen von GPS-Anwendungen werden während einer Kommunikation über die Sprechanlage im Hintergrund eingeblendet. Hinweis: 1. Audio Multitasking wird während einer Zwei-Wege- Kommunikation über die Sprechanlage mit einem Bluetooth-System aktiviert, das diese Funktion ebenfalls unterstützt.
- Page 52 12. FEHLERSUCHE 12.1 Reset bei Fehlfunktion Falls das Bluetooth-System nicht ordnungsgemäß funktioniert, können Sie das Gerät einfach zurücksetzen: 1. Suchen Sie das Reset-Stiftloch unter der mittleren Taste. 2. Führen Sie eine Büroklammer vorsichtig in das Loch ein und drücken Sie die Reset-Taste bei Fehlfunktion mit leichtem Druck.
- Page 53 FEHLERSUCHE Hinweis: 1. Bei der Lade-LED handelt es sich nicht um das Reset- Stiftloch. Drücken Sie nicht auf die LED. 2. Durch ein Reset bei Fehlfunktion wird das Bluetooth- System nicht auf seine Werkseinstellungen zurückgesetzt. 12.2 Zurücksetzen Wenn Sie das Bluetooth-System auf die Werkseinstellungen zurücksetzen möchten, verwenden Sie die Funktion Zurücksetzen im Konfigurationsmenü.
- Page 54 13. WARTUNG UND PFLEGE 13.1 Außenschale Reinigen Sie die Oberfläche mit einem weichen Tuch und etwas Wasser. Hinweis: Reinigen Sie den Helm nie mit Benzin, Diesel oder Verdünnungs- bzw. Lösungsmitteln. Diese Substanzen können schwere Schäden am Helm zur Folge haben, auch wenn keine Beschädigung sichtbar sein sollte.
- Page 55 SCHNELLÜBERSICHT Bedienung Tastenbefehl Mittlere Taste und Taste (+) 1 Sekunde lang gedrückt Einschalten halten Grundfunktion Mittlere Taste und Taste (+) Ausschalten drücken Taste (+) oder Taste (-) Lauter/leiser drücken Anruf annehmen Mittlere Taste drücken Mittlere Taste 2 Sekunden Anruf beenden lang gedrückt halten Mittlere Taste 3 Sekunden Sprachwahl Mobiltelefon lang gedrückt halten...
- Page 56 Bedienung Tastenbefehl Mittlere Taste 5 Sekunden lang gedrückt halten Kopplung der Sprechanlage Mittlere Taste an einem der beiden Bluetooth-Systeme drücken Sprechanlage Kommunikation über die Sprechanlage Mittlere Taste drücken beginnen/ beenden...
- Page 57 SPIDER RT1™, SPIDER ST1™, X1™, X1 Pro™, X1S™, Expand™, Expand Boom™, Bluetooth Mic & Intercom™, Tufftalk™, Tufftalk Lite™, Tufftalk M™ sind Marken der Sena Technologies, Inc. oder ihrer Tochtergesellschaften. Diese Marken dürfen nicht ohne die ausdrückliche Genehmigung von Sena verwendet werden.
- Page 58 1.1.0_DE_October2021...
- Page 59 OUTRUSH R BLUETOOTH HELMET ® USER’S GUIDE 1.1.0 ENGLISH...
- Page 60 RIDE CONNECTED Blast your favorite tunes, talk over the intercom with your buddies, hear directions from your GPS and more, all through your OUTRUSH R Bluetooth ® System Helmet. With built-in Bluetooth ® capabilities, HD Intercom, technology has never felt so minimal or freeing.
- Page 61 Visit sena.com to see how to update your product. 2. Users can follow Sena on Facebook, YouTube, Twitter and Instagram to receive the most up to date information on products, helpful tips and all other announcements regarding Sena products.
- Page 62 TABLE OF CONTENTS ABOUT THE OUTRUSH R BLUETOOTH HELMET General Information 1.2 Product Details 1.2.1 Bluetooth System Button 1.2.2 Detachable Inner Parts 1.3 Package Contents 1.4 Wearing the Helmet 1.4.1 Putting on the Helmet 1.4.2 Removing the Helmet 1.4.3 Removing the Shield Visor 1.4.4...
- Page 63 WITH OTHER BLUETOOTH DEVICES Mobile Phone Pairing 3.1.1 Initially Pairing the Bluetooth system 3.1.2 Pairing When the OUTRUSH R is Turned Off 3.1.3 Pairing When the OUTRUSH R is Turned On 3.2 Second Mobile Phone Pairing - Second Mobile Phone, GPS, and SR10 3.3 GPS Pairing...
- Page 64 BLUETOOTH INTERCOM Intercom Pairing 6.2 Two-way Intercom 6.3 Multi-Way Intercom 6.3.1 Starting a Three-Way Intercom Conference 6.3.2 Starting a Four-Way Intercom Conference 6.3.3 Ending Multi-Way Intercom THREE-WAY CONFERENCE PHONE CALL WITH INTERCOM PARTICIPANT 39 GROUP INTERCOM UNIVERSAL INTERCOM 10. FUNCTION PRIORITY AND FIRMWARE UPGRADES 10.1 Function Priority 10.2 Firmware Upgrades...
- Page 65 11.2.7 VOX Intercom (Default: Disable) 11.2.8 HD Voice (Default: Enable) 11.2.9 HD Intercom (Default: Enable) 11.2.10 VOX Sensitivity (Default: 3) 11.2.11 Voice Prompts (Default: Enable) 11.2.12 Sidetone (Default: Disable) 11.2.13 Advanced Noise Control™ (Default: Enable) 49 11.2.14 Audio Multitasking™ (Default: Disable) 11.2.15 Background Volume (Default: Level 5) 12.
-
Page 66: About The Outrush Rbluetooth Helmet
The contents of this helmet User’s Guide are subjected to change without notice. Its illustration may differ from the actual product. The copyrights for the User’s Guide belong to Sena Technologies, Inc. Reproduction or copying of the User’s Guide without permission is strictly prohibited. -
Page 67: Product Details
ABOUT THE OUTRUSH R BLUETOOTH HELMET 1.2 Product Details No. Name No. Name Shield Visor Microphone Sun Visor Sun Visor Lever Breath Guard Bluetooth System Button Chin Vent Shield Ratchet Chin Guard Rear Vent Chin Guard Lever Shell Speakers Top Vent... -
Page 68: Bluetooth System Button
ABOUT THE OUTRUSH R BLUETOOTH HELMET No. Name Strap Adjuster Chinstrap One-touch Bracket 1.2.1 Bluetooth System Button No. Name (+) Button Center Button Status LED (-) Button Charging LED DC Power Charging & Firmware Upgrade Port Fault Reset Button... -
Page 69: Detachable Inner Parts
ABOUT THE OUTRUSH R BLUETOOTH HELMET 1.2.2 Detachable Inner Parts Inner Pad Cheek Pad (R) Cheek Pad (L) 1.3 Package Contents Helmet Helmet Pouch USB Power & Boom Microphone Reflex Data Cable (USB-C) Sponges (2) Stickers (4)* *Included only in Europe package... -
Page 70: Wearing The Helmet
ABOUT THE OUTRUSH R BLUETOOTH HELMET 1.4 Wearing the Helmet 1.4.1 Putting on the Helmet 1. Unfasten the chinstrap by using the retention system. 2. Expand the helmet opening with your hand, and slide your head into the helmet. 3. Fasten the chinstrap as tight as possible without causing you pain. -
Page 71: Removing The Shield Visor
ABOUT THE OUTRUSH R BLUETOOTH HELMET 1.4.3 Removing the Shield Visor 1. Open the shield visor to the fully opened position. 2. Pull the shield visor outward while pushing the shield ratchet lever downward. 3. Repeat Step 2 on the opposite side. -
Page 72: Installing The Shield Visor
ABOUT THE OUTRUSH R BLUETOOTH HELMET 1.4.4 Installing the Shield Visor Hook A Hook C Hook D Hook B 1. Align hook A, hook B, hook C, and hook D to the shield ratchet as shown in the illustration above. -
Page 73: Opening The Chin Guard
ABOUT THE OUTRUSH R BLUETOOTH HELMET 1.4.5 Opening the Chin Guard Pull the chin guard lever outward and lift the chin guard upward to the fully opened position. Note: You can keep the chin guard up by pushing the chin guard lock lever upward on the left side of... -
Page 74: Removing The Breath Guard
ABOUT THE OUTRUSH R BLUETOOTH HELMET 1.4.6 Removing the Breath Guard Pull the breath guard away from the chin guard until it separates completely. 1.4.7 Installing the Breath Guard Insert the three tabs of the breath guard into the slots. -
Page 75: Removing The Cheek Pads
ABOUT THE OUTRUSH R BLUETOOTH HELMET 1.4.8 Removing the Cheek Pads 1. Unsnap the three fasteners of the cheek pad from the helmet. 2. Repeat the process on the opposite side. 1.4.9 Installing the Cheek Pads 1. Pass the chinstrap through the hole of the cheek pad and snap the three fasteners of the cheek pad into place. -
Page 76: Removing The Inner Pad
ABOUT THE OUTRUSH R BLUETOOTH HELMET 1.4.10 Removing the Inner Pad 1. Detach the inner pad plate from the inner pin next to the chin guard. 2. Pull the inner pad away from the back of the helmet. 3. Hold the front section of the inner pad and pull it... -
Page 77: Installing The Inner Pad
ABOUT THE OUTRUSH R BLUETOOTH HELMET 1.4.11 Installing the Inner Pad 1. Align and insert the three tabs of the inner pad into the slots of the front section. 2. Insert the rear plastic plate of the inner pad into the space between the shell and EPS. -
Page 78: Removing The Sun Visor
ABOUT THE OUTRUSH R BLUETOOTH HELMET 1.4.12 Removing the Sun Visor 1. Slide the sun visor lever in the direction shown in the illustration above to lower the sun visor. 2. Pull one side of the visor in the direction shown in the illustration above. -
Page 79: Pre-Ride Helmet Inspection
ABOUT THE OUTRUSH R BLUETOOTH HELMET 1.5 Pre-Ride Helmet Inspection 1.5.1 Checking the Exterior Check the helmet regularly for damage. Small, superficial scratches will not impair the helmet’s protective qualities. In the case of more serious damage (cracks, dents, flaking and cracking paint, etc.), the helmet should no longer be used. -
Page 80: Getting Started: Bluetooth System
2.1 Downloadable Sena Software 2.1.1 Sena Utility App By simply pairing your phone with your Bluetooth system, you can use the Sena Utility App for quicker, easier setup and management. • App Features - Music, Device settings, and User’s Guide. -
Page 81: Charging
2.3 Charging The Bluetooth system can be charged using many common methods via the supplied USB power & data cable: the OUTRUSH R is compatible with 5 V input USB-charged devices only. Depending upon the charging method, the Bluetooth system will be fully charged in about 2.5 hours. -
Page 82: Checking The Battery Level
GETTING STARTED: BLUETOOTH SYSTEM 2.4 Checking the Battery Level When the Bluetooth system is powering on, the red LED flashes rapidly indicating the battery level. 4 flashes = High, 70 ~ 100% 3 flashes = Medium, 30 ~ 70% 2 flashes = Low, 0 ~ 30% 2.5 Volume Adjustment You can raise or lower the volume by tapping the (+) Button or the (-) Button. -
Page 83: Pairing The Bluetooth System With Other Bluetooth Devices
MP3 player, GPS or Sena SR10 Two-Way Radio Adapter via Mobile Phone Pairing, Second Mobile Phone Pairing. The Bluetooth system can also be paired with another Sena headset or Bluetooth system. 3.1 Mobile Phone Pairing There are three ways to pair the phone. -
Page 84: Pairing When The Outrush R Is Turned Off
PAIRING THE BLUETOOTH SYSTEM WITH OTHER BLUETOOTH DEVICES 2. With your mobile phone in Bluetooth-pairing mode, select Sena OUTRUSH R in the list of devices detected. 3. If your mobile phone asks for a PIN, enter 0000. Note: • The phone pairing mode lasts for 3 minutes. -
Page 85: Second Mobile Phone Pairing - Second Mobile Phone, Gps, And Sr10
2. Tap the (+) Button until you hear a voice prompt, “GPS pairing”. 3. With your Bluetooth device on the GPS navigation screen, select Sena OUTRUSH R in the list of devices detected. 4. If your Bluetooth device asks for a PIN, enter 0000. -
Page 86: Advanced Selective Pairing: A2Dp Stereo Or Handsfree
2. Tap the (+) Button until you hear a voice prompt, “Media selective pairing”. 3. With your mobile phone in Bluetooth-pairing mode, select Sena OUTRUSH R in the list of devices detected. 4. If your mobile phone asks for a PIN, enter 0000. -
Page 87: Mobile Phone Usage
Press and hold the Center Button for 3 seconds in stand-by mode to activate the voice dialer of your mobile phone. 4.2 Speed Dialing 4.2.1 Assigning Speed Dial Presets Speed Dial Presets could be assigned in the settings menu, accessible through Sena Device Manager or Sena Utility App. -
Page 88: Using Speed Dial Presets
MOBILE PHONE USAGE 4.2.2 Using Speed Dial Presets 1. Press and hold the (+) Button for 3 seconds and you will hear a voice prompt, “Speed dial”. 2. Tap the (+) Button or the (-) Button to navigate between the menus. You will hear prompts for each menu item. -
Page 89: Stereo Music
5. STEREO MUSIC 5.1 Bluetooth Stereo Music • Play/Pause music Press and hold the Center Button for 1 second until you hear a double beep. • Track forward/back Press and hold the (+) Button or the (-) Button for 1 second until you hear a beep. - Page 90 STEREO MUSIC Note: 1. Both you and your intercom friend can remotely control music playback such as track forward and track back. 2. Music sharing will be paused when you are using your mobile phone or listening to GPS instructions. 3.
- Page 91 6. BLUETOOTH INTERCOM 6.1 Intercom Pairing Up to three other people can be paired with the Bluetooth system for Bluetooth intercom conversations. Intercom Intercom Intercom Friend B Friend C Friend D 1. Press and hold the Center Button of the Bluetooth system A and B for 5 seconds until red LEDs of the both units start to flash rapidly and until you hear a voice prompt, “Intercom pairing”.
- Page 92 BLUETOOTH INTERCOM Tap the Center Button. 3. Repeat steps 1 and 2 to pair with Intercom Friends C & D. 4. The intercom pairing queue is ‘Last-Come, First- Served’ . If a Bluetooth system has multiple paired Bluetooth systems for intercom conversations, the last paired Bluetooth system is set as first intercom friend .
- Page 93 BLUETOOTH INTERCOM 6.2 Two-way Intercom You can start an intercom conversation with one of any intercom friends by tapping the Center Button: single tap to intercom with the first intercom friend , double tap to intercom with the second intercom friend , and triple tap to intercom with the third intercom friend .
- Page 94 BLUETOOTH INTERCOM 6.3.1 Starting a Three-Way Intercom Conference You (A) can have a Three-Way Intercom Conference with two other Intercom Friends (B & C) by establishing two intercom connections simultaneously. 1. You (A) need to be paired with two other Intercom Friends (B &...
- Page 95 BLUETOOTH INTERCOM 3. You (A) can call the second Intercom Friend (C) by double tapping the Center Button, or the second Intercom Friend (C) may join the intercom by making an intercom call to you (A). Intercom Intercom Friend B Friend C 6.3.2 Starting a Four-Way Intercom Conference...
- Page 96 BLUETOOTH INTERCOM 6.3.3 Ending Multi-Way Intercom You can completely terminate the conference intercom or just disconnect an intercom connection with one of your active Intercom Friends. 1. Press and hold the Center Button for 3 seconds until you hear a beep to terminate all intercom connections.
- Page 97 THREE-WAY CONFERENCE PHONE CALL WITH INTERCOM PARTICIPANT You can have a Three-Way Conference Phone Call by adding an Intercom Friend to the mobile phone conversation. 1. During a mobile phone call, tap the Center Button once, twice, or three times to invite one of your intercom friends to the conversation.
- Page 98 8. GROUP INTERCOM Group Intercom allows you to instantly create a Multi- Way Conference Intercom with three of the most recently paired Bluetooth systems. 1. Go through intercom pairing with up to three Bluetooth systems you want to have Group Intercom with.
- Page 99 Sena Bluetooth system if they support the Bluetooth Hands-Free Profile (HFP). You can pair the Bluetooth system with only one non-Sena headset at a time. The intercom distance depends on the performance of the Bluetooth system to which it’s connected.
- Page 100 UNIVERSAL INTERCOM Example of a Three-Way Universal Intercom Non-Sena Sena Bluetooth Headset system Example of a Four-Way Universal Intercom Sena Bluetooth system Non-Sena Non-Sena Headset Headset Note: Some non-Sena Bluetooth headsets may not support Multi-Way Universal Intercom.
- Page 101 Intercom (lowest) Music sharing by Bluetooth stereo music 10.2 Firmware Upgrades The Bluetooth system supports firmware upgrades. You can update the firmware using the Sena Device Manager. Please visit Sena Bluetooth website at www.sena.com to check the latest software downloads.
- Page 102 11. CONFIGURATION SETTING 11.1 Bluetooth System Configuration Setting 1. To enter configuration menu, press and hold the Center Button for 15 seconds until you will also hear a voice prompt, “Configuration menu”. 2. Tap the (+) Button or the (-) Button to navigate between the menus.
- Page 103 The Bluetooth system will automatically connect with the Remote Control device in pairing mode. 11.2 Software Configuration Setting You can change the settings of the Bluetooth system through the Sena Device Manager or the Sena Utility App. 11.2.1 Speed Dial Assign phone numbers for speed dialing to make a phone call quickly.
- Page 104 CONFIGURATION SETTING 11.2.3 Audio Source Priority (Default: Intercom) Audio Source Priority allows you to select the priority between the intercom and music (which includes GPS app instructions and message notifications) from a smartphone. If the intercom is selected as the Audio Source Priority, your music will be interrupted during an intercom conversation.
-
Page 105: Vox Intercom (Default: Disable)
CONFIGURATION SETTING 11.2.6 VOX Phone (Default: Enable) If this feature is enabled, you can answer incoming calls by voice. When you hear a ringtone for an incoming call, you can answer the phone by saying a word such as “Hello” loudly or by blowing air into the microphone. VOX phone is temporarily disabled if you are connected to intercom. -
Page 106: Hd Voice (Default: Enable)
CONFIGURATION SETTING 11.2.8 HD Voice (Default: Enable) HD Voice allows you to communicate in high-definition during phone calls. This feature increases the quality so that the audio will be crisp and clear during phone call conversations. If this feature is enabled, incoming phone calls will interrupt intercom conversations and audio from the SR10 will not be heard during intercom conversations. -
Page 107: Vox Sensitivity (Default: 3)
CONFIGURATION SETTING 11.2.10 VOX Sensitivity (Default: 3) VOX sensitivity can be adjusted depending on your riding environment. Level 5 is the highest sensitivity setting and level 1 is the lowest. 11.2.11 Voice Prompts (Default: Enable) You can disable voice prompts by software configuration settings, but the following voice prompts are always on. -
Page 108: Audio Multitasking™ (Default: Disable)
The volume of the foreground audio can be adjusted using the Bluetooth system. How much background audio that is heard can be adjusted using the Sena Utility App. HD Intercom and Audio Source Priority become disabled temporarily when Audio Multitasking is enabled. -
Page 109: Background Volume (Default: Level 5)
CONFIGURATION SETTING A. GPS instructions can be heard during phone calls and the volume level of both audio sources can be adjusted using the Bluetooth system. B. GPS app directions will be heard in the background during intercom conversations. Note: 1. -
Page 110: Troubleshooting
12. TROUBLESHOOTING 12.1 Fault Reset When the Bluetooth system is not working properly, you can easily reset the unit: 1. Locate the Pin-hole Reset Button below the Center Button. 2. Gently insert a paperclip into the hole and tap the Fault Reset Button with light pressure. -
Page 111: Factory Reset
TROUBLESHOOTING Note: 1. The charging LED is not the Pin-hole Reset Button. Do not press it. 2. Fault Reset will not restore the Bluetooth system to factory default settings. 12.2 Factory Reset If you want to restore the Bluetooth system to factory default settings, use the Factory Reset in the configuration menu. -
Page 112: Maintenance And Care
13. MAINTENANCE AND CARE 13.1 Outer Shell Use a soft cloth and a small amount of water to remove bugs from the exterior. Note: Never use gasoline, diesel fuel, thinners or solvents to clean the helmet. These substances can cause serious damage to the helmet, even though the resulting damage may not be visible. -
Page 113: Quick Reference
QUICK REFERENCE Type Operation Button Command Press and hold the Center Power on Button and the (+) Button for 1 second Basic Tap the Center Button and Function Power off the (+) Button Tap the (+) Button or the Volume up/down (-) Button Tap the Center Button Answer phone call... - Page 114 Type Operation Button Command Press and hold the Center Button for 5 seconds Intercom pairing Tap the Center Button Intercom of any one of the two Bluetooth systems Start/End each Tap the Center Button intercom...
- Page 115 ® for Bluetooth capabilities. The Bluetooth word mark and logos are owned by the Bluetooth ® SIG, Inc. and any use of such marks by Sena is under license. iPhone and iPod touch are registered trademarks of Apple Inc. ®...
- Page 116 1.1.0_EN_October2021...
- Page 117 GUÍA DEL USUARIO 1.1.0 SPANISH...
- Page 118 GPS y mucho más, todo ello con el casco sistema Bluetooth ® OUTRUSH R. Con funciones Bluetooth ® integradas e intercomunicador HD, la tecnología nunca había sido tan mínima o liberadora.
- Page 119 Visite sena.com para obtener información sobre cómo actualizar el producto. 2. Los usuarios pueden seguir a Sena en Facebook, YouTube, Twitter e Instagram para recibir la información más reciente sobre los productos, consejos útiles y cualquier otra novedad relacionada con los productos Sena.
- Page 120 CONTINUACIÓN DEL ÍNDICE ACERCA DEL CASCO BLUETOOTH OUTRUSH R Información general Detalles del producto 1.2.1 Botón del sistema Bluetooth 1.2.2 Partes interiores desmontables Contenidos del envase Llevar el casco 1.4.1 Ponerse el casco 1.4.2 Quitarse el casco 1.4.3 Retirar la visera de protección 1.4.4...
- Page 121 BLUETOOTH CON OTROS DISPOSITIVOS BLUETOOTH Emparejar teléfono 3.1.1 Emparejamiento inicial del sistema Bluetooth 3.1.2 Emparejamiento con el OUTRUSH R apagado 3.1.3 Emparejamiento con el OUTRUSH R encendido Emparejamiento de segundo teléfono móvil - Segundo teléfono móvil, GPS y SR10 Emparejar GPS Emparejamiento selectivo avanzado: estéreo...
- Page 122 Intercomunicador multi-banda 6.3.1 Inicio de una conversación a tres vías a través del intercomunicador 6.3.2 Inicio de una conversación a cuatro vías a través del intercomunicador 6.3.3 Finalización de una conversación a través del intercomunicador multi-banda CONFERENCIA TELEFÓNICA ENTRE TRES PERSONAS CON PARTICIPANTE DE INTERCOMUNICADOR GROUP INTERCOM UNIVERSAL INTERCOM...
- Page 123 11.2.8 Voz HD (valor predeterminado: activado) 11.2.9 Intercomunicador HD (valor predeterminado: activado) 49 11.2.10 Sensibilidad VOX (valor predeterminado: 3) 11.2.11 Instrucciones de voz (valor predeterminado: activado) 49 11.2.12 Efecto local (valor predeterminado: desactivado) 11.2.13 Advanced Noise Control™ (valor predeterminado: activado) 11.2.14 Audio Multitasking™...
-
Page 124: Acerca Del Casco Bluetooth Outrush R
El contenido de la Guía del usuario de este casco puede cambiar sin previo aviso. Sus ilustraciones pueden diferir del producto real. El copyright de la Guía del usuario pertenece a Sena Technologies, Inc. Quedan totalmente prohibidas la reproducción y copia de la Guía del usuario sin permiso. -
Page 125: Detalles Del Producto
ACERCA DEL CASCO BLUETOOTH OUTRUSH R 1.2 Detalles del producto N.º Nombre N.º Nombre Visera de protección Barbiquejo Visera solar Micrófono Cubrenariz Palanca de la visera solar Ventilación de barbilla Botón del sistema Bluetooth Protector para barbilla Trinquete de protección Rejilla de ventilación trasera... -
Page 126: Botón Del Sistema Bluetooth
ACERCA DEL CASCO BLUETOOTH OUTRUSH R N.º Nombre Ajustador de la correa Barbiquejo Soporte de un solo toque 1.2.1 Botón del sistema Bluetooth N.º Nombre Botón (+) Botón central LED de estado Botón (-) LED de carga Puerto para cargador CC y actualización de firmware... -
Page 127: Partes Interiores Desmontables
ACERCA DEL CASCO BLUETOOTH OUTRUSH R 1.2.2 Partes interiores desmontables Acolchado interior Acolchado Acolchado interno interno (derecha) (izquierda) 1.3 Contenidos del envase Casco Bolsa para el casco Cable USB de Espuma de Etiquetas corriente y protección reflectantes (4)* datos (USB-C) para el micrófono... -
Page 128: Llevar El Casco
ACERCA DEL CASCO BLUETOOTH OUTRUSH R 1.4 Llevar el casco 1.4.1 Ponerse el casco 1. Afloje el barbiquejo con el sistema de retención. 2. Despliegue la abertura del casco con la mano y deslice la cabeza dentro del casco. 3. Apretar el barbiquejo al máximo puede provocarle dolor. -
Page 129: Retirar La Visera De Protección
ACERCA DEL CASCO BLUETOOTH OUTRUSH R 1.4.3 Retirar la visera de protección 1. Abra el visor de protección hasta la posición totalmente abierta. 2. Tire de la visera de protección hacia fuera mientras empuja la palanca del trinquete de protección hacia abajo. -
Page 130: Instalación De La Visera De Protección
ACERCA DEL CASCO BLUETOOTH OUTRUSH R 1.4.4 Instalación de la visera de protección Gancho A Gancho C Gancho D Gancho B 1. Alinee los ganchos A, B, C y D con el trinquete de protección como se muestra en la ilustración anterior. -
Page 131: Apertura Del Protector Para Barbilla
ACERCA DEL CASCO BLUETOOTH OUTRUSH R 1.4.5 Apertura del protector para barbilla Tire de la palanca del protector para barbilla hacia afuera y levante el protector para barbilla hacia arriba hasta la posición totalmente abierta. Nota: puede mantener el protector para barbilla... -
Page 132: Extracción Del Cubrenariz
ACERCA DEL CASCO BLUETOOTH OUTRUSH R 1.4.6 Extracción del cubrenariz Tire del cubrenariz para extraerlo del protector para barbilla hasta que se separe por completo. 1.4.7 Instalación del cubrenariz Introduzca las tres pestañas del cubrenariz en las ranuras. -
Page 133: Retirar Los Acolchados Internos
ACERCA DEL CASCO BLUETOOTH OUTRUSH R 1.4.8 Retirar los acolchados internos 1. Desencaje las tres fijaciones del acolchado interno del casco. 2. Repita el proceso en el lado contrario. 1.4.9 Instalar los acolchados internos 1. Pase el barbiquejo por el orificio del acolchado interno y encaje las tres fijaciones del acolchado interno en su sitio. -
Page 134: Retirar El Acolchado Interior
ACERCA DEL CASCO BLUETOOTH OUTRUSH R 1.4.10 Retirar el acolchado interior 1. Retire la placa del acolchado interior del pasador interior situado junto al protector para barbilla. 2. Tire del acolchado interior para extraerlo de la parte trasera del casco. -
Page 135: Instalar El Acolchado Interior
ACERCA DEL CASCO BLUETOOTH OUTRUSH R 1.4.11 Instalar el acolchado interior 1. Alinee e inserte las tres pestañas del acolchado interior en las ranuras de la sección delantera. 2. Inserte la placa de plástico trasera del acolchado interior en el espacio que hay entre la estructura y el EPS. -
Page 136: Retirar La Visera Solar
ACERCA DEL CASCO BLUETOOTH OUTRUSH R 1.4.12 Retirar la visera solar 1. Deslice la palanca de la visera solar en la dirección mostrada en la ilustración anterior para bajar la visera solar. 2. Tire de uno de los lados de la visera en la dirección mostrada en la ilustración anterior. -
Page 137: Inspección Del Casco Antes De La Conducción
ACERCA DEL CASCO BLUETOOTH OUTRUSH R 1.5 Inspección del casco antes de la conducción 1.5.1 Comprobar el exterior Compruebe el casco de forma habitual en busca de daños. Los arañazos pequeños y superficiales no afectarán al nivel de protección del casco. Si se producen daños más graves (grietas, abolladuras, pintura descascarillada o... -
Page 138: Introducción: Sistema Bluetooth
Características de la aplicación - Música, Configuración del dispositivo y Guía del usuario. • Descargar - Android: Google Play Store > Sena Utility - iOS: App Store > Sena Utility 2.1.2 Sena Device Manager Sena Device Manager permite actualizar el firmware y establecer la configuración directamente desde el PC. -
Page 139: Carga
El sistema Bluetooth se puede cargar mediante diversos métodos habituales con el cable USB de corriente y datos: el OUTRUSH R solo es compatible con dispositivos USB cargados mediante entrada de 5 V. Dependiendo del método de carga, el sistema Bluetooth se cargará... -
Page 140: Comprobación Del Nivel De Batería
INTRODUCCIÓN: SISTEMA BLUETOOTH 2.4 Comprobación del nivel de batería Cuando se enciende el sistema Bluetooth, el LED parpadea rápidamente en color rojo, indicando el nivel de batería. 4 parpadeos = alto, 70–100% 3 parpadeos = medio, 30–70% 2 parpadeos = bajo, 0–30% 2.5 Ajuste de volumen Puede subir o bajar el volumen pulsando el Botón (+) o el Botón (-). -
Page 141: Emparejamiento Del Sistema Bluetooth Con Otros Dispositivos Bluetooth
El sistema Bluetooth puede emparejarse con varios dispositivos Bluetooth, como un teléfono móvil, un reproductor de MP3, un GPS o un adaptador de radio bidireccional Sena SR10, a través de Emparejar teléfono y Emparejamiento de segundo teléfono móvil. El sistema Bluetooth también puede emparejarse con otro auricular Sena o sistema Bluetooth. -
Page 142: Emparejamiento Con El Outrush R Apagado
(+) durante 1 segundo. Oirá la instrucción de voz “Emparejar teléfono”. 2. Con el teléfono móvil en modo de emparejamiento Bluetooth, seleccione el Sena OUTRUSH R en la lista de dispositivos detectados. 3. Si el teléfono móvil solicita un pin, introduzca 0000. -
Page 143: Emparejamiento De Segundo Teléfono Móvil - Segundo Teléfono Móvil, Gps Y Sr10
2. Pulse el Botón (+) hasta que escuche la instrucción de voz “Emparejamiento de segundo teléfono móvil”. 3. Con el teléfono móvil en modo de emparejamiento Bluetooth, seleccione el Sena OUTRUSH R en la lista de dispositivos detectados. 4. Si el teléfono móvil solicita un pin, introduzca 0000. -
Page 144: Emparejamiento Selectivo Avanzado: Estéreo A2Dp O Manos Libres
2. Pulse el Botón (+) hasta que escuche la instrucción de voz “Emparejar medio”. 3. Con el teléfono móvil en modo de emparejamiento Bluetooth, seleccione el Sena OUTRUSH R en la lista de dispositivos detectados. 4. Si el teléfono móvil solicita un pin, introduzca 0000. -
Page 145: Uso Del Teléfono Móvil
4.2 Marcación Rápida 4.2.1 Asignar preconfiguraciones de marcación rápida Es posible asignar preconfiguraciones de marcación rápida en el menú de configuración, al que podrá acceder a través de Sena Device Manager o la aplicación Sena Utility. -
Page 146: Utilizar Preconfiguraciones De Marcación Rápida
USO DEL TELÉFONO MÓVIL 4.2.2 Utilizar preconfiguraciones de marcación rápida 1. Mantenga pulsado el Botón (+) durante 3 segundos hasta que escuche la instrucción de voz “Marcación rápida”. 2. Pulse el Botón (+) o el Botón (-) para navegar entre los menús. -
Page 147: Música En Estéreo
5. MÚSICA EN ESTÉREO 5.1 Música en estéreo Bluetooth • Reproducir/pausar música Mantenga pulsado el Botón central durante 1 segundo, hasta que escuche un doble pitido. • Avanzar/retroceder pista Mantenga pulsado el Botón (+) o el Botón (-) durante 1 segundo hasta que escuche un pitido. 5.2 Compartir música Puede compartir música en estéreo por Bluetooth con un amigo de intercomunicador durante una... - Page 148 MÚSICA EN ESTÉREO Nota: 1. Tanto usted como su amigo de intercomunicador podrán controlar la reproducción de música a distancia, por ejemplo, podrán ir a la pista anterior y a la siguiente. 2. Compartir música se detendrá cuando esté utilizando el teléfono móvil o escuchando instrucciones del GPS.
-
Page 149: Intercomunicador Bluetooth
6. INTERCOMUNICADOR BLUETOOTH 6.1 Emparejamiento de intercomunicador Hasta tres personas más se pueden emparejar con el sistema Bluetooth para conversaciones a través del intercomunicador Bluetooth. USTED Amigo de Amigo de Amigo de intercomunicador B intercomunicador C intercomunicador D 1. Mantenga pulsado el Botón central del sistema Bluetooth A y B durante 5 segundos hasta que el LED rojo de las dos unidades empiece a parpadear rápidamente y escuche la instrucción de voz... - Page 150 INTERCOMUNICADOR BLUETOOTH Pulse el Botón central. 3. Repita los pasos 1 y 2 para emparejarse con los amigos de intercomunicador C y D. 4. La cola de emparejamiento con el intercomunicador es “Último en llegar, primero en ser atendido” . Si el sistema Bluetooth está...
-
Page 151: Conversación A Través Del Intercomunicador A Dos Vías
INTERCOMUNICADOR BLUETOOTH 6.2 Conversación a través del intercomunicador a dos vías Puede iniciar una conversación a través del intercomunicador con uno de sus amigos que disponga de uno si pulsa el Botón central: si lo pulsa una vez, podrá hablar con el primer amigo de intercomunicador ;... -
Page 152: Inicio De Una Conversación A Tres Vías A Través Del Intercomunicador
INTERCOMUNICADOR BLUETOOTH 6.3.1 Inicio de una conversación a tres vías a través del intercomunicador Usted (A) puede mantener una conversación a tres vías a través del intercomunicador con otros dos amigos de intercomunicador (B y C) estableciendo dos conexiones a través del intercomunicador al mismo tiempo. 1. -
Page 153: Inicio De Una Conversación A Cuatro Vías A Través Del Intercomunicador
INTERCOMUNICADOR BLUETOOTH 3. Usted (A) puede llamar al segundo amigo de intercomunicador (C) pulsando dos veces el Botón central, o el segundo amigo de intercomunicador (C) puede unirse al intercomunicador realizándole una llamada de intercomunicador a usted (A). USTED Amigo de Amigo de intercomu- intercomu-... -
Page 154: Finalización De Una Conversación A Través Del Intercomunicador Multi-Banda
INTERCOMUNICADOR BLUETOOTH 6.3.3 Finalización de una conversación a través del intercomunicador multi-banda Puede finalizar el intercomunicador para conferencias por completo o solo desconectar la conexión del intercomunicador con uno de sus amigos de intercomunicador activos. 1. Mantenga pulsado el Botón central durante 3 segundos hasta que escuche un pitido para finalizar todas las conexiones establecidas a través del intercomunicador. -
Page 155: Conferencia Telefónica Entre Tres Personas Con Participante De Intercomunicador
7. CONFERENCIA TELEFÓNICA ENTRE TRES PERSONAS CON PARTICIPANTE DE INTERCOMUNICADOR Puede mantener una conversación telefónica a tres vías añadiendo un amigo de intercomunicador a la conversación mantenida a través del teléfono móvil. 1. Durante una llamada de teléfono móvil, pulse el Botón central una vez, dos veces o tres veces para invitar a uno de sus amigos de intercomunicador a la conversación. -
Page 156: Group Intercom
8. GROUP INTERCOM Group Intercom le permite crear al instante un Intercomunicador multi-banda para conferencias con los últimos tres sistemas Bluetooth emparejados. 1. Realice el emparejamiento de intercomunicador con hasta tres sistemas Bluetooth con los que desee mantener un Group Intercom. 2. -
Page 157: Universal Intercom
Bluetooth de otras marcas. Los auriculares Bluetooth de otras marcas pueden conectarse al sistema Bluetooth de Sena si son compatibles con el Perfil de manos libres (HFP) Bluetooth. Solo podrá emparejar el sistema Bluetooth con un auricular de otra marca cada vez. - Page 158 UNIVERSAL INTERCOM Ejemplo de Universal Intercom a tres vías USTED Auricular de Sistema otra marca Bluetooth Sena Ejemplo de Universal Intercom a cuatro vías USTED Sistema Bluetooth Sena Auricular de Auricular de otra marca otra marca Nota: algunos auriculares Bluetooth de otras marcas...
-
Page 159: Prioridad De Las Funciones Yactualizaciones De Firmware
Compartir música mediante la música en (menor) estéreo Bluetooth 10.2 Actualizaciones de firmware El sistema Bluetooth admite actualizaciones de firmware. Puede actualizar el firmware con Sena Device Manager. Visite el sitio web de Sena Bluetooth en www.sena.com para consultar las descargas de software más recientes. -
Page 160: Ajuste De La Configuración
11. AJUSTE DE LA CONFIGURACIÓN 11.1 Ajustes de configuración del sistema Bluetooth 1. Para acceder al menú de configuración, mantenga pulsado el Botón central durante 15 segundos hasta que también escuche la instrucción de voz, “Configuración”. 2. Pulse el Botón (+) o el Botón (-) para navegar entre los menús. -
Page 161: Borrar Todos Los Emparejamientos
11.2 Ajuste de configuración del software Puede cambiar la configuración del sistema Bluetooth a través de Sena Device Manager o la aplicación Sena Utility. 11.2.1 Marcación Rápida Asigne números de teléfono para utilizar la marcación rápida y realice llamadas de teléfono de una forma... -
Page 162: Prioridad De La Fuente De Audio (Valor Predeterminado: Intercomunicador)
AJUSTE DE LA CONFIGURACIÓN 11.2.3 Prioridad de la fuente de audio (valor predeterminado: intercomunicador) Prioridad de la fuente de audio le permite seleccionar la prioridad entre el intercomunicador y la música (lo que también incluye las instrucciones de la aplicación de GPS y las notificaciones de mensajes) de un teléfono inteligente. -
Page 163: Teléfono Vox (Valor Predeterminado: Activado)
AJUSTE DE LA CONFIGURACIÓN 11.2.6 Teléfono VOX (valor predeterminado: activado) Si esta función está activada, podrá responder a las llamadas entrantes mediante la voz. Cuando escuche un tono de una llamada entrante, podrá responder al teléfono diciendo una palabra como “Hola” en alto o soplando al micrófono. - Page 164 AJUSTE DE LA CONFIGURACIÓN 11.2.8 Voz HD (valor predeterminado: activado) Voz HD le permite comunicarse en alta definición durante las llamadas telefónicas. Esta función mejora la calidad del audio para que resulte nítido y claro durante las conversaciones telefónicas. Si esta función está...
- Page 165 AJUSTE DE LA CONFIGURACIÓN 11.2.9 Intercomunicador HD (valor predeterminado: activado) Intercomunicador HD mejora la calidad del audio del intercomunicador bidireccional de calidad normal a HD. Al entrar en una conversación a través del intercomunicador multi-banda, Intercomunicador HD se deshabilitará temporalmente. Si esta característica está...
- Page 166 Bluetooth. La cantidad de audio en segundo plano que se escucha se puede ajustar con la aplicación Sena Utility. Intercomunicador HD y Prioridad de la fuente de audio se deshabilitan temporalmente al habilitar Audio...
- Page 167 AJUSTE DE LA CONFIGURACIÓN Tabla de combinación de primer plano y segundo plano Primer plano* Segundo plano** Modelo Intercomu- Música o navegador Móvil GPS nicador inteligente OUTRUSH * Se pueden escuchar dos fuentes de audio en primer plano al mismo tiempo con el mismo nivel de volumen. ** Al escuchar una fuente de audio en primer plano, solo se puede escuchar una fuente en segundo plano.
- Page 168 AJUSTE DE LA CONFIGURACIÓN Nota: 1. Audio Multitasking permanecerá activado durante conversaciones a través del intercomunicador de dos vías con un sistema Bluetooth que también sea compatible con esta función. 2. Cuando Audio Multitasking se desactive, la fuente de audio en segundo plano volverá a su nivel de volumen independiente.
- Page 169 12. SOLUCIÓN DE PROBLEMAS 12.1 Restablecimiento tras un fallo Si el sistema Bluetooth no funciona correctamente, puede restablecer la unidad de una forma sencilla: 1. Localice el Botón de restablecimiento mediante introducción de clavija en orificio debajo del Botón central. 2.
- Page 170 SOLUCIÓN DE PROBLEMAS Nota: 1. El LED de carga no es un Botón de restablecimiento mediante introducción de clavija en orificio. No lo presione. 2. La función Restablecimiento tras un fallo no restablecerá los valores predeterminados de fábrica del sistema Bluetooth. 12.2 Restaurar Si desea restaurar los valores predeterminados de fábrica del sistema Bluetooth, utilice Restaurar en el...
- Page 171 13. MANTENIMIENTO Y CUIDADO 13.1 Cubierta exterior Utilice un paño suave y una pequeña cantidad de agua para eliminar los bichos del exterior. Nota: no utilice gasolina, gasóleo, diluyentes ni disolventes para limpiar el casco. Estas sustancias pueden dañar gravemente el casco, aunque no se vea el daño resultante.
- Page 172 REFERENCIA RÁPIDA Tipo Funcionamiento Comando de botón Mantenga pulsados el Botón central y el Botón (+) Encendido durante 1 segundo Función Pulse el Botón central y el básica Apagado Botón (+) Subir o bajar Pulse el Botón (+) o el volumen Botón (-) Responder a...
- Page 173 Tipo Funcionamiento Comando de botón Mantenga pulsado el Botón central durante 5 segundos Emparejamiento de intercomunicador Pulse el Botón central de Intercomu- uno de los dos sistemas nicador Bluetooth Inicio/Finalización de cada Pulse el Botón central intercomunicador...
- Page 174 Sena Technologies, Inc. se reserva el derecho a realizar cualquier cambio y mejora en su producto sin previo aviso. Sena™ es una marca comercial de Sena Technologies, Inc. o sus filiales en EE. UU. y en otros países. SF1™, SF2™, SF4™, SFR™, SRL™, Momentum™, Momentum INC™, Momentum Lite™, Momentum...
- Page 175 1.1.0_ES_October2021...
- Page 176 BLUETOOTH HELMET ® GUIDE DE L’UTILISATEUR 1.1.0 CANADIAN FRENCH...
- Page 177 CONDUISEZ CONNECTÉ Écoutez vos chansons préférées, parlez sur l’intercom avec vos amis, écoutez les directives de votre GPS et plus avec votre casque OUTRUSH R Bluetooth ® Avec les capacités Bluetooth intégrées et l’intercom ® HD, la technologie n’a jamais été aussi minimale et libératrice.
- Page 178 1. Faites gratuitement la mise à jour du micrologiciel à la version la plus récente pour profiter pleinement des nouvelles fonctions avancées intégrées à ce produit. Visitez le site sena.com pour effectuer la mise à jour du produit. 2. Les utilisateurs de Sena peuvent nous suivre sur Facebook, YouTube, Twitter et Instagram pour obtenir de l’information de dernière heure...
- Page 179 TABLE DES MATIÈRES À PROPOS DU CASQUE OUTRUSH R BLUETOOTH HELMET Information générale Détails du produit 1.2.1 Bouton du système Bluetooth 1.2.2 Pièces internes amovibles Contenu de l’emballage Port du casque 1.4.1 Mettre le casque 1.4.2 Retirer le casque 1.4.3 Retirer la visière protectrice...
- Page 180 AVEC D’AUTRES APPAREILS BLUETOOTH Couplage du téléphone 3.1.1 Couplage initial du système Bluetooth 3.1.2 Couplage quand le OUTRUSH R est éteint 3.1.3 Couplage quand le OUTRUSH R est allumé Couplage d’un second téléphone mobile – deuxième téléphone cellulaire, GPS ou SR10 Couplage GPS Couplage sélectif avancé : A2DP stéréo ou Mains...
- Page 181 Intercom à voies multiples 6.3.1 Démarrer une conférence à trois voies par intercom 6.3.2 Démarrer une conférence à quatre voies par intercom 6.3.3 Désactivation de l’intercom à voies multiples CONFÉRENCE TÉLÉPHONIQUE À TROIS VOIES AVEC UN PARTICIPANT PAR INTERCOM INTERCOM DE GROUPE INTERCOM UNIVERSEL 10.
- Page 182 11.2.7 VOX intercom (valeur par défaut : désactivé) 11.2.8 Voix HD (valeur par défaut : activé) 11.2.9 Intercom HD (valeur par défaut : activé) 11.2.10 Sensibilité VOX (valeur par défaut : 3) 11.2.11 Instructions vocales (valeur par défaut : activé) 11.2.12 Effet local (valeur par défaut : désactivé) 11.2.13 Advanced Noise Control™...
-
Page 183: À Propos Du Casque Outrush Rbluetooth Helmet
à modification sans préavis. Les illustrations peuvent différer de l’apparence réelle du produit. Les droits d’auteur pour le Guide de l’utilisateur sont détenus par Sena Technologies, Inc. La reproduction et la copie du Guide de l’utilisateur sans autorisation sont strictement interdites. -
Page 184: Détails Du Produit
À PROPOS DU CASQUE OUTRUSH R BLUETOOTH HELMET 1.2 Détails du produit Numéro Nom Numéro Nom Visière protectrice Microphone Visière pare-soleil Levier de la visière pare-soleil Pare-buée Bouton du système Bluetooth Ventilation de la Levier à cliquet de la mentonnière visière... -
Page 185: Bouton Du Système Bluetooth
À PROPOS DU CASQUE OUTRUSH R BLUETOOTH HELMET Numéro Nom Boucle de réglage de la sangle Sangle jugulaire Fixation à une main 1.2.1 Bouton du système Bluetooth Numéro Nom Bouton (+) Bouton central Témoin d’état Bouton (-) Témoin de charge Port de charge CC et de mise à... -
Page 186: Pièces Internes Amovibles
À PROPOS DU CASQUE OUTRUSH R BLUETOOTH HELMET 1.2.2 Pièces internes amovibles Coussinet interne Coussinet de Coussinet de joue (D) joue (G) 1.3 Contenu de l’emballage Casque Sac pour casque Câble USB Microphone sur tige Autocollants d’alimentation Embouts de mousse réfléchissants... -
Page 187: Port Du Casque
À PROPOS DU CASQUE OUTRUSH R BLUETOOTH HELMET 1.4 Port du casque 1.4.1 Mettre le casque 1. Détachez la sangle jugulaire au moyen du système de rétention. 2. Agrandissez l’ouverture du casque avec la main, puis glissez la tête dans le casque. -
Page 188: Retirer La Visière Protectrice
À PROPOS DU CASQUE OUTRUSH R BLUETOOTH HELMET 1.4.3 Retirer la visière protectrice 1. Ouvrez la visière protectrice à la position d’ouverture complète. 2. Tirez la visière protectrice vers l’extérieur en appuyant vers le bas sur le levier à cliquet de la visière. -
Page 189: Installer La Visière Protectrice
À PROPOS DU CASQUE OUTRUSH R BLUETOOTH HELMET 1.4.4 Installer la visière protectrice Crochet A Crochet C Crochet D Crochet B 1. Alignez les crochets A, B, C et D avec le levier de la visière comme indiqué dans l’illustration ci-dessus. -
Page 190: Ouvrir La Mentonnière
À PROPOS DU CASQUE OUTRUSH R BLUETOOTH HELMET 1.4.5 Ouvrir la mentonnière Tirez le levier de la mentonnière vers l’extérieur et soulevez la mentonnière vers le haut jusqu’à l’ouverture complète. Remarque : Pour que la mentonnière demeure soulevée, poussez vers le haut sur le levier de verrouillage de la... -
Page 191: Retirer Le Pare-Buée
À PROPOS DU CASQUE OUTRUSH R BLUETOOTH HELMET 1.4.6 Retirer le pare-buée Tirez le pare-buée en l’éloignant de la mentonnière jusqu’à ce qu’ils se séparent. 1.4.7 Installer le pare-buée Insérez les trois onglets du pare-buée dans les fentes. -
Page 192: Retirer Les Coussinets De Joue
À PROPOS DU CASQUE OUTRUSH R BLUETOOTH HELMET 1.4.8 Retirer les coussinets de joue 1. Détachez les trois fixations du coussinet de joue. 2. Répétez du côté opposé. 1.4.9 Installer les coussinets de joue 1. Faites passer la sangle de jugulaire par l’orifice du coussinet de joue, puis enclenchez les trois fixations du coussinet de joue. -
Page 193: Retirer Le Coussinet Interne
À PROPOS DU CASQUE OUTRUSH R BLUETOOTH HELMET 1.4.10 Retirer le coussinet interne 1. Détachez la plaque du coussinet interne de la tige interne près de la mentonnière. 2. Tirez sur le coussinet interne pour le séparer de l’arrière du casque. -
Page 194: Installer Le Coussinet Interne
À PROPOS DU CASQUE OUTRUSH R BLUETOOTH HELMET 1.4.11 Installer le coussinet interne 1. Alignez et insérez les trois onglets du coussinet interne dans les fentes de la partie avant. 2. Insérez la plaque de plastique arrière du coussinet interne dans l’espace entre la coquille et le polystyrène expansé. -
Page 195: Retirer La Visière Pare-Soleil
À PROPOS DU CASQUE OUTRUSH R BLUETOOTH HELMET 1.4.12 Retirer la visière pare-soleil 1. Faites glisser le levier de la visière pare-soleil dans le sens indiqué dans l’illustration ci-dessus pour abaisser la visière pare-soleil. 2. Tirez sur un côté de la visière dans le sens indiqué dans l’illustration ci-dessus. -
Page 196: Inspection Du Casque Avant La Conduite
À PROPOS DU CASQUE OUTRUSH R BLUETOOTH HELMET 1.5 Inspection du casque avant la conduite 1.5.1 Inspection de l’extérieur du casque Inspectez le casque régulièrement pour repérer tout dommage. Les petites égratignures superficielles n’affectent pas la fonction de protection du casque. Dans le cas de dommages plus prononcés (fissure, renfoncement, écaillage,... -
Page 197: Démarrage : Système Bluetooth
Sena Device Manager L’assistant Sena Device Manager vous permet de mettre à jour le micrologiciel et de configurer les paramètres directement à partir de votre ordinateur. Téléchargez l’assistant Sena Device Manager à partir du site sena.com. 2.2 Marche et arrêt • Marche Appuyez sans relâcher sur le bouton central et le bouton... -
Page 198: Charge
Bluetooth s’éteint automatiquement pendant la charge. • N’importe quel chargeur USB de tierce partie peut être utilisé avec les produits Sena si le chargeur est approuvé par une agence acceptée par Sena telle que FCC, CE, IC ou autre agence locale. - Page 199 DÉMARRAGE : SYSTÈME BLUETOOTH 2.4 Vérification du niveau de charge de la batterie Pendant que le système Bluetooth s’allume, le témoin rouge clignote rapidement pour indiquer le niveau de charge de la batterie. 4 clignotements : Charge élevée, 70 à 100 % 3 clignotements : Charge moyenne, 30 à 70 % 2 clignotements : Charge faible, 0 à...
- Page 200 GPS ou l’adaptateur de radio bidirectionnelle Sena SR10 avec les fonctions Couplage téléphone, Couplage d’un second téléphone mobile. Le système Bluetooth peut aussi être couplé avec un autre casque Sena ou un autre système Bluetooth. 3.1 Couplage du téléphone Il y a trois façons de coupler le téléphone.
- Page 201 COUPLAGE DU SYSTÈME BLUETOOTH AVEC D’AUTRES APPAREILS BLUETOOTH 2. Pendant que votre téléphone est en mode de couplage Bluetooth, sélectionnez Sena OUTRUSH R dans la liste des appareils détectés. 3. Si votre téléphone vous demande un NIP, indiquez 0000. Remarque : •...
- Page 202 « couplage d'un second téléphone mobile ». 3. Pendant que votre téléphone est en mode de couplage Bluetooth, sélectionnez Sena OUTRUSH R dans la liste des appareils détectés. 4. Si votre téléphone vous demande un NIP, indiquez 0000. 3.3 Couplage GPS 1.
- Page 203 2. Touchez le bouton (+) jusqu’à ce vous entendiez l’instruction vocale « Couplage média ». 3. Pendant que votre téléphone est en mode de couplage Bluetooth, sélectionnez Sena OUTRUSH R dans la liste des appareils détectés. 4. Si votre téléphone vous demande un NIP, indiquez 0000.
- Page 204 4.2 Appel rapide 4.2.1 Attribuer des présélections à la fonction Appel rapide Les présélections de la fonction Appel rapide peuvent être attribués à partir du menu des paramètres, qui est accessible par l’assistant Sena Device Manager ou par l’application Sena Utility.
- Page 205 UTILISATION DU TÉLÉPHONE CELLULAIRE 4.2.2 Utilisation des présélections de la fonction Appel rapide 1. Maintenez enfoncé le bouton (+) pendant 3 secondes jusqu’à ce vous entendiez l’instruction vocale « appel rapide ». 2. Touchez le bouton (+) ou le bouton (-) pour naviguer dans les menus.
- Page 206 MUSIQUE STÉRÉO 5.1 Musique stéréo Bluetooth • Lecture/pause de la musique Appuyez sans relâcher sur le bouton central pendant 1 seconde jusqu’à ce vous entendiez un double bip. • Piste suivante/précédente Appuyez sans relâcher sur le bouton (+) ou le bouton (-) pendant 1 seconde jusqu’à...
- Page 207 MUSIQUE STÉRÉO Remarque : 1. Vous et l’autre participant intercom pouvez télécommander la lecture de musique, par exemple pour passer à la piste suivante ou revenir à la piste précédente. 2. La fonction Partage de musique est mise en pause quand vous utilisez votre téléphone cellulaire et pendant les instructions vocales GPS.
- Page 208 INTERCOM BLUETOOTH 6.1 Couplage intercom Le système Bluetooth peut être couplé avec jusqu’à trois autres dispositifs pour les conversations par intercom Bluetooth. VOUS Participant Participant Participant intercom B intercom C intercom D 1. Appuyez sans relâcher sur le bouton central du système Bluetooth A et B pendant 5 secondes jusqu’à ce que les témoins rouges des deux appareils clignotent rapidement et que vous entendiez l’instruction vocale « couplage intercom ».
- Page 209 INTERCOM BLUETOOTH Touchez le bouton central. 3. Répétez les étapes 1 et 2 pour coupler le système avec les participants intercom C et D. 4. La file d’attente de couplage intercom suit un ordre « Dernier arrivé, premier servi » . Si le système Bluetooth est couplé...
-
Page 210: Intercom À Voies Multiples
INTERCOM BLUETOOTH 6.2 Intercom à deux voies Vous pouvez démarrer une conversation intercom avec n’importe lequel des participants intercom en touchant le bouton central : un toucher pour communiquer par intercom avec le premier participant intercom , double toucher pour le deuxième participant intercom , et triple toucher pour le troisième participant intercom . -
Page 211: Démarrer Une Conférence À Trois Voies Par Intercom
INTERCOM BLUETOOTH 6.3.1 Démarrer une conférence à trois voies par intercom Vous (A) pouvez organiser une conférence à trois voies par intercom avec deux autres participants intercom (B et C) en établissant deux connexions intercom simultanément. 1. Vous (A) devez avoir couplé votre système avec ceux des deux autres participants intercom (B et C) pour démarrer une conférence à... -
Page 212: Démarrer Une Conférence À Quatre Voies Par Intercom
INTERCOM BLUETOOTH 3. Vous (A) pouvez appeler le deuxième participant intercom (C) en touchant deux fois le bouton central ou le deuxième participant intercom (C) peut se joindre à la communication intercom en vous appelant (A). VOUS Participant Participant intercom B intercom C 6.3.2 Démarrer une conférence à... -
Page 213: Désactivation De L'intercom À Voies Multiples
INTERCOM BLUETOOTH 6.3.3 Désactivation de l’intercom à voies multiples Vous pouvez mettre fin à la conférence complètement ou désactiver une connexion intercom avec un des participants intercom. 1. Pour désactiver toutes les connexions intercom, appuyez sans relâcher sur le bouton central pendant 3 secondes jusqu’à... -
Page 214: Conférence Téléphoniqueà Trois Voies Avec Un Participant Par Intercom
CONFÉRENCE TÉLÉPHONIQUE À TROIS VOIES AVEC UN PARTICIPANT PAR INTERCOM Vous pouvez organiser une conférence téléphonique à trois voies en ajoutant un participant intercom à une conversation par téléphone cellulaire. 1. Pendant un appel avec un téléphone cellulaire, touchez le bouton central une fois, deux fois ou trois fois pour inviter un des participants intercom à... -
Page 215: Intercom De Groupe
INTERCOM DE GROUPE La fonction Intercom de groupe vous permet de créer instantanément une conférence à voies multiples par intercom avec les trois derniers systèmes Bluetooth couplés avec le vôtre. 1. Effectuez le couplage intercom avec jusqu’à trois systèmes Bluetooth que vous voulez inclure dans la fonction Intercom de groupe. -
Page 216: Intercom Universel
Bluetooth (HFP). Vous pouvez coupler le système Bluetooth avec un seul casque d’écoute de marque autre que Sena. La portée de l’intercom dépend du rendement du système Bluetooth auquel il est connecté. Quand un casque d’écoute de marque autre que Sena est couplé... - Page 217 Exemple de conférence universelle à quatre voies par intercom VOUS Système Bluetooth Sena Casque de Casque de marque marque autre que Sena autre que Sena Remarque : Certains casques Bluetooth de marque autre que Sena pourraient ne pas être compatibles avec la fonction Intercom universel à voies multiples.
-
Page 218: Priorité De Fonction Et Mises Àniveau Du Micrologiciel
Le système Bluetooth prend en charge les mises à niveau du micrologiciel. Vous pouvez mettre à niveau le micrologiciel à partir de l’assistant Sena Device Manager. Veuillez accéder au site Web de Sena Bluetooth au www.sena.com pour accéder aux téléchargements logiciels les plus récents. -
Page 219: Configuration Des Paramètres
11. CONFIGURATION DES PARAMÈTRES 11.1 Configuration des paramètres du système Bluetooth 1. Pour ouvrir le menu de configuration, appuyez sans relâcher sur le bouton central pendant 15 secondes jusqu’à ce vous entendiez l’instruction vocale « configuration ». 2. Touchez le bouton (+) ou le bouton (-) pour naviguer dans les menus. -
Page 220: Annulation Couplages
11.2 Configuration des paramètres du logiciel Vous pouvez modifier les paramètres du système Bluetooth à partir de l’assistant Sena Device Manager ou de l’application Sena Utility. 11.2.1 Appel rapide Attribuez des numéros de téléphone de composition rapide pour faire des appels rapidement. -
Page 221: Source Audio Prioritaire (Valeur Par Défaut : Intercom)
CONFIGURATION DES PARAMÈTRES 11.2.3 Source audio prioritaire (valeur par défaut : Intercom) La fonction Source audio prioritaire vous permet de sélectionner la fonction qui a priorité : Intercom ou Musique (ce qui inclut les instructions de l’application GPS et les notifications de messages) à partir d’un téléphone intelligent. Si vous sélectionnez l’intercom en tant que Source audio prioritaire, la musique sera interrompue pendant une conversation par intercom. -
Page 222: Vox Téléphone (Valeur Par Défaut : Activé)
CONFIGURATION DES PARAMÈTRES 11.2.6 VOX téléphone (valeur par défaut : activé) Quand cette fonction est activée, vous pouvez répondre aux appels entrants avec une commande vocale. Quand vous entendez la sonnerie d’un appel entrant, vous pouvez répondre au téléphone en disant un mot à voix forte, par exemple « Allô », ou en soufflant de l’air dans le micro. - Page 223 CONFIGURATION DES PARAMÈTRES 11.2.8 Voix HD (valeur par défaut : activé) La fonction Voix HD vous permet de communiquer avec un son de haute définition pendant les appels téléphoniques. Cette fonction augmente la qualité audio pour offrir un son téléphonique clair et net pendant les appels. Quand cette fonction est activée, les appels entrants interrompent les conversations par intercom et l’audio du SR10 n’est pas entendue pendant les conversations par intercom.
- Page 224 CONFIGURATION DES PARAMÈTRES 11.2.9 Intercom HD (valeur par défaut : activé) La fonction Intercom HD améliore l’audio de l’intercom à deux voies d’une qualité normale à une qualité de haute définition. La fonction Intercom HD est désactivée temporairement quand vous démarrez une conversation à...
- Page 225 être réglé au moyen du système Bluetooth. La proportion de l’audio en arrière-plan qui peut être entendue peut être réglée au moyen de l’application Sena Utility. Les fonctions Intercom HD et Source audio prioritaire sont désactivées temporairement quand la fonction Audio Multitasking est activée.
- Page 226 CONFIGURATION DES PARAMÈTRES Tableau de combinaisons premier plan et arrière-plan Premier plan* Arrière-plan** Musique ou Modèle Téléphone Intercom Navigation du téléphone intelligent OUTRUSH * Deux sources audio au premier plan peuvent être entendues simultanément au même niveau de volume. ** Une seule source en arrière-plan peut être entendue à la fois lors de l’écoute d’une source audio au premier plan.
- Page 227 CONFIGURATION DES PARAMÈTRES Remarque : 1. La fonction Audio Multitasking est activée pendant les conversations à deux voies par intercom avec un système Bluetooth qui est aussi compatible avec cette fonction. 2. Quand la fonction Audio Multitasking est désactivée, la source audio en arrière-plan revient à son niveau de volume normal.
- Page 228 12. DÉPANNAGE 12.1 Réinitialisation en cas d’erreur Quand le système Bluetooth ne fonctionne pas correctement, vous pouvez facilement le réinitialiser. 1. Repérez l’orifice de réinitialisation sous le bouton central. 2. Insérez délicatement le bout d’un trombone à papier dans l’orifice et appuyez légèrement sur le bouton de réinitialisation en cas d’erreur.
- Page 229 DÉPANNAGE Remarque : 1. Ne pas confondre le témoin de charge et l’orifice de réinitialisation. N’appuyez pas dessus. 2. La réinitialisation en cas d’erreur ne restaure pas le système Bluetooth à ses valeurs d’usine par défaut. 12.2 Réinitialisation aux valeurs d’usine Pour restaurer le système Bluetooth à...
- Page 230 13. ENTRETIEN 13.1 Coquille extérieure Utilisez un linge doux et un peu d’eau pour nettoyer les traces d’insectes de la surface extérieure. Remarque : Ne jamais utiliser de l’essence à moteur, du carburant diesel, un solvant ou du diluant à peinture pour nettoyer le casque.
- Page 231 RÉFÉRENCE RAPIDE Type Action Commande par bouton Appuyez sans relâcher sur le Marche bouton central et le bouton (+) pendant 1 seconde. Fonction Touchez le bouton central et le de base Arrêt bouton (+). Augmentation ou Touchez le bouton (+) ou le réduction du volume bouton (-).
- Page 232 Type Action Commande par bouton Appuyez sans relâcher sur le Lecture/pause de la bouton central pendant musique 1 seconde. Musique Appuyez sans relâcher sur le Piste suivante/ bouton (+) ou le bouton (-) précédente pendant 1 seconde. Appuyez sans relâcher sur le bouton central pendant 5 secondes.
- Page 233 Hero3 et Hero4 afin de les doter de capacités Bluetooth. ® La marque, le mot et les logos Bluetooth sont la propriété de ® Bluetooth SIG, Inc. et toute utilisation de ces marques par Sena est effectuée sous licence. iPhone et iPod touch sont des marques ®...
- Page 234 1.1.0_FR(CA)_October2021...
- Page 235 GUIDA DELL'UTENTE 1.1.0 ITALIAN...
- Page 236 GUIDARE CONNESSI Il casco con sistema Bluetooth OUTRUSH R ® consente di ascoltare a tutto volume i propri brani preferiti, parlare tramite intercom con gli amici, ascoltare le indicazioni del GPS ed altro ancora. Grazie alle funzionalità Bluetooth integrate e ad ®...
- Page 237 Consultare sena.com per scoprire come aggiornare il prodotto. 2. Gli utenti possono seguire Sena su Facebook, YouTube, Twitter e Instagram per ricevere le ultime informazioni sui prodotti, suggerimenti utili e tutti gli annunci relativi ai prodotti Sena. SENA Technologies, Inc. Assistenza clienti: sena.com...
- Page 238 SOMMARIO INFO SUL CASCO BLUETOOTH OUTRUSH R Informazioni generali Dettagli del prodotto 1.2.1 Pulsante del sistema Bluetooth 1.2.2 Parti interne sganciabili Contenuto della confezione Indossare il casco 1.4.1 Indossare il casco 1.4.2 Rimozione del casco 1.4.3 Rimozione della visiera parabrezza 1.4.4...
- Page 239 BLUETOOTH CON ALTRI DISPOSITIVI BLUETOOTH Accoppiamento con i cellulari 3.1.1 Accoppiamento iniziale del sistema Bluetooth 3.1.2 Accoppiamento con OUTRUSH R spento 3.1.3 Accoppiamento con OUTRUSH R acceso 3.2 Accoppiamento con il secondo cellulare - Secondo cellulare, GPS e SR10 Accoppiamento GPS...
- Page 240 6.3 Intercom a più voci 6.3.1 Avvio di una conferenza intercom a tre voci 6.3.2 Avvio di una conferenza intercom a quattro voci 37 6.3.3 Terminare Intercom a più voci CONFERENZA TELEFONICA CON PARTECIPANTE INTERCOM A TRE VOCI 39 GROUP INTERCOM UNIVERSAL INTERCOM 10.
- Page 241 11.2.10 Sensibilità VOX (impostazione predefinita: 3) 11.2.11 Messaggi vocali (impostazione predefinita: abilitata) 11.2.12 Sidetone (impostazione predefinita: disabilitata) 51 11.2.13 Advanced Noise Control™ (impostazione predefinita: abilitata) 11.2.14 Audio Multitasking™ (impostazione predefinita: disabilitata) 11.2.15 Volume sottofondo (impostazione predefinita: livello 5) 12. RISOLUZIONE DEI PROBLEMI 12.1 Reset dopo errore 12.2 Reset 13.
-
Page 242: Info Sul Casco Bluetooth Outrush R
Il contenuto di questa Guida dell'utente del casco è soggetto a modifiche senza preavviso. Le immagini in essa contenute potrebbero differire dal prodotto reale. I copyright della Guida dell'utente appartengono a Sena Technologies, Inc. È vietata la copia o la riproduzione della Guida dell'utente senza previo consenso. -
Page 243: Dettagli Del Prodotto
INFO SUL CASCO BLUETOOTH OUTRUSH R 1.2 Dettagli del prodotto N. Nome N. Nome Visiera parabrezza Microfono Visiera parasole Leva della visiera parasole Paranaso Pulsante del sistema Bluetooth Presa d'aria mentoniera Fermo della visiera Mentoniera Apertura di ventilazione posteriore Leva mentoniera... -
Page 244: Pulsante Del Sistema Bluetooth
INFO SUL CASCO BLUETOOTH OUTRUSH R N. Nome Meccanismo di regolazione del cinturino Sottogola Fibbia a chiusura automatica 1.2.1 Pulsante del sistema Bluetooth N. Nome Pulsante (+) Pulsante centrale LED di stato Pulsante (-) LED ricarica Porta di ricarica CC e aggiornamento del firmware... -
Page 245: Parti Interne Sganciabili
INFO SUL CASCO BLUETOOTH OUTRUSH R 1.2.2 Parti interne sganciabili Imbottitura interna Guanciale (D) Guanciale (S) 1.3 Contenuto della confezione Casco Sacca portacasco Cavo USB Coprimicrofono Etichette alimentazione e con asticella in adesive trasferimento dati spugna (2) catarifrangenti (4)* (USB-C) -
Page 246: Indossare Il Casco
INFO SUL CASCO BLUETOOTH OUTRUSH R 1.4 Indossare il casco 1.4.1 Indossare il casco 1. Slacciare il sottogola agendo sul sistema di ritenzione. 2. Allargare l'apertura del casco con la mano e infilare la testa nel casco. 3. Stringere il più possibile il sottogola senza che questo causi fastidio. -
Page 247: Rimozione Della Visiera Parabrezza
INFO SUL CASCO BLUETOOTH OUTRUSH R 1.4.3 Rimozione della visiera parabrezza 1. Alzare la visiera parabrezza nella posizione di massima apertura. 2. Tirare la visiera parabrezza verso l'esterno spingendo in basso la leva del fermo visiera. 3. Ripetere il passaggio 2 sul lato opposto. -
Page 248: Installazione Della Visiera Parabrezza
INFO SUL CASCO BLUETOOTH OUTRUSH R 1.4.4 Installazione della visiera parabrezza Gancio A Gancio C Gancio D Gancio B 1. Allineare il gancio A, il gancio B, il gancio C e il gancio D al fermo della visiera, come illustrato nell'immagine sopra. -
Page 249: Apertura Della Mentoniera
INFO SUL CASCO BLUETOOTH OUTRUSH R 1.4.5 Apertura della mentoniera Tirare la leva della mentoniera verso l'esterno e sollevare in alto la mentoniera nella posizione di massima apertura. Nota: è possibile tenere sollevata la mentoniera spingendo in alto la leva di blocco della mentoniera... -
Page 250: Rimozione Del Paranaso
INFO SUL CASCO BLUETOOTH OUTRUSH R 1.4.6 Rimozione del paranaso Estrarre il paranaso dalla mentoniera fino a separarlo completamente. 1.4.7 Installazione del paranaso Inserire le tre linguette del paranaso negli alloggiamenti. -
Page 251: Rimozione Dei Guanciali
INFO SUL CASCO BLUETOOTH OUTRUSH R 1.4.8 Rimozione dei guanciali 1. Sganciare dal casco i tre bottoni a pressione del guanciale. 2. Ripetere la procedura sul lato opposto. 1.4.9 Installazione dei guanciali 1. Infilare il sottogola nel foro del guanciale e far scattare in posizione i tre bottoni a pressione del guanciale. -
Page 252: Rimozione Dell'imbottitura Interna
INFO SUL CASCO BLUETOOTH OUTRUSH R 1.4.10 Rimozione dell'imbottitura interna 1. Sganciare la piastra dell'imbottitura interna dal perno interno accanto alla mentoniera. 2. Estrarre l'imbottitura interna dal retro del casco. 3. Impugnare l'imbottitura interna nella parte frontale ed estrarla dalla parte frontale del casco. -
Page 253: Installazione Dell'imbottitura Interna
INFO SUL CASCO BLUETOOTH OUTRUSH R 1.4.11 Installazione dell'imbottitura interna 1. Allineare e inserire le tre linguette dell'imbottitura interna negli alloggiamenti della parte frontale. 2. Inserire la piastra in plastica posteriore dell'imbottitura interna nello spazio tra la calotta e l'EPS. -
Page 254: Rimozione Della Visiera Parasole
INFO SUL CASCO BLUETOOTH OUTRUSH R 1.4.12 Rimozione della visiera parasole 1. Far scorrere la leva della visiera parasole nella direzione indicata dall'immagine sopra per abbassare la visiera parasole. 2. Tirare un lato della visiera nella direzione indicata dall'immagine sopra. -
Page 255: Ispezione Del Casco Prima Di Guidare
INFO SUL CASCO BLUETOOTH OUTRUSH R 1.5 Ispezione del casco prima di guidare 1.5.1 Verifica della parte esterna Verificate regolarmente la presenza di eventuali danni sul casco. Piccoli graffi superficiali non riducono le qualità protettive del casco. In caso di danni più seri (crepe, ammaccature, sfaldature o crepe della vernice, ecc.), il casco non dovrebbe essere più... -
Page 256: Nozioni Introduttive: Sistema Bluetooth
- iOS: App Store > Sena Utility 2.1.2 Sena Device Manager Sena Device Manager consente di aggiornare il firmware e di configurare le impostazioni direttamente dal PC. Per il download di Sena Device Manager, visitare il sito sena.com. 2.2 Accensione e spegnimento • Accensione Tenere premuto il Pulsante centrale e il Pulsante (+) per 1 secondo. -
Page 257: Ricarica
2.3 Ricarica È possibile caricare il sistema Bluetooth ricorrendo a numerosi metodi comuni, tramite il cavo USB di alimentazione e trasferimento dati: OUTRUSH R è compatibile solo con dispositivi dotati di alimentazione USB da 5 V in ingresso. In base al metodo utilizzato, la ricarica completa del sistema Bluetooth richiede circa 2,5 ore. -
Page 258: Controllo Del Livello Batteria
NOZIONI INTRODUTTIVE: SISTEMA BLUETOOTH 2.4 Controllo del livello batteria In fase di accensione del sistema Bluetooth, il LED rosso lampeggia rapidamente indicando il livello batteria. 4 lampi = alto, 70 ~ 100% 3 lampi = medio, 30 ~ 70% 2 lampi = basso, 0 ~ 30% 2.5 Regolazione del volume Premendo il Pulsante (+) o il Pulsante (-) è... -
Page 259: Accoppiamento Del Sistema Bluetooth Con Altri Dispositivi Bluetooth
Sena SR10 tramite Accoppiamento con i cellulari e Accoppiamento con il secondo cellulare. Inoltre, il sistema Bluetooth può essere accoppiato con un'altra cuffia Sena o un altro sistema Bluetooth. 3.1 Accoppiamento con i cellulari Esistono tre modi per accoppiare il telefono. -
Page 260: Accoppiamento Con Outrush R Spento
ACCOPPIAMENTO DEL SISTEMA BLUETOOTH CON ALTRI DISPOSITIVI BLUETOOTH 2. Con il cellulare in modalità accoppiamento Bluetooth, selezionare Sena OUTRUSH R nell'elenco dei dispositivi rilevati. 3. Se il telefono richiede un PIN, inserire 0000. Nota: • La modalità accoppiamento telefono resta attiva 3 minuti. -
Page 261: Accoppiamento Con Il Secondo Cellulare - Secondo Cellulare, Gps E Sr10
2. Premere il Pulsante (+) fino a quando viene emesso il messaggio vocale “Accoppiamento secondo telefono”. 3. Con il cellulare in modalità accoppiamento Bluetooth, selezionare Sena OUTRUSH R nell'elenco dei dispositivi rilevati. 4. Se il telefono richiede un PIN, inserire 0000. 3.3 Accoppiamento GPS 1. -
Page 262: Accoppiamento Selettivo Avanzato: Stereo A2Dp O A Mani Libere
2. Premere il Pulsante (+) fino a quando viene emesso il messaggio vocale “Accoppiamento media”. 3. Con il cellulare in modalità accoppiamento Bluetooth, selezionare Sena OUTRUSH R nell'elenco dei dispositivi rilevati. 4. Se il telefono richiede un PIN, inserire 0000. -
Page 263: Uso Con I Cellulari
4.2 Composizione rapida 4.2.1 Assegnazione dei numeri di chiamata rapida preimpostati È possibile assegnare numeri di chiamata rapida preimpostati nel menu impostazioni, accessibile da Sena Device Manager oppure dall'app Sena Utility. -
Page 264: Utilizzo Dei Numeri Di Chiamata Rapida Preimpostati
USO CON I CELLULARI 4.2.2 Utilizzo dei numeri di chiamata rapida preimpostati 1. Tenendo premuto il Pulsante (+) per 3 secondi viene emesso il messaggio vocale “Chiamata rapida”. 2. Premere il Pulsante (+) o il Pulsante (-) per navigare tra i menu. Viene emesso un messaggio per ogni voce del menu. -
Page 265: Musica Stereo
5. MUSICA STEREO 5.1 Musica stereo Bluetooth • Riproduzione/Messa in pausa della musica Tenere premuto il Pulsante centrale per 1 secondo fino a quando viene emesso un doppio segnale acustico. • Traccia successiva/precedente Tenere premuto il Pulsante (+) o il Pulsante (-) per 1 secondo fino a quando viene emesso un segnale acustico. - Page 266 MUSICA STEREO Nota: 1. Sia l'utente che l'amico intercom possono controllare la riproduzione di musica in remoto, ad esempio passare alla traccia successiva o alla traccia precedente. 2. Condivisione musica verrà messa in pausa quando viene utilizzato un telefono o si ascoltano le istruzioni del GPS.
-
Page 267: Intercom Bluetooth
6. INTERCOM BLUETOOTH 6.1 Accoppiamento intercom È possibile accoppiare fino a tre persone aggiuntive con il sistema Bluetooth per effettuare conversazioni intercom Bluetooth. UTENTE Amico Amico Amico intercom B intercom C intercom D 1. Tenere premuto il Pulsante centrale dei sistemi Bluetooth A e B per 5 secondi fino a quando i LED rossi delle due unità... - Page 268 INTERCOM BLUETOOTH Premere il Pulsante centrale. 3. Ripetere i passaggi 1 e 2 per effettuare l'accoppiamento con gli Amici intercom C e D. 4. La sequenza di accoppiamento intercom è ‘Last- Come, First-Served (LCFS, ovvero Ultimo arrivato, Primo servito)’ . Se un sistema Bluetooth ha più sistemi Bluetooth accoppiati per conversazioni intercom, il sistema Bluetooth accoppiato per ultimo viene impostato come primo amico intercom .
-
Page 269: Intercom A Due Voci
INTERCOM BLUETOOTH 6.2 Intercom a due voci È possibile avviare una conversazione intercom con uno degli amici intercom premendo il Pulsante centrale: premere una sola volta per effettuare una conversazione intercom con il primo amico intercom , premere due volte per effettuare una conversazione intercom con il secondo amico intercom e premere tre volte per effettuare una conversazione intercom con il terzo amico intercom . -
Page 270: Avvio Di Una Conferenza Intercom A Tre Voci
INTERCOM BLUETOOTH 6.3.1 Avvio di una conferenza intercom a tre voci L'utente (A) può creare una conferenza intercom a tre voci con altri due amici intercom (B e C) stabilendo due collegamenti intercom contemporaneamente. 1. Per la conferenza intercom a tre voci, l'utente (A) deve essere accoppiato con altri due amici intercom (B e C). -
Page 271: Avvio Di Una Conferenza Intercom A Quattro Voci
INTERCOM BLUETOOTH 3. L'utente (A) può chiamare il secondo amico intercom (C) premendo due volte il Pulsante centrale, oppure il secondo amico intercom (C) può unirsi alla conversazione intercom effettuando una chiamata intercom all'utente (A). UTENTE Amico Amico intercom B intercom C 6.3.2 Avvio di una conferenza intercom a quattro voci... -
Page 272: Terminare Intercom A Più Voci
INTERCOM BLUETOOTH 6.3.3 Terminare Intercom a più voci È possibile terminare completamente l'intercom da conferenza o semplicemente interrompere il collegamento intercom con uno degli amici intercom attivi. 1. Per terminare tutti i collegamenti intercom, tenere premuto il Pulsante centrale per 3 secondi fino a quando viene emesso un segnale acustico. -
Page 273: Conferenza Telefonica Con Partecipante Intercom A Tre Voci
7. CONFERENZA TELEFONICA CON PARTECIPANTE INTERCOM A TRE VOCI È possibile effettuare una Conferenza telefonica a tre voci aggiungendo un amico intercom alla conversazione telefonica. 1. Durante una chiamata telefonica, premere il Pulsante centrale una, due o tre volte per invitare uno degli amici intercom alla conversazione. -
Page 274: Group Intercom
8. GROUP INTERCOM Group Intercom consente di creare immediatamente una Conferenza intercom a più voci con tre dei sistemi Bluetooth accoppiati più di recente. 1. Effettuare l'accoppiamento intercom con un massimo di tre sistemi Bluetooth con cui si desidera tenere una conversazione Group Intercom. -
Page 275: Universal Intercom
La cuffia Bluetooth non Sena può essere collegata al sistema Bluetooth Sena se supporta il Profilo viva voce (HFP) Bluetooth. È possibile accoppiare il sistema Bluetooth con una sola cuffia non Sena alla volta. La distanza intercom dipende dalle prestazioni del sistema Bluetooth collegato. - Page 276 Esempio di Universal Intercom a tre voci UTENTE Cuffia Sistema non Sena Bluetooth Sena Esempio di Universal Intercom a quattro voci UTENTE Sistema Bluetooth Sena Cuffia Cuffia non Sena non Sena Nota: alcune cuffie Bluetooth non Sena potrebbero non supportare Universal Intercom a più voci.
-
Page 277: Priorità Delle Funzioni Eaggiornamenti Del Firmware
10. PRIORITÀ DELLE FUNZIONI E AGGIORNAMENTI DEL FIRMWARE 10.1 Priorità delle funzioni Il sistema Bluetooth funziona con il seguente ordine di priorità: (più alta) Telefono Intercom Condivisione della musica tramite musica stereo Bluetooth (più bassa) Musica stereo Bluetooth Una funzione con priorità più bassa sarà sempre interrotta da una funzione con priorità... -
Page 278: Aggiornamenti Firmware
Priorità delle funzioni E AGGIORNAMENTI DEL FIRMWARE 10.2 Aggiornamenti firmware Il sistema Bluetooth supporta gli aggiornamenti del firmware. È possibile aggiornare il firmware utilizzando Sena Device Manager. Per verificare il software più recente disponibile per il download, visitare il sito Web Sena Bluetooth www.sena.com. -
Page 279: Impostazioni Di Configurazione
11. IMPOSTAZIONI DI CONFIGURAZIONE 11.1 Impostazione di configurazione del sistema Bluetooth 1. Per entrare in Configurazione, tenere premuto il Pulsante centrale per 15 secondi fino a quando viene anche emesso il messaggio vocale “Configurazione”. 2. Premere il Pulsante (+) o il Pulsante (-) per navigare tra i menu. -
Page 280: Cancellare Tutti Gli Accoppiamenti
11.2 Impostazioni di configurazione del software È possibile modificare le impostazioni del sistema Bluetooth da Sena Device Manager oppure dall’app Sena Utility. 11.2.1 Chiamata rapida Assegnare i numeri di composizione rapida per effettuare rapidamente una chiamata. -
Page 281: Sorgente Audio Prioritaria (Impostazione Predefinita: Intercom)
IMPOSTAZIONI DI CONFIGURAZIONE 11.2.3 Sorgente audio prioritaria (impostazione predefinita: Intercom) Sorgente audio prioritaria consente di selezionare la priorità tra intercom e musica (che include le istruzioni dell’applicazione GPS e le notifiche dei messaggi) da uno smartphone. Selezionando intercom come Sorgente audio prioritaria, la musica sarà interrotta durante una conversazione intercom. -
Page 282: Vox Telefono
IMPOSTAZIONI DI CONFIGURAZIONE 11.2.6 VOX telefono (impostazione predefinita: abilitata) Se questa funzionalità è abilitata, è possibile rispondere alle chiamate in arrivo con la voce. Quando viene emessa una suoneria per una chiamata in arrivo, è possibile rispondere al telefono pronunciando ad alta voce una parola come “Ciao”... -
Page 283: Hd Voice (Impostazione Predefinita: Abilitata)
IMPOSTAZIONI DI CONFIGURAZIONE 11.2.8 HD Voice (impostazione predefinita: abilitata) HD Voice consente di comunicare in alta definizione durante le chiamate telefoniche. Questa funzionalità aumenta la qualità per ottenere un audio chiaro e nitido durante le conversazioni telefoniche. Se abilitata, le conversazioni intercom si interrompono in caso di chiamata telefonica in arrivo e l’audio emesso dalla SR10 durante le conversazioni intercom viene escluso. -
Page 284: Intercom Hd (Impostazione Predefinita: Abilitata)
IMPOSTAZIONI DI CONFIGURAZIONE 11.2.9 Intercom HD (impostazione predefinita: abilitata) Intercom HD migliora l’audio di una conversazione intercom a due voci da qualità normale ad HD. Intercom HD viene momentaneamente disabilitato quando si partecipa a una conversazione intercom a più voci. Se questa caratteristica è... - Page 285 Il volume dell’audio in primo piano può essere regolato tramite il sistema Bluetooth. È possibile regolare la quantità di audio udibile in sottofondo tramite l’app Sena Utility. Quando la funzione Audio Multitasking abilitata, le funzioni Intercom HD e Sorgente audio prioritaria vengono...
- Page 286 IMPOSTAZIONI DI CONFIGURAZIONE Tabella di combinazione primo piano e sottofondo Primo piano* Sottofondo** Modello Musica o navigazione Telefono Intercom smart OUTRUSH * È possibile ascoltare contemporaneamente due sorgenti audio in sottofondo allo stesso livello di volume. ** È possibile ascoltare solo un audio in sottofondo alla volta mentre si ascolta una sorgente audio in primo piano.
- Page 287 IMPOSTAZIONI DI CONFIGURAZIONE Nota: 1. La funzione Audio Multitasking viene attivata durante le conversazioni intercom a due voci con un sistema Bluetooth che supporta questa funzionalità. 2. Quando si disabilita la funzione Audio Multitasking, la sorgente audio in sottofondo torna al rispettivo livello di volume. 3.
- Page 288 12. RISOLUZIONE DEI PROBLEMI 12.1 Reset dopo errore Quando il sistema Bluetooth non funziona correttamente, è possibile resettare facilmente l’unità: 1. Individuare il Foro di reset posto sotto il Pulsante centrale. 2. Inserire delicatamente una graffetta all’interno del foro e premere il Pulsante reset dopo errore esercitando una leggera pressione.
- Page 289 RISOLUZIONE DEI PROBLEMI Nota: 1. Il LED ricarica non è un Foro di reset. Non premerlo. 2. Il Reset dopo errore non ripristinerà le impostazioni di fabbrica del sistema Bluetooth. 12.2 Reset Per ripristinare le impostazioni di fabbrica del sistema Bluetooth, utilizzare il Reset in Configurazione.
- Page 290 13. MANUTENZIONE E CURA 13.1 Calotta esterna Rimuovere gli insetti dalla parte esterna utilizzare un panno morbido e un po’ d’acqua. Nota: non utilizzare benzina, gasolio, diluenti o solventi per pulire il casco. Tali sostanze possono provocare seri danni al casco, sebbene i danni derivanti potrebbero non essere visibili.
- Page 291 GUIDA RAPIDA Tipo Funzionamento Comando pulsante Tenere premuto il Pulsante centrale e il Pulsante (+) per Accensione 1 secondo Funzione Premere il Pulsante centrale di base Spegnimento e il Pulsante (+) Diminuzione/ Premere il Pulsante (+) o il Aumento volume Pulsante (-) Risposta a una Premere il Pulsante centrale...
- Page 292 Tipo Funzionamento Comando pulsante Tenere premuto il Pulsante centrale per 5 secondi Accoppiamento intercom Premere il Pulsante centrale di uno dei due sistemi Intercom Bluetooth Avvio/Interruzione di ciascuna Premere il Pulsante centrale conversazione intercom...
- Page 293 ® funzionalità Bluetooth. La parola e i loghi Bluetooth sono di proprietà di Bluetooth ® SIG, Inc. e qualsivoglia utilizzo di tali marchi da parte di Sena è concesso in licenza. iPhone ed iPod touch sono marchi registrati ® ®...
- Page 294 1.1.0_IT_October2021...
Need help?
Do you have a question about the OUTRUSH R and is the answer not in the manual?
Questions and answers