
Related Manuals for Electrolux ESO45DIGIT


Summary of Contents for Electrolux ESO45DIGIT
- Page 1 Instruction Book ESO45DIGIT Oven INSTRUCTION BOOK MODE D’EMPLO GEBRUIKSAANWIJZING LIBRO DE INSTRUCCIONES MANUAL DE INSTRUÇOES...
- Page 3 Catalogue Language of introduction Page English French 9-18 Dutch 19-27 Spanish 28-36 Portuguese 37-45...
- Page 4 IMPORTANT SAFETY INSTRUCTIONS PLEASE READ THE FOLLOWING SAFETY WARNINGS AND THE INSTRUCTIONS CAREFULLY BEFORE USING THE APPLIANCE AND KEEP FOR FUTURE REFERENCE. Warnings • This appliance is intended to be used in household and similar applications such as: − staff kitchen areas in shops, offices and other working environments;...
- Page 5 than 8 years. The appliance is not intended to be operated by means of an external timer or separate remote-control system. Regarding the instructions for cleaning surfaces in contact with food, refer to the section “Cleaning and Maintenance” on page 7 of the manual.
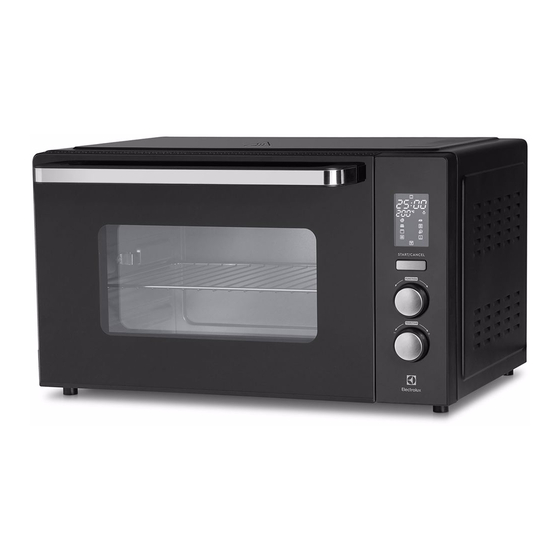
- Page 6 Do not use the appliance for other than intended use. Extreme caution must be used when moving the appliancecontaining hot oil or other hot liquids. OVERVIEW Display Start/Cancel button Function selection knob Temperature/Time control knob Heating element Glass door Door handle Rotisserie fork...
-
Page 7: Before First Use
Indicator Default Temperature Function Default Time light Temperature Range Meat 210°C 150°C ~ 230°C 50 minutes Fish 200°C 150°C ~ 230°C 25 minutes Bake 180°C 70°C ~ 220°C 30 minutes Rotisserie 180°C 70°C ~ 230°C 30 minutes Grill 200°C 150°C ~ 200°C 10 minutes Pizza 200°C... - Page 8 Select Function: Turn the function selection knob to select the desired function. The corresponding function indicator light will blink. Temperature: Turn the knob to increase or decrease the temperature setting. Time: Press the knob to switch to time setting mode. Turn the knob to increase or decrease the cooking time.
-
Page 9: Using The Grill Function
8. Open the door. Always remove food with oven mitts as the food and oven are very hot. USING THE ROTISSERIE FUNCTION 1. Place the baking pan in the lowest position of the oven. This will catch food drippings from the rotisserie fork duringcooking. 2. -
Page 10: Cleaning And Maintenance
3. Turn the FUNCTION knob until the indicator light blinks on the display. 4. The default defrosting temperature is 65°C and cannot be adjusted. 5. Press the TEMP/TIME knob once and then turn it to set the desired defrosting time. 6. -
Page 11: Specifications
The appliance should be taken to your local collection point for recycling. Some collection points accept appliance free of charge. We apologise for any inconvenience caused by minor inconsistencies in these instructions, which may occur as a result of product improvement and development. ELECTROLUX 28/05/2020... - Page 12 MISES EN GARDE IMPORTANTES MERCI DE BIEN VOULOIR LIRE LES CONSIGNES DE SÉCURITÉ ATTENTIVEMENT AVANT D’UTILISER L'APPAREIL ET CONSERVER POUR RÉFÉRENCE ULTÉRIEURE. Attention • Cet appareil est destiné à être utilisé dans des applications domestiques et analogues telles que: − les coins cuisines réservés au personnel des magasins, bureaux et autres environnements professionnels;...
- Page 13 et qu’ils sont surveillés. Maintenir l’appareil et son cordon hors de portée des enfants de moins de 8 ans. Cet appareil n’est pas destiné à être mis en fonctionnement au moyen d'une minuterie extérieure ou par un système de commande à...
- Page 14 similaires. Ne placez aucun objet sur l’appareil quand il est en fonctionnement. Faites très attention quand vous utilisez des récipients de cuisson qui ne sont ni en métal ni en verre. Ne placez aucun des matériaux suivants dans le four : carton, plastique, papier ou tout autre ...
- Page 15 Affichage Indicateurs lumineux du statut Durée Lampe du four Température Indicateurs lumineux d es fonctions Températurepar Indicateur Plage de tempé Fonction Durée par défaut lumineux défaut rature Viande 210°C 150°C ~ 230°C 50 minutes Poisson 200°C 150°C ~ 230°C 25 minutes Cuisson 180°C 70°C ~ 220°C...
-
Page 16: Avant La Première Utilisation
AVANT LA PREMIÈRE UTILISATION Retirez tous les accessoires et matériaux d'expédition emballés à l'intérieur du four. Gardez tous les matériaux d'emballage hors de portée des enfants. Lavez la grille, la plaque de cuisson, le tournebroche et la poignée de retrait du tournebroche dans de l'eau chaude savonneuse. - Page 17 4. Tournez le bouton TEMP / DURÉE pour régler la température souhaitée 5. Appuyez une fois sur le bouton TEMP / DURÉE, puis tournez-le pour régler la durée de cuisson souhaitée. 6. Appuyez sur le bouton DÉMARRAGE / ANULATION pour démarrer la cuisson. 7.
- Page 18 6. Appuyez une fois sur le bouton TEMP / DURÉE, puis tournez-le pour régler la durée de cuisson souhaitée. 7. Appuyez sur le bouton DÉMARRAGE / ANULATION pour démarrer la cuisson. 8. Lorsque la durée de cuisson est écoulée, le four émet quelques bips sonores et l’écran affiche le mot «...
-
Page 19: Utilisation De La Fonction De Maintien Au Chaud
7. Lorsque la durée de dégivrage est écoulée, le four émet quelques bips sonores et l’écran affiche le mot « 00:00 ». 8. Ouvrez la porte. Retirez toujours les aliments avec des gants de cuisine car les aliments et le four seront très chauds. -
Page 20: Mise Au Rebut
N’utilisez jamais de nettoyant chimique ou abrasif. Nettoyez l’extérieur du four avec un chiffon humide. Nettoyez la porte du four avec un chiffon humide puis séchez-la. Essuyez l'intérieur du four avec un chiffon humide et un détergent doux. Séchez avec un chiffon doux. N’immergez pas le four dans de l'eau ni dans aucun autre liquide. - Page 21 Le service après-vente est joignable au +32 2 334 00 00, du lundi au vendredi de 8h à 18h et le samedi de 9h à 18h. En raison des mises au point et améliorations constamment apportées à nos produits, de petites incohérences peuvent apparaître dans ces instructions. Veuillez nous excuser pour la gêne occasionnée. ELECTROLUX 01/06/2020...
- Page 22 BELANGRIJKE VEILIGHEIDSINSTRUCTIES LEES DE VOLGENDE VEILIGHEIDSINSTRUCTIES AANDACHTIG DOOR VOORDAT U HET APPARAAT IN GEBRUIK NEEMT EN BEWAAR ZE VOOR TOEKOMSTIG GEBRUIK. Waarschuwingen • Dit apparaat is bestemd voor huishoudelijk gebruik of gelijksoortige toepassingen zoals: − personeelskeukens in winkels, kantoren en andere werkomgevingen;...
- Page 23 kinderen jonger dan 8 jaar. Het apparaat is niet bestemd voor gebruik door middel van een externe timer of een afzonderlijk op afstand bediend systeem. Voor de instructies voor het reinigen van de oppervlakken die in contact komen met levensmiddelen, zie het hoofdstuk "Reiniging en onderhoud”...
- Page 24 Wees uiterst voorzichtig wanneer u bakjes gebruikt die niet van metaal of ovenbestendig glas zijn gemaakt. Plaats volgende materialen niet in de oven: karton, kunststof, papier of gelijksoortige materialen. Draag altijd beschermende, geïsoleerde ovenwanten als u voorwerpen in de oven plaatst of eruit ...
-
Page 25: Voor Het Eerste Gebruik
Scherm Statuscontrolelampjes Tijd Ovenlamp Temperatuur Functiecontrolelampjes Standaard Temperatuurbereik Controlelampje Functie Standaard tijd temperatuur Vlees 210°C 150°C ~ 230°C 50 minuten 200°C 150°C ~ 230°C 25 minuten Bakken 180°C 70°C ~ 220°C 30 minuten Draaispit 180°C 70°C ~ 230°C 30 minuten Grill 200°C 150°C ~ 200°C... - Page 26 buiten het bereik van kinderen. Reinig het rooster, de bakplaat en de draaispitvork met greep in een warm zeepsopje. Spoel vervolgens af en veeg grondig droog. Maak de binnenkant van de oven schoon met een vochtige doek of spons. Veeg vervolgens droog met keukenpapier en zorg dat de oven droog is voor gebruik.
- Page 27 DE VISFUNCTIE GEBRUIKEN 1. Plaats het voedsel dat u wilt bereiden op het rooster of de bakplaat. 2. Schuif het rooster of de bakplaat in de middelste positie van de oven in. Sluit de deur. 3. Draai de FUNCTIE knop totdat het controlelampje op het scherm knippert.
- Page 28 DE GRILLFUNCTIE GEBRUIKEN 1. Plaats het voedsel dat u wilt bereiden op het rooster of de bakplaat. 2. Schuif het rooster of de bakplaat in de bovenste positie van de oven in. Sluit de deur. 3. Draai de FUNCTIE knop totdat het controlelampje op het scherm knippert.
-
Page 29: Reiniging En Onderhoud
DE CONVECTIEFUNCTIE GEBRUIKEN Gebruik deze functie voor het voorverwarmen of het bereiden van toast, steaks en brood. 1. Plaats het voedsel dat u wilt bereiden op het rooster of de bakplaat. 2. Schuif het rooster of de bakplaat in de middelste positie van de oven in. Sluit de deur. 3. -
Page 30: Technische Gegevens
Hiervoor kunt u contact opnemen met het BCC Service Center: 020 334 88 88. Op werkdagen van 08.00 tot 21.00 uur en op zaterdag van 09.00 tot 17.00 uur. We verontschuldigen ons voor enig ongemak veroorzaakt door kleine inconsistenties in deze gebruikershandleiding, die kunnen ontstaan door productverbetering of –ontwikkeling. ELECTROLUX 28/05/2020... - Page 31 MEDIDAS DE SEGURIDAD IMPORTANTES LEA DETENIDAMENTE ESTAS ADVERTENCIAS Y MEDIDAS DE SEGURIDAD ANTES DE USAR EL APARATO Y GUÁRDELAS PARA FUTURAS CONSULTAS. Advertencias • Este aparato ha sido diseñado para utilizarse en aplicaciones domésticas y similares, tales como: − Cocinas para el personal en tiendas, oficinas y otros entornos laborales.
- Page 32 Mantenga el aparato y su cable fuera del alcance de los niños menores de 8 años. Este aparato no ha sido diseñado para ser utilizado de forma conjunta con un temporizador externo o un sistema de control a distancia independiente. ...
-
Page 33: Descripción General
Tenga mucho cuidado cuando use recipientes para cocinar u hornear fabricados con materiales que no sean metal o vidrio refractario. No coloque ninguno de estos materiales dentro del horno: cartón, plástico, papel o materiales similares. Utilice siempre guantes de protección aislantes para horno cuando introduzca o ... - Page 34 Pantalla Luces indicadoras de estado Tiempo Lámpara del horno Temperatura Luces indicadoras de f unciones Temperatura Intervalo de Tiempo Función indicadora predeterminada temperatura predeterminado Carne 210 °C 150 °C ~ 230 °C 50 minutos Pescado 200 °C 150 °C ~ 230 °C 25 minutos Hornear 180 °C...
-
Page 35: Antes De Usar Por Primera Vez
ANTES DE USAR POR PRIMERA VEZ Quite todos los accesorios y materiales de embalaje en el interior del horno. Guarde todos los materiales de embalaje en un lugar fuera del alcance de los niños. Lave la parrilla, la bandeja de hornear, el espetón y el mango del espetón en agua jabonosa templada. Enjuague y séquelos bien. - Page 36 7. Una vez finalizada la cocción, el horno pitará y la pantalla mostrará «00:00». 8. Abra la puerta. Saque siempre la comida con los guantes de cocina, ya que ésta y el horno estarán muy calientes. CÓMO USAR LA FUNCIÓN PARA PESCADO 1.
- Page 37 CÓMO USAR LA FUNCIÓN DE GRATINAR 1. Coloque la comida a cocinar en la parrilla o la bandeja de hornear. 2. Inserte la parilla o bandeja en la posición superior del horno. Cierre la puerta. 3. Gire el mando FUNCTION hasta que la luz indicadora parpadee en la pantalla.
-
Page 38: Limpieza Y Mantenimiento
CÓMO USAR LA FUNCIÓN DE CONVECCIÓN Use esta función para precalentar o hacer tostadas, chuletas o pan. 1. Coloque la comida a cocinar en la parrilla o la bandeja de hornear. 2. Inserte la parrilla o bandeja por la guía del medio del horno. Cierre la puerta. 3. -
Page 39: Especificaciones
El aparato se debe depositar en un punto local de recogida de residuos para proceder a su reciclaje. En algunos puntos de recogida se aceptan residuos gratuitamente. Le pedimos disculpas por cualquier problema provocado por pequeñas inconsistencias en estas instrucciones, que podrían ser debidas al proceso de desarrollo y mejora del producto. ELECTROLUX 01/06/2020... - Page 40 INSTRUÇÕES DE SEGURANÇA IMPORTANTES LEIA ESTES AVISOS DE SEGURANÇA E INSTRUÇÕES COM ATENÇÃO ANTES DE UTILIZAR O APARELHO E GUARDE-OS PARA FUTURAS CONSULTAS. Avisos • Este aparelho destina-se a um uso doméstico e aplicações semelhantes como: − Áreas de cozinha para funcionários em lojas, escritórios e outros ambientes de trabalho;...
- Page 41 supervisionadas. Mantenha o aparelho e o fio fora do alcance de crianças com idade inferior a 8 anos. O aparelho não deve ser utilizado através de um temporizador externo ou um sistema de controlo remoto em separado. Relativamente às instruções de limpeza das superfícies em contacto com os alimentos, consulte a secção "Limpeza e Manutenção", nas páginas 43&44 do manual.
- Page 42 incluindo cortinas, cortinados, paredes ou similares durante o seu funcionamento. Não guarde nada em cima do aparelho durante o seu funcionamento. Tenha muito cuidado quando utilizar os recipientes para cozinhar concebidos de algo sem ser metal ou vidro adequado para ir ao forno. Não coloque nenhum dos seguintes materiais dentro do forno: cartão, plástico, ou algo semelhante.
- Page 43 Visor Indicadores luminosos de estado Tempo Lâmpada do forno Temperatura Indicadores luminosos d e função Indicador Temperatura Amplitude térmica Função Tempo predefinido luminoso predefinida Carne 210°C 150°C ~ 230°C 50 minutos Peixe 200°C 150°C ~ 230°C 25 minutos Cozer 180°C 70°C ~ 220°C 30 minutos Churrasqueira...
-
Page 44: Antes Da Primeira Utilização
ANTES DA PRIMEIRA UTILIZAÇÃO Retire todos os acessórios e materiais de envio empacotados dentro do forno. Mantenha todo o material de empacotamento fora do alcance das crianças. Lave a grelha, a forma, o garfo de churrasqueira e a pega de remoção da churrasqueira em água quente com detergente. - Page 45 3. Rode o manípulo de FUNÇÃO até que o indicador luminoso pisque no visor. 4. Defina o manípulo TEMP/TEMPO para definir a temperatura desejada. 5. Prima o manípulo TEMP/TEMPO uma vez e depois rode-o para definir o tempo de confeção desejado. 6.
- Page 46 cozinhados. 10. Retire o garfo de churrasqueira com a pega de remoção da churrasqueira. Segure a pega de remoção da churrasqueira numa mão e suporte-a com a outra. Coloque os ganchos na pega por baixo do garfo de churrasqueira. ...
-
Page 47: Limpeza E Manutenção
Utilize esta função para manter os alimentos quentes. 1. Coloque os alimentos na grelha ou na forma. 2. Insira a grelha ou a forma na posição intermédia do forno. Feche a porta. 3. Rode o manípulo de FUNÇÃO até que o indicador luminoso pisque no visor. -
Page 48: Características Técnicas
O aparelho deve ser transportado para o ponto de recolha local, para reciclagem. Alguns pontos de recolha aceitam os aparelhos sem encargos. Pedimos desculpa por qualquer inconveniente provocado por pequenas inconsistências nestas instruções, as quais poderão ser resultado do melhoramento e desenvolvimento do produto. ELECTROLUX 01/06/2020... - Page 49 Descriçào do produto: Brand – Electrolux Marque /Merk /Marca: Model number - ESO45DIGIT Référence commerciale: /Modelnummer / Numero de modelo / Numero do modelo: We declare that the above product has been evaluated and deemed to comply with the requirements of the listed European Directives and standards: Nous déclarons que le produit ci-dessus a été...
- Page 50 Reference number Title ☒ 2014/30/EU EMC Directive (EMC) ☒ 2014/35/EU Low Voltage Directive (LVD) ☒ 2009/125/EC Eco design requirements for energy-related products (ErP) ☒ 2011/65/EU & (EU) 2015/863 RoHS EMC: EN 55014-1:2017 EN 55014-2:2015 EN IEC 61000-3-2:2019 EN 61000-3-3:2013+A1:2019 LVD: EN 60335-2-9:2003+A1:2004+A2:2006+A12:2007+A13:2010 EN 60335-1:2012+A11:2014+A13:2017+A1:2019+A2:2019+A14:2019 EN 62233:2008...
- Page 51 3484 E ESO45DIGIT 02 01 0520...
Need help?
Do you have a question about the ESO45DIGIT and is the answer not in the manual?
Questions and answers