
Related Manuals for ACKERMANN 16-2000-700


Summary of Contents for ACKERMANN 16-2000-700
- Page 1 USER MANUAL 16-2000-700/701/702/703 Rev. 05/2018 16-2000-700/701/702/703 ELECTROSURGICAL UNIT INSTRUCTIONS FOR USE...
- Page 2 USER MANUAL 16-2000-700/701/702/703 Rev. 05/2018 These operating instructions contain information that is subject to copyright. All rights are reserved. This manual should not be photo-copied, duplicated on microfilm or otherwise copied or distributed, completely or in part, without the approval of the manufacturer. The manufacturer will appreciate any errors or anything unclear in this operating manual being pointed out to us by users of our products.
-
Page 3: Table Of Contents
USER MANUAL 16-2000-700/701/702/703 Rev. 05/2018 Contents 1. Areas of use for the HF 16-2000-700 system............5 1.1 HF 16-2000-700 operating modes..............5 2. Electrosurgery basics..................6 2.1 Monopolar operation..................7 2.2 Bipolar operation..................7 3. Symbol......................8 4. Device appearance and construction..............9 4.1 Front panel....................9 4.2 Back panel....................12 4.3 Main panel....................13... - Page 4 USER MANUAL 16-2000-700/701/702/703 Rev. 05/2018 8.4.3 System activation using the AutoStart function........51 8.5 Monopolar cutting..................51 8.5.1 Drying cutting – MIXED CUT..............54 8.5.2 Polypectomy and Papillotomy...............55 8.6 Monopolar coagulation.................59 8.6.1 Argon coagulation................61 8.6.2 Argon-enhanced pulse coagulation............62 8.7 SIMULTANEOUS WORK (optional)..............63 8.8 Bipolar cutting....................65 8.9 Bipolar coagulation..................66...
-
Page 5: Areas Of Use For The Hf 16-2000-700 System
USER MANUAL 16-2000-700/701/702/703 Rev. 05/2018 IMPORTANT NOTICE The attachments to this Operating Manual contain the Safety Manual and the Catalogue of Accessories. Please contact the manufacturer if there are no attachments. 1. Areas of use for the HF 16-2000-700 system... -
Page 6: Electrosurgery Basics
USER MANUAL 16-2000-700/701/702/703 Rev. 05/2018 URO COAG (urological monopolar coagulation in fluid environment) ARTRO COAG (arthroscopic monopolar coagulation in fluid environment) HYSTERO COAG (gynaecological monopolar coagulation in fluid environment) DUAL COAG (forced monopolar coagulation in simultaneous work mode) ... -
Page 7: Monopolar Operation
USER MANUAL 16-2000-700/701/702/703 Rev. 05/2018 2.1 Monopolar operation In the monopolar mode, the HF current is delivered to the tissue by the active electrode. The cutting or coagulation effect results from the concentration of the high density HF current on the small surface of the active electrode. -
Page 8: Symbol
"Fragile, handle with care" Do not use if package is damaged Ackermann electrosurgical devices are manufactured in protection class I CF. It is the highest class of patient protection against electric shock from electromedical devices. Type CF applied parts can be used in contact with any part of the patient body including the heart. -
Page 9: Device Appearance And Construction
USER MANUAL 16-2000-700/701/702/703 Rev. 05/2018 4. Device appearance and construction The generator casing is made of metal without ventilation holes. The front panel is made of plastic. The device can easily be kept clean; generally available disinfection agents may be used for cleaning. - Page 10 (6) stand-by button (7) main view button (8) Version III of the HF 16-2000-700 system is also available with the following configuration of outputs: ASD – MONOPOLAR – ASD – BIPOLAR (Fig. 3). Page: 10 of 134...
- Page 11 USER MANUAL 16-2000-700/701/702/703 Rev. 05/2018 Fig. 3. Equipment connection sockets. universal ASD output with instrument detection ● ● monopolar output (2) ● universal ASD output with instrument detection (3) ● bipolar output (4) ● argon output, gas outflow (5) neutral electrode socket (6) ●...
-
Page 12: Back Panel
USER MANUAL 16-2000-700/701/702/703 Rev. 05/2018 4.2 Back panel Fig. 4. HF 16-2000-700 backside view. The back panel of the casing, as shown in Fig. 4, contains the following items: universal footswitch socket for all outputs (1) footswitch socket for one of the inputs – by default it is assigned to the third ASD output (2) ... -
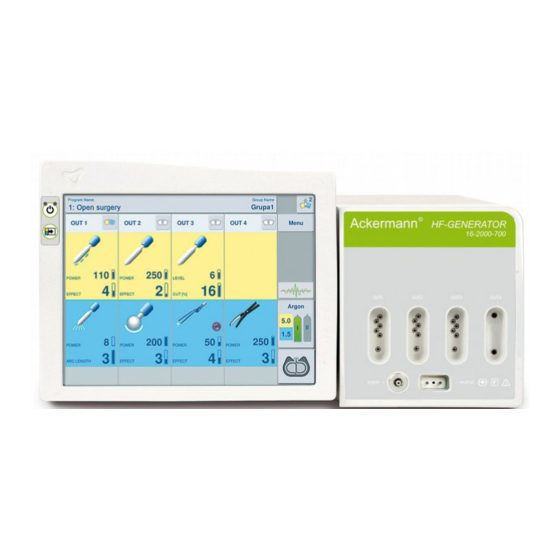
Page 13: Main Panel
USER MANUAL 16-2000-700/701/702/703 Rev. 05/2018 4.3 Main panel HF 16-2000-700 system has a mobile display, which can be tilted to adjust to the user’s needs. Owing to this feature, the system can be placed at different heights. To increase or decrease the screen angle, just move it in the right direction. - Page 14 USER MANUAL 16-2000-700/701/702/703 Rev. 05/2018 Each of the four panels, corresponding to four outputs, is active. To change the settings (operating mode, effects, power limit, additional settings), touch the selected element. The figure below describes a selected panel: Fig. 6. Control panel for output 1.
-
Page 15: Active Panel - Detailed View For A Given Output
USER MANUAL 16-2000-700/701/702/703 Rev. 05/2018 4.4 Active panel – detailed view for a given output Fig. 7. Panel view with two modes – cutting and coagulation. The detailed view of the control panel for a given output (Fig. 7) contains: ... -
Page 16: Hf 16-2000-700 Technical Specifications
USER MANUAL 16-2000-700/701/702/703 Rev. 05/2018 HF 16-2000-700 technical specifications (the list of available modes can differ depending on device version) Table 1. HF 16-2000-700 technical specifications POWER SUPPLY Power supply voltage 220-240 V ±10% 50/60 Hz optionally 110-120 V ±10% 50/60 Hz... - Page 17 USER MANUAL 16-2000-700/701/702/703 Rev. 05/2018 ARTRO CUT Cutting in non-conductive liquids with adjustable 9 effects degree of haemostasis The mode is available in ASD outputs with 322-14S, 327-14S tools connected. URO CUT Urological cutting in non-conductive liquids with 9 effects...
- Page 18 USER MANUAL 16-2000-700/701/702/703 Rev. 05/2018 ARTRO COAG Arthroscopic monopolar coagulation in non- 9 effects conductive liquids The mode is available in ASD outputs with 322-14S, 327-14S tools connected. HYSTERO COAG Gynaecological monopolar coagulation in non- 9 effects conductive liquids The mode is available in ASD outputs with 405-04S, 408-14S tools connected.
-
Page 19: Hf 16-2000-700 Accessories List
USER MANUAL 16-2000-700/701/702/703 Rev. 05/2018 ARGON Argon – type 4.8 (99.998%) or higher Gas input pressure 0.3 – 0.5 MPa (3-5 Bar) Gas outflow 0.1 – 10.0 l/min Adjustment 0.1 l/min throughout the range Pressure measurement Reducer (with manometer) (0.4 MPa) -
Page 20: Preparing The System For Work
USER MANUAL 16-2000-700/701/702/703 Rev. 05/2018 7. Preparing the system for work Getting the system ready to work involves the connection of the power cable and accessories. IMPORTANT NOTICE Operation Manual and Electrosurgical equipment safety guidelines are complete documentation for the device, which should be read before handling the device. - Page 21 USER MANUAL 16-2000-700/701/702/703 Rev. 05/2018 Fig. 8. How to connect the footswitches and the power cable. HF 16-2000-700 system allows to connect the following footswitches: wired 1-button footswitch for cutting, wired 1-button footswitch for coagulation, wired 2-button footswitch, ...
- Page 22 USER MANUAL 16-2000-700/701/702/703 Rev. 05/2018 Fig. 9. How to connect accessories to outputs 1 and 3 (ASD) in the HF 16-2000-700 system, Version I Page: 22 of 134...
-
Page 23: Pneumatic Ducts Connection
USER MANUAL 16-2000-700/701/702/703 Rev. 05/2018 Fig. 10. How to connect accessories to outputs 2 (monopolar) and 4 (bipolar) in the HF 16-2000-700 system, Version II 7.2 Pneumatic ducts connection The gas (argon) under reduced pressure (0.3 – 0.5 MPa (3-5 Bar)) is connected to the output extensions (Fig. - Page 24 USER MANUAL 16-2000-700/701/702/703 Rev. 05/2018 Fig. 11. How to connect the argon ducts to the HF 16-2000-700 system. Fig. 12. How to connect argon to the HF 16-2000-700 system. For more information about argon ducts, see section 7.6.3. Page: 24 of 134...
-
Page 25: Connecting Accessories For Electrosurgical Procedures
USER MANUAL 16-2000-700/701/702/703 Rev. 05/2018 7.3 Connecting accessories for electrosurgical procedures IMPORTANT NOTICE The units manufacturer allows to use of Ackermann accessories only f accessories available in Ackermann catalogue. HF 16-2000-700 system is equipped with high-quality electrosurgical accessories, which allow performing various procedures in the fields of general and vascular surgery, gynaecology, oncology, and many others. -
Page 26: Instrument Cable For Universal Asd Sockets
USER MANUAL 16-2000-700/701/702/703 Rev. 05/2018 7.3.2 Instrument cable for universal ASD sockets The universal output with instrument detection made according to the Smart Device System standard (Fig. 1, items 1,3,4). Universal ASD socket 7.3.3 Monopolar electrode cable with 3-pin plug The active monopolar electrode handle socket is made in compliance with the so-called 3-pin standard (Fig. -
Page 27: Argon Duct
USER MANUAL 16-2000-700/701/702/703 Rev. 05/2018 7.3.5 Argon duct The connection socket for argon output is made in compliance with the Luer Lock standard (Fig. 1, item 5). Argon plug IMPORTANT NOTICE When in doubt as to which accessories may be connected and how to connect them, please contact either the manufacturer or the distributor. - Page 28 USER MANUAL 16-2000-700/701/702/703 Rev. 05/2018 The figures below present the list of modes before connecting an instrument to a ASD socket (Table 1. HF 16-2000-700 technical specifications), and a limited list of modes after connecting an instrument to a socket with the ASD system (Fig.
-
Page 29: Wireless Footswitch Receiver
In this way, the amount of cabling in the operating room is reduced. IMPORTANT NOTICE Two footswitches can be connected simultaneously to the HF 16-2000-700 system. It is possible to freely configure the wired and wireless footswitches. The wireless footswitch for the HF 16-2000-700 system is adapted with a dongle. -
Page 30: Operation With 3-Button Footswitch
USER MANUAL 16-2000-700/701/702/703 Rev. 05/2018 7.5.1 Operation with 3-button footswitch Footswitch should be connected to „MAIN FOOTSWITCH” socket located in the rear side of the unit. Yellow and blue switches are used for activation of cutting and coagulation modes. The dark blue switch activates mode on coagulation panel output OUT 3. - Page 31 USER MANUAL 16-2000-700/701/702/703 Rev. 05/2018 Table 3. Types of available setting for each mode Mode type Types of available settings MONO CUT Effect Power W PRECISE CUT Effect Power W MIXED CUT Effect Power W Cutting time s Coagulation time s...
-
Page 32: Working Parameter Adjustment
USER MANUAL 16-2000-700/701/702/703 Rev. 05/2018 7.6.1 Working parameter adjustment HF 16-2000-700 system is equipped with the ASD instrument detection system. When a ASD instrument is connected, the system identifies it and automatically lists the suggested operating modes and effects, as well as power limit. -
Page 33: Effect Adjustment
USER MANUAL 16-2000-700/701/702/703 Rev. 05/2018 7.6.2 Effect adjustment In the cutting, forced coagulation and hybrid coagulation modes, increasing an effect setting results in obtaining a higher degree of haemostasis. In the soft coagulation mode, increasing an effect results in a shorter coagulation time, and stronger drying of the tissue surface. -
Page 34: Argon Flow Settings
USER MANUAL 16-2000-700/701/702/703 Rev. 05/2018 Fig. 15. Effect adjustment by the footswitch. 7.6.3 Argon flow settings In order to change the argon flow setting and to prime the ducts with argon, after selecting the appropriate mode, click the icon labelled Argon (Fig. 7, item 10). - Page 35 USER MANUAL 16-2000-700/701/702/703 Rev. 05/2018 Fig. 16. Argon flow adjustment for argon-enhanced modes. Fig. 16 presents: example mode of argon-enhanced cutting (1) argon flow adjustment for cutting (2) argon duct filling (3) argon panel (4) ...
-
Page 36: Cautions For Using Argon-Enhanced Coagulation
USER MANUAL 16-2000-700/701/702/703 Rev. 05/2018 7.6.3.1 Cautions for using argon-enhanced coagulation WARNING Fill the instruments with argon before each procedure. To do this, press the argon duct filling button. When using non-primed argon instruments, air can be introduced into the tissues. -
Page 37: Suggested Settings
Below are given the suggested settings for each procedure. The settings can differ, depending on the needs. Ackermann made every effort to determine the optimum suggested settings. Open surgery: Argon-enhanced coagulation (STANDARD ARGON mode): ... - Page 38 USER MANUAL 16-2000-700/701/702/703 Rev. 05/2018 7.6.4 Power monitoring HF 16-2000-700 uses sophisticated monitoring system, that constantly checks parameters on output in real-time and immediately changes the output power to varying conditions in the operation area. Most of the modes have two key parameters: Effect and Power. Effect adjusts the desired result on the tissue.
-
Page 39: System Operation And Surgical Procedures
Ackermann devices are equipped with a neutral electrode application monitoring system, referred to as NEM (Neutral Electrode Monitor). NEM System installed in Ackermann devices is designed for use with ACK neutral electrodes with catalogue numbers 16-2000-1212DFL and 16-2000-1212SMFL. Only these neutral electrodes are compatible with NEM (Neutral Electrode Monitor) System. - Page 40 Neutral electrodes other than those mentioned above may not function properly with the NEM neutral electrode safety system. The manufacturer is not responsible for the use of Ackermann electrosurgical devices with neutral electrodes other than those mentioned above, or for any incidents resulting from such use.
- Page 41 USER MANUAL 16-2000-700/701/702/703 Rev. 05/2018 Indication of neutral electrode application status: incorrect correct An important advantage of the split neutral electrode monitoring system is that monitoring is performed on a continuous basis, also during the operation of the generator. If system activation is attempted in case of inadequate application of the divided neutral electrode, an error message will be displayed on the screen.
-
Page 42: Split Disposable Electrodes
USER MANUAL 16-2000-700/701/702/703 Rev. 05/2018 8.2.2 Split disposable electrodes CAUTION The neutral electrode cannot be modified in any way. Once attached, the electrode should not be transferred to another location. Never use electrodes after their expiry date. Do not use force to remove the electrode. It should be detached carefully. - Page 43 USER MANUAL 16-2000-700/701/702/703 Rev. 05/2018 IMPORTANT NOTICE When using one-piece silicone electrodes, the surgical team is fully responsible for their correct application. Therefore, pay special attention to correctly place the neutral electrode to avoid burns at its application site during the procedure. Application of a one-piece neutral electrode should be monitored throughout the entire procedure.
-
Page 44: Neutral Electrode Application Principles
USER MANUAL 16-2000-700/701/702/703 Rev. 05/2018 WARNING Remember that a silicone electrode loses its conductive properties as active substances are rinsed out from the rubber. Such an electrode increases the risk of burns. Therefore, not only the systems but also the reusable electrodes should be subject to regular inspections. - Page 45 USER MANUAL 16-2000-700/701/702/703 Rev. 05/2018 DISPOSABLE NEUTRAL HYDROGEL ELECTRODE APPLICATION SITES incorrectly correctly Correct sites of neutral electrode application in patients with a cardiac pacemaker. Correct sites of neutral electrode application in adult patients. Correct sites of neutral electrode application in a child.
-
Page 46: Operating Mode Selection
USER MANUAL 16-2000-700/701/702/703 Rev. 05/2018 8.3 Operating mode selection To select the operating mode and set its parameters, please perform the following procedures: STEP 1 Touch the panel corresponding to the output to which a given accessory is connected. The entire panel area is active. - Page 47 USER MANUAL 16-2000-700/701/702/703 Rev. 05/2018 field with mode name Fig. 22. Operating mode selection – step 2. STEP 3 Select the operating mode which is appropriate for the procedure by clicking on the bar with the selected mode name. To confirm the selected mode, double-click the bar with the mode name, or click the exit window or the exit button.
- Page 48 USER MANUAL 16-2000-700/701/702/703 Rev. 05/2018 STEP 4 Set the parameters for the procedure using the arrows for adjustment of settings, and the advanced settings button, if available for a given mode. setting adjustment Fig 24. Operating mode selection – step 4.
- Page 49 USER MANUAL 16-2000-700/701/702/703 Rev. 05/2018 inactive modeFigure f modes Fig. 25. List o with an inactive mode. Panel appearance with an inactive mode: Fig. 26. Panel with an inactive mode. Page: 49 of 134...
-
Page 50: Hf 16-2000-700 System Activation Methods
USER MANUAL 16-2000-700/701/702/703 Rev. 05/2018 HF 16-2000-700 system activation methods HF 16-2000-700 system can be activated: using the handle, using the footswitch, using the AutoStart function (in bipolar coagulation mode). 8.4.1 Activation from handle To activate the system using the handle, connect a handle with two buttons (cutting and coagulation). -
Page 51: System Activation Using The Autostart Function
USER MANUAL 16-2000-700/701/702/703 Rev. 05/2018 For example, Fig. 27 contains the screen in which the third output is activated using the footswitch. footswitch-controlled output selection button Fig 27. Activation of the third output using the footswitch. 8.4.3 System activation using the AutoStart function If the AutoStart function is available in the bipolar coagulation mode, automatic activation after grasping the tissue is possible. - Page 52 USER MANUAL 16-2000-700/701/702/703 Rev. 05/2018 PRECISE CUT Precise monopolar cutting. Used when cutting small and precise structures. A more gentle current allows to increase cutting precision. Instrument: monopolar electrodes, e.g. knife, loop, needle. MIXED CUT Monopolar drying cutting. Alternating cutting and soft coagulation allow to cut tissues with severe bleeding, while minimising blood loss.
- Page 53 USER MANUAL 16-2000-700/701/702/703 Rev. 05/2018 HYSTERO CUT Monopolar cutting for gynaecological procedures (hysteroscopy) in non-conductive liquids, e.g. purisol or glucose. Instrument: loop electrode. URO CUT Monopolar cutting for urological procedures. This mode is used in difficult (wet) environment. It is necessary for TURP and TURB procedures.
-
Page 54: Drying Cutting - Mixed Cut
USER MANUAL 16-2000-700/701/702/703 Rev. 05/2018 IMPORTANT NOTICE In cutting mode, the system is activated using the yellow button in the electrode handle, or the yellow button of the footswitch. 8.5.1 Drying cutting – MIXED CUT Intended use The MIXED CUT mode is alternating cutting and soft coagulation. -
Page 55: Polypectomy And Papillotomy
USER MANUAL 16-2000-700/701/702/703 Rev. 05/2018 Time settings To adjust time settings, click on the additional settings field. By changing these settings, the time of each mode (cutting and coagulation) is adjusted during a cycle: adjustment of cutting time adjustment of coagulation... - Page 56 USER MANUAL 16-2000-700/701/702/703 Rev. 05/2018 Cutting level and percentage setting After connecting a ASD endoscopic cable, the system will recall the suggested settings for this mode automatically. additional settings field level adjustment IMPORTANT NOTICE Level – indicates the degree of cutting and coagulation in the polypectomy and papillotomy modes.
- Page 57 USER MANUAL 16-2000-700/701/702/703 Rev. 05/2018 Time settings To adjust the duration of one cycle, click the additional settings icon. To change the cycle time settings, touch the keys on the scale (indicated by arrows). loop closing detection adjustment of cutting...
- Page 58 USER MANUAL 16-2000-700/701/702/703 Rev. 05/2018 Endo-Detect System – loop closing detection In the Polypectomy mode, the Endo-Detect system is an additional option. It is loop detection. When the Endo-Detect system is active, the system makes it impossible to activate current flow in a loop which is not applied on the tissue. It increases the safety of endoscopic procedures by limiting the risk of accidental activation of current in a loop which is not applied on the tissue.
-
Page 59: Monopolar Coagulation
USER MANUAL 16-2000-700/701/702/703 Rev. 05/2018 Suggested settings for Papillotomy Cutting time: 35 ms Level: Coagulation time: 995 ms 8.6 Monopolar coagulation Depending on software version, the HF 16-2000-700 system is equipped with the following monopolar coagulation modes: SOFT COAG Low-voltage monopolar contact coagulation. - Page 60 USER MANUAL 16-2000-700/701/702/703 Rev. 05/2018 ENDO SPRAY Monopolar endoscopic coagulation . It is used for rapid haemostasis of local haemorrhages. Instrument: polypectomy snare. ARTRO COAG Arthroscopic monopolar coagulation in non- conductive liquids, e.g. purisol or glucose. Instrument: monopolar arthroscopic electrodes.
-
Page 61: Argon Coagulation
USER MANUAL 16-2000-700/701/702/703 Rev. 05/2018 8.6.1 Argon coagulation STANDARD ARGON Argon-enhanced monopolar coagulation. This mode is used for non-contact coagulation of bleeding tissue surfaces. It eliminates smoke and smell. It ensures a very shallow and gentle coagulation. Instrument: rigid argon electrodes for coagulation (see section 7.6.3). -
Page 62: Argon-Enhanced Pulse Coagulation
USER MANUAL 16-2000-700/701/702/703 Rev. 05/2018 8.6.2 Argon-enhanced pulse coagulation Monopolar pulse coagulation is a modified argon-enhanced coagulation. It is used whenever there is a risk of perforation and a very gentle coagulation and precise dosage is required, for instance in gastroenterology. -
Page 63: Simultaneous Work (Optional)
This option allows two operators to perform CUTTING or COAGULATION at the same time. In HF 16-2000-700 unit this function is available in two modes: DUAL CUT and DUAL COAG. DUAL CUT = MONO CUT - 9 effects, max output power 350 W. - Page 64 The power output parameter shown on the screen is the upper limit that can be provided by HF 16-2000-700 unit. The actual and average level provided by unit can be displayed on power screen when the performed action is finished.
-
Page 65: Bipolar Cutting
USER MANUAL 16-2000-700/701/702/703 Rev. 05/2018 8.8 Bipolar cutting Depending on software version, the HF 16-2000-700 system is equipped with the following bipolar cutting modes: BI-CUT Bipolar cutting with different effects of haemostasis. Special bipolar instruments are used for this mode. This mode is particularly useful for procedures performed in neonates and patients with heart pacemaker. -
Page 66: Bipolar Coagulation
USER MANUAL 16-2000-700/701/702/703 Rev. 05/2018 8.9 Bipolar coagulation Depending on software version, the HF 16-2000-700 system is equipped with the following bipolar coagulation modes: SOFT BI-COAG Low-voltage bipolar contact coagulation. In this mode, the current flows between the electrode tips, and no passive electrode is required. -
Page 67: The Autostart And Autostop Functions In Bipolar Coagulation
USER MANUAL 16-2000-700/701/702/703 Rev. 05/2018 The type and parameters for bipolar coagulation are set in the blue part of the panel. Bipolar cutting can be activated using both footswitch sockets. IMPORTANT NOTICE In the bipolar coagulation mode, the system can be activated in two ways: automatically when the tissue is grasped (if the AutoStart function is available) or using the footswitch. - Page 68 USER MANUAL 16-2000-700/701/702/703 Rev. 05/2018 advanced settings effect adjustment power adjustment AutoStart on/off AutoStart time adjustment AutoStop on/off AutoStop time adjustment AutoStart function. In bipolar operation mode, it is possible to automatically activate the bipolar forceps when tissue is grasped. This function can be enabled in the bipolar coagulation settings.
-
Page 69: Vesseal
USER MANUAL 16-2000-700/701/702/703 Rev. 05/2018 8.10 VesSeal Depending on software version, the HF 16-2000-700 device can also offer a mode for sealing large blood vessels. VesSeal is a special bipolar current allowing to seal large blood vessels and to prepare tissue bundles before cutting. It eliminates the need for traditional staplers and ligation. - Page 70 USER MANUAL 16-2000-700/701/702/703 Rev. 05/2018 Exceeding the allowed VesSeal time This mode has an additional function informing the used about exceeding the allowed time of VesSeal operation. If a message and an acoustic signal appear during a procedure, check the clamp application and verify the settings – if possible, increase the settings to obtain a stronger coagulation effect.
-
Page 71: System Overload Control
USER MANUAL 16-2000-700/701/702/703 Rev. 05/2018 8.11 System overload control The system has work time restrictions, which protect it from overloading (OVERLOAD). The restrictions depend on the power settings and the type of procedure. In extreme conditions, overload control allows to at least 10 seconds of work after 30 seconds of rest. - Page 72 USER MANUAL 16-2000-700/701/702/703 Rev. 05/2018 Program recording method: To define your own programs, select the program management bar on the touch panel. program management bar Figure 32. Program management bar. A window for program management will appear on the screen.
- Page 73 USER MANUAL 16-2000-700/701/702/703 Rev. 05/2018 The program management windows contains (Fig. 33): program number (1) program management bar (2) program add/remove to/from the MultiSwitch function list (3) group change mode button (4) button with a number indicating the number of programs in the MultiSwitch function (5) ...
-
Page 74: Copying Of Programs
USER MANUAL 16-2000-700/701/702/703 Rev. 05/2018 8.12.1 Copying of programs To copy the program click on the touch panel the program management bar (Fig. 32). Then choose a program from the list to copy it, click the edit name button and the Copy icon (Fig. 34). - Page 75 USER MANUAL 16-2000-700/701/702/703 Rev. 05/2018 Effect adjustment using the footswitch Figure 36. The MultiSwitch button may also be used to change the program. Press the button shortly to make the change, which is indicated on the screen. Figure 37. Program change using the MultiSwitch button.
-
Page 76: Menu Content
USER MANUAL 16-2000-700/701/702/703 Rev. 05/2018 8.13 Menu content Selecting the Menu button on the main panel allows to use the following tools: Catalogue Language Style Volume Screen brightness Recommended settings Service Contact ... -
Page 77: Catalogue
USER MANUAL 16-2000-700/701/702/703 Rev. 05/2018 8.13.1 Catalogue To review the catalogue of accessories, click the Catalogue icon. Figure 39. Catalogue of accessories. Catalogue updates are free of charge. The medical representative can update the catalogue during a commercial visit. 8.13.2 Change of text and message language... -
Page 78: Style Change
USER MANUAL 16-2000-700/701/702/703 Rev. 05/2018 8.13.3 Style change The system offers an option to change graphics, so that it is possible to work in both bright (Sunset) and dark (Night) operating room. It also allows to change icons (Sunset 3D), which graphically indicate the nature of work in a given mode. -
Page 79: Screen Brightness Change
USER MANUAL 16-2000-700/701/702/703 Rev. 05/2018 IMPORTANT NOTICE For safety reasons, when working with electrosurgical unit, it is not possible to completely mute the acoustic signals. The alarm sounds always remain at the same volume level, regardless of volume adjustments. 8.13.5 Screen brightness change HF 16-2000-700 system offers an option to adjust screen brightness. -
Page 80: Service
USER MANUAL 16-2000-700/701/702/703 Rev. 05/2018 8.13.6 Service The Service icon enables access to service settings. This option is available for authorised service; a password is required. Figure 44. Access to service settings. 8.13.7 Restoring the suggested settings The Suggested settings icon allows to return to the factory suggested settings. -
Page 81: Inspection Due Date
USER MANUAL 16-2000-700/701/702/703 Rev. 05/2018 8.13.8 Inspection due date The Inspection due date icon allows to check inspection validity. There you can find informations about earlier inspections. Figure 46. Inspection due date. 8.13.9 Contact This icon contains contact details for the manufacturer's address. -
Page 82: Maximum Activation Time
USER MANUAL 16-2000-700/701/702/703 Rev. 05/2018 8.13.10 Maximum activation time The HF 16-2000-700 System comes with an option of limiting activation time within the range of 30–180 seconds. This function is by default programmed at 90 seconds, and 0 seconds means that the function is off. -
Page 83: Errors And Messages
USER MANUAL 16-2000-700/701/702/703 Rev. 05/2018 9. Errors and messages 9.1 The most common errors during system operation Table 4. Possible errors during system operation Error type Signalling Troubleshooting The touchscreen remains dark Sound, visual signalling using a Wait about 30 seconds when the... - Page 84 USER MANUAL 16-2000-700/701/702/703 Rev. 05/2018 UNIT ERROR 505 The system has locked for safety reasons. Contact the service. ACCESSORY ERROR Shorted switch on the handle. Please release the handle button. If the button is released and the system continues to display the message, the accessory is damaged. Connect a functioning accessory.
- Page 85 USER MANUAL 16-2000-700/701/702/703 Rev. 05/2018 ARGON ERROR A message informing about the lack of argon. Refill the argon. FOOTSWITCH ERROR Shorted button on the footswitch. Please release the footswitch button. If the message is still displayed, the cutting button on the footswitch is damaged. Connect a functioning footswitch.
- Page 86 USER MANUAL 16-2000-700/701/702/703 Rev. 05/2018 SYSTEM COOLING The system is cooled to protect it from overheating (see section 8.9). The system forces an interruption in the procedure until the indicator turns off (about 30 seconds). AUTOSTOP The message informs that AutoStop has stopped working.
- Page 87 USER MANUAL 16-2000-700/701/702/703 Rev. 05/2018 RESTORING THE SUGGESTED SETTINGS Selecting the appropriate checkbox on the touch panel cancels the set modes in the programs and groups and returns to the factory settings in the entire system. NEUTRAL ELECTRODE APPLICATION Check the neutral electrode connection. For additional information, see sections 8.2.1...
- Page 88 USER MANUAL 16-2000-700/701/702/703 Rev. 05/2018 ENDO-DETECT Closed loop detection message, informing that a non-closed loop has been detected. Please check loop application. CLAMP APPLIED INCORRECT VesSeal clamp has not been applied correctly. Please check if the correct output is activated, if the forceps are clean and if they are assigned to the correct output.
- Page 89 USER MANUAL 16-2000-700/701/702/703 Rev. 05/2018 EXCEEDING THE ALLOWED VesSeal TIME The vessel has not been closed. Please re-apply the clamp. VesSeal AUTOSTOP A message informing about the correct termination of the VesSeal work. Page: 89 of 134...
- Page 90 USER MANUAL 16-2000-700/701/702/703 Rev. 05/2018 BIPOLAR ACCESSORY ERROR The bipolar instrument is shorted. Please open the instrument branches. INSPECTION OVERDUE Inspection overdue. Please contact our service. Page: 90 of 134...
- Page 91 USER MANUAL 16-2000-700/701/702/703 Rev. 05/2018 MAXIMUM ACTIVATION TIME Limitation of activation time was selected. The system forces activation to stop. After reactivation the time is calculated from the start. SIMULTANEOUS WORK When second of two operators choose a different mode than the mode already activated...
-
Page 92: Protection Measures And Warnings
USER MANUAL 16-2000-700/701/702/703 Rev. 05/2018 10. Protection measures and warnings 10.1 When performing electrosurgical procedures, minimize the risk of burns by: a) using only the recommended accessories, b) constantly checking the cables for connecting the application electrodes, and in particular their insulation condition, c) correctly applying of the neutral electrode (see Section “Neutral Electrode... - Page 93 USER MANUAL 16-2000-700/701/702/703 Rev. 05/2018 10.6 CHANNELLING EFFECT In procedures where high-frequency current might flow through body parts with a small transverse diameter or through other pedicles (e.g. ovary-Fallopian tube, testes, gallbladder) there is a risk that the high-frequency current will cumulate in the narrowest place.
- Page 94 use a non-conductive cap on the endoscope eyepiece 10.20 In designing electrosurgical generators, Ackermann paid special attention to the increasingly restrictive requirements regarding electromagnetic emissions. As a result, solutions that ensure minimal emission levels were selected to fulfil current and future requirements.
-
Page 95: Technical Inspection, Warranty And Service
The Declaration of Conformity supplied by the manufacturer does no inludes devices whose maintenance, servicing or repair by unauthorized services. The HF 16-2000-700 unit is equipped with a system, that signalises the term of the technical inspection of the electrosurgical unit. The message is shown at the screen for 30 days before the term expires. - Page 96 In order to ensure correct operation of the device, installation and staff training should be performed by an authorised representative of Ackermann. Each participant of such training receives a certificate which entitles him/her to use Ackermann electrosurgical unit.
- Page 97 USER MANUAL 16-2000-700/701/702/703 Rev. 05/2018 VOLTAGE FOR MODES MODE VOLTAGE MONO CUT 1200 Vp PRECISE CUT 800 Vp MIXED CUT 400 Vp MUCO CUT 760 Vp POLIPO CUT 500 Vp PAPILLO CUT 1.2 kVp ARTRO CUT 700 Vp URO CUT...
- Page 98 USER MANUAL 16-2000-700/701/702/703 Rev. 05/2018 OUTPUT GRAPHS IMPORTANT NOTICE The presented graphs could change with the development of our products. Page: 98 of 134...
- Page 99 USER MANUAL 16-2000-700/701/702/703 Rev. 05/2018 Page: 99 of 134...
- Page 100 USER MANUAL 16-2000-700/701/702/703 Rev. 05/2018 Page: 100 of 134...
- Page 101 USER MANUAL 16-2000-700/701/702/703 Rev. 05/2018 MUCO CUT level 5 level 9 1000 1500 2000 2500 Resistance [Ω] Page: 101 of 134...
- Page 102 USER MANUAL 16-2000-700/701/702/703 Rev. 05/2018 Object 2 MUCO CUT R = 135 ohm P[W] Level Page: 102 of 134...
- Page 103 USER MANUAL 16-2000-700/701/702/703 Rev. 05/2018 PAPILLO CUT 1000 1500 2000 2500 Resistance [ohm] Page: 103 of 134...
- Page 104 USER MANUAL 16-2000-700/701/702/703 Rev. 05/2018 PAPILLO CUT Vppcut Level Page: 104 of 134...
- Page 105 USER MANUAL 16-2000-700/701/702/703 Rev. 05/2018 Page: 105 of 134...
- Page 106 USER MANUAL 16-2000-700/701/702/703 Rev. 05/2018 Page: 106 of 134...
- Page 107 USER MANUAL 16-2000-700/701/702/703 Rev. 05/2018 Page: 107 of 134...
- Page 108 USER MANUAL 16-2000-700/701/702/703 Rev. 05/2018 Page: 108 of 134...
- Page 109 USER MANUAL 16-2000-700/701/702/703 Rev. 05/2018 Page: 109 of 134...
- Page 110 USER MANUAL 16-2000-700/701/702/703 Rev. 05/2018 Page: 110 of 134...
- Page 111 USER MANUAL 16-2000-700/701/702/703 Rev. 05/2018 Page: 111 of 134...
- Page 112 USER MANUAL 16-2000-700/701/702/703 Rev. 05/2018 Page: 112 of 134...
- Page 113 USER MANUAL 16-2000-700/701/702/703 Rev. 05/2018 Page: 113 of 134...
- Page 114 USER MANUAL 16-2000-700/701/702/703 Rev. 05/2018 Page: 114 of 134...
- Page 115 USER MANUAL 16-2000-700/701/702/703 Rev. 05/2018 Page: 115 of 134...
- Page 116 USER MANUAL 16-2000-700/701/702/703 Rev. 05/2018 Page: 116 of 134...
- Page 117 USER MANUAL 16-2000-700/701/702/703 Rev. 05/2018 Page: 117 of 134...
- Page 118 USER MANUAL 16-2000-700/701/702/703 Rev. 05/2018 Page: 118 of 134...
- Page 119 USER MANUAL 16-2000-700/701/702/703 Rev. 05/2018 Page: 119 of 134...
- Page 120 USER MANUAL 16-2000-700/701/702/703 Rev. 05/2018 Page: 120 of 134...
- Page 121 USER MANUAL 16-2000-700/701/702/703 Rev. 05/2018 Page: 121 of 134...
- Page 122 USER MANUAL 16-2000-700/701/702/703 Rev. 05/2018 Page: 122 of 134...
- Page 123 USER MANUAL 16-2000-700/701/702/703 Rev. 05/2018 Page: 123 of 134...
- Page 124 USER MANUAL 16-2000-700/701/702/703 Rev. 05/2018 Page: 124 of 134...
- Page 125 USER MANUAL 16-2000-700/701/702/703 Rev. 05/2018 Page: 125 of 134...
- Page 126 USER MANUAL 16-2000-700/701/702/703 Rev. 05/2018 Page: 126 of 134...
- Page 127 USER MANUAL 16-2000-700/701/702/703 Rev. 05/2018 Page: 127 of 134...
- Page 128 USER MANUAL 16-2000-700/701/702/703 Rev. 05/2018 Page: 128 of 134...
-
Page 129: System And Accessories Maintenance
USER MANUAL 16-2000-700/701/702/703 Rev. 05/2018 12. System and accessories maintenance CLEANING The HF 16-2000-700 has been designed to ensure easier-than-ever operation and maintaining the system clean, in combination with its versatile applications in electrosurgical procedures. As the system case is made of metal without any ventilation holes, it can be cleaned using disinfectants, and the touch panel can be cleaned using alcohol-based disinfectants. -
Page 130: Manual Washing
USER MANUAL 16-2000-700/701/702/703 Rev. 05/2018 12.1.1 Manual washing Non-disposable elements, heavily soiled with tissue remains, should be pre-cleaned with a plastic cleaning plate or plastic brush. Then use one of the following recommended agents for accessory cleaning and sterilisation: Manufacturer... -
Page 131: Autoclave Sterilization
Guidance and manufacturer's declaration – electromagnetic emissions The HF 16-2000-700is intended for use in the electromagnetic environment specified below. The customer or the user of the HF 16-2000-700 should assure that it is used in such an environment Emissions test... - Page 132 USER MANUAL 16-2000-700/701/702/703 Rev. 05/2018 Guidance and manufacturer's declaration – electromagnetic immunity HF 16-2000-700 is intended for use in the electromagnetic environment specified below. The customer or the user of the HF 16-2000-700 should assure that it is used in such an environment.
- Page 133 If the measured field strength in the location in which HF 16-2000-700 is used exceeds the applicable RF compliance level above, normal functioning of the HF 16-2000- 700 should be verified. If abnormal performance is observed, additional measures may be necessary, such as re-orienting or relocating the HF 16-2000-700.
-
Page 134: Environmental Protection Guidelines
USER MANUAL 16-2000-700/701/702/703 Rev. 05/2018 14. Environmental protection guidelines Since the transposition of the 2002/96/EU directive into the national legislation, the following rules have come into force: Electric and electronic equipment must not be disposed of with domestic waste.
Need help?
Do you have a question about the 16-2000-700 and is the answer not in the manual?
Questions and answers