Table of Contents
Advertisement
Quick Links
Advertisement
Table of Contents

Subscribe to Our Youtube Channel
Related Manuals for Dieter Knoll Collection DKP37902XK


Summary of Contents for Dieter Knoll Collection DKP37902XK
- Page 1 DKP37902XK EN User Manual Oven...
-
Page 2: Table Of Contents
CONTENTS 1. SAFETY INFORMATION...................2 2. SAFETY INSTRUCTIONS.................4 3. INSTALLATION....................7 4. PRODUCT DESCRIPTION................8 5. CONTROL PANEL.................... 8 6. BEFORE FIRST USE..................9 7. DAILY USE...................... 10 8. CLOCK FUNCTIONS..................11 9. USING THE ACCESSORIES................13 10. ADDITIONAL FUNCTIONS................15 11. - Page 3 Keep all packaging away from children and dispose of it • appropriately. WARNING: Keep children and pets away from the • appliance when it operates or when it cools down. Accessible parts become hot during use. If the appliance has a child safety device, it should be •...
-
Page 4: Safety Instructions
2. SAFETY INSTRUCTIONS 2.1 Installation Ventilation opening mini‐ 560x20 mm WARNING! mum size. Opening placed on the bottom Only a qualified person must install this rear side appliance. Mains supply cable 1500 mm • Remove all the packaging. length. Cable is placed •... - Page 5 fuses removed from the holder), earth • Do not operate the appliance with wet leakage trips and contactors. hands or when it has contact with water. • The electrical installation must have an • Do not apply pressure on the open door. isolation device which lets you disconnect •...
- Page 6 2.4 Care and cleaning – provide good ventilation during and after the first use at maximum temperature operation. WARNING! • Unlike all humans, some birds and reptiles Risk of injury, fire, or damage to the can be extremely sensitive to potential appliance.
-
Page 7: Installation
2.8 Disposal • Disconnect the appliance from the mains supply. • Cut off the mains electrical cable close to WARNING! the appliance and dispose of it. Risk of injury or suffocation. • Remove the door catch to prevent children or pets from becoming trapped in the •... -
Page 8: Product Description
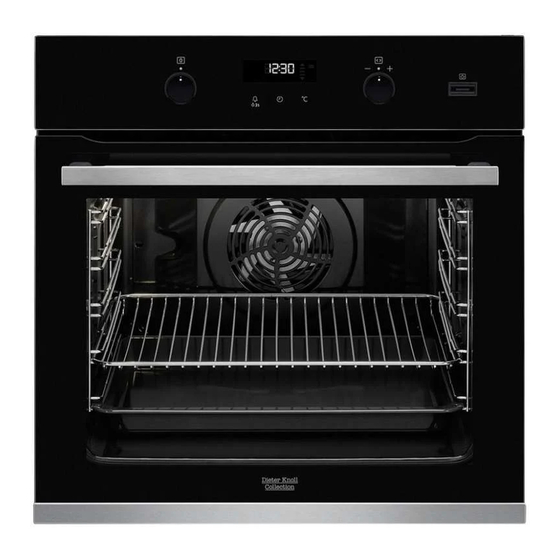
3.2 Securing the oven to the cabinet 4. PRODUCT DESCRIPTION 4.1 General overview Control panel Knob for the heating functions Display Control knob (for the temperature) Heating element Lamp Cavity embossment - Aqua cleaning container Shelf support, removable Shelf positions 4.2 Accessories •... -
Page 9: Before First Use
5.2 Sensor fields / Buttons To set the MINUTE MINDER. Hold it for more than 3 seconds to turn on or turn off the oven lamp. To set a clock function. To check the oven temperature or the temperature of the core tempera‐ ture sensor (if applicable). -
Page 10: Daily Use
7. DAILY USE WARNING! Heating Application function Refer to Safety chapters. This function is designed to 7.1 How to set: Heating function save energy during cooking. When you use this function, Moist Fan Bak‐ Step 1 Turn the knob for the heating func‐ the temperature in the cavity tions to select a heating function. -
Page 11: Clock Functions
requirements according to EU 65/2014 and For the cooking instructions refer to "Hints EU 66/2014. Tests according to EN 60350-1. and tips" chapter, Moist Fan Baking. For general energy saving recommendations The oven door should be closed during refer to "Energy Efficiency" chapter, Energy cooking so that the function is not interrupted Saving. - Page 12 8.3 How to set function: Duration Step 1 Set a heating function. Step 2 - press repeatedly. - starts to flash. Step 3 Turn the control knob to set the minutes. - press to confirm. Step 4 Turn the knob for the temperature to set the hour. - press to confirm.
-
Page 13: Using The Accessories
Step 5 Turn the knob for the temperature to set the hour for the function: End Time. Press: Step 6 Turn the knob for the temperature to set the minutes for the function: End Time. Press: The display shows: the set temperature, Oven turns on automatically later on, works for the set Duration time and stops at the set End Time. - Page 14 Wire shelf Push the shelf between the guide bars of the shelf support and make sure that the feet point down. Deep pan: Push the tray between the guide bars of the shelf support. Wire shelf, Deep pan: Push the tray between the guide bars of the shelf support and the wire shelf on the guide bars above.
-
Page 15: Additional Functions
10. ADDITIONAL FUNCTIONS 10.1 How to use: Child lock When you turn off the oven while the Function Lock is on, the Function Lock When the function is on the oven cannot be switches automatically to the Child Lock. turned on accidentally. Refer to "Additional functions"... -
Page 16: Hints And Tips
10.5 Cooling fan 10.6 Safety thermostat When the oven operates, the cooling fan Incorrect operation of the oven or defective turns on automatically to keep the surfaces of components can cause dangerous the oven cool. If you turn off the oven, the overheating. - Page 17 (°C) (min) Sweet rolls, 16 baking tray or dripping pan 20 - 30 pieces Rolls, 9 pieces baking tray or dripping pan 30 - 40 Pizza, frozen, 0.35 wire shelf 10 - 15 Swiss roll baking tray or dripping pan 25 - 35 Brownie baking tray or dripping pan...
- Page 18 11.4 Information for test institutes Tests according to IEC 60350-1. (°C) (min) Small Conven‐ Baking 20 - 30 cakes, tional Cook‐ tray 20 per tray Small True Fan Baking 150 - 20 - 35 cakes, Cooking tray 20 per tray Small True Fan Baking...
-
Page 19: Care And Cleaning
(°C) (min) Short True Fan Baking 140 - 20 - 40 bread Cooking tray Short True Fan Baking 2 and 4 140 - 25 - 45 bread Cooking tray Short Conven‐ Baking 140 - 25 - 45 bread tional Cook‐ tray Toast, 4 Grill... - Page 20 Clean the cavity after each use. Fat accumulation or other residue may cause fire. Moisture can condense in the oven or on the door glass panels. To decrease the conden‐ sation, let the oven work for 10 minutes before cooking. Do not store the food in the oven Everyday for longer than 20 minutes.
- Page 21 Before the Pyrolysis: Turn off the oven and wait Remove all accessories. Clean the oven floor and the inner until it is cold. door glass with warm water, a soft cloth and a mild detergent. Step 1 Set the function: - flashes.
- Page 22 12.6 How to remove and install: Door The oven door has three glass panels. You can remove the oven door and the internal glass panels to clean them. Read the whole "Removing and installing door" instruction before you remove the glass panels. CAUTION! Do not use the oven without the glass panels.
- Page 23 Step 9 Hold the door glass panels by their top edge and carefully pull them out one by one. Start from the top panel. Make sure the glass slides out of the supports com‐ pletely. Step Clean the glass panels with water and soap.
-
Page 24: Troubleshooting
Before you replace the lamp: Step 1 Step 2 Step 3 Turn off the oven. Wait until the Disconnect the oven from the Put a cloth on the bottom of the oven is cold. mains. cavity. Back lamp Step 1 Turn the glass cover to remove it. -
Page 25: Energy Efficiency
Do not remove the rating plate from the oven cavity. We recommend that you write the data here: Model (MOD.) ......... Product number (PNC) ......... Serial number (S.N.) ......... 14. ENERGY EFFICIENCY 14.1 Product Information and Product Information Sheet* Supplier's name Dieter Knoll Collection ENGLISH... - Page 26 Model identification DKP37902XK 949498232 Energy Efficiency Index 81.2 Energy efficiency class Energy consumption with a standard load, conventional mode 0.93 kWh/cycle Energy consumption with a standard load, fan-forced mode 0.69 kWh/cycle Number of cavities Heat source Electricity Volume 72 l...
-
Page 27: Environmental Concerns
Moist Fan Baking turn on the lamp again but this action will reduce the expected energy savings. Function designed to save energy during cooking. When you use this function the lamp automatically turns off after 30 sec. You may 15. ENVIRONMENTAL CONCERNS appliances marked with the symbol with Recycle materials with the symbol... - Page 28 867368879-A-492021...
Need help?
Do you have a question about the DKP37902XK and is the answer not in the manual?
Questions and answers