Table of Contents
Advertisement
Advertisement
Table of Contents

Subscribe to Our Youtube Channel
Related Manuals for Dieter Knoll Collection DKB65902XK


Summary of Contents for Dieter Knoll Collection DKB65902XK
- Page 1 User Manual Oven DKB65902XK...
-
Page 2: Table Of Contents
CONTENTS Safety information Clock functions Safety instructions Using the accessories Installation Additional functions Product description Hints and tips Control panel Care and cleaning Before first use Troubleshooting Daily use Energy efficiency Subject to change without notice. SAFETY INFORMATION Before the installation and use of the appliance, carefully read the supplied instructions. -
Page 3: Safety Instructions
Children shall not carry out cleaning and user maintenance • of the appliance without supervision. General Safety Only a qualified person must install this appliance and • replace the cable. WARNING: The appliance and its accessible parts • become hot during use. Care should be taken to avoid touching heating elements. - Page 4 • Keep the minimum distance from other • All electrical connections should be appliances and units. made by a qualified electrician. • Install the appliance in a safe and • The appliance must be earthed. suitable place that meets installation •...
- Page 5 • Do not let sparks or open flames to come in contact with the appliance Cable types applicable for installation or when you open the door. replacement for Europe: • Do not put flammable products or items H07 RN-F, H05 RN-F, H05 RRF, H05 VV- that are wet with flammable products F, H05 V2V2-F (T90), H05 BB-F in, near or on the appliance.
-
Page 6: Installation
• Make sure the appliance is cold. There appliances only. Do not use it for house is the risk that the glass panels can lighting. break. • Before replacing the lamp, disconnect • Replace immediately the door glass the appliance from the power supply. panels when they are damaged. - Page 7 Building In min. 550 min. 560 min. 550 min. 560 Securing the oven to the cabinet...
-
Page 8: Product Description
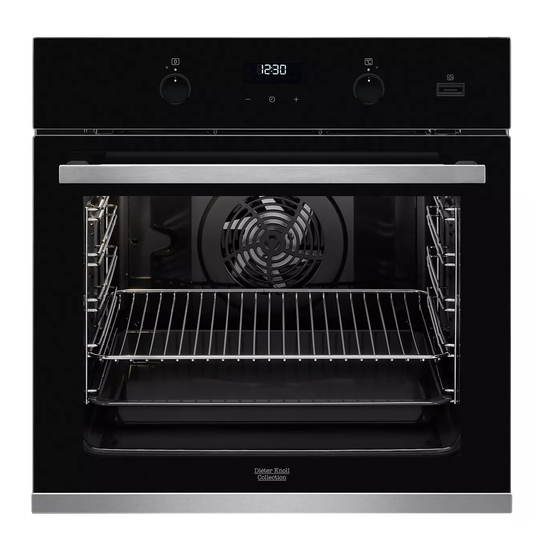
PRODUCT DESCRIPTION General overview Control panel Knob for the heating functions Power lamp / symbol Display Control knob (for the temperature) Temperature indicator / symbol Plus Steam Heating element Lamp Cavity embossment - Aqua cleaning container Shelf support, removable Shelf positions Accessories For cakes and biscuits. -
Page 9: Before First Use
Display A. Clock functions B. Timer C. Clock function BEFORE FIRST USE WARNING! Refer to Safety For function: True Fan Cooking chapters. PLUS refer to "Daily use" chapter, Setting the function: To set the Time of day refer to True Fan Cooking PLUS". "Clock functions"... - Page 10 Oven func‐ Application Oven func‐ Application tion tion To turn on the lamp with‐ To bake on up to three out a cooking function. shelf positions at the same time and to dry Light food. This function is designed Set the temperature 20 - to save energy during 40 °C lower than for Con‐...
-
Page 11: Clock Functions
Setting the function: True Fan 2. Set the function: Cooking PLUS 3. Press: Plus Steam It works only with the function: True Fan This function increases humidity during Cooking PLUS. cooking. The indicator turns on. WARNING! Risk of burns and 4. - Page 12 Setting the time. Changing the Setting the TIME DELAY time 1. Set an oven function and temperature. You must set the time before you operate the oven. 2. Press again and again until starts to flash. flashes when you connect the 3.
-
Page 13: Using The Accessories
USING THE ACCESSORIES Wire shelf and deep pan together: WARNING! Refer to Safety Push the deep pan between the guide chapters. bars of the shelf support and the wire shelf on the guide bars above. Inserting the accessories Wire shelf: Push the shelf between the guide bars of the shelf support and make sure that the feet point down. -
Page 14: Hints And Tips
HINTS AND TIPS If you use two baking trays at the same WARNING! Refer to Safety time, keep one empty level between them. chapters. Cooking meat and fish The temperature and baking Use a deep pan for very fatty food to times in the tables are prevent the oven from stains that can be guidelines only. - Page 15 CAKES / PASTRIES / BREADS (ml) (°C) (min) Bread rolls 20 - 25 Bread 35 - 40 Plum cake / Apple pie / Cinnamon rolls, 100 - 150 160 - 180 30 - 60 baked in a cake mould Use 150 ml of water unless specified otherwise.
- Page 16 Baking and roasting CAKES Conventional True Fan Cooking Cooking (min) (°C) (°C) Whisked rec‐ 3 (2 and 4) 45 - 60 Cake ipes mould Shortbread 3 (2 and 4) 20 - 30 Cake dough mould Buttermilk 60 - 80 Cake cheesecake mould, Ø...
- Page 17 CAKES Conventional True Fan Cooking Cooking (min) (°C) (°C) Meringues 80 - Baking tray Meringues, 2 and 4 80 - Baking two levels, tray preheat the empty oven Buns, pre‐ 12 - 20 Baking heat the tray empty oven Eclairs 25 - 35 Baking tray...
- Page 18 BREAD AND PIZZA Conventional Cook‐ True Fan Cooking (min) (°C) (°C) Rye bread, pre‐ 30 - 45 Bread tin heating is not needed Bread rolls, 6 - 8 2 (2 25 - 40 Baking rolls and 4) tray Pizza 230 - 250 230 - 250 10 - 20 Enamel‐...
- Page 19 MEAT Conventional True Fan Cooking Cooking (min) (°C) (°C) Beef 50 - 70 Pork 90 - 120 Veal 90 - 120 English roast beef, rare 50 - 60 English roast beef, medium 60 - 70 English roast beef, well done 70 - 75 MEAT Conventional...
- Page 20 FISH Conventional True Fan Cook‐ Cooking (min) (°C) (°C) Trout / Sea bream, 3 - 4 fish 40 - 55 Tuna / Salmon, 4 - 6 fillets 35 - 60 Grill Preheat the empty oven. Use the fourth shelf position. Grill with the maximum temperature setting.
- Page 21 BEEF LAMB (°C) (min) (°C) (min) Roast beef or fil‐ 190 - 5 - 6 Lamb leg / Roast 150 - 100 - let, rare lamb, 1 - 1.5 kg Roast beef or fil‐ 180 - 6 - 8 Lamb saddle, 1 - 160 - 40 - 60 let, medium...
- Page 22 Defrost (kg) Defrosting Further defrost‐ time (min) ing time (min) Chicken 100 - 140 20 - 30 Place chicken on an upturned saucer placed on a large plate. Turn halfway through. Meat 100 - 140 20 - 30 Turn halfway through.
- Page 23 Moist Fan Baking - recommended accessories FRUIT Use the dark and non-reflective tins and containers. They have better heat absorption than the light colour and reflective dishes. Apricots 8 - 10 Apple slices 6 - 8 Pears 6 - 9 Ramekins Pizza pan Baking dish...
- Page 24 (°C) (min) Soufflè, 6 ceramic ramekins on 45 - 55 pieces wire shelf Sponge flan flan base tin on wire 35 - 45 base shelf Victoria sand‐ baking dish on wire 35 - 50 wich shelf Poached fish, baking tray or dripping 35 - 45 0.3 kg Whole fish, 0.2...
- Page 25 Information for test institutes Tests according to IEC 60350-1. (°C) (min) Small Conven‐ Baking 20 - 30 cakes, tional tray 20 per Cooking tray Small True Fan Baking 150 - 20 - 35 cakes, Cooking tray 20 per tray Small True Fan Baking 150 -...
-
Page 26: Care And Cleaning
(°C) (min) Short True Fan Baking 140 - 25 - 45 bread Cooking tray Short Conven‐ Baking 140 - 25 - 45 bread tional tray Cooking Toast, 4 Grill Wire max. 2 - 3 minutes Preheat the oven shelf first side; 2 - for 3 minutes. - Page 27 Clean all accessories after each use and let them dry. Use a soft cloth with warm water and a cleaning agent. Do not clean the accessories in a dish‐ washer. Do not clean the non-stick accessories using aggressive agents, sharp- Accessories edged objects or in a dishwasher.
- Page 28 WARNING! Make sure that the oven is cold before you touch it. There is a risk of burns. Removing and installing door The oven door has two glass panels. You can remove the oven door and the internal glass panel to clean it. Read the whole "Removing and installing door"...
-
Page 29: Troubleshooting
6. Put the door on a soft cloth on a stable the installation the surface of the glass surface. panel frame on the screen-printing zones 7. Hold the door trim (B) on the top edge is not rough when you touch it. of the door at the two sides and push When installed correctly the door trim inwards to release the clip seal. - Page 30 Problem Possible cause Remedy The oven does not heat up. The necessary settings are Make sure that the settings not set. are correct. The oven does not heat up. The fuse is blown. Make sure that the fuse is the cause of the malfunc‐ tion.
-
Page 31: Energy Efficiency
......... Serial number (S.N.) ......... ENERGY EFFICIENCY Product Information Sheet Product information according to EU 65-66/2014 Supplier's name Dieter Knoll Collection Model identification DKB65902XK 949499038 Energy Efficiency Index 81.2 Energy efficiency class Energy consumption with a standard load, conventional 0.93 kWh/cycle... - Page 32 Volume 72 l Type of oven Built-In Oven Mass 29.3 kg EN 60350-1 - Household electric cooking Cooking with fan appliances - Part 1: Ranges, ovens, steam When possible, use the cooking functions ovens and grills - Methods for measuring with fan to save energy.
- Page 36 867355773-A-252019...
Need help?
Do you have a question about the DKB65902XK and is the answer not in the manual?
Questions and answers