Table of Contents
Advertisement
Quick Links
Advertisement
Table of Contents

Related Manuals for Genvex ECO 360 R


Summary of Contents for Genvex ECO 360 R
- Page 1 INSTALLATION MANUAL ECO 360 R Mechanical ventilation with passive heat recovery...
-
Page 2: Table Of Contents
TABLE OF CONTENTS Safety information ..................................3 Functional description ................................4 Installation ....................................5 Wall mounting (vertical connections) ........................5 Floor mounting (vertical connections) ........................6 Dimensional sketch ...............................7 Horizontal mounting of the unit (horizontal connections) ................7 Duct connection ................................8 Duct system ..................................10 Insulation of ducts in cold attics ...........................11 Insulation of ducts in heated rooms ........................11 Post-heating of supply air ............................11 Electrical installation ..............................12... -
Page 3: Safety Information
Subject to design changes. Labelling The CE mark represents Genvex’s assurance that the product complies with all regulations laid down for the product in accordance with relevant EU directives. The CE mark is mandatory for most products sold in the EU,... -
Page 4: Functional Description
(flow sensors are accessories and ordered separately). The ECO 360 R is designed for indoor installation, but – if specific country requirements allow – it can also be used outside the building envelope in areas protected from wind... -
Page 5: Installation
These instructions must be followed. If the installation is not executed in accordance with these instructions, KVM- Genvex cannot be held liable for any further damage that is unrelated to the Genvex unit. KVM-Genvex A/S always recommends careful planning of the installation space for your Genvex product in relation to the location of living spaces. -
Page 6: Floor Mounting (Vertical Connections)
1. The unit is mounted on its back on a vibration-damping surface – with service access from above as shown in Figure 3. C. Figure 2. Filter in frame with elastic straps Figure 3. Installation methods – ECO 360 R A. Wall-mounted B. Floor-standing C. Horizontal... -
Page 7: Dimensional Sketch
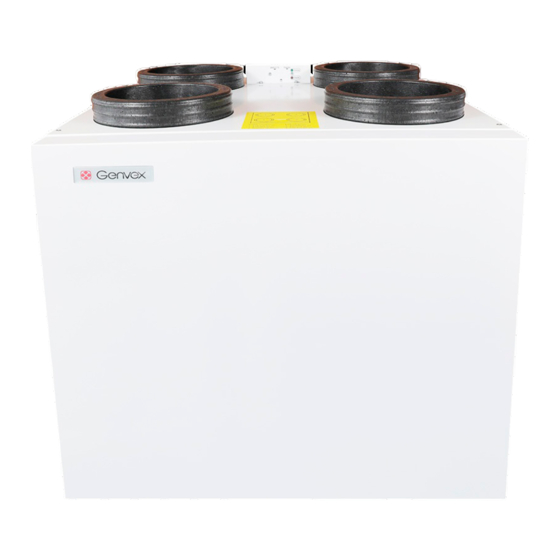
Dimensional sketch In order to allow access for servicing and maintenance, there must be a clearance of at least 600 mm in front of the ECO 360 R 596,4 Right-hand version 1. Discharge air 2. Extract air 3. Outdoor air 4. -
Page 8: Duct Connection
200 160 Note that the ECO 360 R is available in a right-hand version (characterised by the reheater being located in the supply ECO 360 R Left-hand air to the right of the unit) and a left-hand version (charac-... - Page 9 To start the duct installation, it is recommended using 4 x Ø160 mm nipple connectors with double sealing lips. Alternatively, a Ø200 mm spiro pipe can be used, which is connected directly to the outside of the ECO 360 R connector.
-
Page 10: Duct System
1 metre. In order to connect ordinary galvanised steel ducts to the ECO 360 R ventilation unit, you must first install 4 nipple connectors in the unit’s Ø160 mm openings (double sealing lips). Alternatively, Ø200 mm galvanised steel ducts should be placed over the EPP connectors. -
Page 11: Insulation Of Ducts In Cold Attics
Reheating of supply air To benefit from the unit’s high recovery potential (efficien- As the rotary exchanger in the ECO 360 R cannot recapture cy), the ducts must be correctly insulated. all the heat from the exhaust air to the supply air, in the... -
Page 12: Electrical Installation
5. It is recommended setting the integrated post-heating In general, all electrical connections to the ECO 360 R must surface to a supply air temperature of 0-3° below the be executed by an authorised electrician. -
Page 13: System Maintenance
Remember to switch off the power by removing the appli- Do not vacuum or clean at high air pressure. ance connector from the ECO 360 R or at the socket (it can This will damage the filter! be difficult to reach the appliance connector on the unit when ducts have been mounted and insulated) before changing the filter or opening the unit. -
Page 14: Access To Internal Parts
Access to internal parts To access internal parts of the ECO 360 R, the front plate, control board and rotary exchanger must be removed. 3. Remove the 230V power cable and the control cable for 1. Remove the screws from the front plate to access the rotary exchanger motor. -
Page 15: Cleaning And Inspection Of Rotary Heat Exchanger
Check brush strips and synthetic leather seals around the rotor for leaks. If seals show signs of leakage, these must The ECO 360 R is supplied with an extra drive belt fitted – be replaced. this can easily be mounted on the rotor motor by removing... -
Page 16: Post-Heating Surface
Reheater Supply air and exhaust valves Inspect the reheater for dirt and make sure the plug Clean the valves by wiping them with a dry cloth. Make sure connections and heater are intact. the valve does not rotate and thus cause a change in the air volume. -
Page 17: Recommended Maintenance Intervals
Recommended maintenance intervals Component Action Interval Filter Replaced at regular intervals so that full efficien- 3–6 months cy of the unit is achieved. Fans Fans are cleaned to ensure operational reliability 12 months and efficiency. Rotary heat exchanger Make sure the lamellae are clean. Check the 12 months condition of the drive belt and seals around the rotor. -
Page 18: Spare Parts
SPARE PARTS PARTS LIST PARTS LIST - Rotor Item no. Description Item no. Description STOCK STOCK ITEM PART NUMBER ITEM PART NUMBER 068098 Rubber foot Ø25x25, M6x18 071008 Rotary exchanger Ø375x200 NUMBER NUMBER 069875 Optima 270 control board 071009 Brush TF 4.8x14 4P BK 2TFBK 071008 Rotorveksler Ø375x200 068098... -
Page 19: Troubleshooting
• After the warranty period (2 years ->), the installer from whom the unit was purchased or the Genvex Customer Centre by calling 7353 2700. Please have the data from the type plate ready (silver plate on the unit). -
Page 20: Electrical Diagram Optima 270 - Right
ELECTRICAL DIAGRAM OPTIMA 270 – RIGHT MODBUS Display MODBUS Master MODBUS ERROR LAN OK... -
Page 21: Electrical Diagram Optima 270 -Left
ELECTRICAL DIAGRAM OPTIMA 270 –LEFT MODBUS Display MODBUS Master MODBUS ERROR LAN OK... -
Page 22: Power Consumption Display, Control And Rotor
POWER CONSUMPTION Power consumption of display, control board and rotor Watt Heat and moisture recovery rotor according to 13141-7 % heat % moisture... -
Page 23: Declaration Of Conformity
DECLARATION OF CONFORMITY The declaration of conformity can be downloaded from www.genvex.com. DE-COMMISIONING INSTRUCTIONS For further information on dismantling components with a view to disposal and recycling, see illustrations under “System maintenance”... - Page 24 – in fact you can recover up to 95% of the heat energy with a Genvex system. Please visit www.genvex.com to see a list of our distributors KVM-Genvex A/S • Sverigesvej 6 • DK-6100 Haderslev • Tel.: +45 73 53 27 00 • salgogsupport@genvex.dk • www.genvex.com...
Need help?
Do you have a question about the ECO 360 R and is the answer not in the manual?
Questions and answers