
Related Manuals for GBC MINI AUTO COMPACT


Summary of Contents for GBC MINI AUTO COMPACT
- Page 1 INSTRUCTION MANUAL MINI AUTO COMPACT Range Ø 20 / 42 mm (0,78”- 1,78”) G.B.C. Industrial Tools S.p.A. Via Sandro Pertini 41/43 – 25046 Cazzago San Martino (Bs) – Italia – Tel. + 39 030 7451154 – Fax. + 39 030 73 56 629...
- Page 2 MINI AUTO COMPACT Original Instructions - rev.01 - 2016 - in compliance with § 1.7.4 of the Machine Directive 2006/42/CE Index Presentation of the comapny and introduction to the Instruction Manual Warranty General Clauses Intended Use of the Machine Technical Features...
- Page 3 MINI AUTO COMPACT Original Instructions - rev.01 - 2016 - in compliance with § 1.7.4 of the Machine Directive 2006/42/CE G.B.C. Industrial Tools S.p.A. is known worldwide for the quality of its machines and accessories for pipe cutting and beveling procedures of any sort and plate be- veling machines..
- Page 4 MINI AUTO COMPACT Original Instructions - rev.01 - 2016 - in compliance with § 1.7.4 of the Machine Directive 2006/42/CE G.B.C. guarantees the reliability of the machine and its conformity to the specifications herewith reported. The warranty covers the machine in its whole for a time period of one year from the shipment date (ref.
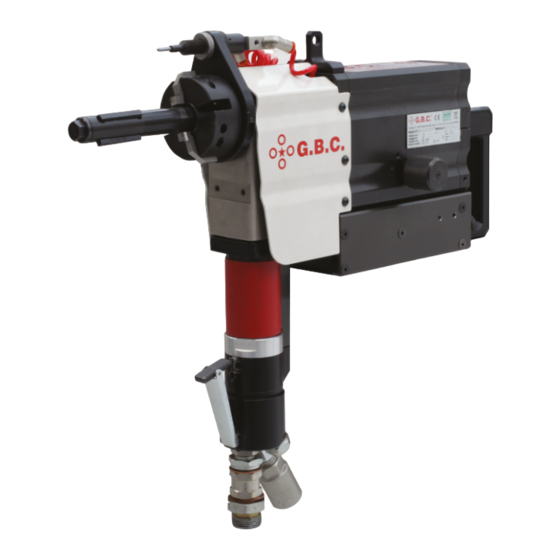
- Page 5 MINI AUTO COMPACT Original Instructions - rev.01 - 2016 - in compliance with § 1.7.4 of the Machine Directive 2006/42/CE The machine shown in the Drawing is conceived wel- ding preparation of pipes. It operates while gripping in the ID of the pipe.
-
Page 6: Technical Features
MINI AUTO COMPACT Original Instructions - rev.01 - 2016 - in compliance with § 1.7.4 of the Machine Directive 2006/42/CE TECHNICAL FEATURES PNEUMATIC ID Locking Range mm (inches) 20 - 42 (0.78 –1.65) Idle Speed gg/min (Rpm) 12 (7 bar) - Page 7 MINI AUTO COMPACT Original Instructions - rev.01 - 2016 - in compliance with § 1.7.4 of the Machine Directive 2006/42/CE G.B.C. Industrial Tools S.p.A. Via Sandro Pertini 41/43 – 25046 Cazzago San Martino (Bs) – Italia – Tel. + 39 030 7451154 – Fax. + 39 030 73 56 629...
- Page 8 MINI AUTO COMPACT Original Instructions - rev.01 - 2016 - in compliance with § 1.7.4 of the Machine Directive 2006/42/CE The machine is supplied with: • Series of Locking Jaws from 20 to 42 mm (one set of which is already mounted) •...
- Page 9 MINI AUTO COMPACT Original Instructions - rev.01 - 2016 - in compliance with § 1.7.4 of the Machine Directive 2006/42/CE INTERCHANGEABLE REDUCED SHAFTD FOR ID PIPES FROM 12.5mm TO 21mm ID G.B.C. Industrial Tools S.p.A. Via Sandro Pertini 41/43 – 25046 Cazzago San Martino (Bs) – Italia – Tel. + 39 030 7451154 – Fax. + 39 030 73 56 629...
- Page 10 MINI AUTO COMPACT Original Instructions - rev.01 - 2016 - in compliance with § 1.7.4 of the Machine Directive 2006/42/CE G.B.C. Industrial Tools S.p.A. designs and assembles its machines in strict compliance with the safety regulations provided by the applicable EC directives and by the Italian laws regulat- ing this matter.
- Page 11 MINI AUTO COMPACT Original Instructions - rev.01 - 2016 - in compliance with § 1.7.4 of the Machine Directive 2006/42/CE Using properly the safety gear entails the only risks to be generated by the user’s system and not by inborn defects of our machines.
- Page 12 MINI AUTO COMPACT Original Instructions - rev.01 - 2016 - in compliance with § 1.7.4 of the Machine Directive 2006/42/CE Considering the mass of the machine no particular problem has been detected in regard to the operator safety. By always using both hands for operating the machine, the operator is unable to reach the bevelling tools as the unit would suddenly stop –...
- Page 13 MINI AUTO COMPACT Original Instructions - rev.01 - 2016 - in compliance with § 1.7.4 of the Machine Directive 2006/42/CE Connection to the air system Connect the hose to the Filter Lubricator as shown in the above picture. At the other end of the Filter you will have to connect the hose that goes into the air system.
- Page 14 MINI AUTO COMPACT Original Instructions - rev.01 - 2016 - in compliance with § 1.7.4 of the Machine Directive 2006/42/CE - Locking Jaws Replacement - Turn the Feeding Adjustment Valve clockwise as shown above. Unscrew the Vane Abutment Nut with a counter-clockwise movement using the appropriate wrench.
- Page 15 MINI AUTO COMPACT Original Instructions - rev.01 - 2016 - in compliance with § 1.7.4 of the Machine Directive 2006/42/CE NB Max 2 full turns. Unscrew the Manual/Auto knob with a counter-clockwise rotation. Select the required jaws and insert them in the vacant seats of the jaws you have just re- Remove the jaws.
- Page 16 MINI AUTO COMPACT Original Instructions - rev.01 - 2016 - in compliance with § 1.7.4 of the Machine Directive 2006/42/CE Apply a small pressure on the jaws with your hand. Screw the Manual/Auto know rotating it clockwise until it stops.
- Page 17 MINI AUTO COMPACT Original Instructions - rev.01 - 2016 - in compliance with § 1.7.4 of the Machine Directive 2006/42/CE Screw back in place the Vane Abutment Nut. G.B.C. Industrial Tools S.p.A. Via Sandro Pertini 41/43 – 25046 Cazzago San Martino (Bs) – Italia – Tel. + 39 030 7451154 – Fax. + 39 030 73 56 629...
-
Page 18: Correct Position
MINI AUTO COMPACT Original Instructions - rev.01 - 2016 - in compliance with § 1.7.4 of the Machine Directive 2006/42/CE Select the required tools according to the actual job to do and also according to the shaft mounted on the ma- chine and place them in the seats of the chuck. - Page 19 MINI AUTO COMPACT Original Instructions - rev.01 - 2016 - in compliance with § 1.7.4 of the Machine Directive 2006/42/CE Close firmly the Feeding Adjustment Valve with a clockwise rotation. Slide the shaft inside the pipe to be bevelled. G.B.C. Industrial Tools S.p.A.
- Page 20 MINI AUTO COMPACT Original Instructions - rev.01 - 2016 - in compliance with § 1.7.4 of the Machine Directive 2006/42/CE NB Max 2 full turns. Unscrew the Manual/Auto knob with a counter-clockwise rotation. The machine is now firmly locked into the pipe.
- Page 21 MINI AUTO COMPACT Original Instructions - rev.01 - 2016 - in compliance with § 1.7.4 of the Machine Directive 2006/42/CE Start the feeding by turning the Feeding Adjustment Valve counter-clockwise and bevel the pipe for about 1- 2mm. Stop the feeding by rotating the Valve in the opposite direction until it stops.
- Page 22 MINI AUTO COMPACT Original Instructions - rev.01 - 2016 - in compliance with § 1.7.4 of the Machine Directive 2006/42/CE Adjust the tools so that they both perfectly touch the pipe end you have just bevelled. Hold up the machine and turn the Manual/Auto knob clockwise until it stops.
- Page 23 Original Instructions - rev.01 - 2016 - in compliance with § 1.7.4 of the Machine Directive 2006/42/CE If possible use a balancer (GBC optional) to sustain the machine perpendicular to the pipes as shown above. Insert the shaft in the pipe.
- Page 24 MINI AUTO COMPACT Original Instructions - rev.01 - 2016 - in compliance with § 1.7.4 of the Machine Directive 2006/42/CE Hold up the machine and center it with the pipe bringing the tools to a distance of about 2-3mm from the pipe itself.
- Page 25 When the desired result is achieved release the security lever to stop the machine feeding and the chuck rota- tion. The Mini Auto Compact will return to the start position. The machine automatic cycle can be stopped immediately by pressing the green button at any time.
- Page 26 MINI AUTO COMPACT Original Instructions - rev.01 - 2016 - in compliance with § 1.7.4 of the Machine Directive 2006/42/CE The machine is equipped with a pneumatic End-Stop (Pin) through which you can determine the length of the pipe protruding from a fixed point that could be either a tubesheet or the pipe itself.
- Page 27 MINI AUTO COMPACT Original Instructions - rev.01 - 2016 - in compliance with § 1.7.4 of the Machine Directive 2006/42/CE Close firmly the Feeding Adjustment Valve with a clockwise rotation. Insert the shaft inside the pipe to be bevelled. G.B.C. Industrial Tools S.p.A.
- Page 28 MINI AUTO COMPACT Original Instructions - rev.01 - 2016 - in compliance with § 1.7.4 of the Machine Directive 2006/42/CE NB Max 2 full turns. Unscrew the Manual/Auto knob with a counter-clockwise rotation. The machine is now firmly locked into the pipe.
- Page 29 MINI AUTO COMPACT Original Instructions - rev.01 - 2016 - in compliance with § 1.7.4 of the Machine Directive 2006/42/CE Start the feeding by turning the Feeding Adjustment Valve and execute the bevel until you reach the desired finishing. Stop the feeding by rotating the Valve in the opposite direction until it stops.
- Page 30 MINI AUTO COMPACT Original Instructions - rev.01 - 2016 - in compliance with § 1.7.4 of the Machine Directive 2006/42/CE The Pin position can be shifted in order to overcome eventual encumbrances preventing it to touch the required surface. Loosen the end.-stop ferrule.
- Page 31 MINI AUTO COMPACT Original Instructions - rev.01 - 2016 - in compliance with § 1.7.4 of the Machine Directive 2006/42/CE Act on the screw by turning it in a clockwise or counter-clockwise direction until the end-stop activates the machine automatic stop.
- Page 32 MINI AUTO COMPACT Original Instructions - rev.01 - 2016 - in compliance with § 1.7.4 of the Machine Directive 2006/42/CE Close the feeding valve tightly by turning it clockwise. Unscrew the vane abutment nut by turning it in a counter-clockwise direction using the specific wrench sup- plied with the machine.
- Page 33 MINI AUTO COMPACT Original Instructions - rev.01 - 2016 - in compliance with § 1.7.4 of the Machine Directive 2006/42/CE NB Max 2 full turns. Unscrew the Manual/Auto knob with a counter-clockwise rotation. Remove the protection from both sides as shown in the above picture.
- Page 34 MINI AUTO COMPACT Original Instructions - rev.01 - 2016 - in compliance with § 1.7.4 of the Machine Directive 2006/42/CE Connect the air hose as shown in the above picture holding your hand on the three locking jaws keeping them pressed and steady in position .
- Page 35 MINI AUTO COMPACT Original Instructions - rev.01 - 2016 - in compliance with § 1.7.4 of the Machine Directive 2006/42/CE Rotate the expansion shaft in a counter- Loose the set screw indicated in the above picture clockwise direction using a long beak pliers until it can be removed from the machine.
- Page 36 MINI AUTO COMPACT Original Instructions - rev.01 - 2016 - in compliance with § 1.7.4 of the Machine Directive 2006/42/CE Insert the reduced shaft in the hole and the spacer as shown in the above picture. Turn the reduced shaft clockwise until it protrudes 58mm from the chuck as shown in the above picture Screw back in position the set screw previously loosen G.B.C.
- Page 37 MINI AUTO COMPACT Original Instructions - rev.01 - 2016 - in compliance with § 1.7.4 of the Machine Directive 2006/42/CE Assemble the reduced shaft extension and the reduced shaft top as shown in the above pictures. Insert the guiding shaft previously assembled in the machine, making sure to match the spacer in the back as shown in the above picture.
- Page 38 MINI AUTO COMPACT Original Instructions - rev.01 - 2016 - in compliance with § 1.7.4 of the Machine Directive 2006/42/CE Assemble the stroke end-stop screwing it in a clockwise rotation. Install the 3 locking jaws suitable for pipe ID to be worked and secure them in place using the specific rings supplied with the reduced shaft assembly.
- Page 39 MINI AUTO COMPACT Original Instructions - rev.01 - 2016 - in compliance with § 1.7.4 of the Machine Directive 2006/42/CE Turn the Manual/Auto knob in a clockwise direction until the end of the stroke. The AUTO function is now active .
- Page 40 MINI AUTO COMPACT Original Instructions - rev.01 - 2016 - in compliance with § 1.7.4 of the Machine Directive 2006/42/CE We suggest to perform a service c/o G.B.C. Industrial Tools S.p.A. premises every 400 hours working cycles. Verify the general conditions of the machine;...
- Page 41 MINI AUTO COMPACT Original Instructions - rev.01 - 2016 - in compliance with § 1.7.4 of the Machine Directive 2006/42/CE The machine does not run : Check the power supply is connected and suitable in regard to the motor power consumption.
Need help?
Do you have a question about the MINI AUTO COMPACT and is the answer not in the manual?
Questions and answers