
Related Manuals for MRMC PTA-1


Summary of Contents for MRMC PTA-1
- Page 1 PTA-1 Quick Start Guide QSG Product code: MRMC-2266-00 Product Covered: MRMC-1555-00, MRMC-2251-00 CRANES AND RIGS | BROADCAST | HEADS & DSLR | PRODUCT PHOTOGRAPHY | RENTALS...
- Page 2 PTA-1 Quick Start Guide Product code: MRMC-2266-00 Product Covered: MRMC-1555-00, MRMC-2251-00 © 2021 Mark Roberts Motion Control Ltd. All rights reserved. No part of this publication may be reproduced, transmitted, or translated by any means — graphical, electronic, or mechanical — including...
-
Page 3: Table Of Contents
Contents PTA-1 Quick Start Guide PTA-1 Quick Start Guide Chapter 1 Quick Start..............1 Important safety instructions ..........1 Power and connections ..........1 General care..............1 Location .................2 Intellectual property .............2 Overview .................3 Mounting positions..............3 Setting up the hardware ............3 Connecting the cables ............8 Appendix 1 Troubleshooting............ - Page 4 PTA-1 Quick Start Guide...
-
Page 5: Chapter 1 Quick Start
Chapter 1 Quick Start PTA-1 Quick Start Guide PTA-1 Quick Start Guide Important safety instructions To ensure the best from the product, please read this manual carefully. Keep it in a safe place for future reference. To reduce the risk of electric shock, do not remove the cover from the unit. -
Page 6: Location
PTA-1 Quick Start Guide Keep cables tidy. Use cable ties to keep them out of harm’s way. If you have a head with slip rings then make use of them; avoid running any cables between the base and the rotating head or camera. -
Page 7: Overview
You can use the Ethernet connection on the PTA-1 to connect directly to a PC running Multi-Head Controller (MHC) software. Setting up the hardware Mount the Pan Tilt Arm (PTA) onto a heavy-duty scaffolding pole by securing the PTA to the pole using the two scaffolding clamps. - Page 8 PTA-1 Quick Start Guide Nuts PTA underslung PTA overslung If the head is going to be used for target tracking, then ensure that the PTA is perfectly levelled to the ground using a spirit level.
- Page 9 PTA-1 Quick Start Guide Attach the safety cable around the bar, through at least one eyelet, and through the pan safety hole (near the connector socket). Remove any excess slack by making extra loops around the bar. Then join with a carabiner and screw the carabiner shut.
- Page 10 PTA-1 Quick Start Guide Attach the roll ring to the arm by sliding the roll wedge into the side plate and ensure the safety catch locks into place —preventing the roll ring to be detached again. Then tighten the two captive screws to firmly secure the roll.
- Page 11 PTA-1 Quick Start Guide Once the PTA-1 is fully constructed, test the movement of the unit by hand before connecting to power. Ensure that full movement of pan and tilt axes is possible and there are no obstructions.
-
Page 12: Connecting The Cables
PTA-1 Quick Start Guide Connecting the cables Attach the power cables ensuring each connector is fully secured into the socket and that the cable or connector is not caught in any moving part. Break-out box PC/laptop running MHC Software From Mains 100-240V 447-63Hz 1.6A Max... - Page 13 PTA and the Pod. Ensure the red markers on the socket and the plug align. Connect one end of the long umbilical cable to the PTA-1 and the other to the power supply socket in the break-out box. Ensure the red markers on the socket and the plug align.
- Page 14 PTA-1 Quick Start Guide Notes...
-
Page 15: Appendix 1 Troubleshooting
MHC. A ‘!’ appears Click the spanner( ) icon appearing below with the the PTA-1 head icon to allow MHC to correct PTA-1 head the error. icon in the MHC Main screen. - Page 16 PTA-1 Quick Start Guide Notes...
-
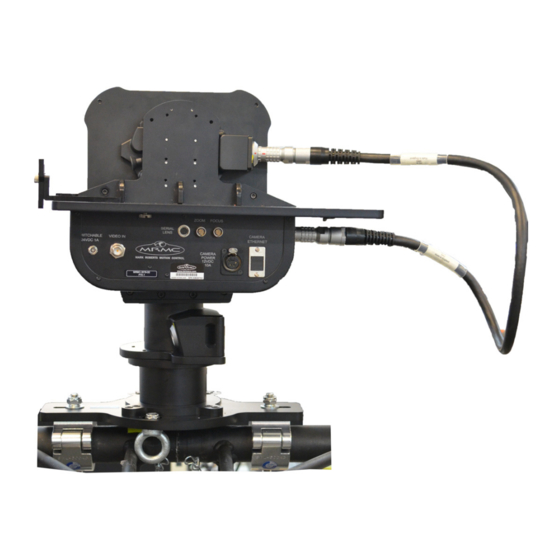
Page 17: Appendix 2 Pta-1 Connectors
Appendix 2 PTA-1 connectors PTA-1 Quick Start Guide PTA-1 Quick Start Guide Connector plate summary SWITCHABLE 24VDC 1A connector is the 24V DC outlet for powering a camera or HDMI/SDI signal converter. Centre positive. VIDEO IN input connector for the video 1 signal from the camera. -
Page 18: Connector Pin-Outs
PTA-1 Quick Start Guide Connector pin-outs Panel mount connector Panel mount connector is the 22-way (female) connector of type EGG.3K.822.CLL1 on the camera platform and the arm. Ethernet 1 Ethernet 2 Ethernet 3 10. Ethernet 4 11. Ethernet 5 12. Ethernet 6 13. -
Page 19: Panel Mount Connector
19. N/C 20. N/C 21. N/C 22. N/C Power In connector Power to supply the head and the power output connector on the junction box. It is a XLR 3-Way (Male) connector. The PTA-1 can run from 12-35 Volts DC. +24V... -
Page 20: Mains In Connector
PTA-1 Quick Start Guide Mains In connector Power input connector n the junction box for the PTA-1 head. It is a 3-Way (Male) C14 IEC connector. 240 Volts AC. Earth Live Neutral SDI Out Connector Connector for SDI Video signal from the camera in the junction box. -
Page 21: Video In Connector
PTA-1 Quick Start Guide Video In Connector The VIDEO connector is rated at 3 GHz allowing the video signal from the camera to go into the head, through the long communications cable, and out through the junction box. VIDEO (inner) -
Page 22: Focus, Zoom Connectors For External Servo Lcms
PTA-1 Quick Start Guide Focus, Zoom connectors for external servo LCMs The FOCUS and ZOOM connectors are for external servo Lens Control Motors (LCMs). Motor + Motor – Encoder A Encoder B Motor ID CAMERA POWER 12VDC OUT 10A connector (large 4-way XLR) General purpose 12V DC outlet. - Page 23 PTA-1 Quick Start Guide Notes...
-
Page 24: Appendix 3 Specifications
Appendix 3 Specifications PTA-1 Quick Start Guide PTA-1 Quick Start Guide Size Operational space ~ 1.2m Weight PTA-1 15.3kg Connection cable 5m: 1.10kg (long) 10m: 2.10kg 15m: 3.10kg 20m: 4.10kg 30m: 6.10kg Connection cable 0.30kg (short) Breakout Box 4.00kg Camera... - Page 25 PTA-1 Quick Start Guide Connections Via camera platform: RJ45 Gigabit Ethernet (1000 BASE-T) (IEEE 802.3ab) for Camera 3G HD SDI Max output 1080p 50/60 Camera power 12V Switchable 24VDC 1A Serial lens connection (10 pin hirose) ...
- Page 26 PTA-1 Quick Start Guide...
- Page 27 PTA-1 Quick Start Guide Product Product description Comments Number MRMC-2136 PTA-1 Robotic POD arm, Adjustable Broadcast Arm platform with Adjustable Platform shower-proof Electronics box, POD breakout box, 600mm umbilical, 5m umbilical, Scaffold plate MRMC-2137 PTA-1 Platform, Adjustable platform Adjustable, with shower-proof...
- Page 28 PTA-1 Quick Start Guide Product Product description Comments Number MRMC-2902 Cable Assembly PTA-1 electronics box 22+1HD Way 600mm to POD arm cable LEMO FGG.3K.822.CLCK23 Z w/75R Cable MRMC-1504 ROBOTIC POD Standard POD SCAFFOLD mounting plate MOUNTING PLATE ASSY MRMC-8007 PTA-1 Kit...
- Page 29 PTA-1 Quick Start Guide...
- Page 30 PTA-1 Quick Start Guide...
- Page 31 PTA-1 Quick Start Guide Notes...
- Page 32 Mark Roberts Motion Control Ltd. Unit 3, South East Studios, Blindley Heath, Surrey RH7 6JP United Kingdom Telephone: +44 (0) 1342 838000 info@mrmoco.com www.mrmoco.com...
Need help?
Do you have a question about the PTA-1 and is the answer not in the manual?
Questions and answers