Table of Contents
Advertisement
Quick Links
Advertisement
Table of Contents

Related Manuals for MEWOI WBGT2019A


Summary of Contents for MEWOI WBGT2019A
- Page 1 WBGT Heat Stress Monitor WBGT2019A, WBGT2019B User Manual www.mewoi.com...
-
Page 3: Table Of Contents
Contents Chapter I Introduction Section I Background · · · · · · · · · · · · · · · · · · · · · · · · · · · · · · · · · · · · · · · · · · · · · · · · · · · · · · · · · · · · · · · · · · · 3 Section II Instrument information ·... -
Page 4: Chapter I Introduction
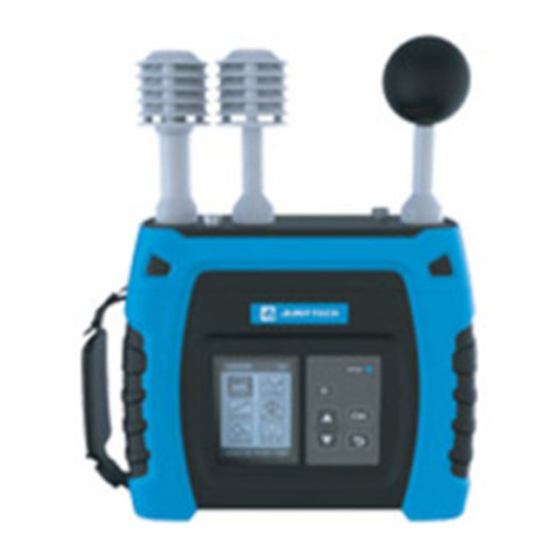
Chapter I Introduction Section I Background The WBGT2019A model, used for monitoring traditional heat stress index, is portable and easy to use. It can accurately and rapidly measure the relative indexes of the heat stress intensity of the individual under specific thermal environment. - Page 5 Commu Data nication transmission Cable cable. Wrist Detachable, For master-device. strap fall-prevention Nylon material Packing portable bag, Eco-Friendly material inner filler. For data Flash disk. import and softwar post-processin Manual User manual Paper documents. Tripod. Optional accessories Stand Tri-sens For tri-sensor Optional accessories or stand measurement.
- Page 6 Technical parameters Parameters WBGT2019A Note Measurement index Dry-bulb 0—85° C temperature range Dry-bulb ± 0.5° C (full range) temperature accuracy Wet-bulb 0—85° C temperature range Wet-bulb ± 0.5° C (full range) temperature accuracy Black globe 0—85° C temperature range Black globe ±...
- Page 7 Endurance Not less than 48 hours External power DC9V,1A Dedicated adapter supply Data logging and display Sensor 3 channels channel Viewing area : Screen Monochrome LCD 60*42 mm Language English Portuguese Recording 1-60 minutes (set arbitrarily) minutes interval default Data output USB port.
-
Page 8: Chapter Ii Functions
The main evaluation results include the stay time under different work intensity. Section II Specification I Instrument composition WBGT2019A is composed of sensor, master-device and other parts, as shown in Figure 1 and Figure 2. ① ② ③... -
Page 9: Section Iii Data Processing
Section III Data processing The evaluation algorithm of relevant standards is built into the WBGT2019A, which can directly conduct field evaluation and give evaluation results. The data can also be shown as curve. At the same time, data can be uploaded to the PC to conduct data processing through PC software. - Page 10 The power adapter is equipped with a variety of replaceable plugs, which can adapt to the standards of the United States, the United Kingdom, Europe and other regions. II Equipment arrangement WBGT2019A is a portable instrument, there is a 1/4 inch screw hole on the bottom of the master-device, a standard tripod can be connected. See Figure 4.
-
Page 11: Section Ii Basic Operation
Section II Basic operations I Sensor preparation The sensor of WBGT2019A and the master-device are designed for split use. The default state is: the sensor is fixed on the top of master-device by self-contained locking screws, as shown in Figure 5. During assembly, the 9-pin plug shall be inserted and the two lock nuts shall be tightened in place, otherwise there may be poor contact. - Page 12 See Figure 6. Figure 6 Power button Note: WBGT2019A has the sleep function, under sleeping state, the LCD will be shut off. Please observe the indicator light to see if the power is off instead of the display state of LCD.
-
Page 13: Section Iii Measurement Application
Section III Measurement application I Usage mode Portable mode: WBGT2019A can be used in a variety of ways. The default mode is portable mode in which single master-device and single sensor is connected. The master-device and single sensor are fastened by the self-contained screw of sensor. - Page 14 See Figure 9. Figure 9 Tri-sensor mode III Operation interface 1. ON/OFF Press power bottom to turn on and off the WBGT2019A. A boot screen will be shown after power on. User can press key to select function at root menu, press key to enter parameter setting menu directly.
- Page 15 2. Function selection Press key to select the function menu, and then press to enter the corresponding interface; Press key to enter the parameter setting interface directly. See Figure 10. Figure 10 Function selection interface 3. Continuous measurement After power on, if there is no key operation for 5 seconds, the master device will automatically start continuous measurement.
- Page 16 connected, the second interface which is WBGT(W) calculation interface will not be shown. In the third interface, real time TLV value accroding to ACGIH will be shown, WBGTi and WBGTo will display them by cyclic switching at 10s intervals. As shown in Figure 11. Figure 11 Continuous measurement interfaces The fourth interface shows the real time value of Td (dew point temperature), HI (heat index), HU (humidity index) are the average of the current...
- Page 17 recording mark in the lower right corner, the number on the right means recording interval; press key again, recording will stop, and there will be a recording mark in the lower right corner. 4. Discontinuous measurement After selecting the interface to enter the discontinuous measurement, the timing setting interface will be shown first, and three periods of time for measurement will be shown at the same time, as shown in Figure 13.
- Page 18 measurement interface, which is used to calculate the real-time average value of WBGTi. When CH2 and CH3 are not connected, the second interface which is WBGT(W) calculation interface will not be shown. In the third interface, real time TLV value accroding to ACGIH will be shown, and WBGTi and WBGTo will be displayed by cyclic switching at 10s intervals.
- Page 19 Figure 15 Discontinuous measurement interfaces Key assignments: Press key in timing setting interface to move cursor, press keys to modify timing values. After setting the timing time, there are two ways to enter the measurement interface: one is to press after the cursor is moved to “start-up”;...
- Page 20 mode) and “User” (User calibration mode). User can click “User” to enter channel selection interface, moves the cursor to select the channel by pressing keys, and press to enter the corresponding calibration interface. In the calibration interface, press key to move the cursor, and press keys to modify value, then press the key for...
- Page 21 Figure 17 Parameter setting interface 1). Language selection After entering the language selection interface, press the key, the page will jump to the parameter keys to select the language. Press setting interface. Press the key to return to the parameter setting interface. See Figure 18.
- Page 22 2). Date and time After entering date and time setting interface, press the key to move the cursor, press keys to modify value, and press after the modification, the page will jump to parameter setting interface. Press key to return to the parameter setting interface. See Figure 19. Figure 19 Time modification interface 3).
- Page 23 4). Memory After entering memory interface, the page will display free space of SD card during the measurement. Press the key to return to the parameter setting interface. See Figure 21. Figure 21 Memory interface 5). Unit selection After entering unit selection interface, press the keys to select unit.
- Page 24 Figure 23 Clothing type interface 7). Reset settings After entering reset settings interface, press keys to select “Yes” and “No”. Click “Yes”, WBGT2019A will initialize to factory settings. key after the selection, and the page will jump to the parameter setting Press interface. Press key to return to parameter setting interface.
- Page 25 Note: 1. Shut down the instrument only when the arrow at the bottom of the page disappears, otherwise the recorded data will be lost. 2. Do not change the test mode when testing started, if it enters one test mode, another test mode will immediately stop.
-
Page 26: Chapter Iv Pc Software
The installation method is shown in the text file “JTSOFT-DM” software installation instructions, Installation steps: The supporting software of this WBGT2019A is based on Windows 7 or higher versions. Click the icon in the installation file to run the software and enter the install wizard;... - Page 27 Figure 24 Prompt interface Then enter the selection interface of software installation path, here user can select installation path, click “NEXT” after selection, as shown in Figure 25. Figure 25 Path selection Enter software installation interface, click “Install”, and the software begins installation.
- Page 28 Figure 26 Installation interface After waiting for more than 10 seconds for the software to complete installation, click “Finish” to complete the installation. See Figure 27. Figure 27 Installation complete After the software is installed, an icon will appear on the desktop and click on the icon to run the software.
-
Page 29: Section Ii Operation
Section II Operation I. Data management function WBGT2019A is equipped with PC processing software JTSOFT-DM which has data management function. It can perform and calculate data viewing through the PC, which is convenient for on-site testing and evaluating. After running the software, the boot interface appears. - Page 30 E. Generate test report: Click the icon to generate a test report. The default is pdf format file. F. Help: Click the icon to open WBGT2019A operation manual. G. About: Click the icon to open our official website. Download device storage file...
- Page 31 Import and export data files and calculations If use data files from other sources for data analysis and calculation, click button to import the corresponding files to the software and support the ‘.csv’ format file import software. In order to ensure the accuracy of the final calculation result, if there is individual data with large numerical error for the data finally used for calculation, choose these data then click button to delete.
- Page 32 Figure 33 Standard selection interface 6) User can perform segmentation calculation and statistics on the current data record file according to time. The software can calculate the data in 1-3 time segments, and the final test result is the average statistical result of data in different time periods.
- Page 33 Figure 36 Test data summary screen 8) For the calculated statistical results, click the button to generate a test report. The statistical results of the test data can be automatically generated in ‘.pdf’ format. The software provides editing tools for simple document format editing and save printing.
-
Page 34: Chapter V Maintenance Of Instrument
Chapter V Maintenance of Instrument Section I Calibration I Temperature calibration It is recommended to conduct temperature calibration and correction for this series of instruments every six months. Calibration through measurement department or self-calibration is acceptable. Self-calibration can be conducted with a special field temperature calibrator. The calibrator accuracy is ±... -
Page 35: Section Ii Storage
Section II Storage If the instrument is not used for a long time, the battery shall be removed from the master-device. The instrument shall be kept in a cool and dry place rather than the humid environment and the environment liable to mold, which will affect the service life of the humidity sensor. -
Page 36: Appendix I:acgih Clothing Corrections
Appendix I ACGIH Clothing Corrections The following clothing corrections are in degrees Celsius. When a clothing correction is entered into the setup portion of the QUESTemp° 36.the value is added to the WBGT only for looking up the stay times. The WBGT value displayed by the unit does not reflect corrections.
Need help?
Do you have a question about the WBGT2019A and is the answer not in the manual?
Questions and answers