Table of Contents
Advertisement
Quick Links
Advertisement
Table of Contents

Subscribe to Our Youtube Channel
Related Manuals for Sercomm XHC3


Summary of Contents for Sercomm XHC3
- Page 1 XHC3 User’s Guide Copyright 2020. All Rights Reserved. Document Version: 3.0 Version Date Changes Jul, 2021 1.Update Xfinity app setup steps 2.Correct typo and format July, 2021 Comcast made changes to images and reworded guidance 28 June, 2021 Initial Draft...
-
Page 2: Table Of Contents
Table of Contents CHAPTER 1 INTRODUCTION..............1 Overview ....................1 Physical Details ..................2 Package Contents ................4 CHAPTER 2 BASIC SETUP ................. 5 Installation .................... 5 CHAPTER 3 WALL MOUNTING ..............10 APPENDIX A SPECIFICATIONS..............12 Technical Specifications ..............12 Regulatory Approvals .................13 Label Information ................15... -
Page 3: Chapter 1 Introduction
Chapter 1 Introduction Overview XHC3 is an indoor only camera that supports full HD resolution and dual band 802.11ac Wi-Fi connectivity. Features Provides 1080p HD video quality Supports Dual Band 2.4GHz/5GHz 802.11ac WIFI for connectivity and Bluetooth 5.0 for onboarding ... -
Page 4: Physical Details
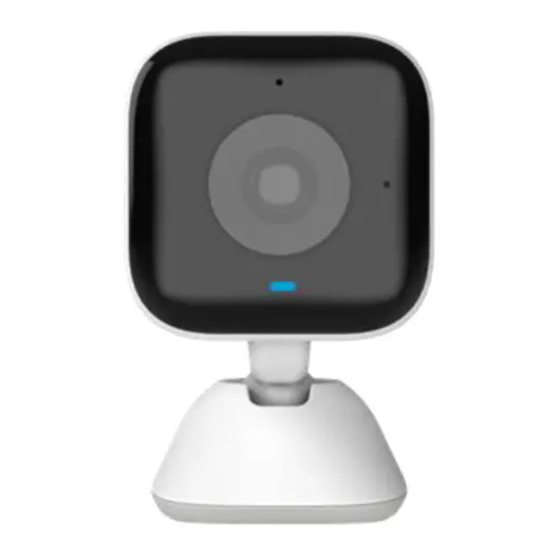
Physical Details Front View Figure 1: Front View Status LED Off. No power or camera is paused from software app Solid Amber. Camera is booting up. Blinking Blue. Camera is ready to pair. Solid Blue. Camera is connected to network and working normally Blinking Amber. - Page 5 Microphone The built-in microphone is designed to capture ambient sound and for bi-direction voice conversation. Rear View Speaker Reset Button Power Input Figure 2: Rear View Power Input Connect the included power adapter here. Do not use other power adapters; doing so may damage the camera.
-
Page 6: Package Contents
Package Contents The following items are included in the package. XHC3 camera x 1 Power adapter x 1 Screw/Anchor x 1 Screw diameter: 3.5mm ; Length: 25mm Anchor inner diameter: 2.9mm ; Length: 30mm Figure 3: What’s in the Box... -
Page 7: Chapter 2 Basic Setup
Chapter 2 Basic Setup This section provides information on how to install and setup XHC3 Installation 1. Choose a location Choose a suitable desired location anywhere inside 2. Power Up Plug the included power cable into to the camera and plug the power adapter into a standard power outlet. - Page 8 3. Check the status LED After bootup is complete, and when camera is ready to be paired, the LED is blinking blue.
- Page 9 4. Setup the Camera 4.1 Download the Xfinity app from the APP store or Google Play Store. 4.2 Sign in to the app with your Xfinity credentials.
- Page 10 4.3 Select Add a Device, then choose the Xfinity Camera to Start installing 4.4 Follow the guidance in the APP to finish the onboarding process. You can also use the camera functions in the same APP after onboarding the camera...
- Page 11 5. Mount the Camera Place the camera in its final permanent location near a power source. For mounting on a wall, please see Chapter 3 Wall Mounting.
-
Page 12: Chapter 3 Wall Mounting
Chapter 3 Wall Mounting This section provides details for final mounting of XHC3. Ensure that the camera is setup successfully before permanently mounting it. 1. Drill the pilot hole on the mounting surface at the desired location. Note: It is suggested to use "Philips Head (PH2)" screwdriver. The diameter of the mounting hole is 6.35mm and total depth is 36.2mm. - Page 13 3. Plug the included power cable into to the camera and plug the power adapter into a standard power outlet. CAUTION: Use only the power adapter provided. Using a different one can result in hardware damage. Figure 8: Routing the Cable 4.
-
Page 14: Appendix Aspecifications
Appendix A Specifications Technical Specifications Camera 4.24” x 2.69” x 2.05” (107.74 x 68.33 x 52.17mm) Dimensions H x W x D Video compression H.264 and MJPEG Operating 32F to 104F (0 C to 40 C) Temperature Storage -4F to 158F (-20 C to 70 C) Temperature Button 1 Reset Button... -
Page 15: Regulatory Approvals
Regulatory Approvals FCC Statement This device complies with Part 15 of the FCC Rules. Operation is subject to the following two conditions: (1) This device may not cause harmful interference, and (2) this device must accept any interference received, including interference that may cause undesired operation. This equipment has been tested and found to comply with the limits for a Class B digital device, pursuant to Part 15 of the FCC Rules. - Page 16 Industry Canada State ment This device complies with ISED’s licence-exempt RSSs. Operation is subject to the following two conditions: (1) This device may not cause harmful interference, and (2) this device must accept any interference received, including interference that may cause undesired operation. Le présent appareil est conforme aux CNR d’...
-
Page 17: Label Information
Label Information XHC3 Device Label Sample (Label size: 36.6 x 38.6mm) XHC3 Box Label Sample (Label size: 45 x 45mm)
Need help?
Do you have a question about the XHC3 and is the answer not in the manual?
Questions and answers