Advertisement
Quick Links
FORMA
Dedicated to Prime Fire 990 +
EN Installation manual / DE Montageanleitung / ES Manual de montaje /
FR Notice de montage / IT Istruzioni di montaggio / PL Instrukcja montażu /
RU инструкция по монтажу
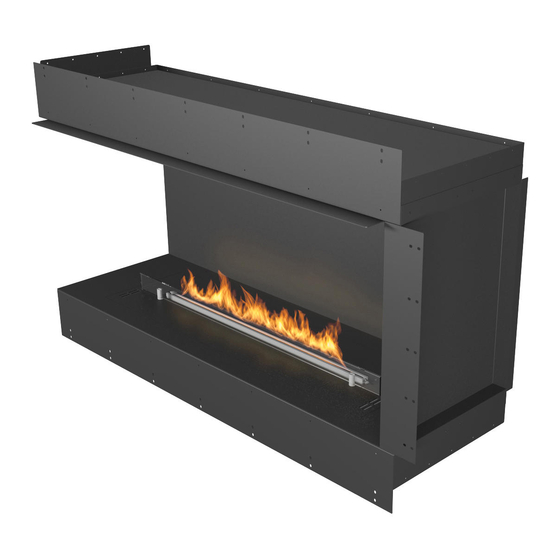
Single Sided
Left Corner
Right Corner
See Through
Room Divider
Three-sided
Copyright Planika Sp. z o.o.
www.planikausa.com
I1475#02
17.05.2021
Advertisement

Related Manuals for Planika Forma 1200 Front


Summary of Contents for Planika Forma 1200 Front
- Page 1 EN Installation manual / DE Montageanleitung / ES Manual de montaje / FR Notice de montage / IT Istruzioni di montaggio / PL Instrukcja montażu / RU инструкция по монтажу Single Sided Left Corner Right Corner See Through Room Divider Three-sided Copyright Planika Sp. z o.o. www.planikausa.com I1475#02 17.05.2021...
- Page 2 Burner / Feuerungsleiste / Hogar / Foyer / Min. m Focolare / Palenisko / Желоб пламени Forma 1200 Front Forma 1200 Left Corner / Right Corner Forma 1200 Three-sided Prime Fire 990 + 44 m Forma 1200 Tunnel Forma 1200 Room Divider...
- Page 3 Casing Forma Flange extension Liston de montaje Bande de montage Listello di montaggio Listwa montażowa Монтажная панель langer Montageleise See Through, Room Divider panel long larga longue lunga długa длинный Flange extension Liston de montaje Bande de montage Listello di montaggio Listwa montażowa Монтажная...
-
Page 4: Single Sided
1. Single Sided W1 min W2 max D1 max H1 min Forma 1200 Single Sided 1320 1020 Element 8. Element 3. Element 4. Min. 3x1,5 mm , 230 V, 50 Hz, PE... - Page 5 Single Sided Make sure to cover the VISIBLE EDGE of the cladding material Stellen Sie sicher, dass die SICHTBARE KANTE des Verkleidungsmaterials abgedeckt ist Asegúrese de cubrir EL BORDE VISIBLE del material de revestimiento. Assurez-vous de couvrir LE BORD VISIBLE du matériau de revêtement Assicurati di coprire il bordo visibile del materiale di rivestimento Upewnij się, żeby wykończyć...
- Page 6 Single Sided Cladding material (Option A - Combustible, Option B – Non-combustible) Option A Option B Element 8. Element 8 Element 6. Element 9. Element 10. Element 11.
- Page 7 2 Left/Right Corner W1 min W2 max D1 max H1 min Appliance Forma 1200 Left/Right Corner 1320 1020 Element 8. Element 3. Element 4. Element 2. Min. 3x1,5 mm , 230 V, 50 Hz, PE...
- Page 8 Left/Right Corner Make sure to cover the VISIBLE EDGE of the cladding material Stellen Sie sicher, dass die SICHTBARE KANTE des Verkleidungsmaterials abgedeckt ist Asegúrese de cubrir EL BORDE VISIBLE del material de revestimiento. Assurez-vous de couvrir LE BORD VISIBLE du matériau de revêtement Assicurati di coprire il bordo visibile del materiale di rivestimento Upewnij się, żeby wykończyć...
- Page 9 Left/Right Corner Cladding material (Option A - Combustible, Option B – Non-combustible) Option A Option B Element 8. Element 6. Element 9. Element 10. Element 11.
- Page 10 3. Three-sided W1 min W2 max D1 max H1 min Appliance Forma 1200 Three-sided 1301 1020 Element 8. Element 3. Element 4. Element 2. Min. 3x1,5 mm , 230 V, 50 Hz, PE...
- Page 11 Three-sided Element 2. Element 8. Make sure to cover the VISIBLE EDGE of the cladding material Stellen Sie sicher, dass die SICHTBARE KANTE des Verkleidungsmaterials abgedeckt ist Asegúrese de cubrir EL BORDE VISIBLE del material de revestimiento. Assurez-vous de couvrir LE BORD VISIBLE du matériau de revêtement Assicurati di coprire il bordo visibile del materiale di rivestimento Upewnij się, żeby wykończyć...
- Page 12 Three-sided Cladding material (Option A - Combustible, Option B – Non-combustible) Option A Option B Element 8. Element 6. Element 9. Element 10. Element 11.
- Page 13 4 See Through W1 min W2 max D1 max H1 min Appliance Forma 1200 See Through 1320 1020 Element 8. Element 3. Element 4. Min. 3x1,5 mm , 230 V, 50 Hz, PE...
- Page 14 See Through Element 1. Element 8. Make sure to cover the VISIBLE EDGE of the cladding material Stellen Sie sicher, dass die SICHTBARE KANTE des Verkleidungsmaterials abgedeckt ist Asegúrese de cubrir EL BORDE VISIBLE del material de revestimiento. Assurez-vous de couvrir LE BORD VISIBLE du matériau de revêtement Assicurati di coprire il bordo visibile del materiale di rivestimento Upewnij się, żeby wykończyć...
- Page 15 See Through Cladding material (Option A - Combustible, Option B – Non-combustible) Option A Option B Element 8. Element 6. Element 9. Element 5. Install the WINDSCREEN in pre made holes located on casing. Do not install technical shield. Installieren Sie bei installiertem Kamin die GLASPLATTEN in den vorbereiteten Löchern im Casing. Installieren Sie kein technisches Glas. Después de colocar la chimenea instale los PANELES DE VIDRIO en los orificios preparados en la carcasa.
-
Page 16: Room Divider
5. Room Divider W1 min W2 max D1 max H1 min Appliance Forma 1200 Room Divider 1320 1020 Element 8. Element 3. Element 4. Element 2. Min. 3x1,5 mm , 230 V, 50 Hz, PE... - Page 17 Room Divider Element 8. Element 8 Element 1. Make sure to cover the VISIBLE EDGE of the cladding material Stellen Sie sicher, dass die SICHTBARE KANTE des Verkleidungsmaterials abgedeckt ist Asegúrese de cubrir EL BORDE VISIBLE del material de revestimiento. Assurez-vous de couvrir LE BORD VISIBLE du matériau de revêtement Assicurati di coprire IL BORDO VISIBILE del materiale di rivestimento Upewnij się, żeby wykończyć...
- Page 18 Room Divider Cladding material (Option A - Combustible, Option B – Non-combustible) Option A Option B Element 8. Element 6. Element 9. Element 5. Install the WINDSCREEN in pre made holes located on casing. Do not install technical shield. Installieren Sie bei installiertem Kamin die GLASPLATTEN in den vorbereiteten Löchern im Casing. Installieren Sie kein technisches Glas. Después de colocar la chimenea instale los PANELES DE VIDRIO en los orificios preparados en la carcasa.
- Page 19 TV Installation...
Need help?
Do you have a question about the Forma 1200 Front and is the answer not in the manual?
Questions and answers