Advertisement
Quick Links
Assembly Manual Parts List
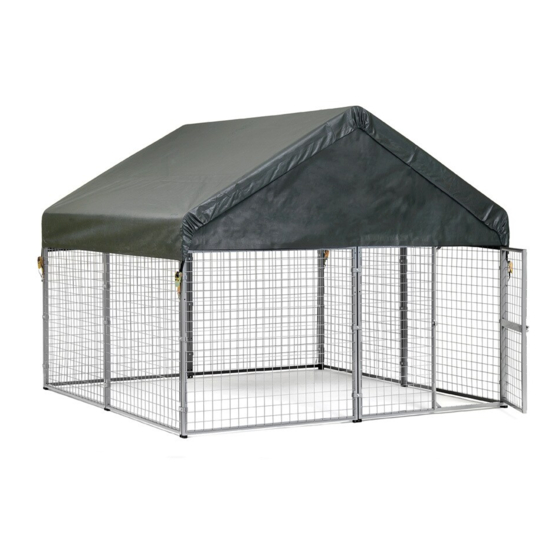
8'x 8'x 6'6'' Dog Kennel
Description of Parts
Top Rafter Poles
Cross Rail Swedged
Cross Rail Swedged
Connect Poles
4-Way Front Connectors
4-Way Top Connectors
3-Way Side Connectors(L)
3-Way Side Connectors(R)
4-Way Side Connectors
Cover
Front Panel
Back Panel
Anchors
1/4" x 1 1/2" Bolts
1/4" Nuts
Gasket 1/4"
Clamp
Square tubing connector
Foot
Plug for tube
Ratchet
Front Frame
Side Frame
Qty.
46 3/8"
6
18177
47 3/4"
3
18111
46 3/4"
3
18112
2
18186
33 3/8"
2
18103
1
18105
2
18107
2
18108
2
18109
1
800250
1
800251
800252
1
18166
15
24
03025
24
01010
24
01011
48
800215
2
800246
8
800249
6
15237
4
10240
1
800247
7
800248
Part #
• 2 or more persons recommended
to assemble
• Estimated assembly time
= 1.5 hours
Recommended Tools
Watertown, CT 06795
05-60180-0B
Model #60180
English
Before You Start
Adjustable
wrench
or
Ratchet with
7/16"
Rubber Mallet
Ladder
www.shelterlogic.com
1•800•524•9970
1•800•559•6175
150 Callender Road
Manufactured Under
U.S. Patents
D415,571 D409,310
D430,306 D414,564
Other Patents Pending
PAGE 1
08/11/2007
Advertisement

Related Manuals for ShelterLogic 60180


Summary of Contents for ShelterLogic 60180
- Page 1 Assembly Manual Parts List Model #60180 English 8'x 8'x 6'6'' Dog Kennel Description of Parts Qty. Part # Top Rafter Poles 46 3/8" 18177 Cross Rail Swedged 47 3/4" 18111 Cross Rail Swedged 46 3/4" 18112 18186 Connect Poles 33 3/8"...
- Page 2 REPLACEMENT PARTS OR QUESTIONS, Assembly Quantity Mfg. PLEASE CONTACT Reference of Parts Part # 800247 CUSTOMER SERVICE: 800248 1.800.524.9970 18103 18105 18107 18108 18109 18111 18112 18177 18186 800246 150 Callender Road Watertown, CT 06795 800249 PAGE 2 05-60180-0B 08/11/2007...
- Page 3 1. ROOF ASSEMBLY Begin by assembling your kennels roof frame as shown in Fig. 1. Be sure all of the "Pop" buttons have seated firmly. (set this aside for later) Fig. 1 Assembly Quantity Mfg. Reference of Parts Part # 18103 18105 18107...
- Page 4 3. ATTACH ROOF Fig. 5 With help, lift the roof assembly up and over the assembled walls. Position it so that the peak is on the gated panel. The (4) corner bends Fig. 4 will insert into the outer tubes on the front and rear of the kennel (do not engage the "Pop"...
- Page 5 If you have any questions, call the customer service number listed on Page 1. Any shelter that is not anchored securely and properly has the potential to fly away. ShelterLogic cannot be responsible for any shelter that blows away. NOTE: Your shelter’s cover can be quickly removed and stored prior to severe weather conditions.
Need help?
Do you have a question about the 60180 and is the answer not in the manual?
Questions and answers