
Related Manuals for ChoiceMMed MDTS100


Summary of Contents for ChoiceMMed MDTS100
- Page 1 INSTRUCTION MANUAL Electronic Pulse Stimulator MDTS100 *Bluetooth function is available for selected device.
-
Page 2: Table Of Contents
CONTENTS PAGE 1. Box Contents 2. Introduction 3. Indications for Use 4. Features 5. Safety Warnings 2/3/4 6. Specification 7. Procedures Include the Following Parameters 6/7/8/9/10 8. How the Device Works 9. Understanding Your Unit 10. Operating Instructions 11/12/13 11. Quality Assurance Tests 12. -
Page 3: Box Contents
1. Box Contents 1 - ChoiceMMed Electronic Pulse Stimulator MDTS100 2 - Lead Wires with Pin Connection 2 - AAA Batteries 4 - Electrode Pads 1 - User Guide 2. Introduction The Electronic Pulse Stimulator is intended for at home use in delivering electric pulses to tired and sore muscles. -
Page 4: Safety Warnings
5. Safety Warnings DANGER • Do not use this device if you have an implanted defibrillator or implanted metallic devices, such as a pacemaker. Such use could cause electrical shock, burns, electrical interference or death. • Don't use the device if you use a high frequency surgical ME EQUIPMENT simultaneously. - Page 5 NOTICE • Do not use this device while driving or sleeping. • Do not use this device in high humidity areas such as a bathroom. • Keep the device away from wet, high temperature and direct-sunlight place. • Keep this device out of reach of children. •...
- Page 6 Be aware ! Consult your physician before using this device. The stimulation with the device may: i. cause lethal rhythm disturbances to the heart in susceptible individuals, and, ii. disrupt the healing process after a recent surgical procedure. The device is not effective for pain of central origin (i.e. appendicitis, Hepatitis), including headache.
-
Page 7: Specification
6. Specification ENviRONMENT CONdiTiON Environmental condition for transportation & storage : -13 ℉ ~158 ℉ (-25℃ ~70℃ ) Temperature Range : ≤90% RH Humidity Atmosphere Pressure : 70kPa~106kPa Environment condition for operation : 41 ℉ ~104 ℉ (5℃ ~40℃ ) Temperature Range : 15% ~ 90% RH Humidity... -
Page 8: Procedures Include The Following Parameters
7. Procedures Include the Following Parameters Procedure contains the master pulse and the sub pulse. The working time of master pulse consists of several sub pulses while the sub pulse consists of several single pulses. Without special instruction in procedure: single pulse width is 140µS; the stimulation time is 20 minutes. --Mode 1 •... - Page 9 Output waveforms at loads of 500Ω Output waveforms at loads of 2kΩ Output waveforms at loads of 10kΩ Output waveforms Pulse burst (500Ω) --Mode 3 • Frequency: 35Hz Pulse Width: 50-140µS • The Maximum amplitude (500Ωload): 150V Output waveforms at loads of 500Ω Output waveforms at loads of 2kΩ...
- Page 10 --Mode 4 • Frequency: 35Hz Pulse Width: 140µS • The Maximum amplitude (500Ωload): 120V Output waveforms at loads of 500Ω Output waveforms at loads of 2kΩ Output waveforms at loads of 10kΩ Output waveforms Pulse burst (500Ω) --Mode 5 • Frequency: 35Hz Pulse Width: 140µS •...
- Page 11 --Mode 6 • Frequency: 82Hz Pulse Width: 140µS • The Maximum amplitude (500Ωload): 80V Output waveforms at loads of 2kΩ Output waveforms at loads of 500Ω Output waveforms at loads of 10kΩ Output waveforms Pulse burst (500Ω) --Mode 7 • Frequency: 35Hz Pulse Width: 140µS •...
- Page 12 Description of each mode: Pulse Frequency Output Mode Width amplitude (V) Type of Pain Sensation Mode (Hz) @500Ωload (µs) Cycle& Acute&Chronic Mode 1 50-140 Massage-Like feeling Modulated Pain 6.25 Variable tingling and pulsing Cycle& Mode 2 /0.9 Acute Pain sensation (sensation should Modulated /2.25 appear to come in waves)
-
Page 13: How The Device Works
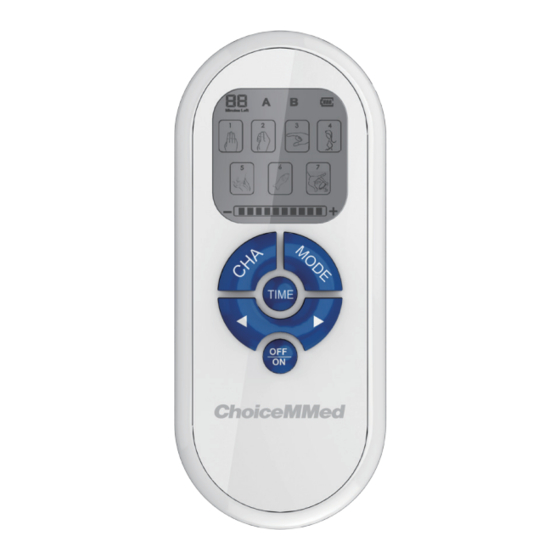
8. How the Device Works The device generates small pulses of electrical current. It transmits these pulses to the user’s skin through adhesive electrode pads, which activates the nerves below and temporarily relieves pain related to soreness. 9. Understanding Your Unit 10. - Page 14 dESCRiPTiON OF OPERATiON diAGRAM Step 1- insert the 2 AAA batteries into the device. Make sure the unit is OFF. Slide the compartment cover on the back of device downward until the cover pops off. Insert 2 AAA batteries according to the diagram inside the battery compartment.
- Page 15 Step 5- Choose the output channel(s) to be used for stimulation. Press the CHA button on the front of the unit to turn on or off the corresponding output channels (Both A&B are ON by default). IMPORTANT: Before stimulation, you must plug the wire into the output port and place the pads on the skin.
-
Page 16: Quality Assurance Tests
11. Quality Assurance Tests The test result of each step should meet the following passing criteria. Otherwise, it may be considered as failed test. ♦ Key Function Test When the functional keys are pressed step by step, the outputs of the device should be identical to the following description: Press the ON / OFF button to turn on the device. -
Page 17: Electrode Pads User Guide
13. Electrode Pads User Guide ♦ Positions for Use Shoulder Foot Back/Waist Arm/Hand Leg/Joints ♦ Steps for Use 1. Insert the pins of connecting wire into the wire connectors of each electrode pad (see image A). 2. Remove the electrode pads from the protective liner. Lift at the edge of the electrode pad and peel from the liner (see image B). -
Page 18: Cleaning And Maintenance
14. Cleaning and Maintenance » Use wet wipes or towels moistened with neutral detergent to clean the device and then use dry towel to wipe it again. » The electrode pads attached with the device are reusable up to 80 uses and should be replaced when the adhesiveness becomes weak. -
Page 19: Symbols
Do the electrode pads touch the skin closely? Remove and place again on the skin. Device does not Are the batteries installed correctly? Remove and install batteries. turn on Replace them with ChoiceMMed Self- Pads are not sticky Pads will deteriorate after multiple uses. Adhesive Replacement Gel Pads MDPS100. -
Page 20: Compliance Information For Emc Test
17. Compliance Information for EMC Test Electromagnetic emission Emission test Compliance Electromagnetic Environment – guidance Conducted and radiated CISPR 11, Group 1, Home Healthcare environment RF emissions Class B Electromagnetic immunity IEC 60601 test Immunity test Compliance Level Electromagnetic Environment – guidance level Electrostatic discharge ±... -
Page 21: Fcc Declaration
—Consult the dealer or an experienced radio/TV technician for help. 19. Applicable Model MDTS100 Beijing Choice Electronic Technology Co., Ltd. Add.: 2nd Floor, 3rd Floor and Room 410-412 4th Floor, No. 2 Building, No. 9 Shuangyuan Road, Shijingshan District...
Need help?
Do you have a question about the MDTS100 and is the answer not in the manual?
Questions and answers