Table of Contents
Advertisement
Quick Links
User Instructions
Dual Channel 4K Video Encoder and Decoder
Z3-HE4K-R
Model Name:
The Power of ZEUS™
DOC-USR-0077-01
Manual Version 2.01.47.15
Software Version 2.01.47.15
August 15, 2015
Before attempting to connect or operate this product, please read these instructions carefully and save the manual for future use.
© Z3 Technology, LLC. All rights reserved. This document contains proprietary and confidential information of Z3 Technology, LLC ("Z3"). This
document may not be used, reproduced, disclosed, or disseminated to anyone without prior written approval of an authorized Z3 representative.
Z3 Technology, LLC incorporates HDMI® technology. The terms of HDMI and HDMI High-Definition Multimedia Interface, and
the HDMI Logo are trademarks or registered trademarks of HDMI Licensing LLC in the United States and other countries.
Advertisement
Table of Contents

Related Manuals for Z3 Technology Z3-HE4K-R


Summary of Contents for Z3 Technology Z3-HE4K-R
- Page 1 Before attempting to connect or operate this product, please read these instructions carefully and save the manual for future use. © Z3 Technology, LLC. All rights reserved. This document contains proprietary and confidential information of Z3 Technology, LLC ("Z3"). This document may not be used, reproduced, disclosed, or disseminated to anyone without prior written approval of an authorized Z3 representative.
- Page 2 Revision History Version Date Change Note Author 2.01.47.15 08/15/2015 Original Document KA/RC...
-
Page 3: Table Of Contents
6.1 Prepare the 4K Source ....................9 6.2 Connect and Power Up the Z3-HE4K-R ................9 6.3 Find the Z3-HE4K-R on the Network using ZFinder ............. 10 6.4 Configure the Encoder to Stream to UDP ................ 12 6.5 Streaming RTP ......................14 6.6 Using DHCP ...................... - Page 4 DOC-USR-0077-01 LIST OF FIGURES Figure 1 Parts Included with the Z3-HE4K-R ................5 Figure 2 Z3-HE4K-R Front View .................... 8 Figure 3 Z3-HE4K-R Rear View ..................... 8 Figure 4 Encoder Connections for Z3-HE4K-R ................9 Figure 5 ZFinder with Z3-HE4K-R Listed................. 10 Figure 6 ZFinder with Z3-HE4K-R Selected ................
-
Page 5: General Information
HDMI to be streamed via UDP or RTP. It is configurable through an easy-to-use GUI. Its versatile design allows it to be configured as two encoders, two decoders or one channel of each. The Z3-HE4K-R is the ideal solution for industrial video, video distribution, surveillance and remote monitoring. -
Page 6: Included Parts List
3.0 INCLUDED PARTS LIST AC Power Cord Z3-HE4K-R 2x HDMI Cables DB-9 Serial Cable Figure 1 Parts Included with the Z3-HE4K-R *Note: The serial cable and gender changer are included for debugging purposes and are not needed by the typical Z3-HE4K-R user. *Note: The HDMI cable is an HDMI 1.4 cable. -
Page 7: Features
Weight: 3.06 kg (6.75 lb) 4.1 Supported Encode Resolutions 4K HDMI: 2160p30 4.2 Supported Decode Resolutions 4K HDMI: 2160p30 Only SATA2 drives are supported. ___________________________________________________________________________________________ Z3 Technology, LLC ♦ 100 N 8 ST, STE 250 ♦ Lincoln, NE 68508-1369 USA ♦ +1.402.323.0702... -
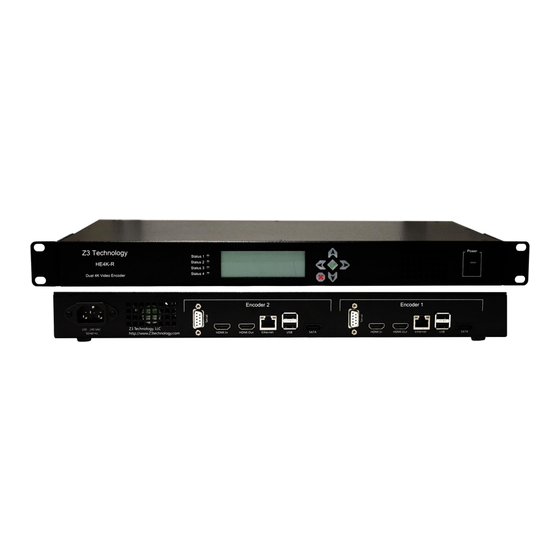
Page 8: Operating Controls
LCD Panel Power Switch Display Controls Figure 2 Z3-HE4K-R Front View *Note: The LCD Display and LCD Panel Controls are not enabled in this version of the Z3-HE4K-R. REAR VIEW Serial HDMI HDMI GigE USB SATA2 Serial HDMI HDMI GigE USB SATA2... -
Page 9: Getting Started And Running The Z3-He4K-R
(2) Take the HDMI1.4 cable from step (1) and connect it to HDMI In of the Z3-HE4K-R. (3) Connect an Ethernet cable to the Ethernet jack on the Z3-HE4K-R. Connect the other end of the Ethernet cable directly to a PC. You will use this PC to control the Z3-HE4K-R. -
Page 10: Find The Z3-He4K-R On The Network Using Zfinder
6.3 Find the Z3-HE4K-R on the Network using ZFinder (8) Make sure your Windows PC is connected to the same network in which the Z3-HE4K-R is connected. (9) Run the “ZFinder” PC Utility on your Windows PC. The ZFinder window appears. ZFinder completes a scan of the network and lists the location of all Z3 systems connected to the network. -
Page 11: Figure 7 System Setup Tab
(13) Click on the CH1 tab to bring up the encoder settings: Click here Figure 8 Clicking on CH1 Tab ___________________________________________________________________________________________ Z3 Technology, LLC ♦ 100 N 8 ST, STE 250 ♦ Lincoln, NE 68508-1369 USA ♦ +1.402.323.0702... -
Page 12: Configure The Encoder To Stream To Udp
(1) Change Output Format to “UDP” (3) Change Dest Port to 5004 Figure 9 Configuring the 4K Encoder to Stream via UDP ___________________________________________________________________________________________ Z3 Technology, LLC ♦ 100 N 8 ST, STE 250 ♦ Lincoln, NE 68508-1369 USA ♦ +1.402.323.0702... -
Page 13: Figure 10 Vlc Open Network Screen For Udp
(21) Press “Play.” (22) You should now see 4K video streaming to VLC: Figure 11 Example of Z3 Video Streaming to VLC (UDP) ___________________________________________________________________________________________ Z3 Technology, LLC ♦ 100 N 8 ST, STE 250 ♦ Lincoln, NE 68508-1369 USA ♦ +1.402.323.0702... -
Page 14: Streaming Rtp
DOC-USR-0077-01 6.5 Streaming RTP The Z3-HE4K-R also supports streaming a 4K stream via RTP. To do this, perform the following steps: (23) Click “stop” to stop any previous encoding runs. (24) Change “Output Format” to “RTP.” (25) Change “Dest Address” to the IP address of the PC you are streaming to (for example, a typical default value is 192.168.0.6). -
Page 15: Figure 13 Vlc Open Network Stream Screen For Rtp
(29) In the “Open Media” box, type “rtsp://192.168.81.68/{name}.mp4”, where “192.168.81.68” is the IP address of the Z3-HE4K-R, and {name} is “z3-1” for unicast streaming, and “z3-1m” for multicast streaming. For example, if the IP address of the Z3-HE4K-R is the default value of 192.168.81.68 and unicast streaming is being done, the user would type in “rtsp://192.168.81.68/z3-1.mp4”:... -
Page 16: Using Dhcp
DOC-USR-0077-01 6.6 Using DHCP The Z3-HE4K-R also supports DHCP . When enabled, the Z3-HE4K-R dynamically receives an IP address to use at startup. The IP address that is assigned can be seen either through the serial interface or through the ZFinder tool running on a PC. To view how DHCP support works, see the following steps: (1) The first thing you need to do is set up a custom configuration so that the DHCP setting is used the next time the system boots up. -
Page 17: Figure 17 Selecting "Z3_Config1" Within The System Setup Tab
(5) Now that DHCP is set in z3_config1, save the configuration by clicking on the “Save” button: Click “Save” Figure 19 Saving a User Preset ___________________________________________________________________________________________ Z3 Technology, LLC ♦ 100 N 8 ST, STE 250 ♦ Lincoln, NE 68508-1369 USA ♦ +1.402.323.0702... -
Page 18: Figure 20 Reboot Reminder For Changing Ip Settings
(7) Now that you’ve set DHCP , saved it to the configuration “z3_config1”, and specified that “z3_config1” will be used when the system restarts, you can reboot the Z3-HE4K-R. (8) Run the “ZFinder” PC Utility on your Windows PC. The ZFinder window appears. ZFinder completes a scan of the network and lists the location of all Z3 systems connected to the network. -
Page 19: Figure 22 Web Gui Using Dhcp Address
DOC-USR-0077-01 (9) Select the Z3-HE4K-R and then click “Open Device.” A web browser will then open at the IP address of the Z3-HE4K-R and you should see the Web GUI: New IP address Figure 22 Web GUI Using DHCP Address (10) You can return to Static IP by unchecking “Use DHCP”... -
Page 20: Tuning For Latency
By default, this is set to 1000ms. You can lower this to as low as 200ms. To do this, go to the following: VLC → Tools → Preferences → Show Settings (ALL) → Input / Codecs → Network caching (ms) ___________________________________________________________________________________________ Z3 Technology, LLC ♦ 100 N 8 ST, STE 250 ♦ Lincoln, NE 68508-1369 USA ♦ +1.402.323.0702... -
Page 21: Using The "Aux Ts File Option
“enc_4k2k.ts” on that drive. Sample values are shown below. (1) Set to “True” (2) Set File Name Figure 24 Using the Aux TS File Enable Option ___________________________________________________________________________________________ Z3 Technology, LLC ♦ 100 N 8 ST, STE 250 ♦ Lincoln, NE 68508-1369 USA ♦ +1.402.323.0702... -
Page 22: Running Decode On The Z3-He4K-R
USB1 (top) Figure 25 Decoder Connections for Z3-HE4K-R (1) Take an HDMI 1.4 cable and connect it to HDMI Out on the Z3-HE4K-R. Connect the other end to a 4K monitor. (2) Connect the Ethernet cable to the Ethernet jack on the Z3-HE4K-R. Connect the other end of the Ethernet cable directly to a PC or to a hub connected to the PC. -
Page 23: Set Decoder Mode
(7) Once you do this, the System Setup tab will appear with decode settings. In this tab, select “serial_menu” as the preset at the bottom left of the GUI: Change to “serial_menu” Figure 27 Changing Preset ___________________________________________________________________________________________ Z3 Technology, LLC ♦ 100 N 8 ST, STE 250 ♦ Lincoln, NE 68508-1369 USA ♦ +1.402.323.0702... -
Page 24: Figure 28 Saving Serial_Menu Settings
The very first time this is done, it can take up to 15 seconds for this window to appear. Figure 29 The “Save complete” Window ___________________________________________________________________________________________ Z3 Technology, LLC ♦ 100 N 8 ST, STE 250 ♦ Lincoln, NE 68508-1369 USA ♦ +1.402.323.0702... -
Page 25: Figure 30 Decoder Initial Menu
(10) After clicking “Ok”, power off the Z3-HE4K-R and power it back on. (11) After the green “ready” light comes up, retype the IP address of the Z3-HE4K-R into the browser. You should then see the decoder settings come up with “serial_menu” as the preset used. -
Page 26: Changing Back To Encoder Mode
(19) After clicking “Ok”, power off the Z3-HE4K-R and power it back on. (20) After the green “ready” light comes up, retype the IP address of the Z3-HE4K-R into the browser. You should then see the encoder settings come up with “serial_menu” as the preset being used... -
Page 27: Performing Other Operations With The Z3-He4K-R
If you have a specific configuration of settings that you would like to preserve, you can save it so that when the Z3-HE4K-R is powered off and back on, it automatically uses those settings. For an example of doing this, please see the description in Section 6.6, “Using DHCP” on page 16. -
Page 28: Using The Password Feature
DOC-USR-0077-01 8.3 Using the Password Feature The Z3-HE4K-R includes an optional password to prevent unauthorized users from accessing the Web GUI. The steps for using it are shown below: (1) In the System Setup tab, click on “go” next to “Set Password”:... -
Page 29: Figure 35 Password Entry Screen
Use “admin” for the user name and the value you had entered before for the password: Figure 38 Password Entry Screen (5) You should now be able to access the web GUI. ___________________________________________________________________________________________ Z3 Technology, LLC ♦ 100 N 8 ST, STE 250 ♦ Lincoln, NE 68508-1369 USA ♦ +1.402.323.0702... -
Page 30: Summary Of Options
This section lists the different options that are available in the various menus. 9.1 The System Setup Tab Parameter Options (default in bold) Notes Sets the IP address of the Z3-HE4K-R. Note that a Local IP Address 192.168.x.y “save” of these settings and a reboot is needed for (192.168.81.68) changes to this value to take effect. -
Page 31: The User Presets Tab
DOC-USR-0077-01 Clicking this causes the Z3-HE4K-R to extract a set of download device logs diagnostic logs that can be sent to Z3 Technology in the event of an issue to be reported. This file is saved on the PC which the GUI is being run from. -
Page 32: The Status Tab
600 for 60 frames per second content). Input Status Input Input type Resolution Capture resolution for that input Capture frames per second for that input ___________________________________________________________________________________________ Z3 Technology, LLC ♦ 100 N 8 ST, STE 250 ♦ Lincoln, NE 68508-1369 USA ♦ +1.402.323.0702... -
Page 33: The Ch1 Tab (Encode Options)
(for example, an input frame rate of 30fps with a divider of 2 would cause an output stream of 15fps). Number of B-frames The number of B-frames. The Z3-HE4K-R always assigns a value of “1” B-frame between P-frames. GOP Size 10 –... - Page 34 The IP address that the encoder is streaming Dest Port 0 – 9999 (5004) The port that the encoder is streaming to. ___________________________________________________________________________________________ Z3 Technology, LLC ♦ 100 N 8 ST, STE 250 ♦ Lincoln, NE 68508-1369 USA ♦ +1.402.323.0702...
- Page 35 Note 1: GOP Sizes Supported: 10, 12, 15, 25, 30, 50, 60, 100, 120, 200, 240 frames ___________________________________________________________________________________________ Z3 Technology, LLC ♦ 100 N 8 ST, STE 250 ♦ Lincoln, NE 68508-1369 USA ♦ +1.402.323.0702...
-
Page 36: The Ch1 Tab (Decode Options)
Click on this to save preset value to what was selected. Operating Mode Encoder UltraHD This selects how the HE4K-R is being used. Decoder ___________________________________________________________________________________________ Z3 Technology, LLC ♦ 100 N 8 ST, STE 250 ♦ Lincoln, NE 68508-1369 USA ♦ +1.402.323.0702... -
Page 37: Appendix A: Troubleshooting
-Is the Ethernet cable plugged in to the Z3-HE4K-R board solidly (do you see the link light)? -Do the Z3-HE4K-R IP address and the PC IP address have the same first two values (or, if netmask is set to 255.255.255.0, the same first three values)? -Do the Z3-HE4K-R and the PC have the same netmask? (Default value is 255.255.0.0)
Need help?
Do you have a question about the Z3-HE4K-R and is the answer not in the manual?
Questions and answers