
Subscribe to Our Youtube Channel
Related Manuals for Blue Diamond HD 2 Series


Summary of Contents for Blue Diamond HD 2 Series
- Page 1 POWER RAKE HD SERIES 2 Operation and Maintenance Manual Register your WARRANTY within 30 days of purchase 888-376-7027 | BlueDiamondAttachments.com Blue Diamond® Attachments...
-
Page 2: Introduction
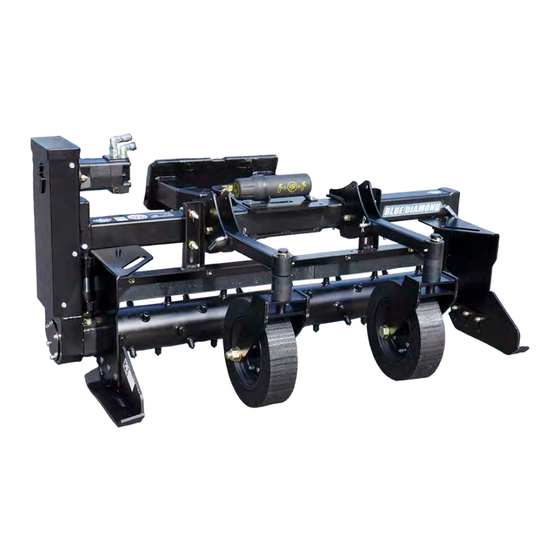
Operator’s Manual and thoroughly understand safe and correct operating, installation and maintenance procedures. Model Number: Blue Diamond is continually working to improve its products. Blue Diamond reserves the right to make Serial Number: any improvements or changes as deemed practical... - Page 3 ATTACHMENT IDENTIFICATION CHAIN CASE HYDRAULIC MOTOR ATTACHMENT MOUNTING FRAME MANUAL STORAGE SIDE SHIELDS MATERIAL BAR ROTOR TEETH MATERIAL BAR GAUGE WHEEL RUBBER SHIELD Blue Diamond® Attachments...
-
Page 4: Table Of Contents
7. Accessories Side Shield Options 7.1.1 Side Shield Right Assembly 7.1.2 Side Shield Left Assembly Gage Wheel Options 7.2.1 Gage Wheel, Single W/Arm Material Bar Options 7.3.1 Material Bar Only 7.3.2 Material Bar / Shield Limited Warranty Blue Diamond® Attachments... -
Page 5: Safety Decals
1.2 Safety Decals Blue Diamond® Attachments... - Page 6 It may also be used to alert against unsafe practices. IMPORTANT The signal word IMPORTANT identifies procedures which must be followed to avoid damage to the machine. Blue Diamond® Attachments...
- Page 7 DO NOT permit personnel to be in the work ditches to prevent overturn. area when operating the equipment. • The equipment must be used ONLY on approved machines. • Modification without approval by an authorized Blue Diamond representative will void the warranty. Blue Diamond® Attachments...
- Page 8 Tighten or replace any parts that show leakage. • Always clean fluid spills. Do not use gasoline or diesel fuel for cleaning parts. Use commercial nonflammable solvents. Blue Diamond® Attachments...
-
Page 9: General Information
HD series 2 power rake and tighten if needed. Grease all • Check for loose bolts and tighten them if fittings. necessary. • Check the rotor and rotor teeth for wear or damage. Blue Diamond® Attachments... - Page 10 SEE MACHINE’S OPERATOR’S MANUAL FOR ADDITIONAL INFORMATION. • Check and adjust hitch to frame pivot point as needed. As wear occurs you may have to tighten up the nut to compensate for wear. Do not overtighten. Blue Diamond® Attachments...
- Page 11 HD series 2 power rake for FOR ADDITIONAL INFORMATION. wear or damage each time the HD series 2 power rake is removed from the machine. Park the machine / attachment on a flat level surface. Blue Diamond® Attachments...
- Page 12 Engage attachment locking levers / wedges (See hydraulic hoses. the machine's Operator’s Manual for detailed information). Relieve auxiliary hydraulic pressure. (See the machine’s Operator’s Manual correct procedure.) Disconnect attachment hydraulic hoses from the machine. Blue Diamond® Attachments...
- Page 13 Enter the operator’s position. See “Entering The Operator’s Position” on page 19. Slowly tilt the machine’s mounting plate forward until the attachment mounting frame is free from the machine’s mounting plate. Drive the machine slowly backward, away from the attachment. Blue Diamond® Attachments...
-
Page 14: Operating The Attachment
48”, 60”, 72 removed. 15 GPM (56.7 L) @ • If an area contains tall grass, clear cut Hydraulics 2500 psi (172 bar) the area first, either by mowing or tilling the ground. 1500 lbs. (680 kg) Lift Capacity Blue Diamond® Attachments... - Page 15 (Item 1) [Figure 2] to the storage position and secure with pin (Item 2) [Figure 2]. Remove the side shields. Opening up the material bar hold back rubber shield will allow for material flow when in tilling mode. Blue Diamond® Attachments...
- Page 16 1. Check the job site, plan on where to deposit debris such as rock and unwanted material. Check for underground obstacles, electrical, utilities, property line stake, large rocks or buried concrete or ledge rock. Blue Diamond® Attachments...
- Page 17 Set the rotor teeth just off the surface and let the teeth dimple the surface. Final Grade - Set the rotor teeth so they are just touching the surface. This will collect the small rock and debris (this is raking action). Blue Diamond® Attachments...
- Page 18 (see may wrap around rotor. STOP IMMEDIATELY machine’s operator’s manual) to the HD and remove foreign material. Spinning of series 2 power rake. rotor and throwing of material may cause harm to operator/bystander! Blue Diamond® Attachments...
- Page 19 Rotor (cracks or excessive wear) • All Hardware • Monthly Maintenance Rotor Bearings • Drive Chain • • Skid Plates • Rotor Teeth (wear, damage, and loosening) • Rotor (cracks or excessive wear) • All Hardware • Blue Diamond® Attachments...
- Page 20 Remove the plug on the rotor bearing and install WARNING grease zerk (Item 1) [Figure 4]. Grease the fitting, remove the grease zerk and re-install plug. AVOID SERIOUS INJURY OR DEATH NOTE: Blue Diamond recommends to remove the grease zerks and re-installed plugs into work under machine...
- Page 21 Apply 2-3 pumps of grease to the grease zerk Remove the top cover on the chain case and (Item 1) [Figure 7] on the gauge wheel spindles. lubricate the chain (Item 1) [Figure 9] every 10 hours of operation with a chain spray lubricant. Blue Diamond® Attachments...
- Page 22 Adjusting the material bar up will let more material pass through the HD series 2 power rake and adjusting the material bar down will hold back material like rocks and debris. NOTE: When adjusting the material bar make sure the material bar is level. Blue Diamond® Attachments...
- Page 23 Remove the rubber shield mounting strip (Item 2) and the rubber shield (Item 3) [Figure 12]. Align the rubber shield and mounting strip onto the material bar. Install bolts, nuts and tighten. Install material bar. See material bar installation on page 32. Blue Diamond® Attachments...
- Page 24 Remove the three nuts and bolts (Item 1) then remove the skid plate (Item 2) [Figure 14]. Align the desired skid plate holes with the side shield (Item 3) [Figure 14] holes, install the bolts, nuts and tighten. Blue Diamond® Attachments...
- Page 25 Chain tension is preset with the extension spring. If the chain becomes excessively loose, it may be necessary to remove one link (two pitches). Blue Diamond® Attachments...
- Page 26 (Item 1) [Figure 18] to adjust (tighten) the angle pivot back to correct tolerance. NOTE: The lock down bolt can be installed to prevent angle pivot weldment spreading. Blue Diamond® Attachments...
- Page 27 The fixed tooth rotor (Item 1) [Figure 20] is also offered for the HD series 2 power rake. NOTE: If a tooth is damaged and needs to be replaced, cut and remove the damaged tooth and weld on the new tooth. Blue Diamond® Attachments...
- Page 28 • Disconnect attachment hydraulic hoses. WARNING AVOID SERIOUS INJURY OR DEATH Securely block up the attachment before working underneath. IMPORTANT Rotor wrapping may cause damage to bearings or bearing seals by jamming/ cutting causing premature wear damage. Blue Diamond® Attachments...
- Page 29 Lubrication on page 30. • Make sure there is no water in chain case when machine is put into storage. • Inspect the machines safety decals for damage. NOTE: Replace any damaged parts, components, decals or reflectors. Blue Diamond® Attachments...
- Page 30 Not enough down pressure. Increase down pressure. Gauge Wheel Wobbles. Re-position arms. Adjust arm Arms not positioned correctly. holder / plate down. Contact Blue Diamond product Faulty manifold. support. Angle Will Not Hold Position. Faulty solenoid. Repair or replace solenoid.
- Page 31 Side Shield Allowing Material Out Over capacity. Install optional skid plate. Leaving Ridges. Side Shields Are Bending. Over capacity. Install optional skid plate. Material Bar Keeps Going Out of Slider plate is bent. Replace slider plate. Adjustment. Blue Diamond® Attachments...
-
Page 32: Power Rake
Option Page 20 7.1 Side Shields Option Page 22 2.2 Hydraulic Model 7.2 Gage Wheel Option 4. PBRX1S Page 41 HYD Main Body Page 10-11 7.3 Material Bar Option Page 20 7.1 Side Shields Option Page 22 Blue Diamond® Attachments... -
Page 33: Pto Main
Item A Guard, Chain Case Model No. Part Number Description 48" 532102 Guard, 4' PTO Chain Case 60" 532103 Guard, 5' PTO Chain Case 72" 532000 Guard, 6' PTO Chain Case 84" Guard, 7' PTO Chain Case 532001 Blue Diamond® Attachments... -
Page 34: Mount (Pto)
Mount, 3 Point Cat 1 232222 Bolt, 5/16-18 x ½ Anti Vibe 232223 Bolt, ¾”-10 x 6-1/2” HHCS Gr8 232224 Nut, ¾”-10 Nyloc Gr8 232225 Washer, ¾” x 1.469” SAE Gr8 232226 Pin, Drawbar ¾” x 6-1/4” 216402 Manual Canister Blue Diamond® Attachments... -
Page 35: Lower Drive Line (Pto)
Washer, ½”, SAE Gr8 232049 Washer, ½” Split Lock Med 232639 Sprocket, 50-2 BS19T 1-3/8” Bore Item A Item B Model Rotor Part No. Frame Part No. 48" 232632 60" 232633 See Rotor Option Page 12 72" 232634 Blue Diamond® Attachments... -
Page 36: Upper Drive Line (Pto)
232639 Sprocket, 50-2 BS19T 1-3/8” Bore 532014 Friction Clutch 232014 Chain Coupler, 50 Series Item A Model Description Drive Shaft Part No. 48" 532105 Drive Shaft, 4’ 60" 532106 Drive Shaft, 5’ 72" 532006 Drive Shaft, 6’ Blue Diamond® Attachments... -
Page 37: Hydraulic Main
Mount Assembly, Skid Steer Standard 232222 Bolt, 5/16-18 x ½ Anti Vibe 232223 Bolt, ¾”-10 x 6-1/2” HHCS Gr8 232224 Nut, ¾”-10 Nyloc Gr8 232225 Washer, ¾” x 1.469” SAE Gr8 232226 Pin, Drawbar ¾” x 6-1/4” 216402 Manual Canister Blue Diamond® Attachments... -
Page 38: Drive Line(Hyd)
232019 Chain, No 50 DBL 93 Pitch + CL 232639 Sprocket, 50-2 BS19T 1-3/8” Bore Item A Item B Model Rotor Part No. Frame Part No. 48" 232632 60" 232633 See Rotor Option Page 12 72" 232634 Blue Diamond® Attachments... -
Page 39: Rotor Options
5. Rotor Options Tooth Option “X” 1. Abrasive Resistant Tooth 2. Carbide Tooth Tooth Option Model 6” Rotor part No. “X” 232640 48" 232641 232642 60" 232643 232644 72" 232645 Blue Diamond® Attachments... -
Page 40: Main Subassemblies
6.2 Mount, Skid Steer Item No. Part Number Description 132404 Mount, Skid Steer Standard 232079 Grease Fitting, ¼”-28 Straight 6.3 Mount, Skid Steer Mini Item No. Part Number Description 132403-25 Mount, Skid Steer Mini 232669 Grease Fitting, ¼”-28 Straight Blue Diamond® Attachments... -
Page 41: Chain Case Pto
Chain Case Body 232007 Chain Tensioner Assembly 232222 Bolt, 5/16”-18 x ½” Anti Vibe 232265 Bolt, ½”-13 x 2.0” HHCS Gr8 232233 Nut, ½”-13 Nyloc Gr8 232234 Washer, ½” x 1.06” SAE Gr8 232658 Bearing, 1-3/8” 2 Bolt Flange Blue Diamond® Attachments... -
Page 42: Chain Case Hydraulic
Washer, 3/8” Split Lock Med 232652 Hydraulic Motor, WF104-1027 232653 Fitting, 8 JOCM to 10 ORBM 232654 Fitting, 8 JOCM to 8 JICF 90SW 232655 Fitting, 8 JICM to 8 ORBM 90 Deg 232656 Sprocket, 50-2 BS19T 1-1/4” Bore Blue Diamond® Attachments... -
Page 43: Chain Tensioner
232234 Washer, ½”, SAE Gr8 6.7 Chain Coupler, 50 Series Item No. Part Number Description 232280 Chai, No 50-2 15P + CL 232281 Sprocket, 5016W with 6 Spline Weld Hub 232282 Sprocket, 50B16 1-3/8” B Keyway SS Blue Diamond® Attachments... -
Page 44: Bearing Guard Assembly
Item No. Part Number Description 532125 Bearing Guard 232265 Bolt, ½”-13 x 2.0” HHCS Gr8 232233 Nut, ½”-13 Nyloc Gr8 232234 Washer, ½” SAE Gr8 232284 Grease Fitting, ¼”-28 90 Deg 232658 Bearing, 1-3/8” 2 Bolt Flange Blue Diamond® Attachments... -
Page 45: Accessories
7.1 Side Shield Options 7.1.1 Side Shield Right Assembly Item No. Part Number Description 232106 Pin, Side Shield 232660 Side Shield, Right 7.1.2 Side Shield Left Assembly Item No. Part Number Description 232106 Pin, Side Shield 232661 Side Shield, Left Blue Diamond® Attachments... -
Page 46: Gage Wheel Options
Nut, ½”-13 Nyloc Gr8 232294 Nut, 5/8”-11 Nyloc Gr8 232234 Washer, ½” SAE Gr8 232667 Pin, Bent Hitch 5/8” x 3.0” 232668 Pin, linch 5/16” x 1-1/4” 232079 Grease Fitting ¼”-28 Straight 232670 4 x 8 Tailwheel Complete Blue Diamond® Attachments... -
Page 47: Material Bar Options
7. Accessories 7.3 Material Bar Options 7.3.1 Material Bar 7.3.2 Material Bar / Shield 7.3.3 Material Bar / Shield with Skirt Blue Diamond® Attachments... -
Page 48: Material Bar Only
U-Bolt, ½” Power Rake Model Material Bar Material Bar Number Item 1 Assembly Hydraulic Part Number Description 48" 232675 232672 Bar, 4' Material, Flat 60" 232676 232671 Bar, 5' Material, Flat 72" 232677 232301 Bar, 6' Material, Flat Blue Diamond® Attachments... -
Page 49: Material Bar / Shield
Description Part Number Description 48" 48" 232673 232675 Shield, 4’ Rotor Bar, 4' Material, Flat 60" 60" 232674 232676 Shield, 5’ Rotor Bar, 5' Material, Flat 72" 72" 232309 232677 Shield, 6’ Rotor Bar, 6' Material, Flat Blue Diamond® Attachments... -
Page 50: Limited Warranty
BLUE DIAMOND ATTACHMENTS liability for any defect with respect to accepted goods shall be limited to repairing the goods at a BLUE DIAMOND ATTACHMENTS designated location or at an authorized dealer location, or replacing them, as BLUE DIAMOND ATTACHMENTS shall elect. The above shall be in accordance with BLUE DIAMOND ATTACHMENTS warranty adjustment policies. - Page 51 Blue Diamond® Attachments...
- Page 52 QUALITY | DEPENDABILITY | INTEGRITY Blue Diamond® Attachments 4512 Anderson Road, Knoxville, TN 37918 88-376-7027 Blue Diamond® Attachments...
Need help?
Do you have a question about the HD 2 Series and is the answer not in the manual?
Questions and answers