Table of Contents
Advertisement
Quick Links
Advertisement
Table of Contents

Related Manuals for Thermopatch Y151


Summary of Contents for Thermopatch Y151
- Page 1 Y151 Thermo-Seal Operator’s Manual 47117- Rev0912...
- Page 2 EC - STATEMENT OF CONFORMITY As manufacturer the company Thermopatch bv Draaibrugweg 14-16 1332 AD ALMERE - NETHERLANDS confirms the machine for temporary marking Thermo-Seal Y-151 meets the requirements as stated in the EC directives for machine safety and health rules and shows conformity to the following criteria and provisions: Low Voltage Directive (73/23/EEC)/EN60950, EMC Directive (89/336/EEC)/ EN55022 &...
- Page 3 Copyright © 2011, Thermopatch, Syracuse, New York. No part of this publication may be reproduced by any means without the prior written permission of Thermopatch, Syracuse, New York. Thermopatch, Thermo-Seal, Alligator, Beaver, Cheetah, Deco-Print, Penguin, TruFlex and the Thermopatch logo are ® trademarks of...
- Page 4 Preface Welcome to the growing group of Thermopatch customers. The product you have purchased has been carefully designed and manufactured to ensure that you will gain the maximum benefit. All Thermopatch products are specifically designed to ensure ease of use with particular attention to safety requirements.
-
Page 5: Table Of Contents
Contents 1. Introduction 1.1 What Did You Receive 1.2 Thermopatch Customer Service 1.3 View of the Y151 Thermo-Seal Machine 1.4 Specifications of the Y151 Thermo-Seal 1.5 Safety 1.6 Conditions of Warranty 2. Installation 2.1 Transport Instructions 2.2 Installing the Machine 2.3 Electrical Requirements... -
Page 6: Introduction
1. Introduction The Y151 Thermo-Seal is a machine for the temporary marking of garments and other textile items. In one cycle, labels for temporary marking are printed, cut and sealed onto the garment or textile item. After washing or chemical cleaning, the labels can be removed from the garment or textile item without leaving any label residue. -
Page 7: What Did You Receive
1.1 What Did You Receive? The Y151 Thermo-Seal machine has been packed in a cardboard shipment container with laminated foam protection cradles on each end. Various components of the Y151 Thermo-Seal machine can be found packaged within. The Y151 Thermo-Seal comes complete with the following components:... -
Page 8: Thermopatch Customer Service
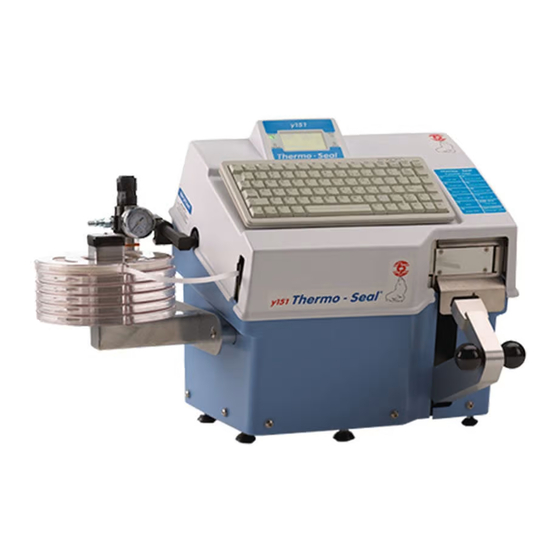
Thermopatch markets a complete line of heat-seal and marking machines, as well as a complete line of materials and supplies. Label Print Machines – Manual, automatic and computer controlled. - Page 9 1.3 The Y151 Thermo-Seal...
-
Page 10: Specifications Of The Y151 Thermo-Seal
1.4 Specifications of the Y151 Thermo-Seal Specifications – 230 Volts Power consumption 575 watts Power supply 230 volts Temperature 176°C Machine height 389 mm Machine width 556.5 mm Machine depth (connections included) 432.5 mm Net weight 18.5 kg Platen Pad dimensions 14.3 x 34.7 mm... -
Page 11: Safety
1.5 Safety Tips The Y151 Thermo-Seal machine has been designed with optimum safety for the machine operator in mind. However, we provide you with some instructions by which you should operate this machine. Always turn off and unplug the machine when doing maintenance or cleaning the machine. -
Page 12: Installation
2.2 Installing the Machine Take the Y151 Thermo-Seal out of the shipment container and put the machine on a worktable near a grounded socket. Ensure that there is sufficient free space around the machine. -
Page 13: Label Tape Storage Rack Installation
Attachment of the Label Tape Storage Rack requires the use of a 4mm L-Hex Key provided. The Label Tape Storage Rack is attached to the Y151 Thermo-Seal machine chassis with the two M6 x 1.0 x 40mm long screws provided. Insert the screws through the clearance holes in the Label Tape Storage Rack engaging the threaded inserts in the machine chassis. -
Page 14: How To Operate The Y151 Thermo-Seal
3. How to Operate the Thermo-Seal 3.1 Ink Cartridge Installation The Y151 Thermo-Seal machine comes complete with an Ink Ribbon Cartridge, Thermopatch supply part RC2410-15. The Ink Ribbon Cartridge is required to print the desired code onto the temporary label tape. -
Page 15: Inserting Label Marking Tape
3.2 Inserting the Label Marking Tape 1. Switch the Power Entry Module Switch “ON.” 2. Place the Label Marking Tape into a Label Tape Cassette and place the Cassette onto the Label Tape Cassette Storage Rack. 3. Pull out approximately 12” or 30cm of tape from the Label Tape Cassette. -
Page 16: Machine Operation
The green “HEAT ON” LED is pulsing or flashing on the LCD Panel. Before you begin printing and sealing, it is necessary for you to understand the features, messages and icons present on the LCD panel of the Y151 Thermo-Seal machine. - Page 17 The picture of the LCD to the right illustrates the Y151 in “Ready” mode. A: Illuminated green LED indicates the power is “ON.” B: Illuminated green LED indicates the heat is “ON” and rising to operating temperature. Flashing LED indicates the machine has reached operating temperature.
-
Page 18: Customizing The Y151 Thermo-Seal (Option Menus)
4. Customizing the Y151 Thermo-Seal The Y151 Thermo-Seal machine software has a number of factory default settings, such as: Sealing Temperature, the Display Language, the Label Marking Tape Length, and the Password to the Special Settings Mode. The Y151 Thermo-Seal software can be customized to your personal requirements. - Page 19 MENU OPTION 1 - SETTINGS MENU DISPLAY DESCRIPTION ADJUSTMENT DEFAULT 1 - Temperature Temperature Change Temperature Up/Down Arrow Key 1°F or 1°C 176°C Right/Left Arrow Key adjust 10°F or 10°C 349°F 1. Normal Time Change Normal Seal Time Up/Down Arrow Key 0.1 second 2.7 Sec.
-
Page 20: Temporary Marking
5. Temporary Marking Temporary, removable marking is used by laundries, hospitals, hotels, textile suppliers, textile care companies and various other industries. The Y151 Thermo-Seal Machine is designed to be used for temporary marking of garments and textile items. Almost all garments or textile items can be marked directly or indirectly. - Page 21 Day Lot System On the Day Lot System one color is designated for all articles received on a specific day of the week. All laundry is processed for a 1 or 2 day turnaround and the entire lot is sorted together. Items that get misplaced or out of lot are easily identified by their color.
-
Page 22: Interrupting The Sealing Cycle
“Extra Length” option. The Extra Length option can be activated by using the F4 Thermo-Seal function key. Attention! Thermopatch cannot take any responsibility for any damages to garments or textile items that occur by the use of this machine. -
Page 23: Troubleshooting
6. Troubleshooting Before referring to the following information, check for proper set up and operation as outlined in preceding sections of this manual. Some repair procedures require a person with mechanical and electrical skills. Failure Possible Causes Solution Machine does Not connected to outlet Check Outlet not function... - Page 24 Failure Possible Causes Solution Poor sealing Temperature setting is incorrect See section 4 quality Air pressure setting is incorrect See section 2.4 Sealing time is incorrect See section 4 Heater Shield is loose or dirty Correct or clean Sealing Platen worn or dirty Replace or clean Poor printing Ink Ribbon Cartridge dry...
- Page 25 Failure Possible Causes Solution Incorrect Obstruc on in Tape Guide Clean Tape Guide Character Spacing Worn Spindle Drive Ring Replace, see sec on 7.6 on Label Tape Defec ve Stepper Motor Replace Marks on garment Ink build-up on Rubber Platen Clean or replace or tex le item Ink build-up on Heater Shield...
-
Page 26: Maintenance
Air Filter Pressure Regulator and unplug the Line Power Cord from the electrical supply. Maintaining a clean machine will extend the service life of the Y151 Thermo-Seal machine. The following is the recommended cleaning schedule for various parts of the Y151 Thermo-Seal machine. -
Page 27: Heater Shield
Lower surface temperature is the main cause of Label Tag losses during the laundering process. 7.5 Tape Guide The Tape Guide in the Y151 Thermo-Seal machine is accessible from the front of the machine under the hinged Machine Top Cover. Open the machine and run a... -
Page 28: Label Tape Drive "O"-Ring
“Off” position and unplug the machine from its electrical source. The picture to the left illustrates the Machine Top Cover of the Y151 Thermo-Seal open with the External Tape Guide removed. Loosen (but do not remove) the two socket hex cap screws retaining the Internal Tape Guide. -
Page 29: Drawings & Parts Listings
8. Drawings and Parts Listing On the following pages, the reader will find technical drawings and corresponding parts listings of the Y151 Thermo-Seal machine. The technical drawing illustrating a particular sub-assembly or area of the machine will precede the parts listings. - Page 30 1. Electrical...
- Page 34 2. Pneumatic...
- Page 37 3. Mechanical...
- Page 41 Socket Hex Shoulder Screw 1/4" x 3/8" Long (#10-32unc) Nylon Washer 1/4" Inside Dynamic Knife Push Rod P/N 47203 Static Knife Hex Jam Nut Blade M5 x 0.8 Dynamic Knife Blade Dynamic Knife Actuation Cylinder P/N 47204 Static Knife Blade Dynamic Knife Blade P/N 47227 P/N 47109...
- Page 42 Y151 Thermo- Seal Replacement Parts List MECHANICAL Part Number Description Qty per machine DH-3187 Rubber Sealing Platen DH-6797 Quick Connect Hose Barb 24089-06 Spindle Drive O-Ring (Buna -N rubber) 24091-75 Press Arm Shock Dampener 20205-143 Printer Head Face Shield 47023...
- Page 43 F +1 315 445-8046 sales@thermopatch.com Thermopatch European Headquarters The Netherlands T +31 36 549 11 11 F +31 36 532 03 98 sales@thermopatch.nl Thermopatch Australia Pty Ltd Australia T +61 395325722 F +386 2 80 55 232 marktpatchaust@bigpond.com.au Thermopatch Canada Inc Canada...
Need help?
Do you have a question about the Y151 and is the answer not in the manual?
Questions and answers