Table of Contents
Advertisement
Advertisement
Table of Contents

Related Manuals for Jorvik JMT9


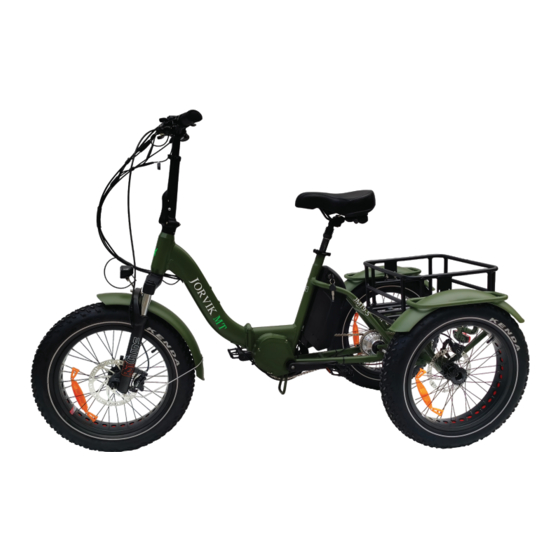
Summary of Contents for Jorvik JMT9
- Page 1 Jorvik JMT9 Mid Drive Folding Electric Mountain Trike...
- Page 3 User Manual Jorvik JMT9 Mid Drive Folding Electric Mountain Trike Thank you for purchasing a Jorvik Electric Tricycle JMT Range. We believe this is the future of transport, not only is it an eco-friendly way of transportation with its electric motor that will whisk you along effortlessly and efficiently, the rider will also reap the benefits of a healthy body and a healthy mind .
- Page 4 For replacement parts, technical information and warranty assistance, please contact Jorvik Tricycles on 01904 848988 or email info@jorviktricycles.com DO NOT DISASSEMBLE, MODIFY OR REPLACE ANY OF THE ELECTRICAL PARTS. Your insurance policies may not provide coverage for accidents involving the use of the electric...
- Page 5 Index Jorvik JMT9 Mid Drive Folding Electric Mountain Trike User Manual Battery charging Warning How to start up the trike Index How to use the LCD display Product Safety How to assemble this tricycle Additional safety Hand throttle control One-year parts warranty...
- Page 6 Product Jorvik JMT9 Mid Drive Folding Electric Mountain Trike...
- Page 7 How To Assemble This Tricycle Jorvik JMT9 Mid Drive Folding Electric Mountain Trike Assembly Instructions Your trike has been pre-assembled. It requires only a few simple steps to get it ready for your first ride. 1. Remove the outside carton after cutting the nylon bands and taking off the lid.
- Page 8 How To Assemble This Tricycle Jorvik JMT9 Mid Drive Folding Electric Mountain Trike Assembly Instructions 5. Insert the quick release skewer & turn the skewer adjusting nut clockwise to tighten it. Keep turning the adjusting nut until you see or feel the nut contact the face of the dropout.
- Page 9 How To Assemble This Tricycle Jorvik JMT9 Mid Drive Folding Electric Mountain Trike Handlebars At the bottom of the stem lift up the chrome safety clasp then open the quick release lever. Then simply mount the handlebar onto the top of the front fork...
- Page 10 Disc Brakes Your Jorvik trike is equipped with disc brakes for maximum reliability. Applying hand pressure to the brake levers will engage the brake pads against the brake rotor, creating friction and slowing down the wheel. The more hand pressure applied to the brake lever, the faster the trike will come to a stop.
- Page 11 How To Assemble This Tricycle Jorvik JMT9 Mid Drive Folding Electric Mountain Trike Assembly Instructions New Brakes Bed-in Procedure Make sure that the brake lever does not contact the New brakes will require a “bed-in” procedure prior to handlebar when full hand pressure is applied. The contact your first ride, which will ensure the most consistent and point should feel firm and solid.
- Page 12 How To Assemble This Tricycle Jorvik JMT9 Mid Drive Folding Electric Mountain Trike Fender And Front Light Assembly Rear Fenders...
- Page 13 How To Assemble This Tricycle Jorvik JMT9 Mid Drive Folding Electric Mountain Trike Front Fender And Light Assembly Please attach the new easy fit front fender using the bolt already located at the rear of the forks or in the hardware box, also attach the front light using the same bolt/bracket as shown in the images.
- Page 14 How To Assemble This Tricycle Jorvik JMT9 Mid Drive Folding Electric Mountain Trike The Seat Make sure that the seat is tight enough so that you can’t twist it out of alignment. Pull the seat clamp handle away from the seat post and slide the seat up to down to adjust it. Move the clamp handle inward toward the seat post so it is held tight by the clamp.
- Page 15 How To Assemble This Tricycle Jorvik JMT9 Mid Drive Folding Electric Mountain Trike Assembly Instructions Use a 15mm spanner to attach and tighten the pedals remember to grease the pedal thread first. Please Note: The pedals are marked “L” for Left and “R”...
- Page 16 How To Assemble This Tricycle Jorvik JMT9 Mid Drive Folding Electric Mountain Trike Front Suspension Travel And Sag Guide Sag is a measurement of the amount of suspension fork travel with the rider stationery in their normal riding position. The Sag depends on the position and weight of the rider and should be between 15% and 30% of the fork’s max travel depending on the intended use and...
- Page 17 Gears Your Jorvik JMT model trike is equipped with 7 speed nexus hub gear driven system. The first gear is for easier and uphill pedalling, and the last gear is for maximum speed on level or downhill terrain. Change gears only while pedalling. When the grip shift nexus gear selector shows ‘1’...
-
Page 18: Battery Fuse
After receiving your E-trike, please keep the keys Battery Fuse separately, in case of losing both keys, Jorvik tricycles Ltd is not able to deliver replacements. The fuse is designed to protect the battery. If the fuse blows, there will be no power to any of the electrical components powered by the battery. - Page 19 The further the throttle switch is from its resting position; the more power is delivered to the motors to accelerate the Jorvik JMT trike. When you want to slow down, you simply release the throttle and let it return to its resting position and simultaneously apply the brakes.
-
Page 20: About Charging
Jorvik JMT9 Mid Drive Folding Electric Mountain Trike Recharging The Battery Charger The Jorvik battery may be charged while on the trike or Included with your new Jorvik Trike is a lithium ion battery, removed and charged at a location away from the E-trike. -
Page 21: Battery Charging
If you find that your battery • Do not operate the battery/charger if damaged. does not hold a sufficient charge, you should contact Jorvik • Recharge the battery only with a charger specified by Tricycles to order a replacement. - Page 22 How To Start Up The Trike Jorvik JMT9 Mid Drive Folding Electric Mountain Trike On the battery, switch the power button to ‘on’. To remove the battery, insert the key, turn the key 180 degrees to the left (anti-clockwise), then pull the battery up and towards the back of the trike.
- Page 23 How To Use The LCD Display Jorvik JMT9 Mid Drive Folding Electric Mountain Trike Hold the power button down on the handlebars until the display turns on. To change the pedal assistance level use the ‘up’ and ‘down’ buttons. When not riding, you can turn off the display by again holding down the power button. The LCD meter display on your Jorvik Tricycles can be programmed to change various functions.
-
Page 24: Mechanical Safety Check
Jorvik JMT9 Mid Drive Folding Electric Mountain Trike Mechanical Safety Check Helmet Check the condition of your Jorvik trike before every ride. Always wear an approved helmet while riding your Jorvik Make sure no nuts, bolts or accessories are loose, with Tricycle and follow the helmet manufacturer’s instructions... -
Page 25: Weight Capacity
The battery, motor or controller can get damaged. Also Additional Passengers avoid cleaning the E-bike with high-pressure cleaner or This Jorvik JMT model is designed for one rider only. running water. DO NOT carry any additional passengers on the front The trike has to be turned on when standstill, otherwise or rear of the bike. -
Page 26: Additional Safety
In general, if at any time you notice a crack or bend in Children your bike, stems, forks, or bars of your tricycle, stop riding immediately; take your Jorvik trike to your local bike shop The user of this product acknowledges both an understanding and an assumption of the risk involved in and have them inspect it. -
Page 27: Warranty Terms
1. We want you to have confidence in any purchase made or general wear and tear (Including Lithium Batteries). from Jorvik Tricycles and we offer a full 12 months parts Damage caused by a non-covered part or by any part warranty from the date of purchase. - Page 28 Unit 6, Hazel Court, Yorvale Business Park, York, YO10 3DR. T: 01904 848988 E: info@jorviktricycles.com www.jorviktricycles.com...
Need help?
Do you have a question about the JMT9 and is the answer not in the manual?
Questions and answers
How to remove a rear wheel for a tyre change or puncture repair.
To remove the rear wheel of a Jorvik JMT9 for a tyre change or puncture repair:
1. Turn off or disconnect the battery to ensure safety.
2. Tip the tricycle onto its side or remove the rear cargo basket for better access to the rear chain.
3. Slacken the 6 frame assembly bolts.
4. Pull the frame back to release chain tension.
5. Tighten the bolts again with a 17mm socket and ring spanner to hold the frame position.
6. Remove the rear wheel.
Ensure the tyre is properly seated during reinstallation.
This answer is automatically generated