
Related Manuals for Uovision HomeGuard WiFi


Summary of Contents for Uovision HomeGuard WiFi
- Page 1 All manuals and user guides at all-guides.com HomeGuard WiFi WiFi Camera Instruction...
-
Page 2: Table Of Contents
All manuals and user guides at all-guides.com Contents 1. Device introduction -----------------------------------------------3-7 2. Quick Guide----------------------------------------------------------8-23 3. Device Setting Methods ------------------------------------------24 4. Camera Settings instruction -------------------------------------25-31 5. Cloud server Instruction-------------------------------------------32-41 6. LinkEazi APP instruction-------------------------------------------42-50 Appendix------------------------------------------------------------------51-54 Policies and disclaim---------------------------------------------------55-56 CE Caution----------------------------------------------------------------57 Warranty Card-----------------------------------------------------------58... -
Page 3: Device Introduction
All manuals and user guides at all-guides.com 1. Device introduction How HomeGuard works HomeGuard can connect to your WIFI network, with our cloud server, it become convenient to be browsed or controlled by PC or Phone... - Page 4 All manuals and user guides at all-guides.com Scenario suggestions Homeguard can be used in Domestic implementation for security purpose, Private property scrutiny, Hunting observation, Scout game... Or any more interesting way you find out, just share your amazing experience with your friend Any question? Just visit our website, send your feedback at tab: http://www.linckeazi.com...
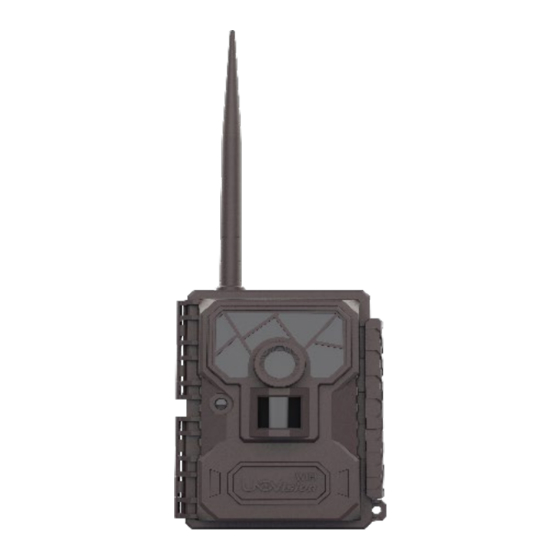
- Page 5 All manuals and user guides at all-guides.com Camera Components 1.WiFi antenna 2.IR flash LED 3.Lens 4.PIR sensor 5.Power switch 6.Keyboard 7.Light sensor 8.HD TFT screen 9.Eject button...
- Page 6 All manuals and user guides at all-guides.com Specification 1...
- Page 7 All manuals and user guides at all-guides.com Specification 2...
-
Page 8: Quick Guide
All manuals and user guides at all-guides.com 2. Quick Guide Preparation: Register device to cloud server, so sync/mobile phone support/PC browser support become available Visit our cloud server: https://www.linckeazi.com... - Page 9 All manuals and user guides at all-guides.com Login your cloud account, at ‘PERDONAL PAGE’ click ‘Add device’ button, fill SN/IMEI/ID (labeled at package) of your devices After added your device, it will show up at the button Give your device a name and Location description can help to remind you to pick the right one...
- Page 10 All manuals and user guides at all-guides.com below button, You can add more than one Wifi camera, and click the camera status will unfold After successfully register the devices to cloud server, your devices will show up...
- Page 11 All manuals and user guides at all-guides.com Set up Installing the batteries and SD card Notice: Spring side always be negative, use the same brand battery MAX 32GB Push Eject button, it will pop out battery case, which can hold 12 set of AA batteries (with 8 at top, and 4 at bottom) After installed batteries,...
- Page 12 All manuals and user guides at all-guides.com Camera main panel symbol instruction Screen will light up Slide to SETUP Main Panel After camera switch to SETUP, the screen will show the as below:...
- Page 13 All manuals and user guides at all-guides.com Connect to WiFi network MENU Press after camera boot up, scroll down tab and press WiFi Connect, it will search available WiFi, select to enter ‘UOVLINK’ (default name is UOV+3 random number, password: Join 87654321), press button to input password, click...
- Page 14 All manuals and user guides at all-guides.com Send a test photo: 1) Press the SHOT button, camera will catch a photo 2) Press the button, to Playback the photo you just taken MENU 3) Press the button you will see the following screen 4) Navigate with the ▼button, select the SEND bar and press...
- Page 15 All manuals and user guides at all-guides.com Mount up devices Slide to SETUP MENU Test After camera boot up, press find Mode and press OK, it will display the WiFi signal status, you can start to find a place to mount camera Take the camera walking through the places you want to mount, Test Mode...
- Page 16 All manuals and user guides at all-guides.com Red LED means in setup mode Green LED indicates signal strength WiFi signal strength is When the Green LED lights off, it means the not enough for transmitting HD photo &video, take few steps back to host device till the Green LED light on, mount camera...
- Page 17 All manuals and user guides at all-guides.com Mount up tips After you select an appropriate place to mount camera, slide switch to ON, the Red LED will flash 30 seconds then it will start working. Set appropriate distance, height, angle, device settings and power strategy will make a difference between good to excellent, here some tricks for reference...
- Page 18 All manuals and user guides at all-guides.com Camera Button instruction SETUP MODE. Assume all the operation start Buttons Only Available in at main panel MENU Entry Exit Exit button: of main menu. Also used as an OK button deeper menu structure, often used with button: 1.Entry and Exit of playback 2.confirm an operation...
- Page 19 All manuals and user guides at all-guides.com and Down: photo mode video mode 1.Quick switch between 2.Navigation through menu options Press Press Video mode Photo mode...
- Page 20 All manuals and user guides at all-guides.com Left (QUICK): 1.Entry Exit of quick setting. 2.Navigation through menu options Press Press Hit once Hit again...
- Page 21 All manuals and user guides at all-guides.com Right (SHOT) button: Press 1.Navigation through menu 2.Shutter in photo mode 3.Record & Stop in video mode Hit once get an Photo mode instant photo Video mode Hit once Start to record Hit again Stop record...
- Page 22 All manuals and user guides at all-guides.com Quick example: Take a photo and send it Slide SETUP It will take several seconds to finish sending...
- Page 23 All manuals and user guides at all-guides.com Common Troubleshooting: No SD card? Camera needs SD card to work. If power supply is ok, try to fill or replace with a good SD card Can’t receive WiFi signal? Check if the battery status is ok. If it’s ok, check camera NET setting (Send Mode= OFF means WiFi will shut down), turn Send Mode to ON, try search WiFi again.
-
Page 24: Device Setting Methods
All manuals and user guides at all-guides.com 3. Device setting methods WiFi Router Cloud Camera Cloud APP SYNC Based on the product system connection, any device setting can be to each other, You can set the devices in below methods: 1.Set camera directly, which is suitable when it close to your hands LinkEazi APP Cloud web portal... -
Page 25: Camera Settings Instruction
All manuals and user guides at all-guides.com 4. Camera Setting menu instruction ① NET tab... - Page 26 All manuals and user guides at all-guides.com Important: Update Firmware At the bottom of NET tab, select the DSP or MCU, Push OK button to start FW downloading, it take about 30 seconds It will request you to restart camera or restart itself: Please follow the instructions, and don’t unplug battery or DC power We recommend you keep your camera with latest Firmware!
- Page 27 All manuals and user guides at all-guides.com ② CAM tab...
- Page 28 All manuals and user guides at all-guides.com...
- Page 29 All manuals and user guides at all-guides.com ③ PIR tab...
- Page 30 All manuals and user guides at all-guides.com Time Frame Setting further explanation Select Work Time, press OK, select ”ON”. Set a start-stop time for the activity of the camera. Notice: If you wish the camera to be active permanently, select the time frame menu and switch it “OFF”.
- Page 31 All manuals and user guides at all-guides.com ④ System tab SYS tab Set Clock Set date formats and time Password Set 4 digit password to encrypt your camera Rename Rename camera, reveal at photo stamp Overwrite Keep on overwrite new data at full SD card Upload Settings Upload current settings to portal Download Settings...
-
Page 32: Cloud Server Instruction
All manuals and user guides at all-guides.com 5.Cloud server instruction Before you start to use LinkEazi APP Web portal Make sure: the camera and host device are WiFi connected all your device registered to cloud server available SIM card and data plan for transmitting data It will ask for storage and network permission for this APP, please click yes Search ‘LinkEazi’... - Page 33 All manuals and user guides at all-guides.com Cloud web portal Visit our cloud sever web portal at: http://www.linckeazi.com You have to fill a username that not exit in current username library, and register with an email that hasn’t register before It’s recommended to set password with the combination of letter, number, symbols...
- Page 34 All manuals and user guides at all-guides.com Cloud web portal add a device Login and at ‘PERSONAL PAGE’, you will find ‘Add Device’ button at up left of page, click it and will prompt a form as below The SN and IMEI/ID labelled at package of product, fill them accordingly Name your device in case you...
- Page 35 All manuals and user guides at all-guides.com After added a device, there will be a status bar, if the devices are connected to network Change battery or check your WiFi network accordingly when the status bar shows low battery or no signal...
- Page 36 All manuals and user guides at all-guides.com Setting device with web portal device setting SETTINGS Click the button at tab, select the device you want to change setting After done with settings, click the ‘Apply Device’ button at right bottom of website, and the settings will SYNC to camera You can save up to 3 sets of setting by...
- Page 37 All manuals and user guides at all-guides.com Important: Add Phone number for host device Cloud server must have the phone number of host device to send commands, follow the below steps, don’t forget to click Apply to Device...
- Page 38 All manuals and user guides at all-guides.com Photo&Video management with web At ‘SUPERVIEW’ tab, you can browse and manage all the photo&video Select the specific camera you want to check Click ‘Batch operation’ button, you can select multiple photo&video to delete or download to your computer...
- Page 39 All manuals and user guides at all-guides.com Quick operation buttons At column of each device, there three quick operation buttons (from left to right): setting, location instant picture and take an Clicked the instant picture button, it will prompt a confirm window, click OK, camera will take an instant photo and send it to web portal Move the mice to the bottom of photo or video, the below tab will show...
- Page 40 All manuals and user guides at all-guides.com Account management At ‘ACCOUNT’ tab, you can manage overall account options You can fill your personal information at first tab, it will show the latest login time With ‘Account Safety’ button, you can change the password of cloud account ‘Guest Account’...
- Page 41 All manuals and user guides at all-guides.com Notification settings The moment camera sends a photo or a video, it will prompt a notification at the email icon Icon’ to enter notification setting tab Click the ‘Email ‘Set message’ shows the setting SYNC history ‘New picture’...
-
Page 42: Linkeazi App Instruction
All manuals and user guides at all-guides.com 6.Cloud APP instruction LinkEazi APP has all the functions that cloud server web portal has, which is convenient to use with a phone. Click APP and create below instruction an account as 1. Fill the blanks 2. - Page 43 All manuals and user guides at all-guides.com Main panel introduction...
- Page 44 All manuals and user guides at all-guides.com Linkeazi APP add a device device, and fill the Click left-top to enter integrated menu, click blanks accordingly(SN/IMEI labelled at product package )
- Page 45 All manuals and user guides at all-guides.com Setting device Follow the below steps, you can find the setting page, Linkeazi has all the setting options as web-portal, when you done with changing apply to device setting, please remember to click...
- Page 46 All manuals and user guides at all-guides.com Important: Add Phone number for host device Cloud server must have the phone number of host device to send commands, follow the below steps, don’t forget to click Apply to Device after adding phone number...
- Page 47 All manuals and user guides at all-guides.com Photo&Video management superview page Navigate to to browse and manage all your photo&video, there’re filter button at right-top and batch operation at bottom...
- Page 48 All manuals and user guides at all-guides.com Account management Navigate to account page to manage all your account information settings, you can create guest account for sharing, and delete device at this page...
- Page 49 All manuals and user guides at all-guides.com Notification settings Navigate to notification settings page, it will prompt a number at APP icon by default, you can set it as your preference...
- Page 50 All manuals and user guides at all-guides.com FAQ and Feedback Click menu FAQ, you can take tips from ‘Common problem’ tab, inquiry’ tab and browse your history feedback with ‘My Describe your problem, our tech support service will reply promptly...
-
Page 51: Appendix
All manuals and user guides at all-guides.com Appendix Error Meaning Suggestions Code Invalid PIR trigger DSP boot timeout Chase trigger DSP boot timeout Time-lapse trigger DSP boot timeout PIR trigger DSP boot timeout Reboot camera, if doesn't work, please contact after-sale service WIFI trigger DSP boot timeout Fail to send data Data send timeout... - Page 52 All manuals and user guides at all-guides.com Failed to initialize app variables Failed to configure the device in its default state Failed to start the device Failed to get wifi mac address Check your network, then reboot camera, if doesn't work, Failed to get softeware version please contact after-sale service Failed to connect the wifi or...
- Page 53 All manuals and user guides at all-guides.com Please register your camera to Please register camera Cloud-server before use it No thumbnail info No parameters Upload parameter registration failed Check your network, then Download parameter registration reboot camera, if doesn't work, failed please contact after-sale service Download firmware registration...
- Page 54 All manuals and user guides at all-guides.com Legal Disclaim Any property loss or physical injury caused by inappropriate usage of device will be responsible for the user. The product is not suitable for customer under 13-year-old, any harm caused by selling this product to under age user will be responsible for the seller You will take responsibility to obey your local legal restriction, and take consequences when you violate local law, and our company might have to...
-
Page 55: Policies And Disclaim
All manuals and user guides at all-guides.com You will be fully responsible for protecting your device or account from stolen, our company will be responsible for the account information leakage which solely caused by technical malfunctions You will have to register your cloud server account with an Email address, our company will not send spam commercial email or leak it to third company, and will offer technical protection of the location information of your device... -
Page 56: Ce Caution
All manuals and user guides at all-guides.com Declaration of Conformity to Directive 2014/53/EU CE Caution: Hereby, the manufacturer declares that this camera is in compliance with the essential requirements and other relevant provisions of Directive 2014/53/EU. Pls ask for your distributor for a copy of the Declaration of Conformity to Directive 2014/53/EU. - Page 57 All manuals and user guides at all-guides.com WARRANTY The camera manufacturer provides 24 months of warranty service for this product against manufacturing defects or malfunctions. If your camera fails to function under normal use within 2 years, the camera manufacturer will repair or replace the camera at no charge.
-
Page 58: Warranty Card
All manuals and user guides at all-guides.com Customer Name: Contact Tel: Date of Purchase: Series No: Fault Description: Retailer:...
Need help?
Do you have a question about the HomeGuard WiFi and is the answer not in the manual?
Questions and answers