Table of Contents
Advertisement
Advertisement
Table of Contents

Related Manuals for Uovision UV595-HD


Summary of Contents for Uovision UV595-HD
- Page 1 (For UV595-HD Model) Page 1...
-
Page 2: Table Of Contents
Content 1 General Description ............. 3 2 Camera Overview ..............4 3 Installing Batteries .............. 5 4 Customizing camera settings ..........6 4.1 Formatting the SD card ................ 6 4.2 Quick Setup ....................7 4.3 View or Delete photos on the color display ........7 5 Introduction of the Menu bar .......... -
Page 3: General Description
1 General Description Congratulations on your purchase of UV595-HD scouting camera. UV595-HD is a powerful and reliable performance scouting camera. Features: 12MP invisible IR camera; 0.65s trigger speed; HD resolution: 720P/1080P NO Glow black LEDs with 12m flash range 2.0” Color TFT... -
Page 4: Camera Overview
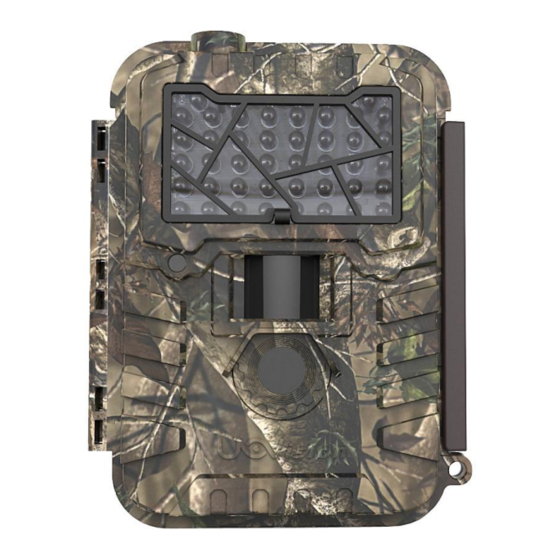
2 Camera Overview Fig 1 Front View Fig 2 Operation Interface Page 4... -
Page 5: Installing Batteries
Fig 3 Bottom View Operation Panel: MENU: To enter the menu, the power switch should on SETUP. ▲▼◄►: Navigation arrows.(“▲”is the shortcut to choose “Video”, while “▼”for “Photo”.) OK: Save parameter settings. : Exchange between playback and preview. DEL: Delete Image. : To capture a photo or record a video manually. -
Page 6: Customizing Camera Settings
There are 6 battery slots. Slot1 and Slot2 form one group and is marked as “1”, slot3 and slot4 form the other group and is marked as “2”, while slot 5 and slot6 form the third group and is marked as “3”. Single “group”... -
Page 7: Quick Setup
Select the SYS tab. Navigate down by pressing the ▼ button until the FORMAT option is highlighted and press OK then choose Yes to format. Fig 6 4.2 Quick Setup To start, turn camera onto Setup. Press Menu button once to open the customization menus. -
Page 8: Introduction Of The Menu Bar
5 Introduction of the Menu bar 5.1 Understanding main screen info Fig 7 5.2 Customizing the camera settings Press LEFT or RIGHT and UP or DOWN to select the desired options,And then press OK to save. Setting Items Description Choose Photo, Video, or Photo +video ►... - Page 9 Choose the video size Video Size 720P/WVGA/QVGA/1080P You can adjust the length of time the Video Length camera takes a video from 5‐60 seconds. Long videos fill the SD card up quickly. Choose to record sound in the video Video sound ON/OFF There may be situations where you might feel the camera is not catching animals...
- Page 10 stamp on the picture or not. Infrared Flash range: 20 ft./6m and 40 ft./12m. ( If most of the subjects are going to be Flash Range inside 6m/20ft, use the 6m/20ft setting. If you need extended night vision, choose the 12m/40ft option.) The default password is 0000.
-
Page 11: Defaults Settings
5.3 Defaults settings: Setting Items Default Camera Mode Photo Photo Size 5M Pixel Photo Burst 1 Photo Video Size 720p Video Length 5 sec Video sound Sensitivity normal Trigger Interval 1 Min Time Lapse Start-Stop Set Clock Enter Time Stamp Flash Range 12m/40ft Password... -
Page 12: Tricks And Tips On Field Setup
7 Tricks and tips on field setup For best results, mount the camera approximately 1.3m/4ft off the ground facing straight forward as level as possible. To enhance the flash, we recommend positioning the camera in an area with a backdrop to reflect the maximum amount of light. For instance, place the camera 7m-10m/20ft‐30ft from a field edge facing the woods. -
Page 13: Appendix Ⅰ: Technical Specifications
Appendix Ⅰ: Technical Specifications 12MP, 8MP (Interpolated), Picture Resolution Real 5MP, 3MP Lens F/NO=3.0 FOV(Field of View)=52° IR-Flash 6m, 12m Display Screen 2.0” LCD Memory Card Up to 32GB Video Resolution 720P,WVGA,QVGA,1080P PIR Sensor Multi Zone PIR Sensitivity Adjustable (High/Normal/Low) Trigger Time 0.65s Weight... -
Page 14: Appendix Ⅱ: Parts List
Appendix Ⅱ: Parts List Part Name Quantity Digital Camera Belt User Manual Declaration of Conformity to Directive 1999/5/EC (Version 2.00) Page 14... - Page 15 Customer Name: Contact Tel: Date of Purchase: Series No: Fault Description: Retailer: The camera manufacturer provides 24 months of warranty service for this product against manufacturing defects or malfunctions. If your camera fails to function under normal use within 2 years, the camera manufacturer will repair or replace the camera at no charge.
Need help?
Do you have a question about the UV595-HD and is the answer not in the manual?
Questions and answers