Advertisement
Quick Links
aspenhome
ah
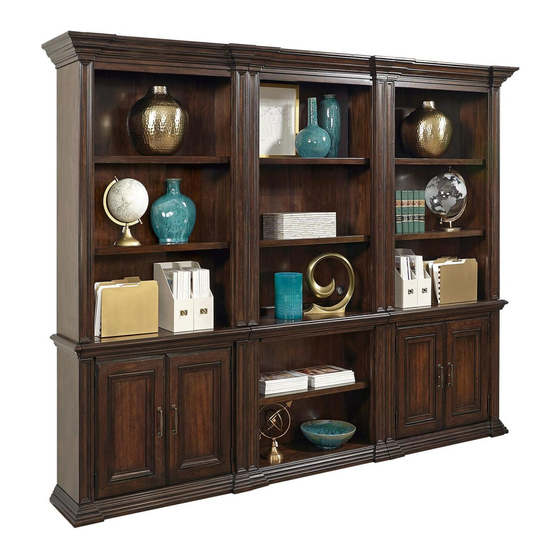
ITEM NO: I91-332
I91-333
Thank you for purchasing this quality product. Be sure to check all packing material carefully for
small parts that may come loose inside the carton during shipment.
I91-332
STEP 1: Line up the front
of bookcases then using the
U bracket (A) with screw
(B) to adjacent bookcase.
FUNCTIONALITY INSTRUCTION
BEFORE USING THIS PRODUCT PLEASE READ, UNDERSTAND, AND FOLLOW THESE INSTRUCTIONS.
Save these instructions for future reference.
Page 1/1
Door Bookcase
Open Bookcase
I91-333
A
B
FOR INDOOR USE ONLY
MADE IN VIETNAM
ASSEMBLY INSTRUCTIONS
R
TOOLS REQUIRED (NOT PROVIDED)
PHILLIPS SCREWDRIVER
COMPONENTS LIST: I91-332/333
Description
No.
Left Crown Molding
1
Right Crown Molding
2
Left Middle Molding
3
Right Middle Molding
4
Left Bottom Molding
5
Right Bottom Molding
6
HARDWARE LIST: I91-332/333
Description
No.
A U bracket
B
Wood Screw
STEP 2: Attach the
moldings to case.
Removable Moldings
Hidden drawer
Adjustable wood shelves
Adjust the leveler
when necessary
Leveler on base
Quantity
Sketch
1 PC
1 PC
1 PC
1 PC
1 PC
1 PC
Quantity
Sketch
1 PC
2 PCS
Locating Dowel
Moldings
If you prefer to adjust the shelf
location, remove the screws and
move shelf brackets to the
desired location. Then secure the
brackets to shelf with screws.
07-20-2017
Magnet
Advertisement

Related Manuals for aspenhome I91-332


Summary of Contents for aspenhome I91-332
- Page 1 ASSEMBLY INSTRUCTIONS ITEM NO: I91-332 Door Bookcase I91-333 Open Bookcase Thank you for purchasing this quality product. Be sure to check all packing material carefully for small parts that may come loose inside the carton during shipment. I91-333 I91-332...
- Page 2 ASSEMBLY INSTRUCTIONS ITEM NO: I91-344 Peninsula Desk Thank you for purchasing this quality product. Be sure to check all packing material carefully for small parts that may come loose inside the carton during shipment. UNIT SHOULD BE INSTALLED BY 2 OR MORE PERSONS.
- Page 3 ASSEMBLY INSTRUCTIONS ITEM NO: I91-344 Peninsula Desk OPTION 1 Left Peninsula Desk Bookcase Desk top STEP 1: Remove the drawer from the bookcase, Attach the assembly desk to the bookcase by using 3 bolts(A) 2 bolts(B), lock washers(C), flat washers(D).
- Page 4 ASSEMBLY INSTRUCTIONS ITEM NO: I91-344 Peninsula Desk STEP 3: Attach drawer frame, pedestal and end connector to back panel by using bolts (16 pcs), lock washers and flat washers. Bookcase STEP 4: Remove the drawer from the bookcase, Attach the assembly desk to the bookcase by using...