
Related Manuals for DR ROTO-HOGTM


Summary of Contents for DR ROTO-HOGTM
- Page 1 ® ROTO-HOG™ POWER TILLER SAFETY & OPERATING INSTRUCTIONS READ AND UNDERSTAND THIS MANUAL AND ALL INSTRUCTIONS BEFORE OPERATING THIS TILLER.
- Page 2 Congratulations on your purchase of a new DR ROTO-HOG POWER TILLER! We have done our utmost to ensure that your DR ROTO-HOG POWER TILLER will be one of the most trouble-free and satisfying pieces of equipment you have ever owned. Please let us know of any questions you may have.
-
Page 3: Table Of Contents
About the Battery ... 16 Extra Wire ... 16 Adding the Engine Oil and Gasoline... 18 Connecting the DR ROTO-HOG POWER TILLER to your Tow Vehicle... 20 Attaching the DR ROTO-HOG POWER TILLER Control Box... 20 CHAPTER 4... 21 OPERATING YOUR DR ROTO-HOG POWER TILLER... 21 Operator Controls... - Page 4 Schematic Diagram - Tine Drive Transmission Assembly... 43 Parts List - Axle Assembly... 44 Schematic Diagram - Axle Assembly... 45 Wiring Diagram - Manual Start model... 46 Wiring Diagram - Electric-Start model ... 47 Warranty... 49 ® ROTO-HOG™ POWER TILLER...
-
Page 5: Chapter 1
Tools Needed: This indicates you will need a special tool to perform a maintenance function on your Tiller. NOTE: This information may be helpful to you. If you are ever unsure about an action you are about to take, don’t do it. Contact Country Home Products’ Toll-Free support at 1-800-DR-OWNER (376-9637) for help or information. -
Page 6: Dr Roto-Hog Power Tiller Specification Sheet
DR ROTO-HOG POWER TILLER Specification Sheet Engine Approximate Run Time on a Tank of Fuel Battery Towing type Ground Clearance in Transport Mode Height Adjustment Range Actuator Stroke Actuator Maximum Load Length of Remote Control Cable # of Cycles for Fully Charged Battery... -
Page 7: Chapter 2
Shown below are copies of all the labels that appear on the equipment. Take a moment to study them and make a note of their location on your DR ROTO-HOG POWER TILLER as you assemble and before you operate the machine. Replace damaged or missing safety and information labels immediately. - Page 8 NEVER operate the DR ROTO-HOG POWER TILLER without the guards and shields in place. #224511 NEVER place your hands or feet near the rotating Tines. #224521 ® ROTO-HOG™ POWER TILLER...
-
Page 9: Protecting Yourself And Those Around You
DO NOT USE THIS MACHINE AROUND UNDERGROUND PIPES AND WIRING. • IF THE DR ROTO-HOG POWER TILLER ENGINE SHOULD STALL, RAISE THE TINES OUT OF THE SOIL AND DISENGAGE THEM. NEVER ENGAGE THE TINES WHEN THEY ARE IN THE GROUND. -
Page 10: Slope Operation
USE OF MACHINERY ON SLOPES IS A MAJOR FACTOR RELATED TO ACCIDENTS, WHICH CAN RESULT IN SEVERE PERSONAL INJURY. USE OF MACHINERY ON SLOPES REQUIRES CAUTION. IF YOU FEEL UNEASY USING THE DR ROTO-HOG POWER TILLER ON A SLOPE, DO NOT OPERATE IT. ALWAYS TAKE THE FOLLOWING PRECAUTIONS WHEN USING THIS MACHINE ON SLOPES: ALWAYS: •... -
Page 11: Safety With Gasoline-Powered Machines
GASOLINE AND ALWAYS FOLLOW THESE PRECAUTIONS: • NEVER RUN THE DR ROTO-HOG POWER TILLER ENGINE IN AN ENCLOSED AREA OR WITHOUT PROPER VENTILATION AS THE EXHAUST FROM THE ENGINE CONTAINS CARBON MONOXIDE, WHICH IS AN ODORLESS, TASTELESS, AND DEADLY POISONOUS GAS. -
Page 12: General Safety
YOU. ALWAYS TAKE THE FOLLOWING PRECAUTIONS WHEN OPERATING THIS MACHINE: • THE DR ROTO-HOG POWER TILLER IS A POWERFUL TOOL AND NOT A PLAYTHING. WHEN USING THIS MACHINE, EXERCISE EXTREME CAUTION AT ALL TIMES. THE DESIGN OF THIS MACHINE IS TO TILL SOIL. -
Page 13: A Note To All Users
Contact your local fire marshal or forest service for specific information in your area. Additional Information and Potential Changes Country Home Products, Inc. reserves the right to discontinue, change, and improve its products at any time without notice or obligation to the purchaser. The descriptions and specifications contained in this manual were in effect at printing. - Page 14 ® ROTO-HOG™ POWER TILLER...
-
Page 15: Chapter 3
CHAPTER 3 SETTING UP YOUR DR ROTO-HOG POWER TILLER This chapter outlines a few simple steps you will need to follow to set up your new machine before you use it. It may be helpful to familiarize yourself with the controls and features on your new machine by reviewing Figure 1 on the following page before beginning the steps outlined in this chapter. -
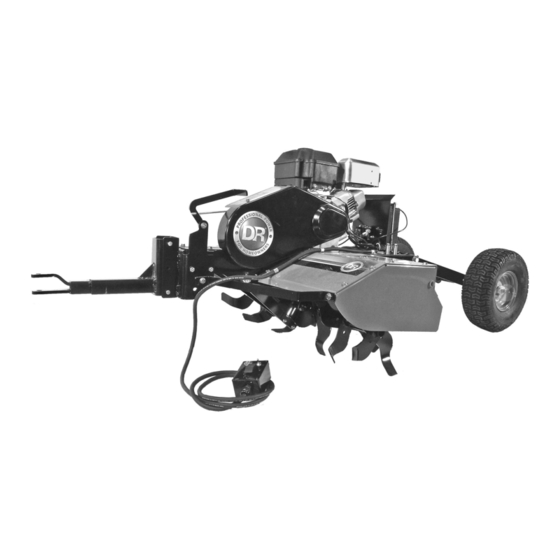
Page 16: Dr Roto-Hog Power Tiller Controls And Features
DR ROTO-HOG POWER TILLER Controls and Features NOTE: The model shown in Figure 1 may look slightly different from your machine. Briggs & Stratton Engine 875 Series Manual Recoil Start Handle Battery Oil Fill Rear Debris Guard Tines Gas Fill Tine Drive Clutch Lever SMOOTH-TRAK™... -
Page 17: Unpacking And Assembling The Machine
Your DR ROTO-HOG POWER TILLER shipped in one carton, completely assembled except for the Wheels, Tow Bar, and Battery. NOTE: Unpacking and assembling the DR ROTO-HOG POWER TILLER is a two-person job, as the Manual Start Unit weighs 259 pounds and the Electric Start Unit weighs 264 pounds. We recommend you have an extra set of hands available before you begin. - Page 18 Pin Legs using Pliers (Figure 9 on page 15). 13. Raise the Tines, lowering the Wheels, and roll the machine from the shipping pallet. Do not discard your packaging material until you are fully satisfied with your new DR ROTO-HOG POWER TILLER.
- Page 19 Axle Hold Down Brackets Figure 7 Push to lower the unit (raise the Axles) Figure 8 Valve Stem Cotter Pin Legs spread apart Figure 9 2-Bolts each side Flat Wheel Washer CALL TOLL FREE 1-800-DR-OWNER...
-
Page 20: Charging The Battery
DO NOT SHORT CIRCUIT THE BATTERY. About the Battery The DR ROTO-HOG POWER TILLER comes with a 12-Volt, maintenance-free, rechargeable, sealed lead acid Battery. A fully charged Battery runs about 20 hours or 400 up/down cycles. Properly maintained and charged, the Battery provides years of dependable service. - Page 21 Charging the Battery Charging the Battery is a simple process. Leave the Battery in your DR ROTO-HOG POWER TILLER when you charge it. 1. Attach the Black (-) alligator clipped wire from the Charger Adapter to the (-) terminal of the Battery, then attach the Red (+) alligator clipped wire to the (+) Battery terminal.
-
Page 22: Adding The Engine Oil And Gasoline
FILL GAS TANK OUTDOORS OR IN A WELL-VENTILATED AREA, AWAY FROM SPARKS, OPEN FLAMES, PILOT LIGHTS, HEAT, AND OTHER IGNITION SOURCES. ® ROTO-HOG™ POWER TILLER Capacities SAE 30 High Detergent Oil – 20 oz. (.60L) Unleaded Gas (85 Octane minimum), 3.0 Qts. (2.8 L) - Page 23 Air Filter Gas Fill Fuel Shut-Off Choke Throttle Recoil Starter Handle Oil Fill Drain & Oil Fill Drain Figure 10 CALL TOLL FREE 1-800-DR-OWNER...
-
Page 24: Connecting The Dr Roto-Hog Power Tiller To Your Tow Vehicle
Figure 11 Attaching the DR ROTO-HOG POWER TILLER Control Box The following procedure includes the steps necessary for attaching the DR ROTO-HOG POWER TILLER Control Box to your Tow Vehicle. There are two (2) options for attaching the Control Box: •... -
Page 25: Chapter 4
CHAPTER 4 OPERATING YOUR DR ROTO-HOG POWER TILLER This chapter covers the procedures for starting and stopping your new DR ROTO-HOG POWER TILLER and discusses basic operation features. There are three (3) applications for the DR ROTO-HOG POWER TILLER: Garden Tilling, Sod Busting, and small Food Plot installation. -
Page 26: Before Starting The Engine
6. Turn the Fuel Shut-Off to the ON position (see Figure 10 on page 19). Manual Starting NOTE: You may use this starting method even though the DR ROTO-HOG POWER TILLER may be equipped with Electric Starting; however, make sure the Key is in the RUN position. -
Page 27: Electric Starting
3. After the Engine starts, slowly push the Choke Control Lever to the left (RUN) position (Figure 10 on page 19). Wait until the Engine runs smoothly before each Choke adjustment. For optimum performance of the DR ROTO-HOG POWER TILLER, you should operate the Engine with the Throttle in the Fast (RABBIT) position (Figure 10 on page 19). -
Page 28: Operating Safety
PROTECT YOUR HEARING. • NEVER PUT YOUR HANDS NEAR THE TINES TO CLEAR DEBRIS WHILE THE ENGINE IS RUNNING. ALWAYS SHUT OFF THE DR ROTO-HOG POWER TILLER ENGINE AND DISCONNECT THE SPARK PLUG WIRE BEFORE CLEARING DEBRIS. • DO NOT REFUEL THE ENGINE WHILE IT IS HOT OR RUNNING. -
Page 29: Understanding The Control Box
Understanding the Control Box The Control Box contains a 3-position momentary Rocker Switch. The “Raise” position raises the Tines (lowers the Wheels). The “Lower” position lowers the Tines (raises the Wheels). When you release the Switch, it will return to center or OFF position (Figure 15). The Control Box also contains the Engine Electric- Start Key Switch for the Electric-Start model and the Optional Spreader ON-OFF Switch. -
Page 30: Operating Parameters
3. Remove the cut vegetation by either rake, vacuum, blowing OR allow it to dry several days and re-cut. FAILURE TO REMOVE LONG VEGETATION WILL RESULT IN FREQUENT STALLING OF THE ENGINE. NOTE: For information on ordering the optional equipment, call Country Home Products at: 1-800-DR-OWNER (376-9637). -
Page 31: Tilling Tips
Create full tillage (depths up to 7") after entire area is dry. • To obtain the most efficient tillage, operate the DR ROTO-HOG POWER TILLER Engine at full throttle at the slowest speed of your Tow Vehicle. -
Page 32: Slopes And Uneven Terrain
NEVER LIFT THE MACHINE WHILE THE ENGINE IS RUNNING. We recommend using two (2) people to lift the DR ROTO-HOG POWER TILLER. Lift the machine by the SMOOTH-TRAK™ Hitch to connect and disconnect from your Tow Vehicle. To transport the machine with your Tow Vehicle, first raise the tines to the MAX position (lower the Wheels) using the Control Box. -
Page 33: Chapter 5
This chapter covers regular maintenance procedures that will ensure the best performance and long life of your DR ROTO-HOG POWER TILLER. For Engine maintenance, please refer to the Engine Owner’s Manual that came with your machine. Service intervals listed in the checklist below supercede those listed in the Engine Owner’s Manual. -
Page 34: Lubrication
MINUTES TO ALLOW PARTS TO COOL AND DISCONNECT THE SPARK PLUG WIRE, KEEPING IT AWAY FROM THE SPARK PLUG. Your DR ROTO-HOG POWER TILLER was lubricated at the Factory. However, periodic lubrication of the Engine and Tines Shaft is required. -
Page 35: Removing And Replacing The Engine Oil
Removing and Replacing the Engine Oil WHEN PERFORMING ANY MAINTENANCE, YOU MUST FIRST SHUT OFF THE ENGINE, WAIT FIVE (5) MINUTES TO ALLOW PARTS TO COOL AND DISCONNECT THE SPARK PLUG WIRE, KEEPING IT AWAY FROM THE SPARK PLUG. BE CERTAIN TO FILL THE ENGINE WITH OIL BEFORE STARTING. SEE PAGE 18. Tools &... -
Page 36: Battery Care
NOTE: Using the recoil starter and then running the Engine will not recharge a dead or significantly discharged Battery. Charging the Battery is a simple process. Leave the Battery in your DR ROTO-HOG POWER TILLER when you charge it. To connect a Battery Charger to your DR ROTO-HOG POWER TILLER, follow the steps listed below. -
Page 37: Recycling A Used Battery
14. WHEN THE BATTERY GETS OLD AND NO LONGER ACCEPTS A CHARGE, REMOVE IT FROM YOUR DR ROTO-HOG POWER TILLER. NEVER LEAVE A DEAD BATTERY IN YOUR MACHINE. Disposing of the Battery Responsibly The Battery is a sealed lead-acid Battery. Recycle or dispose of it in an environmentally sound way. -
Page 38: Removing And Replacing The V-Belt
Tip: Lifting up on the Clutch Idler Pulley (Figure 20) may help in removing the Belt. 4. Reinstall a new Belt (Figure 20), engage the Tine Clutch Lever, and replace the Belt Guard. Disengage Belt Cover Top Screw Figure 19 ® ROTO-HOG™ POWER TILLER Figure 20 Hex Nut Clutch Idler Pulley 6-1/4" Fender Belt Routing... -
Page 39: Tine Shear Pins
Tine Assembly to the drive shaft will shear or break, and the drive components of the DR ROTO-HOG POWER TILLER will not sustain damage. • Two (2) extra sets of Tine Shear Pins are included with the DR ROTO-HOG POWER TILLER. • The design of the Tine Shear Pin is to loosely fit when properly installed. -
Page 40: End Of Season And Storage
Change the Engine oil. • If your DR ROTO-HOG POWER TILLER will be idle for more than 30 days, we recommend using a gas stabilizer. This will prevent sediment from gumming up the carburetor. If there is dirt or moisture in the gas or tank, remove it by draining the tank. Completely fill the tank with fresh, unleaded gas and add the appropriate amount of stabilizer or gasoline additive. -
Page 41: Chapter 6
CHAPTER 6 TROUBLESHOOTING Most problems are easy to fix. Consult the Troubleshooting Table for common problems and their solutions. If you continue to experience problems, call Country Home Products, Inc. for support at: 1-800-DR-OWNER (376-9637). Troubleshooting Table WHEN PERFORMING ANY MAINTENANCE, YOU MUST FIRST SHUT OFF THE ENGINE, WAIT FIVE (5) MINUTES TO ALLOW PARTS TO COOL AND DISCONNECT THE SPARK PLUG WIRE, KEEPING IT AWAY FROM THE SPARK PLUG. - Page 42 45 minutes at a time, the Battery may need to be periodically charged. See the Battery Care section on page 32. ⇒ If the Battery is charged and your DR ROTO-HOG POWER TILLER still will not start, call 1-800-DR-OWNER (376-9637) for assistance.
- Page 43 ⇒ Be sure the Engine Throttle is set on the Fast (RABBIT) position. ⇒ If your DR ROTO-HOG POWER TILLER still bounces, call 1-800-DR-OWNER (376-9637) for assistance. The tilled soil balls ⇒ The ground that you are trying to till is too moist. See Tilling Tips on page 27.
-
Page 44: Chapter 7
CHAPTER 7 PARTS LISTS, SCHEMATIC DIAGRAMS AND WARRANTY Parts List - Main Assembly NOTE: Part numbers listed are available through Country Home Products, Inc. Ref# Part# Description 232971 Pin, Channel Pivot 1/2" 232891 Washer, 1/4" Std .312" x .734" 233071 Bolt, Hex 5/16"-18 x 3/4"... -
Page 45: Schematic Diagram - Main Assembly
Schematic Diagram - Main Assembly 070718 CALL TOLL FREE 1-800-DR-OWNER... -
Page 46: Parts List -Tine Drive Transmission Assembly
Parts List -Tine Drive Transmission Assembly NOTE: Part numbers listed are available through Country Home Products, Inc. Ref# Part# Description 233401 Washer, Felt, .985" x 1.515" 231381 233161 Nut, Hex, 5/16"-18, Flanged Lock 233231 Assembly, Flange & Bearing 233391 Gasket, Flange... -
Page 47: Schematic Diagram - Tine Drive Transmission Assembly
Schematic Diagram - Tine Drive Transmission Assembly 070718 CALL TOLL FREE 1-800-DR-OWNER... -
Page 48: Parts List - Axle Assembly
Parts List - Axle Assembly NOTE: Part numbers listed are available through Country Home Products, Inc. Ref# Part# Description 233041 Nut, Hex 1/4"-20 w/Lock Washer 231431 Spacer, 0.266" x 0.625" x 1.5" 231401 Bracket, Battery Mounting 231441 Bolt, Hex, 1/4"-20 x 3-1/2" GR 5... -
Page 49: Schematic Diagram - Axle Assembly
Schematic Diagram - Axle Assembly 070718 CALL TOLL FREE 1-800-DR-OWNER... -
Page 50: Wiring Diagram - Manual Start Model
Wiring Diagram - Manual Start model 070725 ® ROTO-HOG™ POWER TILLER... -
Page 51: Wiring Diagram - Electric-Start Model
Wiring Diagram - Electric-Start model 070725 CALL TOLL FREE 1-800-DR-OWNER... - Page 52 Notes: ® ROTO-HOG™ POWER TILLER...
-
Page 53: Warranty
Country Home Products, Inc. (home of DR ordinary purposes for which a product of this type is used. Country Home Products, Inc. however, limits the implied warranties of merchantability and fitness in duration to a period of two (2) years in consumer use, ninety (90) days for any other use. - Page 54 Congratulations! Your DR ROTO-HOG POWER TILLER will till faster and with far less effort than any walk-behind tiller. However, like any tiller you have to respect its power and use it properly for best results. Please read the instructions in this manual, and especially remember the following: IF YOU ARE BREAKING NEW GROUND –...
Need help?
Do you have a question about the ROTO-HOGTM and is the answer not in the manual?
Questions and answers