Table of Contents
Advertisement
®
DR
PILOT 2 Cycle Tiller/Cultivator
SAFETY & OPERATING INSTRUCTIONS
Serial No.
Order No.
Read and understand this manual and all instructions before operating the DR PILOT 2 Cycle Tiller/Cultivator.
DR Power Equipment
Toll-free phone: 1-800-DR-OWNER (376-9637)
Fax: 1-802-877-1213
Website: www.DRpower.com
Advertisement
Table of Contents

Related Manuals for DR PILOT 2


Summary of Contents for DR PILOT 2
- Page 1 ® PILOT 2 Cycle Tiller/Cultivator SAFETY & OPERATING INSTRUCTIONS DR Power Equipment Serial No. Toll-free phone: 1-800-DR-OWNER (376-9637) Fax: 1-802-877-1213 Order No. Website: www.DRpower.com Read and understand this manual and all instructions before operating the DR PILOT 2 Cycle Tiller/Cultivator.
-
Page 2: Table Of Contents
NOTE: This information may be helpful to you. We have done our utmost to ensure that your DR PILOT 2 Cycle Tiller/Cultivator will be one of the most trouble-free and satisfying pieces of equipment you have ever owned. Please let us know of any questions you may have. We want to answer them as quickly as possible. -
Page 3: Chapter 1: Important Safety Considerations
We recommend wearing long pants and gloves while using this machine. Be sure the gloves fit properly and do not have loose cuffs or drawstrings. Never place your hands, feet, or any part of your body near the Tines when starting the Engine or while the DR PILOT 2 Cycle Tiller/Cultivator’s Engine is running. ... - Page 4 Use the DR PILOT 2 Cycle Tiller/Cultivator only in daylight. Do not hurry or take things for granted when using the DR PILOT 2 Cycle Tiller/Cultivator. When in doubt about the machine or your surroundings, stop the machine and take time to look things over.
- Page 5 The tines of the cultivator should not rotate when the engine is idling. If it does rotate when engine is idling, contact DR Power Equipment for instructions.
-
Page 6: Chapter 2: Setting Up Your Dr Pilot 2 Cycle Tiller/Cultivator
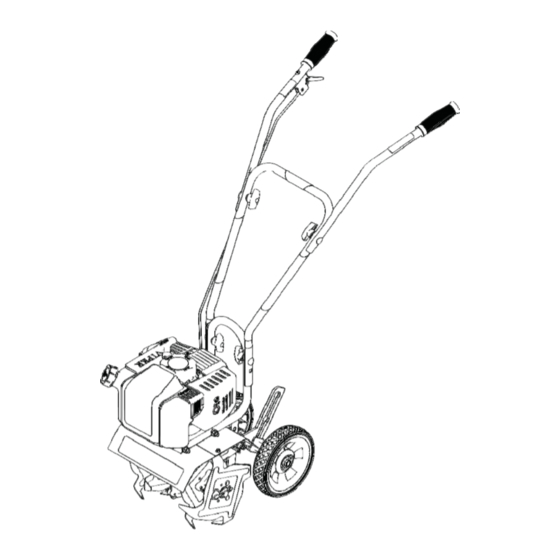
Chapter 2: Setting up your DR PILOT 2 Cycle Tiller/Cultivator This chapter outlines a few simple steps you will need to follow to set up your new machine before you use it. It may be helpful to familiarize yourself with the controls and features on your new machine by reviewing Figure 1 on the following page before beginning the steps outlined in this chapter. - Page 7 DR PILOT 2 Cycle Tiller/Cultivator Controls and Features NOTE: The model shown in Figure 1 may look slightly different from your machine. 2 Position Tool-Less Handlebar Height Adjustment Throttle Control Lever Manual Recoil Start Handle 43cc 2-Cycle Engine See Through...
-
Page 8: Unpacking And Assembling The Machine
Carefully lift the DR PILOT 2 Cycle Tiller/Cultivator out of the carton and set the machine upright with the Tines and Wheels on a level surface. - Page 9 The Drag Stake shipped with its pointed end facing upwards. Remove the Lock Pin, turn the Drag Stake around and direct the point in the downward position facing towards the Tines, and then reinsert the Lock Pin (Figure 3). Do not discard your packaging material until you are fully satisfied with your new DR PILOT 2 Cycle Tiller/Cultivator. Lock Pin Drag Stake Tip pointed forward.
- Page 10 Wipe off any spilled fuel before attempting to start the Engine. NOTE: To refill the Fuel Tank, turn the Engine OFF, and let the Engine cool at least two (2) minutes before removing the Fuel Tank Cap. ® PILOT 2 Cycle Tiller/Cultivator...
-
Page 11: Chapter 3: Operating Your Dr Pilot 2 Cycle Tiller/Cultivator
Chapter 3: Operating Your DR PILOT 2 Cycle Tiller/Cultivator This chapter covers the procedures for starting and stopping your new DR PILOT 2 Cycle Tiller/Cultivator and discusses basic operation features. Before Starting the Engine Remove all long vegetation from the site. Long vegetation will wrap around the Tines and cause poor performance. -
Page 12: Stopping The Engine
Use the DR PILOT 2 Cycle Tiller/Cultivator without placing excessive body weight on the machine. The unit operates most efficiently with the weight of the machine itself. Use common sense when using the machine. Learn to recognize the change in sounds when it is overloaded. Turn off the Engine immediately if the machine becomes jammed to prevent damage to the drive system. - Page 13 Adjusting the Wheels and Drag Stake Vertical Guide Adjusting the Wheels You can adjust the Wheels on the DR PILOT 2 Cycle Tiller/Cultivator to one (1) of three (3) positions (Figure 5). Use the lowest Wheel position for transporting the machine across a smooth level surface while the Engine is not running.
-
Page 14: Chapter 4: Maintaining The Dr Pilot 2 Cycle Tiller/Cultivator
Chapter 4: Maintaining the DR PILOT 2 Cycle Tiller/Cultivator This chapter covers regular maintenance procedures that will ensure the best performance and long life of your DR PILOT 2 Cycle Tiller/Cultivator. Prior to performing any maintenance, you must first shut off the Engine; wait five (5) minutes to allow parts to cool and disconnect the Spark Plug wire, keeping it away from the Spark Plug. - Page 15 Cleaning the Air Filter Never twist the air filter element when cleaning, always press. Tool & Supplies Recommended: Flat Head Screw Driver Liquid Detergent and Warm Water Clean Cloth Lightweight motor oil Before removing the Air Filter Cover, move the Choke Lever to the CHOKE position (Figure 7). To remove the Air Filter Cover, squeeze the Latch Tabs on both sides of the Cover (Figure 8).
- Page 16 Tines face each other to allow for Hitch Clip Pin Hitch Clip Pin adequate spacing between the Tine Blades. Replace the Hitch Clip Pins at each end of the Tine Shaft to Figure 12 hold the Tines in place. ® PILOT 2 Cycle Tiller/Cultivator...
-
Page 17: End Of Season And Storage
If your DR PILOT 2 Cycle Tiller/Cultivator will be idle for more than 30 days, we recommend using a fuel stabilizer. This will prevent sediment from gumming up the carburetor. If there is dirt or moisture in the fuel or tank, remove it by draining the tank. -
Page 18: Chapter 5: Troubleshooting
Chapter 5: Troubleshooting Most problems are easy to fix. Consult the Troubleshooting Table for common problems and their solutions. If you continue to experience problems, visit our website at www.DRpower.com or call: 1-800-DR-OWNER (376-9637) for support. Troubleshooting Table Prior to performing any maintenance, you must first shut off the Engine; wait five (5) minutes to allow parts to cool and disconnect the Spark Plug wire, keeping it away from the Spark Plug. - Page 19 Be sure to run the Engine at full Throttle. If your DR PILOT 2 Cycle Tiller/Cultivator still bounces, visit our website at www.DRpower.com for assistance. The tilled soil balls up The ground that you are trying to till is too moist.
-
Page 20: Chapter 6: Parts Lists And Schematic Diagrams
Chapter 6: Parts Lists and Schematic Diagrams Parts List - Handlebar Assembly NOTE: Part numbers listed are available through DR Power Equipment. Ref# Part# Description 26161 Bolt 10-24 X 1-1/4 Phillips 39902 Handlebar Upper Right 25196 Throttle Cable 39903 Rubber Pad... - Page 21 Schematic Diagram - Handlebar Assembly CONTACT US AT www.DRpower.com...
- Page 22 Parts List - Transmission Assembly NOTE: Part numbers listed are available through DR Power Equipment. Ref# Part# Description 39908 Transmission Assembly 26121 Dust Cap 26118 Fiber Washer 39909 Tine Shaft Seal 39910 Transmission Casting Left 26127 Nut M6 Nylock 39911...
- Page 23 Schematic Diagram - Transmission Assembly CONTACT US AT www.DRpower.com...
- Page 24 Parts List - Engine Assembly NOTE: Part numbers listed are available through DR Power Equipment. Ref# Part# Description Ref# Part# Description 26377 Air Filter Cover 27 26170 Recoil Assembly 39931 Kit Air Filter Assembly 28 39949 Recoil Spacer Plate 26177...
- Page 25 Schematic Diagram - Engine Assembly CONTACT US AT www.DRpower.com...
- Page 26 Parts List and Schematic Diagram - Tines and Hood Assembly NOTE: Part numbers listed are available through DR Power Equipment. Ref# Part# Description Ref# Part# Description 26128 Hair Pin, 5/8-3/4 Inch Cotter 26127 Nut M6 Nylock 26114 Tine “A” Right Outside 39971 Washer M6 X 13 X 1.75 Flat...
- Page 27 NOTES: CONTACT US AT www.DRpower.com...
- Page 28 Daily Checklist for the DR PILOT 2 Cycle Tiller/Cultivator To help maintain your DR PILOT 2 Cycle Tiller/Cultivator for optimum performance, we recommend you follow this checklist each time you use your machine. When performing any maintenance, you must first shut off the Engine; wait five (5) minutes to allow parts to cool and disconnect the Spark Plug wire, keeping it away from the Spark Plug.
Need help?
Do you have a question about the PILOT 2 and is the answer not in the manual?
Questions and answers