Table of Contents
Advertisement
Quick Links
s e c u r i t y
the bright way to do home security.
Division:
PDS 540 File Information
Client:
Amazon
Client ID:
10163406
Item NO.:
Packaging Description:
Package Size:
IM
Contact: Art window/Fanny ext:8236
Finish Date:
Email: art-szo-design@testritegroup.com
Colors:
Cutter
Signed by Applicant & Sales Division
CMYK
Diecut
20210145
TWIN HEAD HALO
LED SECURITY LIGHT
ES00929G
INSTALLATION INSTRUCTIONS
20210145
Packaging Design
T101P61Z01
File NO.:
Implement Confirmation
ES00929G
Sales Division
Design Division
10x15cm
Joe
Applicant
Designer
Amy
Fanny
for all Items
Advertisement
Table of Contents

Related Manuals for Home Zone Security ES00929G


Summary of Contents for Home Zone Security ES00929G
- Page 1 TWIN HEAD HALO LED SECURITY LIGHT s e c u r i t y ES00929G INSTALLATION INSTRUCTIONS the bright way to do home security. Division: 20210145 Packaging Design PDS 540 File Information T101P61Z01 File NO.: Implement Confirmation Client: Amazon Client ID: 10163406 Item NO.:...
-
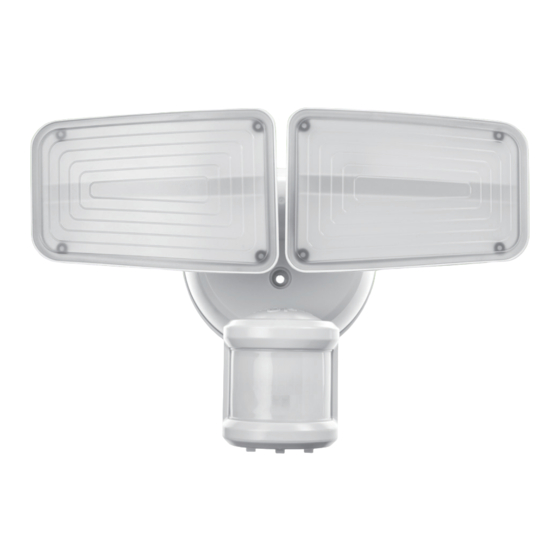
Page 2: What's In The Box
What's in the box Light fixture Rubber plug Mounting bar 2groups Mounting Mounting screw Wire nut bracket screw Parameter Illumination output: approx. 3000 lumens / 5000K Wattage: 32W Power source: AC120V/60Hz Motion detection: up to 70feet (21.3m), 180 degree... -
Page 3: Safety Instructions
Safety instructions 1. Please read all warning and instruction before attempting to install this light. 2. Disconnect power before installing or servicing. Warning Risk of Electrical Shock 1. Turn off electrical power at fuse or circuit breaker box before wiring fixture to the power supply. 2. -
Page 4: Installation
Installation Install the mounting bar to the outlet box with the stamped word "FRONT" facing away from the outlet box, use two mounting screws that best fit the outlet box. (Choose one group of suitable mounting screws among two groups in the hardware pack) Note: For the best performance, install fixture at 5.9 feet ~11.5 feet (1.8~3.5m) above the ground. - Page 5 Connect the source wires from the outlet box with the wires of the back plate using wire nuts as follows: Connect the white wire to white wire Connect the black wire to black wire Connect the Green wire to the house ground wire Note: DO NOT connect electricity before installation and maintenance Place the back plate against the outlet box, insert the mounting...
- Page 6 Attached the light fixture to the back plate using the center mounting screw: • Tighten the center mounting screw securely through the center of the light fixture. Do not overtighten. • Push the rubber plug firmly into the center hole to cover the center mounting screw.
-
Page 7: How It Works
How it Works Adjusting the Lamp Heads and Motion Sensor 1. Swing the lamp heads to adjust the lamp head left and right or up and down to get the desired lamp direction. 2. Gently grasp the motion sensor and adjust the sensor left and right or up and down to get the desired sensor direction. - Page 8 4 Working Modes • Test mode: Check the light’s sensory function in order to test the sensory range. The time duration for the light will be 5s. • Auto: The light will turn on to low brightness automatically at night. When motion is detected, the light will turn on full brightness for the selected time duration.
-
Page 9: Cleaning And Maintenance
Cleaning and Maintenance 1. Clean periodically with soft cloth. 2. Do not use any cleaners with chemicals, solvents or harsh abrasives on this light. Do not use scouring pads, powders, steel wool or abrasive paper. They could cause deterioration of the finish. -
Page 10: Why Register
• Get exclusive deals delivered to you email. Get exclusive offers and deals when you subscribe! Thank you for choosing Home Zone Security! We are here to support you every step of the way. Please be sure to contact our customer support for troubleshooting and register your product for additional benefits.
Need help?
Do you have a question about the ES00929G and is the answer not in the manual?
Questions and answers