
Related Manuals for RCF DXT7000


Summary of Contents for RCF DXT7000
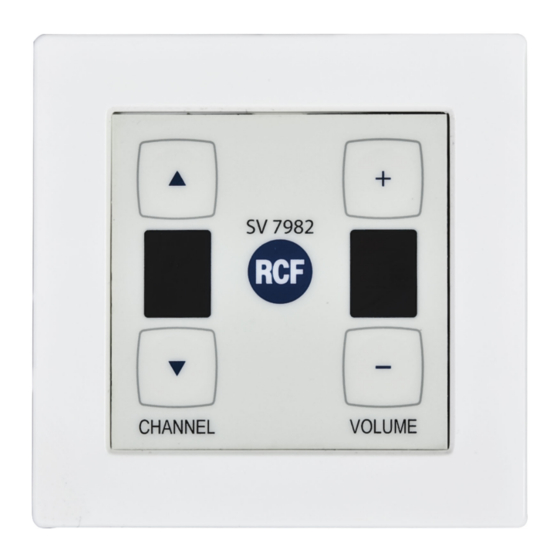
- Page 1 USER MANUAL MANUALE D’USO DXT7000 CHANNEL / VOLUME REMOTE CONTROL SV7982 CONTROLLO REMOTO DI VOLUME E SELEZIONE CANALE...
-
Page 3: Table Of Contents
INDEX INDICE ENGLISH SAFETY PRECAUTIONS 1. DESCRIPTION 2. CONTENTS OF DELIVERY 3. ADDRESS SETTING 4. BUS CONNECTION 5. MOUNTING 6. CONFIGURATION 7. INITIAL DISPLAY INDICATION 8. DISPLAY ERROR CODES 9. OPERATION ITALIANO AVVERTENZE PER LA SICUREZZA 1. DESCRIZIONE 2. CONTENUTO 3. -
Page 4: Safety Precautions
RCF S.p.A. will not assume any responsibility for the incorrect installation and / or use of this product. -
Page 5: Description
RCF S.P.A. THANKS YOU FOR PURCHASING THIS PRODUCT, WHICH HAS BEEN DESIGNED TO GUARANTEE RELIABILITY AND HIGH PERFORMANCE. 1. DESCRIPTION This remote control operates as a channel selector and allows to adjust the volume of a zone group. On its front panel: two channel buttons (up/down), two volume buttons (up/ down) and two 7-segment displays. -
Page 6: Address Setting
3. ADDRESS SETTING Set the device address using S2 dip-switches (1 to 5) according to the following table: 1 2 3 4 5 DIGITAL ADDRESS TABLE DIP-SWITCH ADDRESS DIP-SWITCH ADDRESS... -
Page 7: Bus Connection
4. BUS CONNECTION SV 7982 is connected to the system, via CAT5/CAT6 cable, through its X2 (8-pin) terminal strip on the rear side of the printed circuit board. X2 terminal strip pins: Audio + (cable pair 2) Audio – (cable pair 2) Audio ground (cable pair 3) ground... -
Page 8: Initial Display Indication
7. INITIAL DISPLAY INDICATION On power-up, the two 7-segment displays sequentially indicate: The remote control address, example: 01 The software version, example 1.0 Awaiting data from the MU 7100 central unit. After receiving data from the MU 7100 central unit, the SV 7982 remote control will be in stand-by mode (indicated by a dot on the ‘Volume’... -
Page 9: Operation
9. OPERATION Press a channel button (up or down) to select the channel (up to 7 available, it depends on the software configuration), then press a volume button (up or down) to get the desired volume. If both displays are blank, the first button press will show the current channel and the relevant volume (then press a button again to select a channel or adjust the volume). -
Page 10: Avvertenze Per La Sicurezza
8. La RCF S.p.A. raccomanda vivamente che l’installazione di questo prodotto sia eseguita solamente da installatori professionali qualificati (oppure da ditte specializzate) in grado di farla correttamente e certificarla in accordo con le normative vigenti. Tutto il sistema audio dovrà... -
Page 11: Descrizione
RCF S.P.A. VI RINGRAZIA PER L’ACQUISTO DI QUESTO PRODOTTO, REALIZZATO IN MODO DA GARANTIRNE L’AFFIDABILITÀ E PRESTAZIONI ELEVATE. 1. DESCRIZIONE Il controllo remoto SV 7982 permette la selezione di un canale e la regolazione del volume di un gruppo di zone. -
Page 12: Impostazione Dell'indirizzo
3. IMPOSTAZIONE DELL’INDIRIZZO Impostare l’indirizzo del controllo remoto tramite i microinterruttori S2 (“dip-switch” da 1 a 5) secondo la seguente tabella: 1 2 3 4 5 TABELLA DEGLI INDIRIZZI DIP-SWITCH INDIRIZZO DIP-SWITCH ADDRESS... -
Page 13: Collegamento Al Bus
4. COLLEGAMENTO AL BUS Il controllo remoto SV 7982 è collegabile al sistema, via cavo CAT5/CAT6, tramite il suo connettore X2 (8 poli) posto sul lato posteriore del circuito stampato. Elenco dei poli del connettore X2: Audio + (coppia nr.2 del cavo) Audio –... -
Page 14: Indicazione Iniziale Dei Display
7. INDICAZIONE INIZIALE DEI DISPLAY All’accensione, i 2 display a 7 segmenti mostrano (in sequenza): L’indirizzo del controllo remoto; es.: 01 La versione del software; esempio 1.0 Attesa dei dati dall’unità centrale MU 7100. Dopo la ricezione dei dati dall’unità centrale MU 7100, il controllo remoto SV 7982 è... -
Page 15: Funzionamento
9. FUNZIONAMENTO Premere un tasto CHANNEL per selezionare il canale (fino a 7 disponibili; dipende dalla configurazione software), poi premere un tasto VOLUME per impostare il volume desiderato. Se entrambi i display sono spenti, la prima pressione di un tasto renderà visibili il canale attivo ed il relativo volume (poi premere di nuovo un tasto per cambiare canale o regolare il volume). - Page 16 RCF SpA: Via Raffaello, 13 - 42124 Reggio Emilia > Italy tel. +39 0522 274411 - fax +39 0522 274484 - e-mail: rcfservice@rcf.it...
Need help?
Do you have a question about the DXT7000 and is the answer not in the manual?
Questions and answers