
Related Manuals for RCF TS 9918


Summary of Contents for RCF TS 9918
- Page 1 USER MANUAL MANUALE D’USO TS 9918 - MZ 8060 AUDIO MATRIX REMOTE CONTROL TS 9918-W - CONTROLLO REMOTO PER MATRICE AUDIO MZ 8060...
-
Page 3: Table Of Contents
TABLE OF CONTENTS INDICE ENGLISH SAFETY PRECAUTIONS DESCRIPTION FRONT PANEL SETTINGS, CONNECTION AND INSTALLATION SOFTWARE CONFIGURATION OPERATION SPECIFICATIONS ITALIANO AVVERTENZE PER LA SICUREZZA DESCRIZIONE PANNELLO FRONTALE IMPOSTAZIONI, COLLEGAMENTO ED INSTALLAZIONE CONFIGURAZIONE TRAMITE SOFTWARE FUNZIONAMENTO DATI TECNICI... -
Page 4: Safety Precautions
RCF S.p.A. will not assume any responsibility for the incorrect installation and / or use of this product. WARNING: To prevent the risk of fire or electric shock, never expose this remote control to rain or humidity. - Page 5 9. Hearing loss Exposure to high sound levels can cause permanent hearing loss. The acoustic pressure level that leads to hearing loss is different from person to person and depends on the duration of exposure. To prevent potentially dangerous exposure to high levels of acoustic pressure, anyone who is exposed to these levels should use adequate protection devices.
-
Page 6: Description
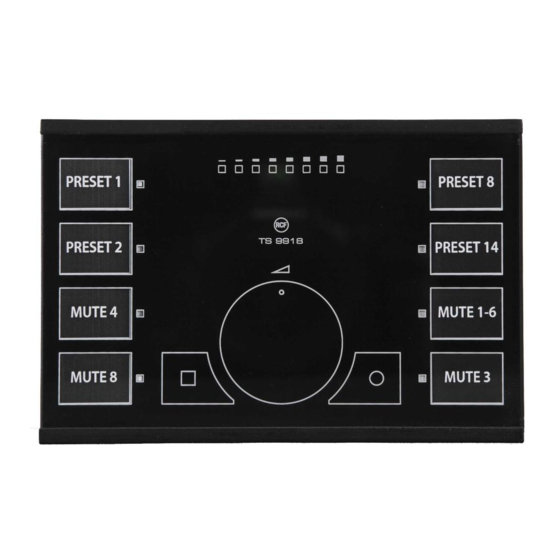
TS 9918 is a touch-sensitive remote control for the MZ 8060 audio matrix with a slim design and a glass surface, available either in black (TS 9918) or white (TS 9918-W), for wall mounting (it can fit several standard electrical boxes). -
Page 7: Settings, Connection And Installation
SETTINGS, CONNECTION AND INSTALLATION TS 9918 remote control consists of 2 parts: 1. A frame to fit to several standard electrical boxes. 2. A frame with the printed circuit board and the touch-sensitive front panel. Find both the J1 connector and the six dip-switches on the printed circuit board (figure 1). - Page 8 ID b Read the next manual paragraph. ID c Set to ON only if the TS 9918 remote control is the last device of its LAST DEV bus (otherwise, set it to OFF). It must be set like the dip-switch no.6 .
- Page 9 Insert (pushing it until it clicks into) the frame with the printed circuit board and the front panel to the frame / adapter FIGURE 3 FIGURE 4 FIGURE 5 The figure 5 shows the section view of the TS 9918 remote control after its wall mounting.
-
Page 10: Software Configuration
(while the ‘–’ symbol on red background indicates ‘not detected’ / ‘not present’). If necessary, click either Add to add another TS 9918 remote control to the list or Remove to remove the selected one. When a new firmware (for TS 9918) is available, click FW Upgrade to upgrade all the connected TS 9918. - Page 11 On the right, in the Controls Programming page, it is possible to assign a function to each of the eight keys T1 – T8 (each key can be matched to a different function). First click one of the eight keys T1 – T8, then select the assigned Function (PRESET, MUTE, ASSIGN LEVEL or none) and the required parameters: Controller Type, Parameter A, Parameter B.
- Page 12 Function Controller Type Parameter A Parameter B Description If the key is selected, the VOL wheel allows to MASTER INPUT 1 – 8, (none) adjust the master unit level of the input set as INPUT INPUT 1 – 8 (slave) * ‘Parameter A’...
- Page 13 Long Press Duration: time [ms] required to consider a ‘long press’ when holding a key. Auto-Lock Timeout: time [s] (without touching a key) after which the TS 9918 keyboard gets automatically locked (all LEDs blink 3 times). Scroll Wheel Sensitivity: allows to set how many wheel turns are required to scroll through the full level range.
-
Page 14: Operation
VOL wheel. LED BRIGHTNESS SETTING When using a TS 9918 remote control, all LEDs showing the current settings are always lit up at their maximum. Yet, it is possible to set the brightness mode that is applied only when the remote control is not used and its keyboard is locked. -
Page 15: Specifications
SPECIFICATIONS Width: 140 mm Height: 90 mm Depth: 27 mm (part protruding from the wall: 14 mm). Net weight: 0.22 kg Power supply: 24 V dc Current drain: 20 ÷ 40 mA FRAME DIMENSIONS [mm]... -
Page 16: Avvertenze Per La Sicurezza
L’installazione e l’utilizzo errati del prodotto esimono la RCF S.p.A. da ogni responsabilità. ATTENZIONE: Per prevenire i rischi di fiamme o scosse elettriche, non esporre le parti che compongono il controllo remoto alla pioggia od all’umidità. - Page 17 8. La RCF S.p.A. raccomanda vivamente che l’installazione di questo prodotto sia eseguita solamente da installatori professionali qualificati (oppure da ditte specializzate) in grado di farla correttamente e certificarla in accordo con le normative vigenti. Tutto il sistema audio dovrà essere in conformità...
-
Page 18: Descrizione
PRESTAZIONI ELEVATE. DESCRIZIONE TS 9918 è un controllo remoto per la matrice audio MZ 8060, con un design elegante e tastiera sensibile al tocco, disponibile sia in nero (TS 9918) sia in bianco (TS 9918-W), sottile e con superficie di vetro, installabile a parete (compatibile con la maggior parte delle scatole elettriche standard). -
Page 19: Impostazioni, Collegamento Ed Installazione
IMPOSTAZIONI, COLLEGAMENTO ED INSTALLAZIONE Un controllo remoto TS 9918 si compone di 2 parti: 1. un telaio per l'adattamento alla maggior parte delle scatole elettriche standard; 2. un telaio con il circuito stampato ed il pannello frontale sensibile al tocco. - Page 20 Impostazione dell’indirizzo digitale (1 ÷ 8, 3 bit). ID b Vedere il paragrafo successivo del manuale. ID c Impostare su ON solo se il controllo remoto TS 9918 è l’ultimo LAST DEV dispositivo del bus, altrimenti lasciarlo su OFF; deve essere impostato come il dip-switch nr.6 .
- Page 21 (spingendolo fino ad incastrarlo) il telaio con il circuito stampato ed il pannello frontale al quello per l’adattamento FIGURA 3 FIGURA 4 FIGURA 5 La figura 5 mostra la sezione del controllo remoto TS 9918 dopo l'installazione a parete.
-
Page 22: Configurazione Tramite Software
RdNet per PC (riferirsi al manuale d’uso MZ 8060 su come utilizzare il software RdNet ed aprire la finestra MZ 8060). Quando si è in modalità “Online”, i controlli remoti TS 9918 non possono essere usati e tutti i loro LED lampeggiano simultaneamente. - Page 23 A sinistra, c'è la lista dei TS 9918 rilevati. Il simbolo “√” (su fondo verde) indica che il TS 9918 è collegato correttamente (mentre il simbolo “–” su fondo rosso indica che non è presente o non è stato rilevato).
- Page 24 Function Controller Type Parameter A Param. B Descrizione Se il tasto è selezionato, il controllo VOL permette di MASTER INPUT 1 – 8, (nessuno) regolare il livello “Master” dell’ingresso scelto nel INPUT INPUT 1 – 8 (slave) * “Parameter A” Se il tasto è...
- Page 25 “pressione lunga” di un tasto quando lo si mantiene premuto. Auto-Lock Timeout: tempo [s] (senza premere un tasto) dopo il quale la tastiera del controllo remoto TS 9918 si blocca automaticamente (tutti i LED lampeggiano 3 volte). Scroll Wheel Sensitivity: permette di impostare quanti giri [turns] del controllo rotante VOL sono necessari per scorrere l'intero campo dei valori di livello.
-
Page 26: Funzionamento
VOL. IMPOSTAZIONE DELLA LUMINOSITÀ DEI LED Durante l’utilizzo del controllo remoto TS 9918, tutti i LED rappresentativi dell’attuale configurazione sono sempre accesi al loro massimo. Tuttavia, è possibile impostare la loro luminosità quando (e solamente) il... -
Page 27: Dati Tecnici
L’impostazione iniziale si seleziona nel software, tramite il parametro LED Brightness on Locking nella pagina Settings. Quando la tastiera del controllo remoto è bloccata, tenere premuto il tasto di servizio U2 per cambiare sequenzialmente l’impostazione della luminosità dei LED tra DAYLIGHT, NIGHT e OFF (il tempo richiesto si imposta tramite il parametro Long Press Duration nella pagina Settings). - Page 28 Salvo eventuali errori ed omissioni. RCF S.p.A. si riserva il diritto di apportare modifiche senza preavviso. Except possible errors and omissions. RCF S.p.A. reserves the right to make modifications without prior notice. www.rcf.it RCF S.p.A. Italy Via Raffaello Sanzio, 13...
Need help?
Do you have a question about the TS 9918 and is the answer not in the manual?
Questions and answers