
Related Manuals for Zanussi ZOHNX3X1A


Summary of Contents for Zanussi ZOHNX3X1A
- Page 1 User Manual GETTING STARTED? EASY. ZOHNX3X1A EN User Manual Oven FR Notice d'utilisation Four...
-
Page 2: Safety Information
VISIT OUR WEBSITE TO: Get usage advice, brochures, trouble shooter, service and repair information: www.zanussi.com/support SAFETY INFORMATION Before the installation and use of the appliance, carefully read the supplied instructions. The manufacturer is not responsible for any injuries or damage that are the result of incorrect installation or usage. -
Page 3: Safety Instructions
Disconnect the appliance from the power supply before • carrying out any maintenance. If the mains power supply cable is damaged, it must be • replaced by the manufacturer, its Authorised Service Centre or similarly qualified persons to avoid an electrical hazard. WARNING: Ensure that the appliance is switched off before •... - Page 4 • This appliance is supplied only with a main Depth with open door 1022 mm cable. Ventilation opening 560x20 mm minimum size. Opening Cable types applicable for installation or re- placed on the bottom placement for Europe: rear side Mains supply cable 1500 mm H07 RN-F, H05 RN-F, H05 RRF, H05 VV-F, length.
-
Page 5: Internal Lighting
• Do not let sparks or open flames to come in • Replace immediately the door glass panels contact with the appliance when you open the when they are damaged. Contact the door. Authorised Service Centre. • Do not put flammable products or items that are •... - Page 6 INSTALLATION BUILDING IN WARNING! Refer to Safety chapters. (*mm) min. 550 min. 560 (*mm) min. 550 min. 560...
-
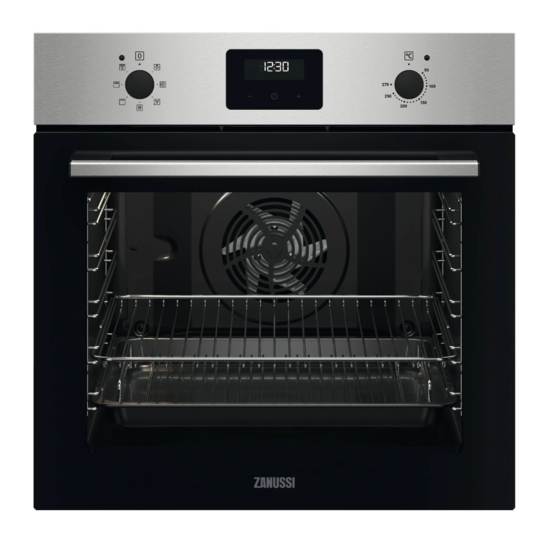
Page 7: Product Description
SECURING THE OVEN TO THE CABINET PRODUCT DESCRIPTION GENERAL OVERVIEW Control panel Knob for the heating functions Power lamp / symbol Display Control knob (for the temperature) Temperature indicator / symbol Heating element Lamp Cavity embossment - Aqua cleaning container Shelf support, removable Shelf positions ACCESSORIES... -
Page 8: Before First Use
To set the time. DISPLAY A. Clock functions B. Timer BEFORE FIRST USE WARNING! Refer to Safety chapters. BEFORE FIRST USE The oven can emit an odour and smoke during preheating. Make sure that the room is ventilated. Step 1 Step 2 Step 3 Set the clock... -
Page 9: Heating Functions
HEATING FUNCTIONS Heating function Application Heating function Application To grill thin pieces of food The oven is off. in large quantities and to toast bread. Fast Grilling Off position To bake pizza. To make in- To bake on up to three shelf tensive browning and a positions at the same time crispy bottom. - Page 10 HOW TO SET: CLOCK FUNCTIONS How to set: Time of Day - flashes when you connect the oven to the electrical supply, when there was a power cut or when the timer is not set. - press to set the time. After approximately 5 sec., the flashing stops and the display shows the time.
-
Page 11: Using The Accessories
How to cancel: Clock functions Step 1 - press repeatedly until the clock function symbol starts to flash. Step 2 Press and hold: The clock function turns off after few seconds. USING THE ACCESSORIES around the shelf prevents cookware from slipping WARNING! Refer to Safety chapters. -
Page 12: Additional Functions
Wire shelf, Baking tray / Deep pan: Push the tray between the guide bars of the shelf support and the wire shelf on the guide bars above. ADDITIONAL FUNCTIONS COOLING FAN SAFETY THERMOSTAT When the oven operates, the cooling fan turns on Incorrect operation of the oven or defective automatically to keep the surfaces of the oven cool. -
Page 13: Baking And Roasting
BAKING AND ROASTING Conventional Cooking True Fan Cooking CAKES (min) (°C) (°C) Whisked rec- 3 (2 and 4) 45 - 60 Cake ipes mould Shortbread 3 (2 and 4) 20 - 30 Cake dough mould Buttermilk 60 - 80 Cake cheesecake mould, Ø... - Page 14 Conventional Cooking True Fan Cooking CAKES (min) (°C) (°C) Buns, preheat 12 - 20 Baking tray the empty oven Eclairs 25 - 35 Baking tray Eclairs, two 2 and 4 35 - 45 Baking tray levels Plate tarts 45 - 70 Cake mould, Ø...
- Page 15 Conventional Cooking True Fan Cooking FLANS (min) (°C) (°C) Pasta flan, preheating is not 40 - 50 needed Vegetable flan, preheating is 45 - 60 not needed Quiches 50 - 60 Lasagne 180 - 190 180 - 190 25 - 40 Cannelloni 180 - 190 180 - 190...
- Page 16 Conventional Cooking True Fan Cooking MEAT (min) (°C) (°C) Whole duck 120 - 150 Whole goose 150 - 200 Rabbit, cut in pieces 60 - 80 Hare, cut in pieces 150 - 200 Whole pheasant 90 - 120 Use the second shelf position. Conventional Cooking True Fan Cooking FISH...
- Page 17 GRILL (min) (min) (kg) 1st side 2nd side Fish fillet, 4 pieces 12 - 14 10 - 12 Toasted sandwiches, 4 - 6 5 - 7 Toast, 4 - 6 2 - 4 2 - 3 DEFROST Defrosting time Further defrosting (kg) (min) time (min)
- Page 18 VEGETABLES FRUIT (°C) Herbs 40 - 50 2 - 3 Apricots 8 - 10 Apple slices 6 - 8 Set the temperature to 60 - 70 °C. Pears 6 - 9 FRUIT Plums 8 - 10 MOIST FAN BAKING - RECOMMENDED ACCESSORIES Use the dark and non-reflective tins and containers.
-
Page 19: Information For Test Institutes
(°C) (min) Brownie baking tray or dripping 45 - 50 Soufflè, 6 pieces ceramic ramekins on wire 45 - 55 shelf Sponge flan base flan base tin on wire shelf 35 - 45 Victoria sandwich baking dish on wire shelf 35 - 50 Poached fish, 0.3 baking tray or dripping... - Page 20 (°C) (min) Small Conven- Baking 20 - 30 cakes, tional tray 20 per Cooking tray Small True Fan Baking 150 - 20 - 35 cakes, Cooking tray 20 per tray Small True Fan Baking 2 and 4 150 - 20 - 35 cakes, Cooking tray...
-
Page 21: Care And Cleaning
(°C) (min) Toast, 4 Grill Wire max. 2 - 3 mi- Preheat the oven shelf nutes first for 3 minutes. pieces side; 2 - 3 minutes second side Beef Grill Wire max. 20 - 30 Put the wire shelf burger, shelf and on the fourth level dripping... - Page 22 HOW TO REMOVE: SHELF SUPPORTS Remove the shelf supports to clean the oven. Step 1 Turn off the oven and wait until it is cold. Step 2 Pull the front of the shelf support away from the side wall. Step 3 Pull the rear end of the shelf support away from the side wall and remove it.
-
Page 23: Troubleshooting
Step 3 Close the oven door halfway to the first opening position. Then lift and pull for- ward and remove the door from its seat. Step 4 Put the door on a soft cloth on a stable surface. Step 5 Hold the door trim (B) on the top edge of the door at the two sides and push inwards to release the clip seal. -
Page 24: Energy Efficiency
Problem Check if... Problem Check if... The oven does not The fuse is blown. The display shows There was a power heat up. "12.00". cut. Set the time of day. The door gasket is Do not use the oven. damaged. Contact an Author- The lamp does not The lamp is burnt... -
Page 25: Information Sur La Sécurité
VISITEZ NOTRE SITE WEB POUR : Obtenir des conseils d’utilisation, des brochures, un dépanneur, des informations sur le service et les réparations : www.zanussi.com/support INFORMATION SUR LA SÉCURITÉ Avant d'installer et d'utiliser cet appareil, lisez soigneusement les instructions fournies. Le fabricant ne pourra être tenu pour responsable des blessures et dégâts résultant d'une mauvaise... -
Page 26: Sécurité Générale
SÉCURITÉ GÉNÉRALE Cet appareil doit être installé et le câble remplacé uniquement • par un professionnel qualifié. N'utilisez pas l'appareil avant de l'avoir installé dans la structure • encastrée. Débranchez l'appareil de l'alimentation électrique avant toute • opération d'entretien. Si le câble d’alimentation secteur est endommagé, son •... -
Page 27: Branchement Électrique
câble d’alimentation de l’appareil doit être Hauteur minimale du 590 (600) (mm) effectué par notre service après-vente agréé. meuble (Hauteur mini- • Ne laissez pas les câbles d'alimentation entrer male du meuble sous en contact ou s'approcher de la porte de le plan de travail) l'appareil ou de la niche d'encastrement sous l'appareil, particulièrement lorsqu'il est en... -
Page 28: Éclairage Intérieur
• La décoloration de l'émail ou de l'acier inoxydable est sans effet sur les performances de l'appareil. • Utilisez un plat à rôtir pour des gâteaux moelleux. Les jus de fruits provoquent des UTILISATION taches qui peuvent être permanentes. • Cet appareil est exclusivement destiné... -
Page 29: Mise Au Rebut
la température, les vibrations, l’humidité, ou sont • Contactez votre service municipal pour obtenir conçues pour signaler des informations sur le des informations sur la marche à suivre pour statut opérationnel de l’appareil. Elles ne sont mettre l’appareil au rebut. pas destinées à... - Page 30 (*mm) min. 550 min. 560 FIXATION DU FOUR AU MEUBLE...
-
Page 31: Description De L'appareil
DESCRIPTION DE L'APPAREIL VUE D’ENSEMBLE Bandeau de commande Manette de sélection des modes de cuisson Voyant / symbole de mise sous tension Affichage Thermostat Indicateur / symbole de température Élément chauffant Éclairage Ventilateur Bac de la cavité - Bac de nettoyage Aqua Clean Support de grille, amovible Position des grilles... -
Page 32: Avant La Première Utilisation
AVANT LA PREMIÈRE UTILISATION AVERTISSEMENT! Reportez-vous aux chapitres concernant la sécurité. AVANT LA PREMIÈRE UTILISATION Une odeur et de la fumée peuvent s'échapper du four durant le préchauffage. Assurez-vous que la pièce est ventilée. Étape 1 Étape 2 Étape 3 Réglez l’horloge. -
Page 33: Fonctions De L'horloge
Mode de cuisson Application Mode de cuisson Application Cette fonction est conçue Pour cuire des pizzas. Pour pour économiser de l'éner- faire dorer de façon intensi- gie en cours de cuisson. ve et obtenir un dessous Chaleur tour- Fonction Pizza Lorsque vous utilisez cette croustillant. - Page 34 COMMENT RÉGLER : FONCTIONS DE L’HORLOGE Comment régler : Heure - clignote lorsque vous branchez le four à l'alimentation électrique, lorsqu'il y a eu une coupure de courant ou que le minuteur n'est pas réglé. - appuyez pour régler l’heure. Après environ 5 s, le symbole cesse de clignoter et l'heure s'affiche.
-
Page 35: Utilisation Des Accessoires
Comment régler : Minuteur Éta- Tournez la manette sur la position Arrêt. pe 4 Comment annuler : Fonctions de l’horloge Éta- - appuyez plusieurs fois jusqu’à ce que le symbole de la fonction horloge se mette à pe 1 clignoter. Éta- Maintenez la touche pe 2... -
Page 36: Fonctions Supplémentaires
Grille métallique, Plateau de cuisson / Lèchefrite: Poussez le plateau entre les rails du support de grille et glissez la grille métallique entre les rails se trouvant juste au-dessus. FONCTIONS SUPPLÉMENTAIRES VENTILATEUR DE REFROIDISSEMENT surchauffe dangereuse. Pour éviter cela, le four dispose d'un thermostat de sécurité... - Page 37 RÔTISSAGE ET CUISSON Chauffage Haut/ Bas Chaleur tournante GÂ- TEAUX (min) (°C) (°C) Recettes avec 3 (2 et 4) 45 - 60 Moule à un fouet gâteau Pâte sablée 3 (2 et 4) 20 - 30 Moule à gâteau Cheesecake 60 - 80 Moule à...
- Page 38 Chauffage Haut/ Bas Chaleur tournante GÂ- TEAUX (min) (°C) (°C) Meringues, 2 et 4 80 - 100 Plateau de deux niveaux, cuisson préchauffer le four à vide Petits pains, 12 - 20 Plateau de préchauffer le cuisson four à vide Éclairs 25 - 35 Plateau de...
- Page 39 Chauffage Haut/ Bas Chaleur tournante PAIN ET PIZ- (min) (°C) (°C) Scones 10 - 20 Plateau de cuisson Préchauffez le four à vide. Utilisez le moule à gâteaux. Chauffage Haut/ Bas Chaleur tournante PRÉPARATIONS À BASE D'ŒUFS (min) (°C) (°C) Flan de pâtes, le préchauf- 40 - 50 fage n’est pas nécessaire...
- Page 40 Chauffage Haut/ Bas Chaleur tournante VIANDE (min) (°C) (°C) Rôti de bœuf, bien cuit 70 - 75 Chauffage Haut/ Bas Chaleur tournante VIANDE (min) (°C) (°C) Gigot d’agneau 110 - 130 Poulet entier 70 - 85 Dinde entière 210 - 240 Canard entier 120 - 150 Oie entière...
- Page 41 GRIL (min) (min) (kg) 1ère face 2e face Filets de bœuf, tranches, 4 morceaux 12 - 15 12 - 14 Steak de bœuf, 4 morceaux 10 - 12 6 - 8 Poulet, demi, 2 30 - 35 25 - 30 Brochettes, 4 10 - 15 10 - 12...
- Page 42 DÉSHYDRATATION - CHALEUR TOURNANTE Couvrez les plateaux avec du papier sulfurisé ou du papier de cuisson. Pour de meilleurs résultats, arrêtez le four à mi- LÉGUMES (°C) cuisson, ouvrez la porte et laissez-la refroidir pendant une nuit pour terminer le séchage. Pour un plateau, utilisez le troisième niveau de la Herbes 40 - 50...
- Page 43 (°C) (min) Petits pains, Plateau de cuisson ou 35 - 45 (9 pièces) plat à rôtir Pizza, surgelée, grille métallique 45 - 55 0,35 kg Gâteau roulé Plateau de cuisson ou 30 - 40 plat à rôtir Brownie Plateau de cuisson ou 45 - 50 plat à...
- Page 44 (°C) (min) Légumes, po- Plateau de cuisson ou 35 - 45 chés, 0.4 kg plat à rôtir Omelette végéta- plaque à pizza sur la grille 35 - 45 rienne métallique Légumes médi- Plateau de cuisson ou 35 - 45 terranéens, 0.7 plat à...
- Page 45 (°C) (min) Génoi- Chauffage Grille mé- 40 - 50 Préchauffez le Haut/ Bas tallique four pendant moule à 10 minutes. gâteau 26 cm Génoi- Chaleur Grille mé- 40 - 50 Préchauffez le tournante tallique four pendant moule à 10 minutes. gâteau 26 cm Génoi-...
-
Page 46: Entretien Et Nettoyage
(°C) (min) Steak Gril Grille mé- max. 20 - 30 Placez la grille haché, tallique et métallique sur le 6 piè- lèchefrite quatrième niveau ces, et la lèchefrite sur 0,6 kg le troisième niveau du four. Retournez les aliments à la moitié... - Page 47 Éta- Éteignez le four et attendez qu’il pe 1 soit froid. Éta- Écartez l'avant du support de pe 2 grille de la paroi latérale. Éta- Écartez l'arrière du support de pe 3 grille de la paroi latérale et retirez le support. Éta- Réinstallez les supports de grille pe 4...
- Page 48 Éta- Fermez la porte du four à la première pe 3 position d'ouverture (mi-parcours). Puis soulevez et tirez la porte vers l'avant et retirez-la de son logement. Éta- Déposez la porte sur une surface sta- pe 4 ble recouverte d'un tissu doux. Éta- Tenez la garniture de porte (B) sur le pe 5...
-
Page 49: Dépannage
DÉPANNAGE AVERTISSEMENT! Reportez-vous Problème Vérifiez si... aux chapitres concernant la sécurité. QUE FAIRE SI... Le joint de porte est N'utilisez pas le four. endommagé. Contactez un service Dans tous les cas ne figurant pas dans ce tableau, après-vente agréé. veuillez contacter un service après-vente agréé. L’affichage indique Une coupure de cou- «... -
Page 50: En Matière De Protection De L'environnement
EN MATIÈRE DE PROTECTION DE L'ENVIRONNEMENT les appareils portant le symbole avec les Recyclez les matériaux portant le symbole ordures ménagères. Emmenez un tel produit dans Déposez les emballages dans les conteneurs votre centre local de recyclage ou contactez vos prévus à... - Page 52 WWW.ZANUSSI.COM/SHOP...
Need help?
Do you have a question about the ZOHNX3X1A and is the answer not in the manual?
Questions and answers