Table of Contents
Advertisement
Quick Links
Advertisement
Table of Contents
Troubleshooting

Subscribe to Our Youtube Channel
Related Manuals for Garmin OVERLANDER


Summary of Contents for Garmin OVERLANDER
- Page 1 OVERLANDER ™ Owner’s manual...
- Page 2 © 2019 Garmin Ltd. or its subsidiaries All rights reserved. Under the copyright laws, this manual may not be copied, in whole or in part, without the written consent of Garmin. Garmin reserves the right to change or improve its products and to make changes in the content of this manual without obligation to notify any person or organisation of such changes or improvements. Go to www.garmin.com...
-
Page 3: Table Of Contents
Using the Touchscreen......8 Adjusting the screen brightness.... 8 Finding and saving locations..17 Points of Interest........17 Vehicle Profiles........ 9 Navigating to a Garmin Explore Car Profile..........9 Location..........18 Adding a vehicle profile......9 Finding a location by category..18 Switching the Vehicle Profile.... - Page 4 Understanding Parking Colours and Off-Road Navigation....... 33 Symbols..........25 Search tools...........25 Garmin Explore........33 Finding a junction......25 Logging in to a Garmin Explore Finding a location using Account..........34 coordinates........25 Map............ 34 Viewing history........25 Downloading Garmin Explore Clearing the list of recently found Maps..........
- Page 5 Saving a Phone Number as a Preset... 40 Audio Settings........47 Disconnecting a Bluetooth device..41 Speaker Zone Settings....47 Deleting a paired Bluetooth device..41 Garmin PowerSwitch™ App....48 Deleting a paired phone......41 Activating a Power Switch....48 Traffic..........41 Turning Off All Switches....48 Customising a Button.......
- Page 6 Connecting Accessories....62 Connecting a Control Input....63 Device information......54 Connecting the Device to Vehicle Power..........63 Viewing E-label Regulatory and Pairing with a Garmin Navigation Compliance Information....... 54 Device..........64 Specifications........54 Garmin PowerSwitch Charging the Device......54 Specifications........
-
Page 7: Getting Started
1 Update the maps and software on your device (Updating Maps and Software Using a Wi‑Fi Network, page 55). 2 Set up a Garmin Explore account (Garmin Explore, page 33). ™ 3 Mount the device in your vehicle and connect it to power... - Page 8 Microphone for hands-free calling Volume control power key Micro USB power and data port Map and data memory card slot 3.5mm audio jack Magnetic mount interface with 14 pin connector Speaker Getting started...
-
Page 9: Mounting And Powering The Device In Your Vehicle
Mounting and Powering the Device in Your Vehicle WARNING This product contains a lithium-ion battery. To prevent the possibility of personal injury or product damage caused by battery exposure to extreme heat, store the device out of direct sunlight. Both the device and its mount contain magnets. Under certain circumstances, magnets may cause interference with some internal medical devices and electronic devices, including pacemakers, insulin pumps or hard drives in laptop computers. - Page 10 3 If necessary, loosen the thumbscrew on the suction cup arm and the nut on the ball mount , and adjust the mount for better viewing and operation. 4 Tighten the thumbscrew on the suction cup arm and the nut on the ball mount. 5 Place the device onto the magnetic mount.
-
Page 11: Installing The Ball Mount Adapter
Installing the Ball Mount Adapter Your device includes a one-inch ball mount that is compatible with third-party mounting solutions. 1 Remove the four screws securing the mount socket to the magnetic mount. 2 Remove the mount socket. 3 Secure the one-inch ball mount to the magnetic mount using the screws removed in step 1. -
Page 12: Turning The Device On Or Off
Turning the device on or off • To turn the device on, press the power key or connect the device to power. • To put the device in power saving mode, press the power key while the device is on. While in power saving mode, the screen is off and the device uses very little power, but it can wake instantly for use. -
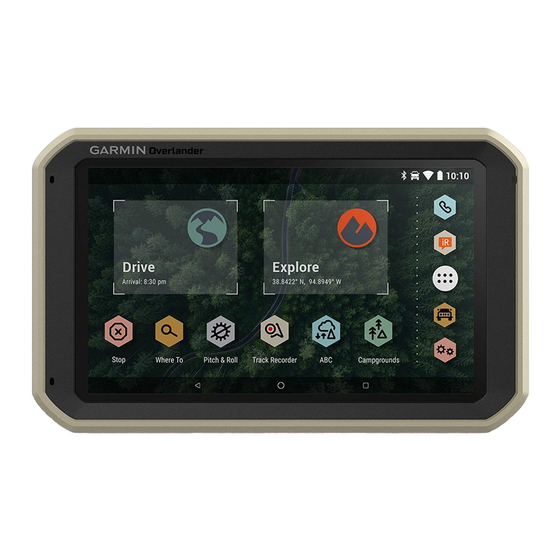
Page 13: Home Screen
Hold to customise the wallpaper or add widgets to the home screen. Select to view road navigation features and search for points of interest. Select to view the Garmin Explore app, which provides off-road navigation information and detailed topo graphical maps. -
Page 14: Viewing Notifications
Viewing Notifications 1 Swipe down from the top of the screen. The list of notifications appears. 2 Select an option: • To launch the action or app mentioned in the notification, select the notification. • To dismiss a notification, swipe the notification to the right. Status bar icons The status bar is located at the top of the main menu. -
Page 15: Vehicle Profiles
If you have a large vehicle or if you are towing a trailer, you should set up a vehicle profile. You can set a vehicle profile for each vehicle configuration used with your Overlander device. -
Page 16: Driver Awareness Features And Alerts
2 Select or clear the tick box next to each alert. Red light and speed cameras NOTICE Garmin is not responsible for the accuracy of or the consequences of using a red light or speed camera database. NOTE: this feature is not available for all regions or product models. -
Page 17: Street Navigation
Street Navigation Routes A route is a path from your current location to one or more destinations. • The device calculates a recommended route to your destination based on the preferences you set, including the route calculation mode (Changing the route calculation mode, page 15) and avoidances (Avoiding Delays, Tolls and Areas, page... -
Page 18: Your Route On The Map
Distance to the next action. Name of the street or exit associated with the next action. Opens the Garmin Explore app for off-road navigation. Route highlighted on the map. Next action in the route. Arrows on the map indicate the location of upcoming actions. -
Page 19: Active Lane Guidance
Map tools. Provides tools to show you more information about your route and surroundings. Active lane guidance As you approach some turns, exits, or interchanges in your route, a detailed simulation of the road appears beside the map, if available. A coloured line indicates the proper lane for the turn. -
Page 20: Parking Near Your Destination
Parking Near Your Destination Your device can help you find a parking spot near your destination. When you approach some destinations, the device automatically prompts you to search for parking. 1 Select an option: • When the device prompts you, select Yes to search for nearby parking. •... -
Page 21: Taking A Detour
• From the map, select > • From the notification bar, swipe down, and select in the Garmin Navigation notification. Using Suggested Routes Before you can use this feature, you must save at least one location and enable the travel history feature... -
Page 22: Avoiding Toll Roads
Avoiding toll roads Your device can avoid routing you through areas that require tolls, such as toll roads, toll bridges, or congestion areas. The device may still include a toll area in your route if no other reasonable routes are available. 1 Select >... -
Page 23: Avoiding A Road
Avoiding a road 1 Select > Navigation > Route preferences > Custom Avoidances. 2 If necessary, select Add Avoidance. 3 Select Add Avoid Road. 4 Select the starting point of the section of road to avoid and select Next. 5 Select the ending point of the road section and select Next. 6 Select Done. -
Page 24: Navigating To A Garmin Explore Location
Navigating to a Garmin Explore Location Before you can navigate to a Garmin Explore location, you must add one or more locations to your Garmin Explore account. 1 Select > Explore. 2 Select a category. 3 Select a location. 4 Select an option. -
Page 25: Finding National Parks
Finding National Parks Device models that include maps for North America or the United States also include detailed information for national parks in the United States. You can navigate to a national park or to a location within a national park. 1 Select >... -
Page 26: Searching Foursquare Points Of Interest
Searching Foursquare points of interest You can search for Foursquare points of interest loaded on your device. Select > Foursquare. TripAdvisor ® Your device includes TripAdvisor points of interest and ratings. TripAdvisor ratings appear automatically in the search results list for applicable points of interest. You can also search for nearby TripAdvisor points of interest and sort by distance or popularity. -
Page 27: Finding A Location Using The Search Bar
Finding a location using the search bar You can use the search bar to search for locations by entering a category, brand name, address or town name. 1 Select 2 Select Search in the search bar. 3 Enter all or part of the search term. Suggested search terms appear below the search bar. -
Page 28: Location Search Results
Select a location to view the option menu. Select to view detailed information about the selected location. Select to view the selected location in the Garmin Explore app. Select to view alternate routes to the locations. Select to start navigating to the location using the recommended route. -
Page 29: Location Search Results On The Map
Location Search Results on the Map You can view the results of a location search on the map instead of in a list. From the location search results, select . The nearest location appears at the centre of the map, and basic information about the selected location appears at the bottom of the map. -
Page 30: Changing The Search Area
2 Scroll to the Other Categories section, and select a category. Parking Your Overlander device includes detailed parking data, which can help you find nearby parking based on the likelihood of available parking spots, type of parking area, price, or accepted payment methods. -
Page 31: Finding Parking Near Your Current Location
Finding Parking Near Your Current Location 1 Select > Categories > Parking. 2 Select Filter Parking, and select one or more categories to filter parking by availability, type, price, or payment methods (optional). NOTE: detailed parking data is not available in all areas or for all parking locations. 3 Select a parking location. -
Page 32: Finding Emergency Services And Fuel
Finding emergency services and fuel You can use the Where Am I? page to find the nearest hospitals, police stations, and fuel stations. 1 From the map, select the vehicle. 2 Select Hospitals, Police Station, Petrol Stations or Roadside Assist.. NOTE: some service categories are not available in all areas. -
Page 33: Editing A Saved Location
Editing a Saved Location 1 Select > Favourites. 2 If necessary, select a category. 3 Select a location. 4 Select 5 Select > Edit. 6 Select an option: • Select Name. • Select Phone Number. • Select Categories to assign categories to the saved location. •... -
Page 34: Map Tools
Map Tools Map tools provide quick access to information and device functions while you view the map. When you activate a map tool, it appears in a panel at the edge of the map. Stop: stops navigation of the active route. Edit Route: allows you to re-route or skip locations in your route (Changing Your Active Route, page 14). -
Page 35: Customising The Up Ahead Categories
Customising the up ahead categories You can change the location categories that appear in the Up Ahead tool. 1 From the map, select > Up Ahead. 2 Select a category. 3 Select 4 Select an option: • To move a category up or down in the list, select and drag the arrow next to the category name. •... -
Page 36: Restriction Warnings
Restriction Warnings Height Weight Axle Weight Length Width No Lorries Allowed No Trailers Allowed No Hazardous Materials Allowed No Flammables Allowed No Water Pollutants Allowed No Left Turn No Right Turn No U Turn Road condition warnings Risk of grounding Lateral wind Narrow road Sharp curve... -
Page 37: Alerts
Alerts Weighbridge Road not verified for lorries Trip information Viewing trip data from the map Before you can view trip data on the map, you must add the tool to the map tools menu. From the map, select > Trip Data. Customising the trip data fields Before you can customise the data that appears in the trip data map tool, you must add the trip data tool to the map tools menu. -
Page 38: Viewing Traffic On The Map
Viewing traffic on the map The traffic map shows colour-coded traffic flow and delays on nearby roads. 1 From the main menu, select > > Traffic. 2 If necessary, select > Legend to view the legend for the traffic map. Searching for traffic incidents 1 From the main menu, select >... -
Page 39: Off-Road Navigation
Off-Road Navigation Garmin Explore The Garmin Explore website and mobile app allow you to plan trips and use cloud storage for your waypoints, routes and tracks. Garmin Explore offers advanced planning both online and offline, allowing you to share and sync data with your device. -
Page 40: Logging In To A Garmin Explore Account
Logging in to a Garmin Explore Account The first time you use your device, you are prompted to log in to a Garmin Explore account. 1 Select Explore. 2 Read and agree to the End User Licence Agreement. NOTE: if you do not agree with the licence terms, you can select to exit the Garmin Explore app. -
Page 41: Creating A Waypoint
Creating a Waypoint You can use the Garmin Explore app to create and save waypoints. You can use your device to navigate to waypoint locations. 1 Select Map. 2 Select an option. • To create a waypoint at your current location, select >... -
Page 42: Synchronising Garmin Explore Account Data
Before you can synchronise account data, you must connect to a Wi‑Fi network. You can synchronise data, such as waypoints, routes and activities with your Garmin Explore account. This can be helpful to keep your data available on each of your compatible devices. Your device periodically synchronises data with your account automatically. -
Page 43: Stopping Tracking
2 Select an option. • To continue recording a track, select Resume Recording. • To save a track for viewing in Garmin Explore, select Save Track to Garmin Explore. • To discard the track, select Discard Track. Pitch and Roll WARNING The Pitch and Roll application is intended to show vehicle angles based on calibrated measurements only. -
Page 44: Calibrating The Compass
After the pairing process is complete, the inReach and Overlander devices connect automatically when they are within range. Sending an inReach Message Before you can send an inReach message using your Overlander device, you must pair it with a compatible inReach device (Connecting an inReach Device, page 38). -
Page 45: Initiating An Sos Rescue
6 If necessary, verify the code displayed on your phone matches the code displayed on your Overlander device. 7 Select Pair. NOTE: to view contacts and call logs on your Overlander device, you may need to go to the Bluetooth settings on your phone and enable the contact sharing permission for the paired Overlander device. For more information, see the owner's manual for your phone. -
Page 46: Tips After Pairing The Devices
Tips after pairing the devices • After the initial pairing, the two devices can connect automatically each time you turn them on. • When your phone is connected to your device, you are ready to receive voice calls. • When you turn on the device, it tries to connect to the last phone to which it was connected. •... -
Page 47: Disconnecting A Bluetooth Device
2 Select the device to disconnect. Deleting a paired Bluetooth device You can delete a paired Bluetooth device to prevent it from automatically connecting to your Overlander device in the future. Deleting a paired smartphone also deletes all synced phonebook contacts and call history from your Overlander device. -
Page 48: Enabling Traffic
The device indicates the strength of the wake-up phrase as you enter the phrase. 3 Select Done. Activating voice command 1 Say OK Garmin. The voice command menu appears. 2 Say a command from the menu. 3 Respond to the voice prompts to complete the search or action. -
Page 49: Starting A Route Using Voice Command
Connecting to a Stereo Using Bluetooth 1 Enable Bluetooth visble mode on your compatible Fusion stereo. 2 Turn on your Overlander device and place the device within 10 m (33 ft.) of the stereo. 3 On your Overlander device, select >... -
Page 50: Connecting To A Stereo Using A Wireless Network
Connecting to a Stereo Using a Wireless Network You can connect your Overlander device to a compatible Fusion stereo that is connected to the same wireless network. 1 Select an option: • Connect your Fusion stereo to the vehicle's Ethernet or wireless network. -
Page 51: Audio Control
Audio Control Adjusting the Volume for a Zone 1 Select > > Fusion Link > 2 Move the slider to control the volume for a zone. Muting all Connected Stereos You can quickly mute the audio from this stereo or from all stereos connected to the network. From any source, select The mute symbol appears and audio from this stereo is silenced. -
Page 52: Dsp Settings
Adjusting the Subwoofer Filter You can use the subwoofer filter setting to control the subwoofer cut-off frequency for each zone, which can enhance the blend of the sound produced by the speakers and the subwoofer. Audio signals above the selected cutoff frequency are not passed to the subwoofer. -
Page 53: Audio Settings
Audio Settings Select > > Fusion Link > Music: enables you to configure the speaker zones. Tuner Region: sets the region used by the various radio sources. Device Name: sets a name for this stereo. Searching: enables Fusion Alpha Search Technology (FAST), which allows you to quickly search for tracks by letter or number. -
Page 54: Garmin Powerswitch™ App
Displays Garmin PowerSwitch device tabs and custom layout tabs Activating a Power Switch Before you can use the Garmin PowerSwitch app to activate a switch, you must install your Garmin PowerSwitch device in your vehicle and pair it with the Garmin PowerSwitch app. -
Page 55: Customising A Button
Before you can use control input functions, you must connect a control input to your Garmin PowerSwitch device (Connecting a Control Input, page 63). You can assign one or more switches to turn on when the Garmin PowerSwitch device receives a signal from a control input. 1 Select 2 Select your Garmin PowerSwitch device. -
Page 56: Adding A Button To A Custom Layout
11 Select . 12 If necessary, select Add Action to add additional actions to the button. You can add one action for every switch on the Garmin PowerSwitch device. Arranging Buttons In a Custom Layout 1 From the Garmin PowerSwitch app, select a custom layout tab. -
Page 57: Overlander Settings
Enabling maps You can enable map products installed on your device. TIP: to purchase additional map products, go to http://buy.garmin.com. 1 Select > Navigation > Map & Vehicle > myMaps. 2 Select a map. -
Page 58: Driver Assistance Settings
NOTE: while the device is connected to the vehicle mount, it only supports landscape mode. Cast: enables you to show the contents of the device screen on a compatible external display wirelessly. Overlander settings... -
Page 59: Sound And Notification Settings
Legal Information: allows you to view the end-user licence agreement (EULA) and software licence information. Regulatory information: displays e-label regulatory and compliance information. Garmin device information: displays hardware and software version information. Restoring settings You can restore a category of settings to the factory default values. -
Page 60: Resetting Data And Settings
This option deletes your travel history, apps, accounts, settings, saved networks, paired devices and all other user data. Installed maps are not deleted. User files in the Garmin folder may not be deleted. Device information Viewing E-label Regulatory and Compliance Information 1 From the settings menu, swipe to the bottom of the menu. -
Page 61: Updating Maps And Software Using A Wi-Fi Network
This allows you to keep your device up to date without connecting it to a computer. 1 Using the included USB cable, connect the device to external power. NOTE: a USB power adapter is not included. Go to the product page on garmin.com to purchase a power adapter accessory. -
Page 62: Updating Maps And Software With Garmin Express
Updating Maps and Software with Garmin Express You can use the Garmin Express application to download and install the latest map and software updates for your device. 1 If you do not have the Garmin Express application installed on your computer, go to garmin.com/express... -
Page 63: Installing Garmin Express
• To install a specific update, click View Details and click Install next to the update you want. The Garmin Express application downloads and installs the updates onto your device. Map updates are very large and this process may take a long time on slower internet connections. -
Page 64: Changing The Fuse In The Vehicle Power Cable
Changing the Fuse in the Vehicle Power Cable NOTICE When replacing the fuse, do not lose any of the small pieces and make sure they are put back in the proper position. The vehicle power cable does not work unless it is assembled correctly. If your device does not charge in your vehicle, you may need to replace the fuse located at the tip of the vehicle adapter. -
Page 65: The Mount Does Not Hold My Device In Place While I Drive
• Enable Bluetooth wireless technology on your phone and bring your phone within 10 m (33 ft.) of the device. • Verify your phone is compatible. Go to www.garmin.com/bluetooth for more information. • Complete the pairing process again. To repeat the pairing process, you must unpair your phone and device... -
Page 66: Appendix
Incorrectly wiring the power cable can result in damage to the vehicle or the battery and can cause bodily injury. You can use a connected Garmin PowerSwitch device to control lights, fans and more from your Overlander device. -
Page 67: Opening The Front Cover
Opening the Front Cover You must open the front cover to make electrical connections. 1 Lift the front cover latch and rotate it anticlockwise. 2 Pull the front cover off of the device. Appendix... -
Page 68: Connecting Accessories
Accessory requirements: • Verify the amperage rating of each accessory before wiring it to the Garmin PowerSwitch device. The device supports accessories up to 30 A for each channel and a maximum of 100 A for the entire system. -
Page 69: Connecting A Control Input
Connecting a Control Input You can connect to the control terminals to enable the Garmin PowerSwitch device to turn on customisable outputs. For example, you can connect your vehicle ignition switch to a control input terminal to turn on accessories automatically each time you start your vehicle. The control terminals detect a signal from 3.3 V to 18 V. -
Page 70: Pairing With A Garmin Navigation Device
Backup Cameras Your device can display the video feed from one or more connected backup cameras. The device withstands incidental exposure to water of up to 1 m for up to 30 min. For more information, go to www.garmin.com/waterrating. Appendix... -
Page 71: Garmin Navigation Device
5 Follow the on-screen instructions. NOTE: the pairing code or password is located on the transmitter or the camera. After you complete the pairing process with a camera for the first time, it connects automatically to the Garmin navigation device. -
Page 72: Changing The Camera Orientation
About memory cards You can purchase memory cards from an electronics supplier, or purchase pre-loaded Garmin mapping software (www.garmin.com). Memory cards can be used to store files such as maps and custom POIs. Installing a memory card for maps and data You can install a memory card to increase the storage space for maps and other data on your device. -
Page 73: Connecting The Device To Your Computer
3 Select a file. 4 Select Edit > Copy. 5 Browse to a folder on the device. NOTE: for a removable drive or volume, you should not place files in the Garmin folder. 6 Select Edit > Paste. Purchasing additional maps 1 Go to your device product page at garmin.com. - Page 74 February 2022 GUID-0BA92502-A113-48CC-93AF-081F06BC6CDF v9...
Need help?
Do you have a question about the OVERLANDER and is the answer not in the manual?
Questions and answers
can I change the battery