Advertisement
Quick Links
Advertisement

Subscribe to Our Youtube Channel
Related Manuals for Autool CT200


Summary of Contents for Autool CT200
- Page 1 AUTOOL CT200 Injector Cleaner & Tester User Manual www.autooltech.com...
-
Page 2: Copyright Information
AUTOOL. The information contained herein is designed only for the use of this unit. AUTOOL is not responsible for any use of this information as applied to other units. - Page 3 1 Overview 1.1 Functions and features Fuel injector diagnostic and cleaning equipment is a mechatronics product that combines ultrasonic cleaning technology and microcomputer oil pressure closed- loop control cleaning and detection technology. This product simulates various operating conditions of the engine, and cleans and inspects the fuel injectors of various automobiles and motorcycles.
- Page 4 1.2 Working environment and technical parameters Working environment Power supply: AC220V±10% Frequency: 50HZ±0.5 Relative humidity: <85% Environment temperature: 0℃~+40℃ External magnetic field strength: <400A/m No open flames are allowed around Technical parameters Tank capacity:1300 ml Range of rotation:0-7500r/min PWM pulse width:0~20.0ms step0.1ms Time:0~20min Cleaning frequency:40 kHz Cylinder volume:180 ml...
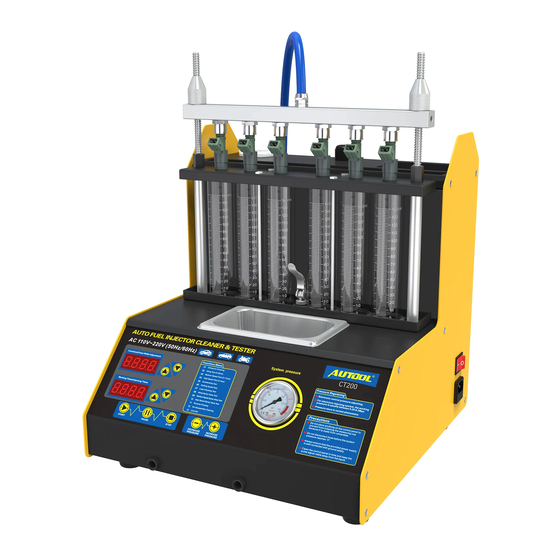
- Page 5 2 Structure and composition 2.1 Structure ⑪ ① ② ⑭ ⑮ ③ ④ ⑤ ⑥ ⑦ ⑧ ⑫ ⑨ ⑬ ⑯ ⑩ 1-Lock pole;2-Lock nut;3-Oil rail;4-Top oil inlet connector;5-Glass measuring cylinder;6-Oil drain handle;7-Ultrasonic cleaning tank;8-Operation panel; 9-Pressure gauge;10-Cleaning agent drain valve;11-Oil outlet pipe; 12-Power switch;13-Power socket;14-Signal wire;15-Oil fill-in port;...
-
Page 6: Operation Process
Time/time adjustment button: adjust the working time of the injector and the number of injections. ● Press up to increase the working time of the injector/the number of injections. ● Press down to reduce the working time of the injector/the number of injections. - Page 7 2) Insert the plugs of the drive wires into the injector sockets in turn. (Special fuel injectors need to be connected with an adapter cable) 3) Press the item selection up and down keys to select the "01 ultrasonic cleaning" item, and then press the working time up and down keys to set the time.
- Page 8 ① ⑦ ② ⑧ ③ 1-Oil outlet pipe; 2-Oil rail; 3-Top oil inlet connector; ④ 4-Injectors; ⑤ 5-Upper plate seat; 6-Glass measuring cylinder; ⑥ 7-Lock nut; 8-Lock pole Top-in fuel injector installation diagram ● Select the top oil inlet connector from the accessories and install it into the oil separator.
- Page 9 3) The rest of the operation steps are consistent with item 02 04 High speed test 1) Select "04 High Speed Test". 2) Press the start button. 3) The rest of the operation steps are consistent with item 02 05 Accelerating test 1) Select “05 Accelerating Test”.
-
Page 10: Storage And Maintenance
2) Press the up and down buttons to set the number of times. (Generally set to 2000 times) 3) Press down on the oil drain handle to observe the fuel injection volume. 4) Press the start button to start the test. 5) After the test, raise the drain handle and put the testing agent back into the tank. - Page 11 3) Drain the ultrasonic cleaning agent. Wipe the equipment clean with a dry soft cloth. 4) If the machine needs to be stored for a long time, discharge the testing agent into a bottle and seal it. 4.2 Maintenance ● Replacement of testing agent After the testing agent has been used for a period of time, a lot of impurities will accumulate, and the agent containing dirt cannot be used, otherwise it will easily block the fuel injector.
-
Page 12: Warranty
5) Man-made faults are not covered by the warranty. Disclaimer: All information, illustrations, and specifications contained in this manual, AUTOOL resumes the right of modify this manual and the machine itself with no prior notice. The physical appearance and color may differ from what is shown in the manual, please refer to the actual product.
Need help?
Do you have a question about the CT200 and is the answer not in the manual?
Questions and answers