Table of Contents
Advertisement
Available languages
Available languages
Quick Links
Advertisement
Chapters
Table of Contents

Related Manuals for Simplicity BRIO CANISTER


Summary of Contents for Simplicity BRIO CANISTER
- Page 1 Owner’s Manual Model No. BRIO...
-
Page 2: Table Of Contents
CONTENTS Getting Started Important Safety Instructions Grounding Instructions Parts Identification Assembly Controls Operation Using the Tools Storage Maintaining The Vacuum Replacing the Dust Bag Maintaining and Replacing the Filters Troubleshooting Troubleshooting Key Replacement Parts For Best Performance Warranty Information Register Online... -
Page 3: Important Safety Instructions
AS DESCRIBED IN THIS MANUAL. USE ONLY MANUFACTURER’S RECOMMENDED ATTACHMENTS. TO REDUCE THE RISK OF PERSONAL INJURY OR DAMAGE TO YOUR UNIT USE ONLY SIMPLICITY RECOMMENDED ACCESSORIES. THIS MACHINE IS INTENDED FOR COMMERCIAL USE ONLY. IT IS DESIGNED EXCLUSIVELY TO PICK UP DIRT, DRY DEBRIS AND DUST IN AN INDOOR ENVIRONMENT AND IS NOT CONSTRUCTED FOR ANY OTHER USE. -
Page 4: Grounding Instructions
GROUNDING INSTRUCTIONS This appliance must be grounded. If it should malfunction or breakdown, grounding provides a path of least resistance for electric current to reduce the risk electric shock. This machine is equipped with a cord having an equipment-grounding conductor and grounding plug. The plug must be inserted into an appropriate outlet that is properly installed and grounded in accordance with all local codes and ordinances. - Page 5 GENERAL INFORMATION WHEN USING ELECTRICAL EQUIPMENT BASIC SAFETY PRECAUTIONS SHOULD BE FOLLOWED INCLUDING THE FOLLOWING. IMPORTANT SAFETY INSTRUCTIONS READ AND UNDERSTAND ALL INSTRUCTIONS CAREFULLY BEFORE USE • Switch off the machine before removing the plug. • Keep the power supply cord clear of moving parts. During operation hazard may occur when running the machine over the power supply cord.
- Page 6 GUIDELINES FOR THE OPERATOR WARNING Operators must be fully trained in the use of the machine in accordance with these instructions, able to perform user maintenance and the correct selection of accessories. Operators should be physically capable to maneuver, transport and operate the machine.
-
Page 7: Parts Identification
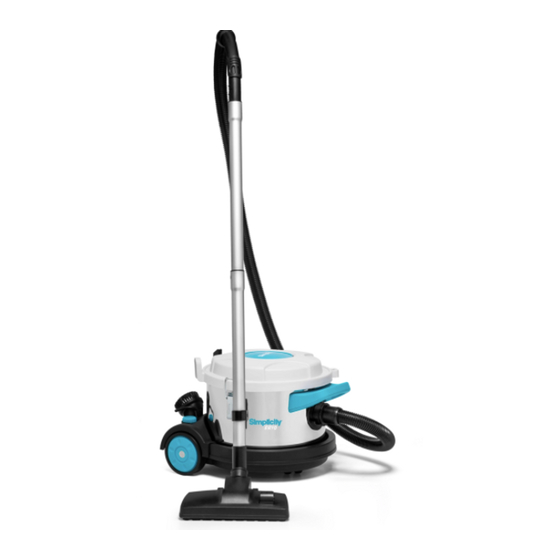
PARTS IDENTIFICATION Inside (1) Top cover (9) Dusting brush (2) Top latches (10) Crevice tool (16) Cloth bag (3) Handle (11) On/Off switch (17) Pleated High-Efficiency Filter (4) Hose inlet (12) Suction control dial (18) Foam filter (5) Wand dock (13) Tool storage (6) Wands (14) Power cord... -
Page 8: Assembly
ASSEMBLY WARNING - before assembling, transporting or changing accessories tools, switch the vacuum off and unplug from the electrical outlet. • Insert the hose into the dust intake socket on the front of the vacuum cleaner (Fig. 1) • Twist in a clockwise direction until locked into position. -
Page 9: Controls
CONTROLS • The on/off switch is positioned at the rear of the machine (Fig. 4) • To turn the machine on, press the button. • To turn the machine off, press the button again. (Fig. 4) Tip: When operating the unit in a noise-sensitive area, the unit may be adjusted with the knob on the right rear of the unit. -
Page 10: Operation
OPERATION • Ensure the power cord is fully extended before use. • Ensure a cloth bag is fitted before use. • Press the on/off button to turn the vacuum cleaner on. • Adjust suction by sliding the airflow adjuster located on the hose handle (Fig. -
Page 11: Using The Tools
USING THE TOOLS The floor tool can be used for cleaning carpets, rugs and hard floors. • Press the floor heads pedal down when cleaning hard floors. (Fig. 7) (Fig. 7) • Press the floor heads pedal up when cleaning carpet or rugs. (Fig. -
Page 12: Maintaining The Vacuum
Replacing the Filters For maximum performance, it’s important to keep the filters clean. Not cleaning and replacing your filters regularly with genuine Simplicity replacement filters can reduce the suction power and cause overheating. To replace the pleated high-efficiency filter and foam filter: •... -
Page 13: Troubleshooting
Suction airflow adjuster Pull back on the slide to increase (on handle) airflow. Any other service should be performed by an Authorized Simplicity Service Center. To locate your nearest service center, visit our website at Simplicityvac.com, or call 888-974-6759. KEY REPLACEMENT PARTS •... -
Page 14: Warranty Information
WARRANTY INFORMATION What is Covered: Simplicity vacuums are covered by a Limited Warranty. For details, see Simplicityvac.com/warranty-information Register online THANK YOU FOR YOUR PURCHASE Simplicityvac.com/register-warranty best What’s the way to be a part of the in crowd? It’s simple: register your Simplicity vacuum today... - Page 15 888-9-SIMPLY (888-974-6759) 1760 Gilsinn Lane Fenton, MO 63026 ©2022 Tacony Corporation...
- Page 16 Manuel du propriétaire N° de modèle BRIO...
- Page 17 TABLE DES MATIÈRES Pour commencer Instructions de sécurité importantes Instructions de mise à la terre Identification des pièces Assemblage Commandes Utilisation Utilisation des outils Rangement Entretien de l’aspirateur Remplacement du sac à poussières Entretien et remplacement des filtres Dépannage Dépannage Principales pièces de rechange Pour une meilleure performance Informations sur la garantie...
-
Page 18: Instructions De Sécurité Importantes
UNIQUEMENT LES ACCESSOIRES RECOMMANDÉS PAR LE FABRICANT. POUR RÉDUIRE LE RISQUE DE BLESSURES CORPORELLES OU DE DOMMAGES À VOTRE APPAREIL, UTILISEZ UNIQUEMENT LES ACCESSOIRES RECOMMANDÉS PAR SIMPLICITY. CETTE MACHINE EST DESTINÉE À UN USAGE COMMERCIAL UNIQUEMENT. ELLE EST CONÇUE EXCLUSIVEMENT POUR RAMASSER LA SALETÉ, LES DÉBRIS SECS ET LA POUSSIÈRE DANS UN ENVIRONNEMENT INTÉRIEUR ET N'EST PAS CONSTRUITE POUR UNE AUTRE UTILISATION. -
Page 19: Instructions De Mise À La Terre
INSTRUCTIONS DE MISE À LA TERRE Cet appareil doit être mis à la terre. En cas de mauvais fonctionnement ou de panne, la mise à la terre fournit un chemin de moindre résistance visant à réduire le risque de choc électrique. Cet machine est équipée d’un cordon muni d’un conducteur de mise à... - Page 20 INFORMATIONS GÉNÉRALES LORS DE L'UTILISATION D'UN ÉQUIPEMENT ÉLECTRIQUE, DES PRÉCAUTIONS DE SÉCURITÉ DE BASE DOIVENT ÊTRE PRISES, NOTAMMENT LES SUIVANTES. INSTRUCTIONS DE SÉCURITÉ IMPORTANTES LISEZ ET COMPRENEZ ATTENTIVEMENT TOUTES LES INSTRUCTIONS AVANT UTILISATION • Éteignez la machine avant de retirer la fiche. •...
- Page 21 DIRECTIVES POUR L'OPÉRATEUR AVERTISSEMENT Les opérateurs doivent être parfaitement formés à l'utilisation de la machine conformément à ces instructions, capables d'effectuer la maintenance de l'utilisateur et de choisir correctement les accessoires. Les opérateurs doivent être physiquement capables de manœuvrer, de transporter et d'utiliser la machine.
-
Page 22: Identification Des Pièces
IDENTIFICATION DES PIÈCES (1) Couvercle supérieur (9) Brosse dépoussiérante À l'intérieur (2) Loquets supérieurs (10) Suceur plat (16) Sac en tissu (3) Poignée (11) Interrupteur marche/arrêt (17) Filtre plissé à haute efficacité (4) Arrivée du tuyau souple (12) Molette de commande (18) Filtre en mousse d’aspiration (5) Point d'amarrage du tube... -
Page 23: Assemblage
ASSEMBLAGE AVERTISSEMENT - avant d'assembler, de transporter ou de changer des outils accessoires, éteignez l'aspirateur et débranchez-le de la prise électrique. • Insérez le tuyau dans la prise d'aspiration de la poussière à l'avant de l'aspirateur (Fig. 1) • Tournez dans le sens des aiguilles d'une montre jusqu'à... -
Page 24: Commandes
COMMANDES • L'interrupteur marche/arrêt est positionné à l'arrière de la machine (Fig. 4) • Pour allumer la machine, appuyez sur le bouton. • Pour éteindre la machine, appuyez à nouveau sur le bouton. (Fig. 4) Conseil : Lors de l'utilisation de l'appareil dans une zone sensible au bruit, l'appareil peut être réglé... -
Page 25: Utilisation
UTILISATION • Assurez-vous que le cordon d'alimentation est complètement étendu avant utilisation. • Assurez-vous qu'un sac en tissu est installé avant utilisation. • Appuyez sur le bouton marche/arrêt pour allumer l'aspirateur. • Réglez l'aspiration en faisant glisser le régulateur de débit d'air situé sur la poignée du tuyau (Fig. -
Page 26: Utilisation Des Outils
UTILISATION DES OUTILS L'accessoire pour sols peut être utilisé pour nettoyer les moquettes, les tapis et les sols durs. • Appuyez sur la pédale des têtes de sol lorsque vous nettoyez des sols durs. (Fig. 7) (Fig. 7) • Appuyez sur la pédale des têtes de sol vers le haut lorsque vous nettoyez des tapis ou des moquettes. -
Page 27: Entretien De L'aspirateur
Ne pas nettoyer et remplacer régulièrement vos filtres avec des filtres de rechange d'origine Simplicity peut réduire la puissance d'aspiration et provoquer une surchauffe. Pour remplacer le filtre plissé à haute efficacité et le filtre en mousse : •... -
Page 28: Dépannage
(sur la le débit d'air. poignée) Tout autre entretien doit être effectué par un centre de service Simplicity agréé. Pour trouver le centre de service le plus proche, visitez notre site Web à l’adresse Simplicityvac.com, ou appelez le 888-974-6759. -
Page 29: Informations Sur La Garantie
INFORMATIONS SUR LA GARANTIE Ce que couvre cette garantie : Les aspirateurs Simplicity sont couverts par une garantie limitée. Pour plus de détails, consultez le site Simplicityvac.com/warranty-information Enregistrement en ligne THANK YOU NOUS VOUS FOR YOUR PURCHASE REMERCIONS DE VOTRE ACHAT... - Page 30 888-9-SIMPLY (888-974-6759) 1760 Gilsinn Lane Fenton, MO 63026 ©2022 Tacony Corporation...
- Page 31 Manual del propietario N.º de modelo BRIO...
- Page 32 CONTENIDO Empezando Instrucciones de seguridad importantes Instrucciones de conexión a tierra Identificación de piezas Montaje Controles Operación Uso de las herramientas Almacenamiento Mantenimiento de la aspiradora Sustitución de la bolsa de polvo Mantenimiento y reemplazo de los filtros Solución de problemas Solución de problemas Piezas de repuesto clave Para un mejor rendimiento...
-
Page 33: Instrucciones De Seguridad Importantes
DESCRIBE EN ESTE MANUAL. UTILICE ÚNICAMENTE LOS ACCESORIOS RECOMENDADOS POR EL FABRICANTE. PARA REDUCIR EL RIESGO DE LESIONES PERSONALES O DAÑOS A SU UNIDAD, UTILICE ÚNICAMENTE LOS ACCESORIOS RECOMENDADOS POR SIMPLICITY. ESTA MÁQUINA ESTÁ DISEÑADA SOLO PARA USO COMERCIAL. ESTÁ DISEÑADO EXCLUSIVAMENTE PARA RECOGER LA SUCIEDAD, LOS RESIDUOS SECOS Y EL POLVO EN UN ENTORNO INTERIOR Y NO ESTÁ... -
Page 34: Instrucciones De Conexión A Tierra
INSTRUCCIONES DE CONEXIÓN A TIERRA Este aparato debe estar conectado a tierra. En caso de mal funcionamiento o avería, la conexión a tierra proporciona una vía de menor resistencia para la corriente eléctrica, reduciendo así el riesgo de descarga eléctrica. Esta máquina está equipada con un cable que tiene un conductor de conexión a tierra del equipo y un enchufe de conexión a tierra. - Page 35 INFORMACIÓN GENERAL CUANDO SE UTILICEN EQUIPOS ELÉCTRICOS, DEBEN SEGUIRSE LAS PRECAUCIONES BÁSICAS DE SEGURIDAD, INCLUYENDO LAS SIGUIENTES. INSTRUCCIONES DE SEGURIDAD IMPORTANTES LEA Y COMPRENDA TODAS LAS INSTRUCCIONES CUIDADOSAMENTE ANTES DE USAR • Apague la máquina antes de quitar el enchufe. •...
- Page 36 PAUTAS PARA EL OPERADOR ADVERTENCIA Los operadores deben estar plenamente formados en el uso de la máquina de acuerdo con estas instrucciones, ser capaces de realizar el mantenimiento del usuario y la correcta selección de los accesorios. Los operadores deben ser físicamente capaces de maniobrar, transportar y manejar la máquina.
-
Page 37: Identificación De Piezas
IDENTIFICACIÓN DE PIEZAS Dentro (1) Cubierta superior (9) Cepillo para polvo (2) Pestillos superiores (10) Boquilla para rendijas (16) Bolsa de tela (3) Mango (11) Interruptor de encendido/ (17) Filtro plisado de alta apagado (4) Entrada de la manguera eficiencia (12) Dial de control de succión (5) Muelle de varillas (18) Filtro de espuma... -
Page 38: Montaje
MONTAJE ADVERTENCIA: antes de montar, transportar o cambiar los accesorios de las herramientas, apague la aspiradora y desenchúfela de la toma de corriente. • Introduzca la manguera en el enchufe de entrada de polvo en la parte delantera de la aspiradora (Fig. -
Page 39: Controles
CONTROLES • El interruptor de encendido/apagado está situado en la parte trasera de la máquina (Fig. 4) • Para encender la máquina, pulse el botón. • Para apagar la máquina, pulse el botón de nuevo. (Fig. 4) Consejo: Cuando se utiliza la unidad en un área sensible al ruido, la unidad puede ser ajustada con la perilla en la parte posterior derecha de la unidad. -
Page 40: Operación
OPERACIÓN • Asegúrese de que el cable de alimentación esté completamente extendido antes de usarlo. • Asegúrese de colocar una bolsa de tela antes de usarla. • Presione el botón de encendido/ apagado para encender la aspiradora. • Ajuste la succión deslizando el regulador de flujo de aire ubicado en el mango de la manguera (Fig. -
Page 41: Uso De Las Herramientas
USO DE LAS HERRAMIENTAS La herramienta para pisos puede utilizarse para limpiar alfombras, moquetas y suelos duros. • Presione el pedal de los cabezales para pisos cuando limpie pisos duros. (Fig. 7) (Fig. 7) • Presione el pedal de los cabezales para pisos cuando limpie alfombras o tapetes. -
Page 42: Mantenimiento De La Aspiradora
Para obtener el máximo rendimiento, es importante mantener los filtros limpios. Si no se limpian y sustituyen los filtros regularmente con filtros de reemplazo originales de Simplicity, se puede reducir la potencia de aspiración y provocar un sobrecalentamiento. Para reemplazar el filtro plisado de alta eficiencia y el filtro de espuma: •... -
Page 43: Solución De Problemas
(en el mango) Cualquier otro servicio debe ser realizado por un Centro de Servicio Autorizado de Simplicity. Para ubicar su centro de servicio más cercano, visite nuestro sitio web en Simplicityvac.com o llame al 888-974-6759. PIEZAS DE REPUESTO CLAVE •... -
Page 44: Información De Garantía
INFORMACIÓN DE GARANTÍA Qué está cubierto: Las aspiradoras Simplicity están cubiertas por una garantía limitada. Para obtener más información, consulte Simplicityvac.com/warranty-information Regístrese en línea THANK YOU GRACIAS FOR YOUR PURCHASE POR SU COMPRA Regístrese en línea Simplicityvac.com/register-warranty ¿Cuál es la mejor manera de formar parte de este grupo? What’s the... - Page 45 888-9-SIMPLY (888-974-6759) 1760 Gilsinn Lane Fenton, MO 63026 ©2022 Tacony Corporation...
Need help?
Do you have a question about the BRIO CANISTER and is the answer not in the manual?
Questions and answers