Table of Contents
Advertisement
Quick Links
Advertisement
Table of Contents

Related Manuals for RCP ADF-B06


Summary of Contents for RCP ADF-B06
- Page 1 Pulse Oximeter Model # ADF-B06...
-
Page 2: Table Of Contents
Pulse Oximeter TABLE OF CONTENTS INTRODUCTION ............... 3 NOTES ON SAFETY ............3 Handling batteries properly: ........4 PRODUCT OVERVIEW............5 SYMBOLS ................6 POWER-ON KEY/FUNCTIONAL KEY OPERATIONS ..6 ALERT SOUND SETTINGS ..........7 BRIGHTNESS SETTING ............8 POWER SAVING FUNCTION ..........8 ALERT RANGE SETTING ............ -
Page 3: Introduction
Model # ADF-B06 INSTRUCTION MANUAL INTRODUCTION This Pulse Oximeter is provided to you by Remote Care Partners (RCP), for use exclusively with the health monitoring program from your provider. Please read this manual carefully and keep it handy for future reference. -
Page 4: Handling Batteries Properly
Pulse Oximeter Do not directly expose your eyes to light-emitting components of the Oximeter, as that could cause harm to your eyes. For details about clinical limitations and contraindications, please carefully consult the relevant medical literature. Warning: Do not use the Oximeter in an environment with any inflammable gases, inflammable anesthetic, or other inflammable substances. -
Page 5: Product Overview
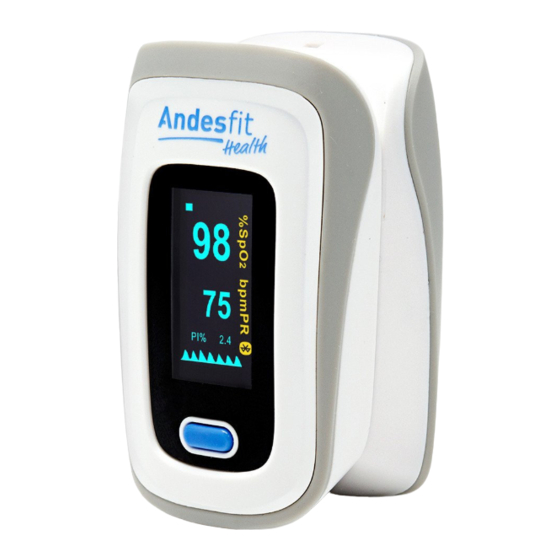
Pulse Oximeter PRODUCT OVERVIEW Symbol of oxygen saturation Measured value of oxygen saturation Bar graph Plethysmogram Measured value of Pulse rate Symbol of pulse rate Battery power indication/Bluetooth symbol (alternately displayed) V1.1 REMOTE CARE PARTNERS PAGE 5... -
Page 6: Symbols
Pulse Oximeter SYMBOLS Symbol Description BF-type application part Caution: Please see this manual. %SpO Symbol of oxygen saturation bpmR Symbol of pulse rate Bluetooth symbol When end users abandon this product, they must send the product to the collection place for recycling. -
Page 7: Alert Sound Settings
Pulse Oximeter ALERT SOUND SETTINGS Hold the power-on key/functional key while the Oximeter is in powered-on state. Parameter setting interface 1 is displayed. Move "*" to the corresponding option by pressing the function key. Hold the function key to set Alm to on and set Beep to off. -
Page 8: Brightness Setting
1 to 5. The greater the value, the greater the brightness of the screen. POWER SAVING FUNCTION The ADF-B06 has a power-saving feature. It can save power by reducing screen brightness automatically. If you leave your finger in the device for more than 150 seconds, the brightness will reduce to level 1. -
Page 9: Alert Range Setting
Pulse Oximeter ALERT RANGE SETTING On parameter interface 2, press the functional key to switch between options. On this interface, you can set the upper limit and lower limit of SpO2 Alm and PR Alm. While the "*" symbol stays on the +/- option, hold the function key to set the option to + or -. -
Page 10: Taking A Measurement
Oximeter. If you do not completely insert your finger into the cavity, the measurement may be inaccurate. The reading will automatically transfer to the RCP SmartHub and will then be sent to your provider. V1.1 REMOTE CARE PARTNERS PAGE 10... -
Page 11: About The Display
Pulse Oximeter Notes: • Do not move your finger during measurement. • Keep your body still during the measurement. • After the readings become stable, read the measured values of oxygen saturation and the pulse rate on the screen. • The Oximeter will automatically turn off 10 seconds after you remove your finger. -
Page 12: Cleaning
Pulse Oximeter CLEANING Power off the instrument and remove the batteries before cleaning. Ensure that the appearance of the instrument is neat, dust-free, and dirt-free. Clean the outer surface of the instrument (including the OLED screen) using 75% medical alcohol and a piece of dry soft cloth. Caution: Avoid running the Oximeter underwater or submerging it in water or any other liquid during cleaning. -
Page 13: Maintenance
Pulse Oximeter MAINTENANCE • Remove the batteries from the battery slot and properly store them if you do not plan to use the Oximeter for a long period of time. • Store the Oximeter between 14 and 122°F (–10 to +50°C) and at humidity levels no greater than 93%. -
Page 14: Technical Specification
Pulse Oximeter TECHNICAL SPECIFICATION Dimensions Width 62.0 mm Depth 37.0 mm Height 32.0 mm Weight (including 42.5 g batteries) Peak wavelength range of the light emitted from the probe Red Light 660 nm ± 3 Infrared Light 905 nm ± 5 Maximum optical output power of the probe Infrared Light 1.2 mW... - Page 15 Pulse Oximeter Default values and conditions of alert Parameter Value Oxygen saturation Upper limit: 100 Lower limit: 94 Pulse rate Upper limit: 130 Lower limit: 50 Alert condition When the alert switch is on and the actual measured value goes beyond the preset alert parameter range, the Oximeter...
-
Page 16: Storage And Transportation
Pulse Oximeter STORAGE AND TRANSPORTATION Packaged products should be stored in well- ventilated rooms without corrosive gas and with an ambient temperature of –10 to +50°C, a relative humidity lower than 93% (without condensation), and an atmospheric pressure of 50–106 kPa. V1.1 REMOTE CARE PARTNERS PAGE 16... -
Page 17: Contact Information And Notices
Pulse Oximeter CONTACT INFORMATION AND NOTICES Remote Care Partners 855-477-7000 www.remotecarepartners.com AndseFit LTD Unit 513 Lakeside 1, No. 8 Science Park West Ave Hong Kong Science Park Hong Kong FCC Compliance Statement This device complies with part 15 of the FCC Rules. - Page 18 Pulse Oximeter FCC WARNING This equipment has been tested and found to comply with the limits for a Class B digital device, pursuant to Part 15 of the FCC Rules. These limits are designed to provide reasonable protection against harmful interference in a residential installation.
Need help?
Do you have a question about the ADF-B06 and is the answer not in the manual?
Questions and answers