
Related Manuals for GAOMON PD1220


Summary of Contents for GAOMON PD1220
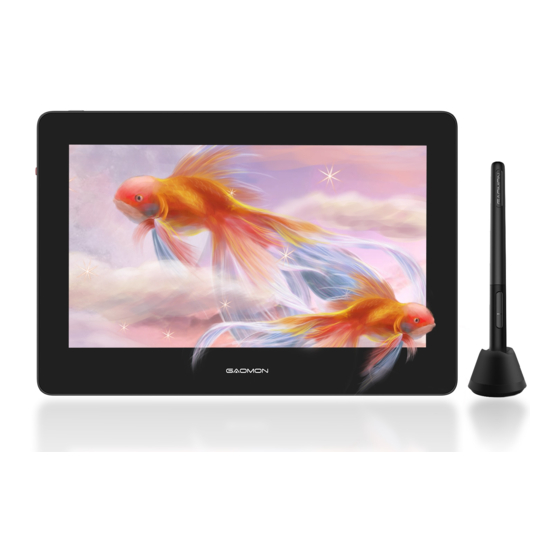
- Page 1 Pen Display PD1220 / PD1320 User Manual Windows 7 or later, macOS 10.12 or later, Android (USB3.0 DP1.2)
- Page 2 PD1220 / PD1320 Precautions 1. Please read this manual carefully before using, and keep it well for future reference. 2. Before cleaning the pen display please unplug the power cord and wipe with a soft damp cloth, do not use any kind of detergents.
-
Page 3: Table Of Contents
PD1220 / PD1320 Content 1.Product Overview ......................4 ......................1.1 Product Introduction ....................... 1.2 Product and Accessories ..........................1.3 Connection ........................1.4 Driver Installation ......................1.5 Pen Nib Replacement 2. OSD Menu ........................11 3. Function Settings ......................12 .................... -
Page 4: Product Overview
1. Product Overview 1.1 Product Introduction Thanks for buying GAOMON PD1220/PD1320 Pen Display. This is a new generation of professional battery-free pen display, which can greatly improve your work efficiency of painting and creation, and full of fun. You can freely painting and writing, depicting different lines and colors, just as the pen writes on the paper, which brings you a real shock experience. - Page 5 PD1220 / PD1320 1.2.2 Digital Pen The digital pen is battery-free and boasts 8192levels of pressure sensitivity. Upper button:Right mouse key function(default) Lower button: Eraser function(default) Pen nib: Left mouse key function 1.2.3 Accessories Spare Nibs 5V/2A Adapter Pen AP50...
- Page 6 PD1220 / PD1320 1.2.4 Power Adapter Please select the appropriate plug according to your country or region, and assemble it to the power adapter (the plug that comes with the product will be different depends on countries and regions). UK Standard...
-
Page 7: Connection
PD1220 / PD1320 1.3 Connection Scenario 1 Step 1: Connect the pen display to PC with the HDMI cable; Step 2: Connect the pen display to PC with the Type-C male plug inserted into the pen display, and the USB-A male plug inserted into the computer. (The red USB-A male plug is for power supply) - Page 8 For phone charging, charger that supports PD protocol is suggested. Type-C Type-C Type-C USB-A USB-A Note: Please make sure your Android phone supports'Dex','Desktop', or 'TNT' mode. Visit GAOMON website for compatible phone models: https://gaomon.net/Pen_Display/PD1220&PD1320.html www.gaomon.net...
-
Page 9: Driver Installation
PD1220 / PD1320 1.4 Driver Installation 1.4.1 OS Support Windows 7 or later, macOS 10.12 or later. 1.4.2 Install Driver Please download the driver from our website: www.gaomon.net/download After finishing installation, you can find the grey driver icon in the system tray area, which means the driver was installed successfully;... -
Page 10: Pen Nib Replacement
PD1220 / PD1320 1.5 Pen Nib Replacement 1. The nib will wear off after using for a long time, then you need to replace a new nib. 2. Unscrew the pen holder and take out a new nib. 3. Insert the old pen nib into the hole at the bottom of the pen holder and tilt the pen to pull out the nib. -
Page 11: Osd Menu
PD1220 / PD1320 2.0 OSD Menu OSD Settings 1. When the headphone jack is not connected, the thumbwheel switch can be used to wheel up/ down to increase/decrease the display brightness; 2. When the headphone jack is connected, the thumbwheel switch can be used to wheel up/down the volume;... -
Page 12: Function Settings
PD1220 / PD1320 3.0 Function Settings 3.1 Device Connection Prompt 1. No Device Detected: The computer does not recognize the tablet. 2. Device connected: The computer has recognized the pen display. www.gaomon.net... -
Page 13: Working Area Setting
PD1220 / PD1320 3.2 Working Area Setting 3.2.1 Using Multiple Monitors The location of cursor depends on the screen mode you chose when connected the pen display to an external display (such as laptop or all-in-one PC), for instance: In Duplicate Mode, the pen display and the external display will show the same picture, and the cursor will be displayed on each monitor simultaneously. - Page 14 PD1220 / PD1320 3.2.2 Working Area Setting Define the tablet area that will be mapped to the screen area. 1. Full Area: The entire active area of the tablet. This is the default setting. 2. Custom Area: Drag the corners of the foreground graphic to select the screen area.
- Page 15 PD1220 / PD1320 3.2.3 Rotate Working Area By changing the direction of the pen display to provide more choices for users. Four directions are available. www.gaomon.net...
-
Page 16: Pen Buttons Function Setting
PD1220 / PD1320 3.3 Pen Buttons Function Setting Customized Setting: Selec t the function to be achieved on the pop-up dialog box, and it will be saved automatically. www.gaomon.net... - Page 17 PD1220 / PD1320 www.gaomon.net...
-
Page 18: Pressure Sensitivity Setting
PD1220 / PD1320 3.4 Pressure Sensitivity Setting The pressure sensitivity will be changed by dragging the points of the pressure curve. Drag the points to the upper left for higher sensitivity. Drag the points to the lower right for lower sensitivity. -
Page 19: Pen Pressure Testing
PD1220 / PD1320 3.5 Pen Pressure Testing You can gradually apply pressure to the stylus on the screen to test the pressure level. www.gaomon.net... -
Page 20: Calibration
PD1220 / PD1320 3.6 Calibration Screen Calibration: Click the red cross on the screen to complete calibration. Factory Reset: Click ‘Factory Reset’ to reset the pen display. Cancel Calibration: Click ‘Cancel Calibration’ or press ‘ESC’ to stop the calibration. www.gaomon.net... -
Page 21: Enable The Windows Ink Feature
PD1220 / PD1320 3.7 Enable the Windows Ink Feature The function is for software that supports Windows Ink, such as Microsoft Office, Windows Journal, Adobe Photoshop CC, SketchBook 6 and so on. www.gaomon.net... -
Page 22: Mouse Mode (Only For Specific Models)
PD1220 / PD1320 3.8 Mouse Mode (Only for specific models) As shown below, check the checkbox in front of the mouse mode to open the mouse mode. Under mouse mode, when you move the pen, the cursor moves following the relative coordinate principle, similar to moving the cursor with the mouse. -
Page 23: Customize Press Keys And Pressure Curve
PD1220 / PD1320 3.9 Customize Press Keys and Pressure Curve You can customize the function of press keys and pressure curve for different program. Select a program, customize the function of press keys, and adjust the pressure curve, the settings will be automatically saved. -
Page 24: Data Export And Import
PD1220 / PD1320 3.10 Data Export and Import The driver supports exporting and importing your custom configuration data of the product, which is convenient for you to use different software and avoid the trouble of repeated settings. www.gaomon.net... -
Page 25: Specifications
PD1220 / PD1320 4. Specifications 4.1 PD1220 Specifications Model PD1220 Panel Size 11.6inch 1920 x 1080(16:9) Resolution LCD Type Active Area 256.3 x 144.2mm Contrast Ratio 1000:1 Screen Brightness 220cd/m Response Time 25ms 89° /89° (H)/89° /89° (V) Viewing Angle (Typ,)(CR >... -
Page 26: Pd1320 Specifications
PD1220 / PD1320 4.2 PD1320 Specifications Model PD1320 Panel Size 13.3inch 1920 x 1080(16:9) Resolution LCD Type Active Area 293.8x 165.2mm Contrast Ratio 1000:1 Screen Brightness 220cd/m Response Time 25ms 89° /89° (H)/89° /89° (V) Viewing Angle (Typ,)(CR > 10) -
Page 27: Trouble Shooting
PD1220 / PD1320 5.0 Trouble Shooting 5.1 Breakdowns Related to Display Malfunctions Suggested Solutions *Make sure the power is on *Make sure the power cable is connected Power indicator doesn't work *Check the power socket *Try a new power cable 1. -
Page 28: Breakdowns Related To Functions
PD1220 / PD1320 5.2 Breakdowns Related to Functions Malfunctions Suggested Solutions 1. If the driver is damaged or not properly installed, please uninstall it first and then install it again (please close all graphics software when installing). Digital pen doesn’t work and no pressure in the graphics software 2. -
Page 29: Contact Us For After-Sales Service
PD1220 / PD1320 6.0 Contact Us for After-sales Service GAOMON TECHNOLOGY CORPORATION www.facebook.com/Gaomonpentablet twitter.com/Gaomonpentablet service@gaomon.net https://www.gaomon.net www.gaomon.net... - Page 30 PD1220 / PD1320 Precauciones 1. Por favor lea este manual detenidamente antes del uso y manténgalo para referencia futura. 2. Antes de limpiar la tableta por favor desconecte el cable de energía y limpie con una tela suave y húmeda, no use ningún tipo de detergente.
- Page 31 PD1220 / PD1320 Contenido 1. Descripción del Producto ......................................1.1 Introducción del producto ....................... 1.2 Producto y Accesorios ..........................35 1.3 Conexión .................... 1.4 Instalación de Controladores ..................... 1.5 Reemplazo de la Punta 2. Menu OSD ........................3. Configuración de Funciones ..................
-
Page 32: Descripción Del Producto
1. Descripción del Producto 1.1 Introducción del Producto Muchas gracias por comprar la Tableta Gráfica GAOMON PD1220/PD1320. Esta es una nueva generación de tabletas gráficas profesionales, libres de baterías, que pueden mejorar su eficiencia de trabajo, pintura, creación y diversión. Podrá pintar y escribir libremente, representando diferentes líneas y colores, igual que un lápiz escribe en el papel, lo que le brindará... - Page 33 PD1220 / PD1320 1.2.2 Lápiz Digital El lápiz digital es sin batería y presume de 8192 niveles de sensibilidad a la presión. Botón superior: Click derecho del ratón (por defecto) Botón inferior: Función de borrador (por defecto) Punta: Función de click izquierdo 1.2.3 Accesorios...
- Page 34 PD1220 / PD1320 1.2.4 Adaptador de Corriente Por favor elija el enchufe correcto acorde a su país o región y móntelo al adaptador de corriente (el enchufe que viene con el producto será diferente dependiendo en países y regiones) Estándar RU Estándar EU...
-
Page 35: Conexión
PD1220 / PD1320 Conexión Método 1 Paso 1: Conecte la tableta con pantalla al PC con el cable HDMI; Paso 2: Conecte la tableta con pantalla al PC con el conector macho tipo C insertado en la tableta con pantalla y el conector macho USB-A insertado en el ordenador, y en caso de que no responda la tableta con pantalla o parpadee la pantalla parpadeante, el otro conector macho USB-A izquierdo también debe enchufarse en el PC o en el adaptador de corriente. - Page 36 Type-C Type-C Type-C USB-A USB-A Nota: Asegúrese de que su teléfono Android soporte el modo "Dex", "Desktop" o "TNT". Visite el sitio web de GAOMON para ver los modelos que son compatibles de teléfonos: https://gaomon.net/Pen_Display/PD1220&PD1320.html www.gaomon.net...
-
Page 37: Instalación De Controladores
PD1220 / PD1320 1.4 Instalación del Controlador 1.4.1 Soporte de OS Windows 7 o más nuevo, macOS 10.12 o más nuevo. 1.4.2 Instalar Controlador Por favor descargue el controlador de nuestro sitio web: www.gaomon.net/download Tras finalizar la instalación, puede encontrar el icono gris del driver en el área de la bandeja... -
Page 38: Reemplazo De La Punta
PD1220 / PD1320 1.5 Reemplazo de la Punta 1. La punta se desgastará después de haber sido usada por mucho tiempo, lo cual significa que es hora de reemplazarla. 2. Desatornille el soporte del lápiz y retire una punta nueva. -
Page 39: Menu Osd
PD1220 / PD1320 Menu OSD Configuración de OSD 1. Cuando el conector para auriculares no está conectado, puede subir/bajar el interruptor de la rueda selectora para aumentar/disminuir el brillo de la pantalla; 2. Cuando el conector para auriculares está conectada, el interruptor de la rueda selectora se puede usar para subir/bajar el volumen;... -
Page 40: Configuración De Funciones
PD1220 / PD1320 3.0 Configuración de Funciones 3.1 Aviso de Conexión del Dispositivo 1. Dispositivo no detectado: el ordenador no reconoce la tableta. 2. Dispositivo conectado: La computadora ha reconocido la tableta gráfica. www.gaomon.net... -
Page 41: Configuración De Área De Trabajo
PD1220 / PD1320 3.2 Configuración del Área de Trabajo 3.2.1 Usar Múltiples Monitore La ubicación del cursor depende en el modo de pantalla que usted elija cuando conectó la tableta gráfica a un monitor externo (como una laptop o computadora todo en uno), por ejemplo : En el Modo Duplicar, la tableta gráfica y el monitor externo mostrarán la misma imágen y el cursor... - Page 42 PD1220 / PD1320 3.2.2 Ajuste de Área de Trabajo Defina el área de la tableta que se mostrará en el área de la pantalla. 1. Área Completa: toda el área completa de la tableta. Este es el ajuste predeterminado. 2. Personalizar Área: Arrastrar las esquinas del primer plano para seleccionar el área de la pantalla.
- Page 43 PD1220 / PD1320 3.2.3 Rotar el Área de Trabajo Se puede cambiar la orientación de la tableta gráfica para proveer más opciones para los usuarios. Hay cuatro orientaciones disponibles. www.gaomon.net...
-
Page 44: Configuración De Funciones De Los Botones Del Lápiz
PD1220 / PD1320 3.3 Configuración de las Funciones de los Botones del Lápiz Ajuste personalizado :Seleccione la función que quiera en la caja de diálogo emergente y se guardará automáticamente. www.gaomon.net... - Page 45 PD1220 / PD1320 www.gaomon.net...
-
Page 46: Configuración De La Sensibilidad A La Presión
PD1220 / PD1320 3.4 Configuración de la Sensibilidad a la Presión La sensibilidad a la presión se cambia arrastrando los puntos de la curva de presión. Arrastre los puntos a la parte superior izquierda para mayor sensibilidad. Arrastre los puntos a la parte inferior derecha para menor sensibilidad. -
Page 47: Prueba De Presión Del Lápiz
PD1220 / PD1320 3.5 Prueba de Presión del Lápiz Puede aplicar presión gradualmente al lápiz en la pantalla para poner a prueba el nivel de presión. www.gaomon.net... -
Page 48: Calibración
PD1220 / PD1320 3.6 Calibración Calibración de la Pantalla: Cliquee la cruz roja en la pantalla para completar la calibración. Restablecimiento de Fábrica : Cliquee “Reestablecer de Fábrica” para reestablecer la tableta gráfica. Cancelar Calibración: Cliquee “Cancelar Calibración” o presione “ESC” para detener la calibración. -
Page 49: Habilitar La Función De Windows Ink
PD1220 / PD1320 3.7 Habilitar la Función de Windows Ink La función se usa en programas que soporten Windows Ink, como Microsoft Office, Windows Journal, Adobe Photoshop CC, SketchBook 6 y más. www.gaomon.net... -
Page 50: Modo Ratón (Sólo Para Modelos Específicos)
PD1220 / PD1320 3.8 Modo Ratón (Sólo para modelos específicos) Como se muestra a continuación, marque la casilla de verificación frente al modo de ratón para abrir el modo de ratón. En el modo de ratón, cuando se mueve el lápiz, el cursor se mueve siguiendo el principio de coordenadas relativas, similar a mover el cursor con el ratón. -
Page 51: Personalización De Las Teclas De Presión Y Curva De Presión
PD1220 / PD1320 3.9 Personalizar las Teclas de Presión y Curva de Presión Puede personalizar la función de las teclas de presión y curva de presión para distintos programas. Seleccione el programa, personalice la función de las teclas, ajuste la curva de presión y su configuración se guardará... -
Page 52: Exportación E Importación De Datos
PD1220 / PD1320 3.10 Exportación e Importación de Datos El controlador soporta la exportación e importación de datos de configuración personalizados para el producto, lo cual es conveniente para que usted use otros programas y evite tener que configurar todo de nuevo. -
Page 53: Especificaciones
PD1220 / PD1320 Especificaciones 4.1 Especificaciones de PD1220 Modelo PD1220 Tamaño de Panel 11.6 Pulgadas 1920 x 1080(16:9) Resolución Tipo de LCD Área Activa 256.3 x 144.2mm Relación de Contraste 1.000: 1 Pantalla Brillo 220cd/m2 Tiempo de Respuesta 25ms 89°/89°(H)/89°/89°(V) Ángulo de Visión... -
Page 54: Especificaciones Pd1320
PD1220 / PD1320 4.2 Especificaciones de PD1320 Modelo PD1320 Tamaño de Panel 13.3 Pulgadas 1920 x 1080(16:9) Resolución Tipo de LCD Área Activa 293.8x 165.2mm Relación de Contraste 1.000: 1 Pantalla Brillo 220cd/m2 Tiempo de Respuesta 25ms 89°/89°(H)/89°/89°(V) Ángulo de Visión (Tip.)(CR >... -
Page 55: Solución De Problemas
PD1220 / PD1320 5.0 Solución de Problemas 5.1 Averías Relacionadas a la Tableta Mal Funcionamiento Solución Sugerida *Asegúrese de que esté enciendida *Asegúrese de que el cable de alimentación esté conectado El indicador de encendido no funciona *Chequee la toma de corriente *Pruebe con otro cable de alimentación... -
Page 56: Averías Relacionadas A Funciones
PD1220 / PD1320 5.2 Averías Relacionadas a Funciones Mal Funcionamiento Soluciones Sugeridas 1. El controlador está dañado o no fué instalado correctamente, por favor desin- stálelo primero y vuelva a instalarlo. (Por favor cierre todos los programas gráficos El lápiz digital no funciona y al instalar). -
Page 57: Contáctenos Para Servicio Postventa
PD1220 / PD1320 6.0 Contáctenos para Servicio Postventa GAOMON TECHNOLOGY CORPORATION www.facebook.com/Gaomonpentablet twitter.com/Gaomonpentablet service@gaomon.net https://www.gaomon.net www.gaomon.net...
Need help?
Do you have a question about the PD1220 and is the answer not in the manual?
Questions and answers