IBM BladeCenter HS20 Installation And User Manual
Hide thumbs
Also See for BladeCenter HS20:
- Deployment manual (54 pages) ,
- Installation and user manual (96 pages)
Table of Contents
Advertisement
Quick Links
BladeCenter HS20
Type 7981
Installation and
User's Guide
Welcome.
Thank you for buying an
IBM blade server.
server features superior
performance, availability,
and scalability.
This
Installation and User's Guide
contains information for setting up,
configuring, and using your
blade server.
Additionally, a service information
label is attached to each BladeCenter
unit and blade server. This label
provides a graphical summary of
many of the installation and service
activities that are associated with
each device.
For more information about your
BladeCenter components and
features, you can view the
publications on the
CD or download from the
IBM Support Web site.
Go to
http://www.ibm.com/support/
Your blade
Documentation
Before installing the BladeCenter HS20
Type 7981 blade server in a BladeCenter unit,
complete the following procedures:
Install and configure the rack according
to the documentation that came with the rack.
Install the BladeCenter unit into the rack and
configure it, according to the documentation
provided with the BladeCenter unit.
Supply 200-240 V ac to the BladeCenter unit.
Install the latest firmware in all BladeCenter
components.
Before you install the blade server into the
BladeCenter unit, install options such as
drives, memory modules, processor or
expansion cards in the blade server, if applicable.
Install the blade server in the BladeCenter unit.
See Chapter 3 for more information.
Configure the blade server.
See Chapter 4 for more information.
Install the operating system.
See Chapter 5 for more information.
Install additional applications
according to the instructions provided
with the applications.
The blade server is now
ready to use. Be sure to
register and profile your
blade server on the
IBM Support Web site.
Advertisement
Table of Contents

Related Manuals for IBM BladeCenter HS20


Summary of Contents for IBM BladeCenter HS20
- Page 1 BladeCenter HS20 Type 7981 Before installing the BladeCenter HS20 Type 7981 blade server in a BladeCenter unit, complete the following procedures: Installation and Install and configure the rack according to the documentation that came with the rack. User’s Guide Install the BladeCenter unit into the rack and configure it, according to the documentation provided with the BladeCenter unit.
- Page 2 Check all cables for loose connections and verify that all optional devices you installed are on the ServerProven list at http://www.ibm.com/servers/eserver/ serverproven/compat/us/. View information about IBM Support Line at http://www.ibm.com/services/sl/products/ or view support telephone numbers at Is the problem http://www.ibm.com/planetwide/.
- Page 3 BladeCenter HS20 Type 7981 Installation and User’s Guide...
- Page 4 Documentation CD and Appendix B, “Notices,” on page 65. First Edition (March 2006) © Copyright International Business Machines Corporation 2006. All rights reserved. US Government Users Restricted Rights – Use, duplication or disclosure restricted by GSA ADP Schedule Contract with IBM Corp.
-
Page 5: Table Of Contents
Reliability, availability, and serviceability features ... . . 9 IBM Director ......10 Major components of the blade server . - Page 6 Japanese Voluntary Control Council for Interference (VCCI) statement . . . 70 Index ......71 BladeCenter HS20 Type 7981: Installation and User’s Guide...
-
Page 7: Safety
Vor der Installation dieses Produkts die Sicherheitshinweise lesen. Prima di installare questo prodotto, leggere le Informazioni sulla Sicurezza. Les sikkerhetsinformasjonen (Safety Information) før du installerer dette produktet. Antes de instalar este produto, leia as Informações sobre Segurança. © Copyright IBM Corp. 2006... - Page 8 IBM Safety Information book. For example, if a caution statement begins with a number 1, translations for that caution statement appear in the IBM Safety Information book under statement 1. Be sure to read all caution and danger statements in this documentation before performing the instructions.
- Page 9 Statement 1: DANGER Electrical current from power, telephone, and communication cables is hazardous. To avoid a shock hazard: v Do not connect or disconnect any cables or perform installation, maintenance, or reconfiguration of this product during an electrical storm. v Connect all power cords to a properly wired and grounded electrical outlet.
- Page 10 Statement 2: CAUTION: When replacing the lithium battery, use only IBM Part Number 33F8354 or an equivalent type battery recommended by the manufacturer. If your system has a module containing a lithium battery, replace it only with the same module type made by the same manufacturer.
- Page 11 Statement 4: ≥ 18 kg (39.7 lb) ≥ 32 kg (70.5 lb) ≥ 55 kg (121.2 lb) CAUTION: Use safe practices when lifting. Statement 5: CAUTION: The power control button on the device and the power switch on the power supply do not turn off the electrical current supplied to the device.
- Page 12 Refer to the information that is provided with your device for electrical specifications. Statement 21: CAUTION: Hazardous energy is present when the blade is connected to the power source. Always replace the blade cover before installing the blade. BladeCenter HS20 Type 7981: Installation and User’s Guide...
-
Page 13: Chapter 1. Introduction
For firmware updates, click Downloads and drivers. For documentation updates, under Search technical support, type 7981 and click Search. Note: Changes are made periodically to the IBM Web site. Procedures for locating firmware and documentation might vary slightly from what is described in this document. - Page 14 Record information about the blade server in the following table. You will need this information when you register the blade server with IBM. You can register the blade server at http://www.ibm.com/support/mysupport/. Product name BladeCenter HS20 Machine type 7981 Model number...
- Page 15 The BladeCenter HS20 blade server has the bezel shown in the following illustration. Note: The illustrations in this document might differ slightly from the hardware. Release handles A set of blank labels comes with the blade server. When you install the blade server in the BladeCenter unit, write identifying information on a label and place the label on the BladeCenter unit bezel.
-
Page 16: Related Documentation
The most recent versions of all BladeCenter documentation are at http://www.ibm.com/support/. In addition to the documentation in this library, be sure to review the IBM BladeCenter Planning and Installation Guide for your BladeCenter unit type for information to help you prepare for system installation and configuration. -
Page 17: Using The Documentation Browser
Using the Documentation Browser Use the Documentation Browser to browse the contents of the CD, read brief descriptions of the documents, and view documents using Adobe Acrobat Reader or xpdf. The Documentation Browser automatically detects the regional settings in use in your system and displays the documents in the language for that region (if available). -
Page 18: Notices And Statements Used In This Document
Notices and statements used in this document The caution and danger statements that appear in this document are also in the multilingual Safety Information document, which is on the IBM Documentation CD. Each statement is numbered for reference to the corresponding statement in the Safety Information document. -
Page 19: Features And Specifications
Features and specifications The following table is a summary of the features and specifications of the blade server. Note: Power, cooling, removable-media drives, external ports, and advanced system management are provided by the BladeCenter unit. Microprocessor: Integrated functions: Electrical Input: 12 V dc v Dual-channel gigabit Ethernet ®... -
Page 20: What Your Blade Server Offers
The blade server supports up to two 2.5-inch small form factor (SFF) Serial Attached SCSI (SAS) hard disk drives. v IBM Director IBM Director is a workgroup-hardware-management tool that you can use to centrally manage servers. For more information, see the IBM Director documentation on the IBM Director CD. -
Page 21: Reliability, Availability, And Serviceability Features
You can configure and monitor the power environment by using the management module. For more information about configuring and using power throttling, see the management-module documentation or http://www.ibm.com/support/. Reliability, availability, and serviceability features Three of the most important features in server design are reliability, availability, and serviceability (RAS). -
Page 22: Ibm Director
Reduced service and support costs For more information about IBM Director, see the documentation on the IBM Director CD that comes with the server, the IBM Director Information Center at http://publib.boulder.ibm.com/infocenter/eserver/v1r2/topic/diricinfo/ fqm0_main.html, and the IBM xSeries Systems Management Web page at http://www.ibm.com/ servers/eserver/xseries/systems_management/, which presents an overview of IBM Systems Management and IBM Director. -
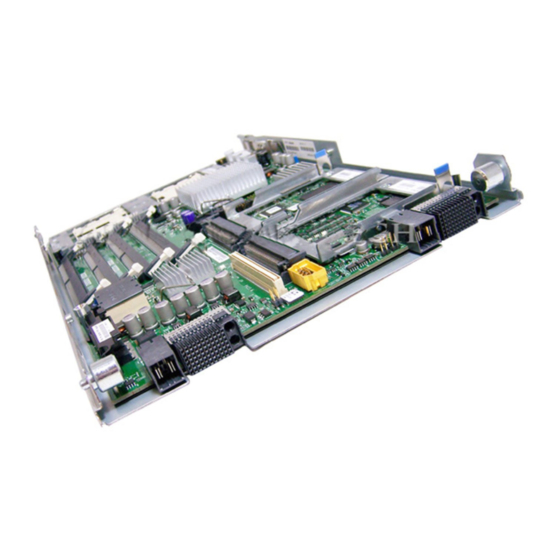
Page 23: Major Components Of The Blade Server
Major components of the blade server You must remove the blade server from the BladeCenter unit and remove the cover to see the components. The following illustration shows the major components of a BladeCenter HS20 Type 7981 blade server. DIMM socket Heat Sink... - Page 24 BladeCenter HS20 Type 7981: Installation and User’s Guide...
-
Page 25: Chapter 2. Power, Controls, Jumpers, Switches, And Indicators
If the operating system supports the Wake on LAN feature and the blade server power-on LED is flashing slowly, the Wake on LAN feature can turn on the blade server, if the Wake on LAN feature has not been disabled through the management-module. © Copyright IBM Corp. 2006... -
Page 26: Turning Off The Blade Server
The management module can turn off the blade server. Understanding the control panel and LEDs This section describes the controls and LEDs on the BladeCenter HS20 blade server. Note: The control panel door is shown in the closed (normal) position in the following illustration. - Page 27 The location LED on the BladeCenter unit will be lit also. The location LED can be turned off through the management-module Web interface or through IBM Director Console. Information LED: When this amber LED is lit, it indicates that information about a system error for the blade server has been placed in the system error log.
-
Page 28: System Board Illustration
Using system board switches The following illustration shows the location of switch block 2 (SW2). Table 1 on page 17 describes the function of each switch on the switch block. Switch block (SW2) BladeCenter HS20 Type 7981: Installation and User’s Guide... -
Page 29: Using Light Path Diagnostics To Troubleshoot The System Board
Table 1. Switch block 2 (SW2) settings Switch number Description Switch block 2 has eight switches: v 1 - BIOS backup page – Off: the BIOS starts from the Primary BIOS page. – On: the BIOS starts from the backup BIOS page. v 2 - Wake On LAN bypass –... - Page 30 The following illustration shows the light path diagnostics panel on the system board. NMI error LED Microprocessor mismatch error LED SBRD System-board error LED TEMP Over temperature error LED Light path diagnostics LED Light path diagnostics switch BladeCenter HS20 Type 7981: Installation and User’s Guide...
- Page 31 Table 3. Light path diagnostics panel LEDs LED error Action Check error log for additional information. Restart the blade server. If the error still exists, call for service. MIS (microprocessor speed Check microprocessors to make sure that they are the same mismatch) speed.
- Page 32 BladeCenter HS20 Type 7981: Installation and User’s Guide...
-
Page 33: Chapter 3. Installing Options
For a list of supported options for the blade server, go to http://www.ibm.com/ servers/eserver/serverproven/. System reliability guidelines... -
Page 34: Removing The Blade Server From The Bladecenter Unit
(see “Turning off the blade server” on page 14 for more information). Attention: Wait at least 30 seconds, until the hard disk drives stop spinning, before proceeding to the next step. BladeCenter HS20 Type 7981: Installation and User’s Guide... -
Page 35: Opening The Blade Server Cover
2. Open the two release handles as shown in the illustration. The blade server moves out of the bay approximately 0.6 cm (0.25 inch). 3. Pull the blade server out of the bay. Spring-loaded doors further back in the bay move into place to cover the bay temporarily. -
Page 36: Installing A Sas Hard Disk Drive
7. If you have other options to install or remove, do so now; otherwise, go to “Completing the installation” on page 34. BladeCenter HS20 Type 7981: Installation and User’s Guide... -
Page 37: Removing A Sas Hard Disk Drive
Removing a SAS hard disk drive The following illustration shows how to remove a SAS hard disk drive. Hard drive release lever SAS ID 1 SAS ID 0 Hard drive release lever To remove a SAS hard disk drive, complete the following steps: 1. - Page 38 BladeCenter unit or any unpainted metal surface on any other grounded rack component in the rack you are installing the DIMM option in for at least 2 seconds; then, remove the DIMM from its package. BladeCenter HS20 Type 7981: Installation and User’s Guide...
-
Page 39: Removing The Blade Server Bezel Assembly
8. To install the DIMMs, repeat the following steps for each DIMM that you install: a. Turn the DIMM so that the DIMM keys align correctly with the connector on the system board. Attention: To avoid breaking the retaining clips or damaging the DIMM connectors, handle the clips gently. -
Page 40: Installing An Additional Microprocessor
The following illustration shows how to install the second microprocessor on the system board for the blade server. Heat Sink Microprocessor 2 Microprocessor 1 and Heat Sink BladeCenter HS20 Type 7981: Installation and User’s Guide... - Page 41 To install an additional microprocessor, complete the following steps: 1. Read the safety information beginning on page v and “Installation guidelines” on page 21. 2. Shut down the operating system, turn off the blade server, and remove the blade server from the BladeCenter unit. See “Removing the blade server from the BladeCenter unit”...
- Page 42 Press firmly on the heat sink. c. Align the four screws on the heat sink with the holes on the heat-sink retention module. BladeCenter HS20 Type 7981: Installation and User’s Guide...
-
Page 43: Installing An I/O-Expansion Card
Fibre Channel expansion card v Myrinet expansion card See the ServerProven list at http://www.ibm.com/servers/eserver/serverproven/ for a list of available I/O-expansion cards and their form-factor types. When you add an I/O-expansion card, you must make sure that the I/O-modules it is mapped to both support the expansion card network-interface type. -
Page 44: Installing A Small-Form-Factor Expansion Card
SAS connector 1 and a standard-form-factor expansion card installed in the blade server. If you are removing the SAS disk drive, backup any information on it that you want to keep to another storage device. BladeCenter HS20 Type 7981: Installation and User’s Guide... - Page 45 If the SAS hard disk drive that is installed in SAS connector 1 is part of a RAID array, delete the SAS RAID array before removing the drive. When you delete the RAID array, the array configuration information is removed, but no data is deleted. To install a standard-form-factor expansion card, complete the following steps: 1.
-
Page 46: Completing The Installation
Note: If you have just connected the power cords of the BladeCenter unit to electrical outlets, you must wait until the power-on LED on the blade server flashes slowly before pressing the power-control button. BladeCenter HS20 Type 7981: Installation and User’s Guide... -
Page 47: Installing The Blade Server Bezel Assembly
Installing the blade server bezel assembly The following illustration shows how to install the blade server bezel assembly. Bezel-assembly release Bezel-assembly release Control panel Control-panel connector cable To install the blade server bezel assembly, complete the following steps: 1. Read the safety information beginning on page v and “Installation guidelines” on page 21. -
Page 48: Installing The Blade Server In A Bladecenter Unit
1 minute for a BladeCenter unit or 20 minutes for a BladeCenter T unit. 4. Make sure that the release handles on the blade server are in the open position (perpendicular to the blade server). BladeCenter HS20 Type 7981: Installation and User’s Guide... -
Page 49: Updating The Blade Server Configuration
5. Slide the blade server into the blade bay until it stops. The spring-loaded doors farther back in the bay that cover the bay opening move out of the way as you insert the blade server. 6. Push the release handles on the front of the blade server closed. 7. -
Page 50: Input/Output Connectors And Devices
Ethernet-compatible I/O-modules on the BladeCenter unit. Network signals to and from the blade server or any expansion cards are automatically routed to a same-network-interface I/O-module through circuitry in the BladeCenter unit. BladeCenter HS20 Type 7981: Installation and User’s Guide... -
Page 51: Chapter 4. Configuring The Blade Server
The IBM Remote Deployment Manager (RDM) Version 4.20 program is available for purchase. You can use IBM RDM Version 4.20 (or later) to install a BIOS code update onto a blade server by following the instructions in the documentation that comes with the RDM program. -
Page 52: Configuration/Setup Utility Menu Choices
– Remote Console Redirection Select this choice to enable Serial over LAN (SOL) and to set remote console communication parameters. – Video Select this choice to view information about the integrated video controller. BladeCenter HS20 Type 7981: Installation and User’s Guide... - Page 53 – System MAC Addresses Select this choice to set and view the MAC addresses for the Ethernet controllers on the blade server. v Date and Time Select this choice to set the system date and time, in 24-hour format (hour:minute:second). v System Security Select this choice to set a power-on password.
-
Page 54: Using Passwords
Configuration/Setup Utility menu. You can use any combination of up to seven characters (A–Z, a–z, and 0–9) for the password. Keep a record of your password in a secure place. BladeCenter HS20 Type 7981: Installation and User’s Guide... -
Page 55: Using The Serverguide Setup And Installation Cd
The ServerGuide Setup and Installation CD includes an easy-to-use setup and installation program that is designed for the IBM blade server. The ServerGuide program detects the blade server model and hardware options that are installed and uses that information during setup to configure the hardware. The ServerGuide program simplifies operating-system installations by providing updated device drivers and, in some cases, installing them automatically. -
Page 56: Setup And Configuration Overview
When you use the ServerGuide Setup and Installation CD, you do not need setup diskettes. You can use the CD to configure any supported IBM blade server model. The setup program provides a list of tasks that are required to set up the blade server. -
Page 57: Installing The Operating System Without Serverguide
If you have already configured the blade server hardware and you decide not to use the ServerGuide program to install the operating system, complete the following steps to download the latest operating-system installation instructions from the IBM Support Web page: 1. -
Page 58: Configuring The Gigabit Ethernet Controllers
Ethernet controller to an I/O-module bay for the blade server. Note: Other types of blade servers, such as the BladeCenter HS20 Type 8678 blade server, that are installed in the same BladeCenter unit as the BladeCenter HS20 Type 7981 blade server might have different Ethernet controller routing. -
Page 59: Configuring A Raid Array
Two SAS hard disk drives in the blade server can be used to implement and manage RAID level-0 (striping) or RAID level-1 (mirror) arrays in operating systems that are listed on the ServerProven list at http://www.ibm.com/servers/eserver/ serverproven/. For the blade server, you must configure the SAS RAID using the LSI Configuration Utility program. - Page 60 BladeCenter HS20 Type 7981: Installation and User’s Guide...
-
Page 61: Chapter 5. Installing The Operating System
2000 with Service Pack 3 applied. Instructions for creating a Windows 2000 Integrated CD are contained in the latest operating-system installation instructions for Windows 2000 on the IBM Support Web page. Important: 1. The operating system in the blade server must provide USB support for the blade server to recognize and use the keyboard, mouse, and removable media drives. -
Page 62: Using Rdm Version 4.20 Or Later To Install The Operating System
Downloading installation instructions To download operating-system installation instructions, complete the following steps: 1. Go to the IBM Support Web page at http://www.ibm.com/support. 2. From the Browse by product list, select Servers. 3. Under Select your product, from the Family list, select your server model;... -
Page 63: Chapter 6. Solving Problems
I/O-modules, removable media drives, and the blade servers, while the operating system is running. Real Time Diagnostics can be plugged into an existing IBM Director environment or installed without IBM Director present. For documentation and download information for Real Time Diagnostics, see http://www.ibm.com/servers/eserver/xseries/... -
Page 64: Post Beep Code Descriptions
All other beep 1. Make sure that the memory modules are installed correctly. codes 2. Turn off the blade server; then, restart the blade server. If the problem remains, call for service. BladeCenter HS20 Type 7981: Installation and User’s Guide... -
Page 65: Post Error Messages
POST error messages The following table provides an abbreviated list of the error messages that might appear during POST. See “Diagnostics” in the Problem Determination and Service Guide for your blade server type for more information about the POST error messages. -
Page 66: Serverguide Problems
(SAS RAID systems) or available. the ServerGuide System Partition is not present. Run the ServerGuide program and make sure that setup is complete. BladeCenter HS20 Type 7981: Installation and User’s Guide... -
Page 67: Troubleshooting Charts
Troubleshooting charts The following tables list problem symptoms and suggested solutions. See the Problem Determination and Service Guide for your blade server type for more detailed troubleshooting charts. If you cannot find the problem in these charts, run the diagnostic programs. If you have run the diagnostic test programs, or if running the tests does not reveal the problem, call for service. -
Page 68: Monitor Problems
Make sure that the monitor cable is connected to the video connector on the blank when you direct it to a management module. Some IBM monitors have their own self-tests. If you suspect a working blade server, or it problem with your monitor, see the information that comes with the monitor for goes blank when you start adjusting and testing instructions. -
Page 69: Mouse Problems
Mouse problems Symptom Suggested action The mouse does not work. v Make sure that the KVM select button LED on the front of the blade server is lit, indicating that the blade server is connected to the shared mouse. v Make sure that the mouse cable is securely connected to the management module and that the keyboard and mouse cables are not reversed. -
Page 70: Option Problems
Local power control for the blade server is enabled (use the management-module Web interface to verify), or the blade server was instructed through the management module (Web interface or IBM Director) to turn on. Note: For more information about IBM Director, see the IBM Director documentation on the IBM Director CD. -
Page 71: Service Processor (Bmc) Problems
Service processor (BMC) problems Symptom Suggested action The service processor reports Shut down the operating system and turn off the blade server; then, remove the a general monitor failure. blade server from the BladeCenter unit, wait for 30 seconds, reinstall the blade server in the BladeCenter unit, and restart the blade server. -
Page 72: Light Path Diagnostics Leds
LEDs. If the light path diagnostics power present LED is not lit when the light path diagnostics button is pressed, no power is available to light the blade-error LEDs, and they will be unable to provide any diagnostic information. BladeCenter HS20 Type 7981: Installation and User’s Guide... - Page 73 Table 7. Light path diagnostics Problem Action None An error has occurred and cannot be Check the system error log in the management isolated, or the service processor has module for more information about the error. failed. The error is not represented by a light path diagnostics LED.
- Page 74 BladeCenter HS20 Type 7981: Installation and User’s Guide...
-
Page 75: Appendix A. Getting Help And Technical Assistance
If you need help, service, or technical assistance or just want more information about IBM products, you will find a wide variety of sources available from IBM to assist you. This appendix contains information about where to go for additional information about IBM and IBM products, what to do if you experience a problem with your system or optional device, and whom to call for service, if it is necessary. -
Page 76: Getting Help And Information From The World Wide Web
Getting help and information from the World Wide Web On the World Wide Web, the IBM Web site has up-to-date information about IBM ® systems, optional devices, services, and support. The address for IBM xSeries BladeCenter information is http://www.ibm.com/eserver/xseries/. The address for IBM IntelliStation information is http://www.ibm.com/intellistation/. -
Page 77: Appendix B. Notices
Web sites. The materials at those Web sites are not part of the materials for this IBM product, and use of those Web sites is at your own risk. IBM may use or distribute any of the information you supply in any way it believes appropriate without incurring any obligation to you. -
Page 78: Trademarks
When referring to processor storage, real and virtual storage, or channel volume, KB stands for approximately 1000 bytes, MB stands for approximately 1 000 000 bytes, and GB stands for approximately 1 000 000 000 bytes. BladeCenter HS20 Type 7981: Installation and User’s Guide... -
Page 79: Product Recycling And Disposal
IBM makes no representations or warranties with respect to non-IBM products. Support (if any) for the non-IBM products is provided by the third party, not IBM. Some software may differ from its retail version (if available), and may not include user manuals or all program functionality. -
Page 80: Battery Return Program
United States, go to http://www.ibm.com/ibm/environment/ products/batteryrecycle.shtml or contact your local waste disposal facility. In the United States, IBM has established a return process for reuse, recycling, or proper disposal of used IBM sealed lead acid, nickel cadmium, nickel metal hydride, and battery packs from IBM equipment. -
Page 81: Electronic Emission Notices
Properly shielded and grounded cables and connectors must be used in order to meet FCC emission limits. IBM is not responsible for any radio or television interference caused by using other than recommended cables and connectors or by unauthorized changes or modifications to this equipment. -
Page 82: Taiwanese Class A Warning Statement
Taiwanese Class A warning statement Chinese Class A warning statement Japanese Voluntary Control Council for Interference (VCCI) statement BladeCenter HS20 Type 7981: Installation and User’s Guide... -
Page 83: Index
35 opening 23 I/O expansion card BMC 5704S Gigabit Ethernet card description 31 daughter card 32 daughter card I/O-expansion card I/O expansion card 32 installing 31 description IBM Director 8, 10 DIMM error LED 18 © Copyright IBM Corp. 2006... - Page 84 30 installing 28 RDM, using 50 problem 55 reliability specifications 7 features 9 microprocessor error LED Remote Deployment Manager, using 50 description 18 remove SAS drive option 25 remove blade server 22 BladeCenter HS20 Type 7981: Installation and User’s Guide...
- Page 85 removing blade bezel assembly 27 United States electronic emission Class A notice 69 SAS hard disk drive 25 United States FCC Class A notice 69 requirements updating firmware 45 hardware 4 using hardware and software 4 jumpers 16 software 4 switches 16 utility Configuration/Setup Utility program 39...
- Page 86 BladeCenter HS20 Type 7981: Installation and User’s Guide...
- Page 88 Part Number: 31R1715 Printed in USA (1P) P/N: 31R1715...
Need help?
Do you have a question about the BladeCenter HS20 and is the answer not in the manual?
Questions and answers