
Subscribe to Our Youtube Channel
Related Manuals for Kasco CERTISAFE RM-100


Summary of Contents for Kasco CERTISAFE RM-100
- Page 1 RM-100 FLOOR MOUNT Assembly & Installation Manual Document number 852111 Document version number 2021.2.0 800 Deere Rd. Prescott, WI 54021 | 715.262.4488 | sales@kascomarine.com | kascomarine.com RM-100 FLOOR MOUNT MANUAL...
-
Page 2: Table Of Contents
TABLE OF CONTENTS Safety First �������������������������������������������������������������������������������������������������������������������������������2 Product & Installation Overview �������������������������������������������������������������������������������������������3 Suggested Tools and Supplies �����������������������������������������������������������������������������������������������3 Parts Included List ������������������������������������������������������������������������������������������������������������������4 Parts Included Illustration �����������������������������������������������������������������������������������������������������5 Base Assembly ������������������������������������������������������������������������������������������������������������������������6 Retrieval Chain Attachment - Mixer Side �����������������������������������������������������������������������������7 Cord Attachment - Mixer Side �����������������������������������������������������������������������������������������������8 Tank Penetration ��������������������������������������������������������������������������������������������������������������������9 Assembled Unit Installation ������������������������������������������������������������������������������������������������11 Mixer Maintenance Recommendations �����������������������������������������������������������������������������13... -
Page 3: Safety First
Back to Contents SAFETY FIRST IMPORTANT: PLEASE READ THIS MANUAL AND SAVE FOR FUTURE REFERENCE WARNINGS: Moving Machinery Shock Hazard • Under NO circumstances should anyone enter the water with the mixer connected or in operation. • Running the unit out of water will create a dangerous situation and damage the seals. •... -
Page 4: Product & Installation Overview
• Please consult your CertiSafe™ sales representative for mixer mount placement, retrieval, and inspec- tion requirements. Some parts will arrive pre-assembled from Kasco; however, all assembly steps are listed for reference. RM-100 FLOOR MOUNT MANUAL... -
Page 5: Suggested Tools And Supplies
Back to Contents SUGGESTED TOOLS AND SUPPLIES Electric or cordless drill 3/8” drill bit 7/8” hole saw 1/2” socket or 1-7/64” wrench (for 10 AWG cord) hole saw Half-round metal file Pan to catch shavings 1/8” Allen wrench 10mm wrench 7/16”... -
Page 6: Parts Included List
Back to Contents PARTS INCLUDED LIST Assembly Item Description Qty Part No. Base CertiSafe™ mixer base leg 997200 5/16” serrated flange screw 566206 5/16” nylon locknut 566202 1/4” shoulder screw 451110 1/4” flat washer 566208 1/4” nylon locknut 566212 Retrieval Long retrieval chain - 50 ft. -
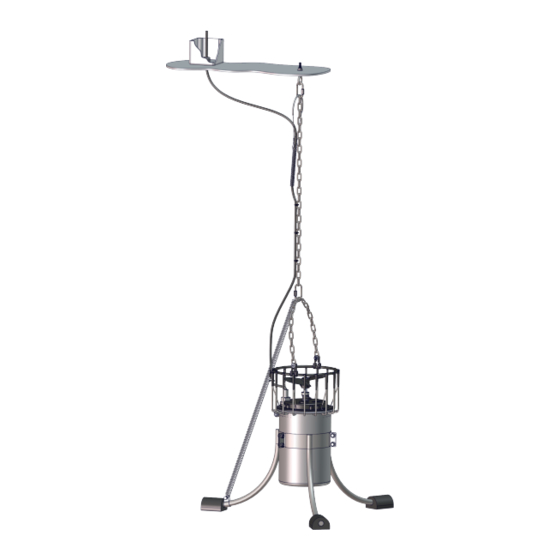
Page 7: Parts Included Illustration
Back to Contents PARTS INCLUDED ILLUSTRATION Steel tank roof RM-100 FLOOR MOUNT MANUAL... -
Page 8: Base Assembly
Back to Contents BASE ASSEMBLY 1. Assemble the three mixer base legs loosely to each other using six 5/16” flanged screws (B) and 5/16” nylon locknuts (C). 2. Place the mixing unit upside down on the foam packing from the mixer unit box, if available. 3. -
Page 9: Retrieval Chain Attachment - Mixer Side
Back to Contents RETRIEVAL CHAIN ATTACHMENT - MIXER SIDE 1. Place the unit upright on the legs of the base assembly. 2. Insert each end link of the short retrieval chain (J) into a tab slot on the cage top ring. 3. -
Page 10: Cord Attachment - Mixer Side
Back to Contents CORD ATTACHMENT - MIXER SIDE 1. Use zip ties (P) to attach the power cable first to the cage and then to the long retrieval chain. Ensure there is enough gathered slack in the cable so that when the assembled unit is lowered into the tank, its weight is on the chain and not the cable. -
Page 11: Tank Penetration
Back to Contents TANK PENETRATION • The maximum tank roof thickness accommodated by the tank penetration parts included is 1/8”. • Suggested measurements are based on a 24” square access hatch. Tank hatch center point Ø 7/8” 4” Ø 3/8” 1. - Page 12 Back to Contents TANK PENETRATION (CONT.) 8. Fit a flat washer (S) and then the sealing washer (T) onto the eye bolt (Q). 9. From the tank interior, insert the eye bolt (Q) with washers (S, T) through the 3/8” hole. 10.
-
Page 13: Assembled Unit Installation
Back to Contents ASSEMBLED UNIT INSTALLATION With the mount, retrieval chain, and cord affixed to the mixer and the tank roof penetration complete, the entire assembled unit is ready for installation. 1. As a precaution against dropping the chain, attach the last link of the long retrieval chain (G) to the top connecting link (H) prior to lowering the CertiSafe™... - Page 14 8. Tighten the top nut on the cord grip (U) to seal the power cable penetration. 9. Terminate the power cable into an exterior junction box (not supplied by Kasco). RM-100 FLOOR MOUNT MANUAL...
-
Page 15: Mixer Maintenance Recommendations
• Replacing the seal and changing the oil every 3-5 years will add reliability and longevity to the mixer. • Seal replacement and all other repair services should be performed by Kasco Marine. Electrical Troubleshooting • If a unit fails to operate, you can use a series of simple checks to determine the general cause. -
Page 16: Mixer Warranty
(for return delivery of the repaired unit), daytime phone number, and an e-mail address for correspondence regarding the warranty claim. Any expedited shipping method for the return of the unit is at the customer’s expense. Kasco Marine will return units repaired under warranty at our expense via ground freight within the continental United States. -
Page 17: Non-Warranty Repairs
This request should include a daytime phone number and e-mail address. Estimate options are as follows: • Kasco contacts the customer with a repair total after we evaluate the unit, but before we perform the work quoted. •... -
Page 18: Repair Contact Form
Back to Contents REPAIR CONTACT FORM • Kasco requires that all equipment sent for repair MUST be accompanied by this form and marked to Repairs attention. Kasco Marine • Unit should be cleaned before shipping. 800 Deere Road • Kasco is NOT responsible for shipping damage accrued in Prescott, WI 54021 return shipment.
Need help?
Do you have a question about the CERTISAFE RM-100 and is the answer not in the manual?
Questions and answers