PRÜFTECHNIK VIBXPERT II Operating Instructions Manual
Balancer vibration analysis
Hide thumbs
Also See for VIBXPERT II:
- Operating instructions manual (176 pages) ,
- Short instructions (28 pages) ,
- Short instructions (26 pages)
Table of Contents
Advertisement
Quick Links
VIBXPERT
Balancer
Vibration analysis
Field balancing
in 1 or 2 planes
Operating
Instructions
Series: VIB 5.310
Firmware version: 3.2x
Edition: May 2012
Order no.: LIT 53.203.EN
Translation of the original manual (german)
II
®
Dear customer,
We are grateful for your trust and hope that
you are happy with our product. If you have
any suggestions for improving this product
or this instruction manual, please let us know.
PRÜFTECHNIK Condition Monitoring
Fax: +49 89 99616-300
eMail: info@pruftechnik.com
Advertisement
Table of Contents

Subscribe to Our Youtube Channel
Related Manuals for PRÜFTECHNIK VIBXPERT II


Summary of Contents for PRÜFTECHNIK VIBXPERT II
- Page 1 VIBXPERT ® Balancer Vibration analysis Field balancing in 1 or 2 planes Operating Instructions Dear customer, Series: VIB 5.310 Firmware version: 3.2x We are grateful for your trust and hope that you are happy with our product. If you have any suggestions for improving this product or this instruction manual, please let us know.
- Page 2 PRÜFTECHNIK. This specially for field balancing designed instrument is based on the VIBXPERT II platform, which is used worldwide by many technicians for mobile data acquisition and signal analysis. The 'Balancer' is distinguished by its efficiency and ease of use. The measurement process implemented in the instrument is based on the well-known "influencing coefficients method"...
- Page 3 • Fully networkable • PC connection via USB, Ethernet, RS232. And if you want more from your Balancer ..then upgrade to the VIBXPERT II FFT data collector and signal analyzer. Just enter the password! * VIBXPERT is protected by the follow- ing US patents: US 4,800,512 VIBXPERT II Balancer* from PRÜFTECHNIK once again demonstrates...
- Page 4 Foreword About this manual VIBXPERT II Balancer is also referred to as 'VIBXPERT', 'Balancer' and 'device' in these operating instructions. If you don't have this manual handy, open the online help in the de- vice with the HELP key. This manual is valid for Firmware Version 3.2x.
-
Page 5: Table Of Contents
Contents Contents Chapter 1: Introduction ............1-8 Delivery package ................1-9 Safety and operating notes............1-10 Chapter 2: Getting started ..........2-1 Overview ..................2-1 Keyboard ....................2-2 Status display per LED ..................2-2 Notes on operation ..............2-3 Interfaces ...................2-5 Power supply................2-7 Charging the battery in the device ...............2-7 Charging in the external charging station ............2-8 Carrying pouch - VIB 5.356 ............2-9 Belt ......................2-9... - Page 6 Contents Changing the sensor ..................3-5 Setting up a new measurement task ............3-6 Creating a new setup ..................3-6 Entering an Event/Comment ..............3-14 Trend..................3-15 Results ..................3-16 Result details .....................3-16 Characteristic overall value - single values ..........3-16 Characteristic overall values - trending ............3-17 Time waveform ..................3-18 Amplitude / Envelope Spectrum ..............3-20 3D display of spectra: Waterfall diagram ............3-23...
- Page 7 Contents Chapter 5: Appendix ............5-1 Numerical editor.................5-1 Text Editor ..................5-2 File Manager ................5-3 Functions of the MENU key .................5-3 Printing out the PDF file ................5-4 Transferring a PDF file on a USB pendrive .............5-4 VIBXPERT utility ................5-5 Installing and starting the program ..............5-5 Registering optional functions ..............5-6 Setting up a connection with VIBXPERT ............5-7 Configuring VIBXPERT .................5-7...
-
Page 8: Chapter 1: Introduction
PRÜFTECH- NIK agent immediately. VIB 5.310 B VIBXPERT II 'Balancer' package VIB 5.310 VIBXPERT II FFT data collector, incl. battery (VIB 5.325) VIB 5.317-B Firmware-Zertifikat ‚Balancer‘ VIB 5.320-INT Charger VIB 5.328... - Page 9 VIBXPERT II Balancer Delivery package VIBXPERT II 'Balancer' package VIB 5.310 B VIB 5.328 VIB 8.970 LIT 01.800 VIB 5.310 VIB 5.356 VIB 5.320-INT VIB 6.147 VIB 3.420 VIB 5.330 SUSB VIB 5.436 VIB 6.631 VIB 6.632 VIB 3.306 VIB 5.437-2,9 VIB 5.339...
-
Page 10: Safety And Operating Notes
1-10 Safety and operating notes Safety and operating notes Read this section carefully, paying especially close attention to the safety notes, before working with the device. Symbols used Danger to life and limb! WARNING! Operating errors that can lead to data loss or equipment damage. - Page 11 1-11 Safety and operating notes • If the rotor is in a protective housing, any gaps in the housing must be closed before switching on the machine. • The permitted switch-on frequency of the machine may not be Attention! exceeded. Otherwise, the motor could be damaged. • The cause of the imbalance must be determined before balancing, and must be corrected if necessary (e.g. remove any caking on the rotor, weld any cracks on the impeller or replace the impeller). • VIBXPERT may only be operated if it is undamaged, dry and clean.
- Page 12 1-12 Safety and operating notes Nameplates The diagram below shows the locations and the contents of the device nameplate and the battery nameplate (standard version). VIB 5.310 00100 Nameplate for the VIBXPERT device with serial number ('S.No.') Nameplate for the rechargeable battery with with serial number and 00100 safety notes...
-
Page 13: Chapter 2: Getting Started
Getting started Chapter 2: Getting started Overview The illustrations show the interfaces and operating elements: Full color display - large, backlit, high contrast. Ambient light sensor con- trols keyboard illumination. Four LEDs indicate: - Alarm condition - Measurement error - Battery charge status. Keyboard - ergonomic, backlit. Memory card (built-in) 2 MB, replaceable. -
Page 14: Keyboard
Getting started Keyboard The keys can be comfortably operated with the thumb of the right hand. In a dark environment the keyboard illumination automatically turns on. Plus (+) / Minus (-) key Additional (ENTER) key on - Zoom for X axis the rear panel (p. -
Page 15: Notes On Operation
Getting started - Operation Notes on operation To keep operation as simple and intuitive as possible, the graphical user interface guides the user step-by-step and is based on the 'Micro- soft Windows' operating concept. Switch on / off Switching on VIBXPERT To switch on the device, hold the On/Off key down for two seconds. VIB XPERT is ready for operation when the start screen appears. - Page 16 Getting started - Operation Menu The functions of the current program section are found in the 'Menu' which is displayed with the MENU key and hidden again with the ESC key. An arrow next to a menu entry indicates a further submenu. To open it, press the right navigation key. Help Tips and operating instructions are available for every screen in the program.
-
Page 17: Interfaces
Getting started - Interfaces Interfaces The connections for the sensor and data cables are located on the front of the measurement device. The cable connectors and sockets are colored for easy identification. To unplug the connector, push the connector sleeve backwards to re- lease the lock. - Page 18 Getting started - Interfaces Digital The yellow channel is used as the: - Input for digital signals from a trigger or a RPM sensor - Serial interface for data transmission (RS 232) - Output for stroboscope control (TTL signal) The permissible range for trigger signals is: -26V ... 0V (negative) or -5V ... +26V (positive). Attention! Switching threshold positive: max. 2.5V rising min. 0.6V falling Switching threshold negative: min. -8V rising max. -10V falling The input signal must not exceed the switching threshold of the positive and negative range as otherwise incorrect measurements can occur.
-
Page 19: Power Supply
Getting started - Power supply Power supply VIBXPERT is supplied with energy by a Lithium-Ion rechargeable bat- tery. With the power on the the battery icon on the display indicates the residual charge of the battery: Battery is being charged Battery icon Residual charge 100% Residual charge 25% Battery almost empty If the battery is almost empty, a message appears on the display and the blue LED flashes. -
Page 20: Charging In The External Charging Station
Getting started - Power supply During extended periods of non-use and during storage, connect VIB- XPERT regularly to the mains supply. This prevents the battery from becoming completely discharged, and the date and time settings are retained. • Do not use damaged batteries! • Do not send back damaged batteries! • Do not use force to open the battery or throw it in the fire! Attention! • Do not short-circuit connection contacts! -
Page 21: Carrying Pouch - Vib 5.356
Getting started - Carrying pouch Carrying pouch - VIB 5.356 The stable and functional carrying pouch allows safe and convenient transport of the measurement device. A belt and a hand strap can be attached to the pouch: Belt Fasten the belt to the two diagonally opposite eyelets. Adjust the belt length so that the measurement device hangs comfortably from the shoulder to allow convenient operation. -
Page 22: Memory Card
2-10 Getting started - Memory card Memory card A CompactFlash (CF) card with 2 GB memory capacity is installed in the VIBXPERT as standard. If required, the standard card can be replaced by a card with greater memory capacity. Backup all data before replacing the card using the 'VIBXPERT util- ity' program (see page 5-5)! When closing the cover, it must be additionally sealed with a sili- Attention! - Page 23 2-11 Getting started - Memory card • Coat the groove along the edge of the card compartment cover with a small amount of silicone adhesive (NOVASIL S-11) and re- place the cover. Remove any excess adhesive with a cloth. Note Notch for silicone adhesive (framed) The cover can also be replaced without silicone adhesive.
-
Page 24: Basic Settings - Device Setup
2-12 Getting started - Basic settings Basic settings - Device Setup Before carrying out measurements with VIBXPERT, the basic settings in the 'Device Setup' should be checked and changed if necessary. • Switch on VIBXPERT. • Click on 'Device Setup' in the start screen. The 'Device Setup' screen appears. -
Page 25: Display Settings, Switchoff And Additional Options
2-13 Getting started - Basic settings Display settings, switchoff and additional options • Click on 'Display' in the 'Device Setup' screen. : Press the navigation key right or left until the desired rightness brightness is achieved. To accept the setting, press 'Enter'. : The display/ the device auto- witch Backlight off uto power off matically switches off if no action occurs within the turn-off time... -
Page 26: Transducers
2-14 Getting started - Basic settings Transducers The transducer menu (see below) contains all of the functions and pre settings for the transducer. Click on 'Transducers' to open the menu. Available transducers in VIBXPERT The measurement-relevant parameters for many transducers are stored in VIBXPERT. - Page 27 2-15 Getting started - Basic settings Filtering the transducer list The transducer list can be can filtered according to specific criteria: • Press the MENU key. • Click on 'Find'. • Press the right navigation key wto open the associated submenu. The following criteria can be selected here: Display all transducers Display factory-configured transducers only actory Display user-configured transducers only Display preselected transducers as 'available' only vailaBle : Display the transducers for a specific measurement quantity quantity only; the measurement quantity is selected in the associated submenu (see below).
- Page 28 2-16 Getting started - Basic settings Tranducer detection and Hardware settling In this menu, the transducer detection feature and the settling of the amplifier stages in VIBXPERT can be switched on and off. The settling of the amplifier can only be activated when the trans- ...
- Page 29 2-17 Getting started - Basic settings Keyphaser Here you can extend the time limit set for rpm measurements and phase measurement to enable measurements on very low-speed ma- chines (range: 10 ... 30 s, default: 10 s). In coast-down measurements the time limit is automatically set in relation to the stop speed. The 'Active edge' option is used to define whether the edge of the incoming trigger mark or outgoing trigger mark on the shaft is to be used as the reference signal.
-
Page 30: Language
• Confirm the resulting message to restart the application (see be- low). Communication Settings for network communication, see page 2-28. Registration For upgrading to VIBXPERT II you have to register the modules 'VIB- XPERT - 1 channel', 'VIBXPERT - 2 channels' and 'Balancing'. The corresponding password can be found on the associated registration certificate: • Click on 'Registration'. -
Page 31: Units
2-19 Getting started - Basic settings Units The units - where appropriate - are set to SI units in the factory. To change the unit for the respective measurement quantities, proceed as follows: • Click on 'Units'. • Select the units for the measurement quantities. The accuracy in decimal places appears in the lower area of the win- dow for the current unit as well as the conversion factor for the asso- ciated SI unit. -
Page 32: Key Controls
2-20 Getting started - Basic settings Key controls Additional functions are activated for some keys in VIBXPERT as stan- dard that are intended to ease working on-site on the machine or to increase data security. • Click on 'Key controls'. The following options can be activated or deactivated in the next screen: Additional key on the rear panel VIBXPERT has an additional input key on the rear panel which can be... -
Page 33: Printer
2-21 Getting started - Basic settings Printer With VIBXPERT, you can print out measurement results, reports and PDF file directly on a USB-printer. • Click on the 'Printer settings' icon to open the Printer menu. Setting up a printer To set up a new printer, proceed as follows: • Click on the 'Printer settings' icon to open the 'Printer settings' menu (see below). • Select the top menu, press the MENU key and click on 'New' (see below). • Select your printer type. • Enter a name in the text editor. • Then set the print parameters: Resolution, paper format and - depending on the printer type - the color model and paper source. - Page 34 2-22 Getting started - Basic settings Deleting a print job • Click on 'Print queue' in the 'Printer settings' menu. • Select the print job in the list. • Press the MENU key and click on 'Delete job'. If a print job is being processed, a print icon appears at the top edge of the screen. Print job is being processed Connecting the printer Only printers with a USB interface can be connected to VIBXPERT. Use the USB cable available as an accessory for I/O devices to connect the printer (VIB 5.3330 MUSB).
-
Page 35: Service Menu
2-23 Getting started - Basic settings Service menu • Click on 'Service' to open the Service main menu (see below). A series of functions are available for service, maintenance and train- ing purposes. For clarity, the settings are grouped into submenus: Device Info This menu contains device information for service and repair as well as the date of the next offset compensation and calibration (for more details, see also p. 5-10). - Page 36 2-24 Getting started - Basic settings • Click on the respective tree entry and confirm the resulting prompt with 'OK'. • For reasons of security, the word 'OK' must be entered a second time in the text editor before the action can be carried out. Demo For training or demonstration purposes, the VIBXPERT screen display can be shown on a PC monitor with the aid of the VIBXPERT demo program.
-
Page 37: Memory Card (Cf)
2-25 Getting started - Basic settings To backup the log file on the memory card in the VIBXPERT, click on the 'Backup Log' icon and confirm the prompt with 'Yes'. The log file can be transferred to the PC using the 'VIBXPERT update tool'. Memory card (CF) In this menu, you can format, check and repair the memory card. -
Page 38: Data Transfer
2-26 Getting started - Data transfer Data transfer The following data is transferred between VIBXPERT and the PC: - Measurement tasks to VIBXPERT (route) - Software (update) - Printer drivers to VIBXPERT - Data backup to the PC - Data restore to VIBXPERT - PDF and screenshots to the PC For transferring the data use the 'VIBXPERT utility' tool found on the PRÜFTECHNIK CD. -
Page 39: Network Connection
2-27 Getting started - Data transfer Network connection Data transfer via an Ethernet network requires the following compo- nents and information: - Network connection - Ethernet cable for VIBXPERT (VIB 5.331). - PC with network interface card connected to the network/hub - IP address and subnet mask of the PC in the network (lan): Connect the Ethernet cable VIB 5.331 to etwork connection the communication port (green) and network socket. -
Page 40: Setting Up The Network Communication
2-28 Getting started - Data transfer Setting up the network communication • Connect VIBXPERT to the network (see previous page). • Switch on VIBXPERT. • Click on 'Device Setup' in the start screen, and then on 'Ethernet': • Enter a valid IP address for VIBXPERT: Take the first three numbers of your PC's IP address and change the last number only (see also the following instructions). Make sure that the IP address for VIBXPERT is not already allocated in the network. -
Page 41: Ip Address Of The Local Pc In The Network
2-29 Getting started - Data transfer IP address of the local PC in the network If the IP address and the subnet mask of the PC are not known, ask your network administrator or find it yourself on the PC: Open the DOS box on your PC: • Click on “Start” and then on “Execute”. • Enter “cmd” (under Windows 2000 / XP). • Enter “ipconfig -all” in the DOS box. Windows START menu DOS box Example: The screen displays the IP ad- dress and the subnet mask of a PC in a... -
Page 42: Entering A Fix Ip Address For The Local Pc
2-30 Getting started - Data transfer Entering a fix IP address for the local PC You must assign a fixed IP address to the computer if you connect the computer directly to the measurement device with a patch cable: • From the START menu, select SETTINGS, choose NETWORK and DIAL-UP CONNECTIONS. • Right-click on LOCAL AREA CONNECTION and select PROPER- TIES. -
Page 43: Update
2-31 Getting started - Update Update The current device software for VIBXPERT can be downloaded from the PRÜFTECHNIK homepage* in the Internet. *http://www.pruftechnik.com The update file is compressed in a ZIP archive that first has to be un- packed after it is downloaded to your PC. It is recommended to load the software update onto the device via Ethernet or USB because the serial connection is slower. - Page 44 2-32 Getting started - Update • In the next step ('3') select the update file on the PC. This file has already been downloaded as an archive file (*.zip) from the PRÜFTECHNIK homepage and unpacked to a temporary folder. The file name includes the version number (e.g. 'VXP2_300_ build638.ptz') and the extension 'ptz'. • Click on <Next>: • In the next step (‘4’) click on <Download> to start the data trans- fer to VIBXPERT. • After the data transfer has finished, click on <Close> to close the program. • The device switches itself on and off repeatedly until the update is completed. This process generally takes a few minutes. Wait for the VIBXPERT start screen to appear.
-
Page 45: Chapter 3: Vibration Analysis
Vibration analysis Chapter 3: Vibration analysis With a vibration analysis you can determine whether an imbalance may be the cause for increased machine vibrations. Resonance tests and phase measurements assist you in the diagnosis and help you to determine the optimum operating conditions for the rotor. For this purpose VIBXPERT provides a comprehensive collection of vibration measurement tasks in the 'Multimode' operating mode. -
Page 46: What Is A Measurement Task
Vibration analysis: Measurement task What is a measurement task? To carry out a measurement, VIBXPERT requires information on the type of measurement*, the sensor being used and, if necessary, data for the evaluation of the result. Information as to whether the RPM must be recorded with each measurement is also required. -
Page 47: Measurement, Analysis, Diagnosis
Vibration analysis: Measurement Measurement, Analysis, Diagnosis Preparation Before beginning a measurement, ensure that ..the battery is fully charged ... the device settings are set properly (date, units, ..) ... the required tasks are created and stored in VIB XPERT.. -
Page 48: Save Result
Vibration analysis: Measurement Initiate live mode manually Keep the 'Enter' key pressed when the measurement starts. The actual data collection begins when you release the 'Enter' key. If the live mode starts automatically, the ‘Live’ symbol appears in the title bar and the progress bar remains at 0% (see below). Note Before every measurement, VIBXPERT checks that the sensor and cables are correctly connected if sensor detection is activated in the... -
Page 49: Options Before, During And After A Measurement
Vibration analysis: Options Options before, during and after a measurement Aborting a measurement • Press the ESC key during the measurement. Repeating a measurement • In the results screen, press 'Enter', or ... • Press the MENU key in the results screen and click on 'Remeasure'. Changing the measurement channel Multimode: • Highlight the measurement type in the selection screen. • Press the MENU key, and click on 'Task manager'. • Click on the 'Measurement Channel' field to activate it (see below) and then select the measurement channel (A, B , A/B). • To save the change, press the MENU key and click on 'OK'. -
Page 50: Setting Up A New Measurement Task
Vibration analysis: Options Setting up a new measurement task User-defined measurement tasks cannot be created for the mea- surement types 'amplitude spectrum' and 'envelope spectrum'. Note To configure a new measurement task, proceed as follows: • Highlight the measurement type in the selection screen. • Press the MENU key and click on 'Task Manager'. The Task Man- ager appears and can be used to set up the new measurement task (see P . 3-2). - Page 51 Vibration analysis: Options • Enter a name in the text editor. • Then set up the Setup parameters: - Press the MENU key. - Click on 'Edit'. - Change the parameters as required: see sections A to D on the following pages. • To save, press the MENU key and click on 'OK'. How to review the setup parameters: • Open the 'Task Manager' • Select the setup in the respective pull-down menu. *'Show' appears for factory-defined • Press the MENU key, and click on 'Show*' or 'Edit*'. setups whose parameters cannot be edited.
- Page 52 Vibration analysis: Options A. Measurement setup parameters easurement quantity The measurement quantity is fix and is defined via the measure- Acceleration, low-speed ment icon. Exception: The measurement quantity can be changed for the ‘Impact test’, ‘Phase’ and ‘Coastdown’ measurement tasks. ample frequency ime waveform The sample frequency defines the maximum upper frequency and influences the maximum measurement time.
- Page 53 Vibration analysis: Options verlap Percentage by which consecutive measurements overlap. Overlap = 0%, the total measurement time is: number of averages x measurement time; Overlap > 0%, the total measurement time is accordingly shorter. For the runup / coastdown curve, the number of usable measure- ments can be increased by selecting a higher overlap. ime synchronous averaging hase oastdown alancing In this type of averaging, the time signals of each individual rota- tion are averaged to reduce non-synchronous components in the...
- Page 54 3-10 Vibration analysis: Options ulse per rev with measurement Number of measurement marks on the shaft or coupling. easurement range all viBration measurements *'Fixed range', e.g. for a runup / coast- The measurement range for the analog channel can be automati- down curve or impact test.
- Page 55 3-11 Vibration analysis: Options * (e ilter nvelope * Parameter is fix : Envelope calculation using a software algorithm. oftware hp/lp f * (e ): 800 Hz / 10 kHz ilter nvelope * (e ): 8 emodulation factor nvelope Ratio of the highpass frequency prior to demodulation to the low- pass frequency after demodulation. *, i umBer of lines pectrum...
- Page 56 3-12 Vibration analysis: Options Transducer setup parameters If you have defined a default sensor for vibration measurements (see p. 2-22), the ‘Sensor Setup’ menu is deactivated. Note quantity Measurement quantity of the sensor: vibration acceleration, veloc- ity, displacement, current, RPM, user-defined quantity ignal type Signal type of the sensor (e.g. LineDrive, ICP , voltage) nput voltage range Voltage / current range for transducers of the signal type 'Voltage', Current', 'ext.
- Page 57 3-13 Vibration analysis: Options C. Evaluation parameters for overall value / time waveform meas. For characteristic overall value measurement tasks, which are mea- sured according to ISO 10816-3, the corresponding thresholds are stored in fixed evaluation setups. For all other measurement tasks, create a user-defined evaluation setup.
-
Page 58: Entering An Event/Comment
3-14 Vibration analysis: Options Entering an Event/Comment You can record information relating to data collection using pre- defined events* and freely editable comments. Up to 10 events can be * Import user-defined events via OMNI- assigned to every measurement result. TREND. Assigning an event • In the result screen press the MENU key and click on 'Event/Com- ment' (see below). The event editor appears. • Select the relevant event or events in sequence. The selection is listed in the lower event window. -
Page 59: Trend
3-15 Vibration analysis: Trend Trend The standard procedure for monitoring machine conditions is the regular recording of characteristic overall values over a longer period of time. The trend of the machine condition can be traced back from the resulting trend curve and its probable development in the future can be predicted. -
Page 60: Results
3-16 Vibration analysis: Results Results After each measurement, it is possible to save the results and to evalu- ate them on the device. Numerous functions that can be called up with the MENU key in the results screen are available for this purpose (see below). Result details The following information can be displayed: - Measurement Task, Measurement Channel, Measurement Range, - Sensor Type, Date/Time, Status - Statistical Data (for overall values only) • Press MENU and click on 'Result Details'. -
Page 61: Characteristic Overall Values - Trending
3-17 Vibration analysis: Results Characteristic overall values - trending If more than two measurements are saved in a file, the results for each overall value are displayed as a trend curve. Markers on the trend curve indicate each individual measurement. The measurement values at the cursor position, the date, the rpm if applicable, and assigned events and comments are specified below the diagram. Use the F key to display the individual results. -
Page 62: Time Waveform
3-18 Vibration analysis: Results Time waveform The measurement results are displayed in the top section of the win- dow. The data field in the lower half lists the two highest amplitudes (positive & negative). If a threshold value is exceeded, the absolute value and the difference to the measurement value is displayed ('del- ta', see below). - Page 63 3-19 Vibration analysis: Results : Show/hide delta cursor elta Press 'Enter' to switch over between main and delta cursor. In this case the measurement can only be repeated via the MENU key (MENU - 'Remeasure')! The cursor coordinates indicate the distance to the main cursor. The data field specifies the frequency which corresponds to the distance between the main and delta cur- sor (see below).
-
Page 64: Amplitude / Envelope Spectrum
3-20 Vibration analysis: Results Amplitude / Envelope Spectrum The spectrum is displayed in the upper pane. After the measurement, additional data can be displayed in the lower window pane. • Press the MENU key. • Select 'Info', and click on the desired data set. Info / Max 10 Lists the 10 highest amplitudes in the spectrum. Click on an entry to set the cursor to the corresponding line of the spectrum. - Page 65 3-21 Vibration analysis: Results Stroboscope Enable this feature if you want to control a strobe light with the fre- quency at the main cursor position. Move the cursor in the spectrum, to change the flash rate. You can use a strobe light to visually slow the movement of an object, making it easier to analyze, check for proper procedures Note and find undesirable vibration sources.
- Page 66 3-22 Vibration analysis: Results Cursor • Press the MENU key and click on 'Cursor' (see below) : See 'Time waveform', page 3-18. elta : The harmonic cursor is used to assign harmonics in the armonics spectrum. The spacing of the individual cursors to one another corresponds to the basic frequency at the main cursor. To adjust this, the main or the delta cursor (highest displayed order) can be moved.
-
Page 67: Display Of Spectra: Waterfall Diagram
3-23 Vibration analysis: Results 3D display of spectra: Waterfall diagram If several spectra were recorded for one measurement task (max. 75), these appear in a 3-dimensional diagram - the waterfall diagram. Navigation Navigate through the individual spectra. Move the cursor along the frequency axis. Change view To rotate the waterfall diagram change the display mode: • Press the MENU key and click on ‘Resize display field’. Use the navigation keys to do the following: tilt the diagram around the frequency axis. - Page 68 3-24 Vibration analysis: Results Which of the two axes (X or Z) can be zoomed is displayed by a flash- ing bar along the edge. - If the right bar flashes, the Z-axis can be zoomed with the naviga- tion keys. - If the upper bar flashes, the X-axis can be zoomed with the + / – key. To change the active axis, press the MENU key and click on ‘Zoom > X-axis’ or ‘Zoom > Z-axis’. Evaluating individual spectra (2D view) For the evaluation of an individual spectrum, proceed as follows: • Highlight the relevant spectrum with the cursor.
-
Page 69: Sound Spectrum: Third-Octave And Octave Level Diagram
3-25 Vibration analysis: Results Sound spectrum: third-octave and octave level diagram VIBXPERT makes the sound spectrum available for the display and evaluation of acoustic signals. The signal picked up by the micro- phone is broken down in the frequency domain into bands with a constant relative band width (octave bands or third-octave bands). - Page 70 3-26 Vibration analysis: Results The reference value unit corresponds to the measurement quantity set in the spectrum. The unit can only be changed for user-defined Note quantities. • Set a suitable evaluation filter (decibels (A),(B), (C) or (D)). If you do not wish to evaluate the sound pressure level with a filter, set ‘decibel’.
-
Page 71: Display Setup
3-27 Vibration analysis: Display setup Display Setup In the Display Setup you set up the view in the results screen. You can open the setup before or after the measurement: In the Results screen, after a measurement: • Press the MENU key and click on 'Display Setup'. Before a measurement, in the task selection screen (see below): • Highlight the measurement task symbol. • Press the MENU key and highlight the 'Display Setup' entry. • Press the navigation key right and click on 'Measurement' or 'Trend' respectively (see below). Depending on the measurement type you can set the following pa- rameters: X. - Page 72 3-28 Vibration analysis: Display setup : Speed or step size when zooming : The values on the trend curve can be identified with markers. ayout A grid can be displayed for easier evaluation of the data and the cursor can be displayed as a cross (short) or line cursor (long). B1. Display Setup for measurement: Spectrum / Time waveform : Step size when zooming the X and Y-axis.
- Page 73 3-29 Vibration analysis: Display setup B2. Display Setup for Trend: Spectrum (Waterfall diagram) & a : s. section B1; in a waterfall diagram, a grid can be ursor mplitude superimposed for easier evaluation of the data. C1. Display Setup for measurement: Coastdown, Orbit, Phase The following sections C to E only describe the parameters specific to the measurement type. Global display parameters, such as 'Zoom' and 'Cursor', can be found in sections A and B.
-
Page 74: Reports
3-30 Vibration analysis: Reports Reports The print function in VIBXPERT enables printouts of the following reports: - Screenshots - Measurement reports To be able to print directly on a printer from VIBXPERT, you require: - A printer with USB connection - A VIBXPERT USB printer cable (VIB 5.330 MUSB, accessory) Reports in PDF format can be transferred to a PC, where they can then be printed. The following options are available for this function: - Data transfer via VIBXPERT Utility Program (p. 5-8f.). -
Page 75: Measurement Reports
3-31 Vibration analysis: Reports Measurement reports A measurement report is used to create detailed documentation on a measurement. The report contains the results, general information on the operator and additional measurement information. Measurement reports are available for the following measurements: pectrum ime waveform verall values trend alancing Configuring the measurement report Which information is contained in the measurement report is defined... -
Page 76: Printing Out The Measurement Report
3-32 Vibration analysis: Reports Create a new customer as follows: • Open the customer selection menu and click on the lowest entry, <Edit>. The customer list appears. • Press the MENU key and click on 'New'. • Enter the customer data in the text editor. : Information on the inspector/asset. Click in the cor- nspector sset responding text field to edit the information. : The result file name appears in the report. esult file name : Report-specific event. Click in the text field to open the eport event event editor and select the event. -
Page 77: Loading Reports Onto Usb Pen Drive
3-33 Vibration analysis: Reports Loading reports onto USB pen drive Reports in PDF format can be transferred to a USB pen drive and then to a PC, where they can then be printed. To do this, you need the following: - VIBXPERT adapter for USB pen drive - VIB 5.330 MEM - USB pen drive - VIB 5.330-USB Connect the USB adapter to the communication channel (green jack). In the file manager, the USB pen drive is shown as a separate direc- tory ‘USB’. To transfer the report: • Mark the file. • Press MENU and click ‘Copy’ or ‘Move’. • Mark the directory ‘USB’. • Press MENU and click ‘Insert’. VIB 5.330 MEM VIB 5.330-USB... -
Page 78: Exporting Measurement Data In Ms Excel Format
3-34 Vibration analysis: Reports Exporting measurement data in MS Excel format - Exportable measurement data: Overall value, FFT spectrum, balancing result, time waveform, coast-down measurement (amplitude phase and overall value), 2-channel measurements - Compatible version: MS Excel 2003, MS Excel 2007 • Connect VIBXPERT to the PC. • Start the VIBXPERT Utility Program and register the report mod- ule (see p. 5-6f.). • In the utility startup screen, click ‘Transfer files’... -
Page 79: Measurement Tasks
3-35 Vibration analysis: Measurement tasks Measurement tasks This chapter contains information on the individual measurement tasks and tips for carrying out a measurement. Characteristic overall vibration values Overall vibration values Characteristic overall vibration values are used for assessing machine, bearing and gear conditions. A good indicator of the vibration forces acting on a machine is the effective value (RMS) of the vibration ve- acceleration locity in the frequency range 10 - 1000 Hz or 2 - 1000 Hz. Yardsticks... -
Page 80: Rpm Measurements
3-36 Vibration analysis: Measurement tasks RPM measurements The Laser-Trigger Sensor (VIB 6.631) is used for RPM measurement and as a trigger encoder. The sensor detects the signals optically, i.e. without contacting rotating machine parts during the measurement. Red laser light is emitted from the sensor head and strikes a measure- ment mark on the rotating shaft. -
Page 81: Temperature Measurement
3-37 Vibration analysis: Measurement tasks Typical installation for a vibration measurement with simultaneous recording of the rotational speed. Sensor with magnetic holder (VIB 6.142R + VIB 3.420) Reflective tape (VIB 3.306) Trigger stand Laser trigger sensor (VIB 6.632) (VIB 6.631) Trigger cable (VIB 5.432-2.9) Temperature measurement... -
Page 82: Runup / Coastdown
3-38 Vibration analysis: Measurement tasks Runup / Coastdown The runup and coastdown curves record the changes in the vibration behavior of the machine when it starts up or shuts down. This analy- sis function can be used to determine the resonance frequencies of a machine. The following measurement types are available: - Phase vector (amplitude and angle), dependent on the RPM - Overall value, dependent on the RPM... - Page 83 3-39 Vibration analysis: Measurement tasks A.2 Selecting the measurement task in the Task Manager: • Highlight the respective icon. • Press the F key to display the stored measurement tasks • Select the required measurement task using the identifier. or 2-c: 2-channel measurements : 'Overall Value - RPM' measurement type verall alue : Runup tartup : Coastdown oastdown B. Starting the measurement • Click on the measurement task icon. A connected laser-trigger sensor is automatically switched on for adjustment.
- Page 84 3-40 Vibration analysis: Measurement tasks C. Supplementary information C.1 'Overall Value - RPM' measurement type This type of measurement records the progression of the character- istic overall vibration values relative to the RPM. Points of resonance are indicated by RPMs with increased vibration amplitudes. The Results screen displays the path of the RMS value in the upper diagram; one of the three peak values (0-p, p-p, crest factor) can be displayed in the lower diagram:...
- Page 85 3-41 Vibration analysis: Measurement tasks Nyquist diagram This type of diagram displays the locus (amplitude and phase) of the curve in polar coordinates (see below right). Changing the type of diagram Press the F key and select the type of diagram. Averaging cancellation if rpm deviation >...
- Page 86 3-42 Vibration analysis: Measurement tasks C.4 Measuring rate (number of measurement points) An important criteria for the quality of the results is the number of measurement values saved. The more measurement values, the more meaningful the measurement. The decisive factor here is how quickly the machine reaches the operating RPM or how quickly it comes to a standstill.
-
Page 87: Envelope Analysis
3-43 Vibration analysis: Measurement tasks Envelope analysis Envelope analysis is a proven method for detecting periodic impacts in the vibration signal of a machine. It is mainly used for the diagno- sis of roller bearing damage and gearing damage and is based on the demodulation of amplitude modulated vibration signals. -
Page 88: Phase Measurement
3-44 Vibration analysis: Measurement tasks Phase measurement The phase measurement is used to identify machine faults that cause lines at the same position in the spectrum (e.g. static/ dynamic unbal- Synchronous Phase ance). The synchronous phase measurement determines the amplitude and the phase angle of the vibration pointer from the RPM-synchro- nous components of the vibration signal. -
Page 89: Impact Test - 1 Channel
3-45 Vibration analysis: Measurement tasks Impact test - 1 channel The Impact test is used to determine the resonance frequency of a structure. In the case of a rotating machine, it is possible to determine the RPM ranges in which vibrations are disproportionately amplified by resonance* and could damage the machine. - Page 90 3-46 Vibration analysis: Measurement tasks Tips for setting the measurement parameters Set the 'Trigger Start" time to a negative value in order to record the Note signal before the excitation. If the measurement starts before the excitation, increase the trig- ger threshold in the measurement setup by approximately half (P .
- Page 91 Balancing: Introduction Chapter 4: Balancing Increased vibrations on machines are undesirable phenomena. They impair product quality, place additional strain on components and, last but not least, reduce operational safety. The most frequent cause for these increased vibrations is imbalance. The high centrifugal forc- es that result lead to premature wear of machine components such as bearings and seals, for example.
-
Page 92: Balancing On Machines With Rotating Masses
Balancing: Introduction Basically, the consideration of whether to carry out balancing in one or two planes depends on the specific machine situation, i.e. on the balancing behavior of the rotor and the vibration behavior of the machine. Simultaneous balancing in two planes is quicker and more precise than successive balancing measurements in each of two in- dividual planes. -
Page 93: Assembly
Balancing: Preparations Preparatory activities Preparations include the mounting of the measurement components. The machine must be..disconnected before carrying out any work on the machine..protected against being switched on again inadvertently! WARNING! Assembly 1. Find out the cause of the imbalance visually and fix it if possible, e.g.: Remove any coatings from the impeller, fasten any loose bal- ancing weights or tighten any loose screws on the foundation. - Page 94 Balancing: Preparations 4. Attach a reference mark on the shaft for the trigger sensor while the machine is at a standstill (s. page 3-36). 5. Mount the laser trigger sensor (VIB 6.631) with the trigger bracket (VIB 6.632) on the machine (s. page 3-36). 6. Connect the vibration transducer to the measurement instrument. • The balancing RPM should lie as close as possible to the operat- ing RPM. If this is not possible due to high vibration values, start at a lower RPM and approach the operating RPM step-by-step in Note several balancing runs.
- Page 95 Balancing: Operation Operation If you are not yet familiar with operation in balancing mode, please note the following instructions: Settings All settings necessary for the measurement and evaluation of a bal- ancing run are made in setup menus. The following setups can only be changed before a balancing run is begun: - Measurement setup: measurement settings (see p. 4-22) - Transducer setup: parameters of the transducer in use...
- Page 96 Balancing: Operation The respective balancing step appears on the upper left of both screens: 0. Initial imbalance Measurement of the original imbalance; if the vibration values are within the tolerance range, the rotor is balanced. Otherwise, the bal- ancing weights must be placed on the rotor according to the following balancing steps.
- Page 97 Balancing: 1-plane balancing Balancing in one plane On the basis of an example, the next section illustrates the steps that are needed to balance in one plane: Requirements - In the following example, the machine setup is not used. - The default settings in the 'Tools' menu item are not changed: - Correction mode: free - "Add" balancing weights - Check that the functions are all active, except for the coefficients calculation which is inactive.
-
Page 98: Measuring The Initial Imbalance
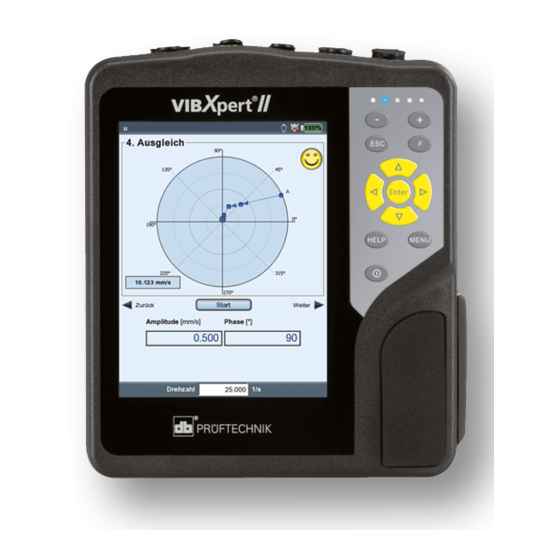
Balancing: 1-plane balancing Measuring the initial imbalance 1. Switch the machine on. Wait until the machine has reached the balancing RPM and operating temperature if necessary. 2. Press 'Enter' to start the measurement. First, VIBXPERT records the RPM. The green LED flashes with each trigger pulse. If the RPM varies too much, a warning message appears. Finally, the instrument measures the amplitude and phase of the RPM synchronous vibration. -
Page 99: Trim Run
Balancing: 1-plane balancing 4. Switch the machine on. 5. Press 'Enter' to start the measurement. 6. If the measurement values are stable, press 'Enter' to stop the mea- surement. 7. Switch the machine off. In the trial run the imbalance should change enough to steadily reduce the residual imbalance in the subsequent balancing runs. If the imbalance changes only slightly, increase the trial weight. -
Page 100: Undoing Balancing Runs
4-10 Balancing: 1-plane balancing In the following trim runs VIBXPERT checks whether the imbalance has sufficiently reduced from one run to the next. If this is not the case, the following message appears: ‘No Improvement’. The run con- cerned must be repeated with a different balancing weight. Start again if the vibration values worsen and the balancing weights do not become smaller. -
Page 101: Overview Of The Measurement Procedure
4-11 Balancing: 2-plane balancing Balancing in two planes In principle, the process here corresponds to the previous section. Therefore, only the specific features of balancing in two planes are described in the following section: Overview of the measurement procedure Select plane A: Determine the measurement and balancing plane A. 0. Initial imbalance: Measurement in plane A and plane B 1A. Trial run: Recommendation for trial weight in plane A; measurement in plane A and plane B with trial weight in plane A 1B. Trial run: Recommendation for trial weight in plane B;... -
Page 102: Trial Run
4-12 Balancing: 2-plane balancing Trial run The trial run is divided into two parts which are marked in the main screen as "1A" or "1B": The trial weight is attached in and its influence is mea- plane A sured in both planes. The trial weight is attached in and its influence measured plane B in both planes. - Page 103 4-13 Balancing: Evaluation Evaluation of the data The following data are listed in the data screen for each completed balancing run: : Mass of the balancing weight : Fixing angle ngle : Vibration overall values (RMS, 0-p, p-p*) iBration * see Display setup, p. 4-20 : Phase angle ngle If you entered the rotor mass and the balancing radius in the machine setup or the tools menu respectively, then the achieved balancing quality and the centrifugal force on the rotor are also calculated.
-
Page 104: Combining Balancing Weights
4-14 Balancing: Evaluation Options for balancing 1. Combining balancing weights If several weights have already been placed on the rotor, they can be combined into one single weight. VIBXPERT vectorially adds the weights of the completed balancing runs and displays the resulting weight and fixing angle in the 'Data' screen and the 'Data View' screen. -
Page 105: Changing The Correction Mode (Tools Menu / Machine Setup)
4-15 Balancing: Options 2. Changing the correction mode (Tools menu / Machine setup) The correction mode describes how the balancing weight is attached to the rotor. Normally the correction mode is set to 'Free & add', i.e. the weight can have any mass and be placed at any angular position. • Press the MENU button in the data screen, and click on "Tools" (see below)*. * Machine setup see page 4-22 The following correction modes are available additionally: –... - Page 106 4-16 Balancing: Options 2.2 Fixed weight Activate the "Fixed weight" option if only specific masses (e.g. 2g, 5g, 10g) are available for balancing. Then enter the mass of the "Fixed weight". VIBXPERT calculates two angular positions at which the two equal weights must be placed. "Free" "Fixed weight" Select the "Trial/ Trim masses -> Add" option in the "Tools" menu. The fixed weight m must meet the following requirements relative to the variable weight m free...
-
Page 107: Removing The Balancing Weight (Tools Menu/ Machine Setup)
4-17 Balancing: Options 3. Removing the balancing weight (Tools menu/ Machine setup) If the balancing weights cannot be attached to the rotor by clamping, welding, screwing or similar, the imbalance can also be compensated by grinding material off the rotor. To do this, select the "Trial/ Trim weights ->... -
Page 108: Entering The Balancing Radius And Rotor Mass Later (Tools)
4-18 Balancing: Options 5. Entering the balancing radius and rotor mass later (Tools) If you start the balancing procedure without the machine setup, you can enter the balancing radius and the rotor mass later in the Tools menu. VIBXPERT then calculates the balancing quality and the cen- trifugal force for the current trim run. - Page 109 4-19 Balancing: Options 2. Load the coefficient from the file: • Click on 'Load'. • Select the coefficient file. Here, the coefficient must be saved after the trial run. Note 3. Adopting the influence coefficient by restarting from a file: • Open the balancing file. • Navigate to the last balancing step (measurement or data screen). • Press the MENU button, and click on 'Restart'. A warning appears. Click on 'OK'. • Start the balancing measurement ('Initial imbalance'). To reset the influence coefficients in a file, click on 'Reset' in the Tools menu.
- Page 110 4-20 Balancing: Display-Setup Display setup In the display setup, you can define the display settings for the data screen and measurement screen. The display setup can be called up on every screen: • Press the MENU button and click on 'Display setup'. : Speed or step size when zooming. : The imbalance pointers of the two ual plane Balancing plot mode planes can be displayed separately in two polar plots or together in...
- Page 111 4-21 Balancing: Printing Printing the balancing report Two different report types are available for documentation: - Screenshot: Printout of the current screen - Report printouts: Detailed report printout with general measure- ment data and balancing-related data. A report printout can be started from the measurement or data screen: Screenshot • Press the MENU button and click on 'Print > Screenshot'. • Select the printer, press the MENU button and click on 'Print'. Report printouts • Press the MENU button and click on 'Print > 'Report printouts'. • Select the printer. • Select the report configuration in the 'Reports' menu, or create a new report configuration (see page 3-31).
-
Page 112: Machine Setup
4-22 Balancing: Machine setup Setup parameters To execute the balancing procedure VIBXPERT requires different set- tings, which are collected in ‘setup menus’: - Machine setup (see below) - Measurement setup (see p. 4-25) - Transducer setup (see page 3-12) These setups are configured prior to a balancing procedure. Dur- ing balancing, only certain parameters from the machine setup can be changed. - Page 113 4-23 Balancing: Machine setup Depending on the selection, the following parameters can be set: - No. of locations: 3-100. Usually the number of ventilator blades. - Fixed weight: Mass of the available balancing weight. - Outer diameter: The tape measure can be used to determine the position of the balancing weight without a reference angle (see graphic on page 4-16). When balancing in two planes the correction mode can be set sepa- rately for each plane. *: add / remove; in general, an imbalance is cor- rial rim weights rected by affixing weights to the rotor.
- Page 114 4-24 Balancing: Machine setup : The angle between the sensor and the trigger sensor is rigger angle taken into account in the calculation of the attachment angle for the trial weight. Convention: Angle is counted against the direction of rotation of the rotor. *: Reference RPM for calculation of the peed for Balance quality achieved balance grade and centrifugal force (see p. 4-18). * This parameter can be changed in *: Yes / No; see "Check functions" on page 4-17.
-
Page 115: Measurement Setup
4-25 Balancing: Measurement setup Measurement setup In order to edit or create a measurement setup proceed as follows: • Mark a rotor type in the selection screen (see p. 4-7). • Press the MENU button and click on "Task manager". • Select a user-defined task. • Mark the "Measurement setup" field. • Press the MENU button and click on "New" or on "Edit": The following parameters can be edited: : 0.5 / 1 / 2 / 10 Hz; select "10 Hz" as the lowest frequency if the ilter machine RPM is more than 600 RPM and the machine is placed on a soft foundation. : Yes / No; To suppress high frequency noise signals, a owpass filter low pass filter (1 kHz) can be activated (Yes). With 'No', the signal is processed without the low pass filter. : 1 - 20; the number of measurements is auto- of measurements matically increased to the maximum value if the indicator shows strongly varying imbalance. - Page 116 4-26 Balancing: Control plane Balancing with a control plane While balancing in one plane, the vibration pointer in a second plane - the control plane - can be recorded and displayed as well. Activating the control plane In the machine setup activate the 'Control 2nd plane' option (see p. 4-24 below). Connect the transducers to the measurement channels Connect the transducer in the balancing plane to the channel that is selected in the measurement task manager.
- Page 117 4-27 Balancing calculator Balance calculator With the VIBXPERT balance calculator you can convert any arrange- ment of balance weights on a rotor to a resulting weight. The balance calculator operates as an independent functional mod- ule. The result cannot be saved or used in an ongoing balancing Note procedure.
-
Page 118: Operation Of The Balance Calculator
4-28 Balancing calculator Operation of the balance calculator The calculator can be started before or during a balancing procedure. • Press MENU and click ‘’. • Press the Plus (+) key to add a new weight. In the correction modes ‘Fixed location’ and ‘Fixed weight’, two weights are possible for each line. N ote • Press the Minus (-) key to delete the marked weight from the list. -
Page 119: Balancing Quality Classes
4-29 Balancing classes Balancing quality classes (excerpt from DIN ISO 1940) Qty. class Examples of balancing bodies or machines Crank gear rigidly assembled four-stroke engines and elasti- cally mounted ships diesel engines Crank gear rigidly mounted, high-speed 4-cylinder diesel engines Crank gear rigidly mounted, high-speed diesel motors with six and more cylinders Automobile wheels, rims, wheel sets, drive shaft crank gear... - Page 120 4-30 Balancing: Messages Messages during balancing Insufficient improvement The vibration values are greater than 1 mm/s and have not suffi- ciently improved. Check whether the cause is actually an imbalance. One-plane balancing is recommended The dynamic portion of the calculated balancing weight is larger than the static portion.
- Page 121 4-31 Balancing: Messages Pointer change too large The vibration pointer in the trial run has changed too much in magni- tude and phase in comparison to the initial imbalance run. Pointer change too small The vibration pointer in the trial run has not changed enough in mag- nitude and phase in comparison to the initial imbalance run.
- Page 122 4-32 Balancing: Emergency storage Emergency storage If the balancing procedure is stopped prematurely (e.g. battery dis- charged), the data are stored in a recovery file. When the device is switched on again, the balancing procedure can be continued with the aid of this recovery file. Opening the recovery file • Switch on the measuring device. • In the start screen, click on the 'Balance' symbol. • Open the tab in which the interrupted balancing procedure was started (e.g.
-
Page 123: Chapter 5: Appendix
Appendix - Editors Chapter 5: Appendix This chapter provides information on how to use - the numerical and text editors, - the VIBXPERT utility software, - the File Manager Instructions on handling and maintaining the VIBXPERT as well as the technical data complete this chapter. -
Page 124: Text Editor
Appendix - Editors Text Editor Entering text • Press the F key until the cursor appears in the character table (see below). • To enter the text, click on the respective characters in the table . If the required character is not included, then press the '+' key to display further character tables. • Finally press the MENU key and click on 'OK'. • To cancel, press the ESC key. Deleting text • Press the F key until the cursor appears in the text field. • To delete an individual character/word: - Place the cursor to the right of the character/word to be deleted. - Press the F key to switch the cursor into the character table. -
Page 125: File Manager
Appendix - File manager File Manager The File Manager administrates the measurements which were saved in the 'Multimode' and 'Balancing' operating modes. In the 'PDF files' folder you will find the print files generated in the PDF format. You can print out or delete these here. The File Manager is opened by ... -
Page 126: Printing Out The Pdf File
Appendix - file manager Printing out the PDF file The print files saved in the PDF format can be printed as follows: • Connect VIBXPERT to a printer. • Open the File Manager and select the file to be printed. • Press the MENU key and select 'Print > Printer'. Printing starts. Details on connecting and setting up a printer can be found in Chapter 2 (p. 2-21). Note Transferring a PDF file on a USB pendrive See page 3-33. -
Page 127: Vibxpert Utility
Appendix - VIBXPERT utility VIBXPERT utility The 'VIBXPERT utility' tool can be used for the following tasks: - Updating firmware (with the VIBXPERT update tool) - Saving and restoring results and settings - Formatting the CF memory card - Export results in CSV format (Phase, Balancing) - Export results into MS Excel. - Loading screen contents onto the PC. - Loading PDF files onto the PC. -
Page 128: Registering Optional Functions
Appendix - VIBXPERT utility Registering optional functions The following functions are optional and must be enabled by a pass- word: - Conversion of measurement files into formats that can be pro- Registration cessed by other analysis programs (UFF / IEEE) - Export results into MS Excel. Activate the 'Excel report' demo version • Connect VIBXPERT to the PC and perform a connection test (see next section). -
Page 129: Setting Up A Connection With Vibxpert
Appendix - VIBXPERT utility Setting up a connection with VIBXPERT Data transmission takes place via a network or USB connection. • Connect VIBXPERT to the network or a PC using the cable provided (see also p. 2-26). Connection • Click on the 'Connection' button. • Set the type of connection (USB or Ethernet). • For Ethernet only: Enter the IP address of the data collector in the network in the 'IP address' field (see also p. 2-29f.). • To test the connection, click on the 'Test communication' button. If the connection is working, a yellow 'Smiley' symbol appears. A red 'Smiley' symbol indicates a faulty connection. -
Page 130: Transferring Files
Appendix - VIBXPERT utility Transferring files The following files can be transferred from the device to the PC: - PDF files generated with a PDF printer driver. - Screenshots generated by pressing <F> & <-> simultaneously . Get files - Results in CSV format for analysis and display in a spreadsheet program (eg MS Excel). • Click on the 'Get files' button. • Then click on the respective button and select the files you wish to transfer. - Page 131 Appendix - VIBXPERT utility • Click on ‘Format CF card’ to format the memory card in the device. Risk of data loss! Before proceeding, make sure that all important data and settings are backed up on an external storage device. Formatting deletes all data on the memory card. The process is not reversible! Attention! • Click on OK to start formatting.
-
Page 132: Technical Notes
5-10 Appendix - Technical notes Technical notes VIBXPERT is a precision instrument and should be treated as such. Storage Use the VIBXPERT carrying pouch for transporting VIBXPERT and for making on-site measurements. If VIBXPERT is not used for lengthy periods, stow the measurement instrument in the pouch and con- nect it regularly to the mains to avoid the battery from completely discharging. -
Page 133: Guarantee
5-11 Appendix - Technical notes Guarantee The measurement device has a guarantee period of 1 year. Any guar- antee claims expire if service work is carried out by non-authorized personnel. Spare parts, accessories Only original spare parts and accessories may be used. Information on these parts is given in the VIBXPERT product catalog (LIT 01.700. -
Page 134: Technical Data
5-12 Appendix - Technical notes Technical data Firmware features Computer Processor Measurement Modes Marvell PXA320 806 MHz Input Channels Multimode Keyboard 2 analog inputs for Characteristic Overall Values 1 navigation pad and 7 keys (Zoom, Voltage (AC/DC, ±30 V max.) Vibration (Acceleration, Velocity, Escape, Function, Help, Meno, On/ Current (AC/DC, ±30 mA max.) -
Page 135: Declaration Of Conformity
EN ISO/IEC 17050-1 PRÜFTECHNIK Condition Monitoring GmbH, Oskar-Messter Str. 19-21, 85737 Ismaning, Germany declares in sole responsibility, that the equipment Name: VIBXPERT II Type: VIB 5.310 / VIB 5.320 / VIB 5.321 Description: FFT data collector and signal analyzer incl. charger complies with the appropriate European Directives. -
Page 136: Troubleshooting
5-14 Appendix - Troubleshooting Troubleshooting Symptom: VIBXPERT will not start up. The start procedure is not executed com- pletely, the display stops at the screen showing the LINUX penguin. Cause: Failure in the flash memory. Solution: Reload the firmware. Reloading firmware Before reloading the firmware, ensure that the following components are at hand or installed on the PC: - VIBXPERT update tool version 1.47 or higher. - Page 137 5-15 Appendix - Troubleshooting • Switch VIBXPERT off and on again. The update tool subsequently contacts VIBXPERT and starts transfer of the basic firmware. The progress of the data transfer is shown in the right pane: 'Transferring data X%' • Then it is only necessary to load the firmware: To do this, follow the instructions on Page 2-31.
-
Page 138: Index
5-16 Index Index Symbole Demodulation factor 3-11 Device Info 2-23 3D display 3-23 Join masses 4-28 Device Setup 2-12 Display 2-13 Protective film 2-13 Accessories 5-11 Keyboard 2-2 Display mode 3-28 Amplitude spectrum 3-23 Key controls 2-20 Display setup 4-20 Assembly 4-3 Keyphaser 2-17 Disposal 5-11... - Page 139 5-17 Index Options - Measurement 3-5 Service menu 2-23 Order 3-9 Settling time 3-12 VIB 5.317-B 1-8 Order filter 3-44 Setup VIBXPERT Order scaling 3-28 new 3-6 Technical notes 5-10 Overall value 3-16 Sidebands 3-19, 3-22 VIBXPERT PC license 2-18 calculating 3-19 Signal VIBXPERT utility 5-5...
- Page 140 Productive maintenance technology PRÜFTECHNIK Condition Monitoring Oskar-Messter Straße 19-21 85737 Ismaning, Germany www.pruftechnik.com Tel. +49 89 99 61 6-0 +49 89 99 61 6-300 eMail: info@pruftechnik.com Printed in Germany LIT 53.203.05.2012.0EN VIBXPERT is a registered trademark of PRÜFTECHNIK AG. Contents ®...
Need help?
Do you have a question about the VIBXPERT II and is the answer not in the manual?
Questions and answers