Table of Contents
Advertisement
Quick Links
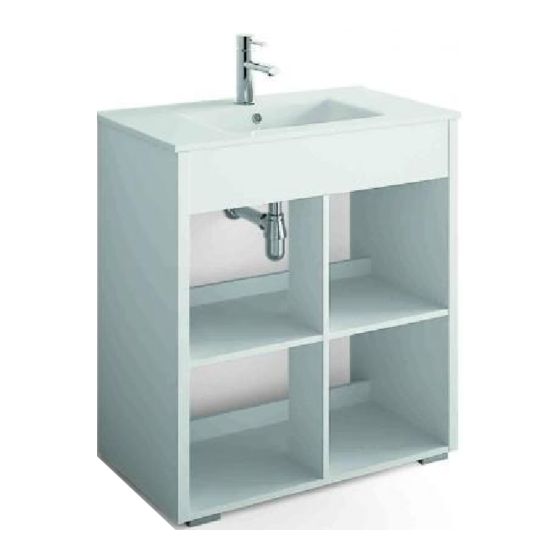
Norton Vanity Unit (80cm)
Thank you for purchasing this Croydex product. Please follow the fixing and care instructions to ensure your vanity
unit is fitted safely and retains its high quality finish.
Please retain this leaflet for future reference.
This installation guide applies to the following vanity unit:
WS010322 - Norton Vanity Unit (80cm)
Tools required - not supplied
Pencil;Tape Measure; Philips Screwdriver; Mallet; Drill; 5mm Drill Bit; 8mm Drill Bit (Ceramic drill bit optional).
KEEP DIY TOOLS OUT OF THE REACH OF CHILDREN
Home Safety Advice
- It is recommended that two people fit this product to ensure that it is fitted safely.
- Always take care when using power tools, particularly in the bathroom.
- Always check for hidden cables and pipework before drilling and take extreme care if there is any
water in the working area.
- It is advisable to use a residual current circuit breaker (RCCB).
- Always wear suitable eye protection when drilling.
- If the product is to be fitted on a ceramic tiled wall, a ceramic drill bit should be used.
- Always ensure that the drill hole passes through the central tiled area rather than through the grouted
area. To prevent damage to the tile, mask the area around the hole with tape before drilling.
- Do not strike the product with hard or sharp objects.
Product Care
To retain the best quality finish, clean product regularly with a soft damp cloth.
Do not use abrasive or chemical cleaners as these will damage the product.
Product Location
Vanity units are only as strong as the wall to which they are fixed and the fixings that are used.
For different wall types you will need to ensure that you are using the correct type of fixing for the material of the wall.
The addition of backboards on the outside of the wall or appropriate strengthening of internal structures may be
required to provide adequate wall strength.
NOTE: If the wall is made of lightweight thermal blocks, aerated hollow brickwork or prefabricated partitions
even the most appropriate fixings may not be able to withstand the loads which can be suddenly applied to
the vanity unit.
Vanity Unit Components
A. Side Panel (P001) x 1
B. Side Panel (P002) x 1
C. Front Panel (P003) x 1
D. Base Panel (P004) x 1
E. Shelf Panel (P005) x 1
1
F. Partition Panel (P006) x 2
G. Rear Panel (P007) x 3
H. Support Panel (P008) x 1
CAB 093 R01
Advertisement
Table of Contents

Related Manuals for Croydex Norton WS010322


Summary of Contents for Croydex Norton WS010322
- Page 1 Norton Vanity Unit (80cm) Thank you for purchasing this Croydex product. Please follow the fixing and care instructions to ensure your vanity unit is fitted safely and retains its high quality finish. Please retain this leaflet for future reference. This installation guide applies to the following vanity unit:...
- Page 2 Vanity Unit Fixing Components A. Vanity Unit Feet Screws B. Vanity Unit Feet D. Wall Screws (H008) x 2 C. Wall Plugs (H007) x 2 (H005) x 16 (H006) x 4 Installation Step 1 A. Side Panel (P001) x 1 E.
- Page 3 Installation Step 2 B. Side Panel (P002) x 1 Click! CAB 093 R01...
- Page 4 Installation Step 3 G. Rear Panel (P007) x 3 Click! CAB 093 R01...
- Page 5 Installation Step 4 Stand Vanity Unit Upright! Installation Step 5 H. Support Panel (P008) x 1 Click! CAB 093 R01...
- Page 6 Installation Step 6 C. Front Panel (P003) x 1 Click! Installation Step 7 Click! F. Partition Panel (P006) x 2 CAB 093 R01...
- Page 7 D. Wall Screws (H008) x 2 Ø8 Ø5 For details of the other items in the Croydex range please visit our website: www.croydex.com Croydex Ltd, Central Way, Andover, Hants, SP10 5AW, UK Tel: +44 (0) 1264 365881 Fax: +44 (0) 1264 356437 Email: info@croydex.co.uk...
Need help?
Do you have a question about the Norton WS010322 and is the answer not in the manual?
Questions and answers