Table of Contents
Advertisement
Quick Links
Contents
Indications for Use . . . . . . . . . . . . . . . . . . . . . . . . . . . . 2
Revision History . . . . . . . . . . . . . . . . . . . . . . . . . . . . . . 2
Getting Started
Setting Up VistaTablet or VistaPhone Device . . . . . . . . 3
Checking Device Battery Level and Patch Hours . . . . . 5
Changing Patient Name and Device Name. . . . . . . . . . 6
Removing Previous VitalPatch . . . . . . . . . . . . . . . . . . . 7
Applying the VitalPatch. . . . . . . . . . . . . . . . . . . . . . . . . 8
Wearing the VitalPatch . . . . . . . . . . . . . . . . . . . . . . . . . 9
Monitoring Using VistaPoint
Pairing VitalPatch with VistaPoint . . . . . . . . . . . . . . . . 11
Using the VistaPoint Dashboard . . . . . . . . . . . . . . . . . 14
When Monitoring is Complete . . . . . . . . . . . . . . . . . . 17
Reporting a Symptom. . . . . . . . . . . . . . . . . . . . . . . . . 17
Making a Video Call or Appointment . . . . . . . . . . . . . 18
Recalibrating Automatic Body Temperature . . . . . . . . 18
Changing Pacemaker Status . . . . . . . . . . . . . . . . . . . 18
Entering Vital Signs Manually
Entering Body Temperature Manually . . . . . . . . . . . . . 19
Entering Oxygen Saturation Manually. . . . . . . . . . . . . 19
Entering Blood Pressure Manually . . . . . . . . . . . . . . . 20
Entering Weight Manually . . . . . . . . . . . . . . . . . . . . . . 20
Troubleshooting
"VitalPatch Off Body" Message . . . . . . . . . . . . . . . . . 21
Other VitalPatch Error Messages . . . . . . . . . . . . . . . . 22
Device Troubleshooting . . . . . . . . . . . . . . . . . . . . . . . 23
Using Bluetooth to Upload Vital Signs
Oxygen Saturation (Berry BM1000 Fingertip) . . . . . . . 25
Oxygen Saturation (Berry BM2000A Wrist) . . . . . . . . . 27
Oxygen Saturation (Nonin 3150 Wrist) . . . . . . . . . . . . 31
Oxygen Saturation (Nonin 3230 Fingertip) . . . . . . . . . 33
Blood Pressure (A&D UA-651 Arm) . . . . . . . . . . . . . . . 35
Weight (A&D UC-352) . . . . . . . . . . . . . . . . . . . . . . . . . 37
IFU-26 Rev. J | December 2021
Welcome
This guide will help you start monitoring using the
VistaPoint
application and the VitalPatch
®
• The VitalPatch biosensor (referred to as "VitalPatch"
in this document) is an adhesive device worn on the
chest to measure and record vital signs. Refer to the
VitalPatch Instructions for Use for detailed clinical
instructions.
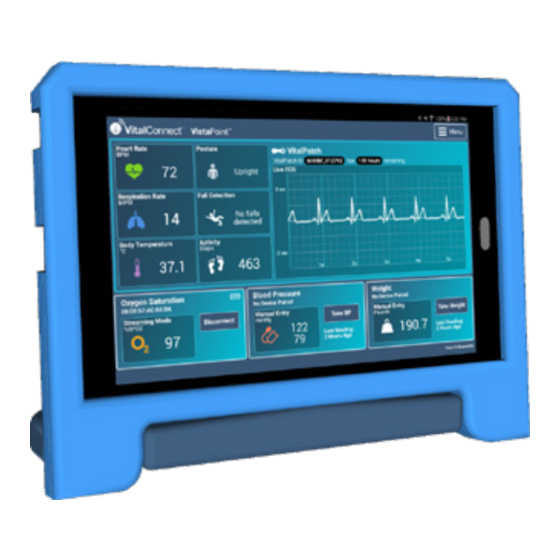
• The VistaPoint application collects and uploads vital
signs from the VitalPatch and approved third-party
devices to your care team. VistaPoint runs on the
portable VistaTablet
or VistaPhone
™
In addition to this guide, follow all instructions provided
by your care team.
VitalPatch
VistaPoint on VistaTablet
VitalPatch
VistaPoint on VistaPhone
Related Documents
Refer to IFU-06, VitalPatch Instructions for Use for
more information.
Getting Help
Tap the Menu button in the upper-right corner of the
screen and then tap Help. You can read instructional
documents or watch tutorial videos. Press the Home
button to return to monitoring.
VistaPoint
®
Instructions for Use
biosensor.
®
device.
™
Care Team
Care Team
3.2
1
Advertisement
Table of Contents

Subscribe to Our Youtube Channel
Related Manuals for VitalConnect VistaPoint 3.2


Summary of Contents for VitalConnect VistaPoint 3.2
-
Page 1: Table Of Contents
VistaPoint ® Instructions for Use Contents Welcome This guide will help you start monitoring using the Indications for Use ......2 VistaPoint application and the VitalPatch biosensor. -
Page 2: Indications For Use
Where to Report may produce motion artifacts that affect the displayed, measured values for ECG and heart rate. 1. VitalConnect, Inc. • After applying VitalPatch, it may take 60 seconds for 2. Users and patients can report to FDA at: heart rate to stabilize and respiration rate 180 https://www.accessdata.fda.gov/scripts/... -
Page 3: Setting Up Vistatablet Or Vistaphone Device
Section 1: Setting Up VistaTablet or VistaPhone Device Monitoring requires that you use the VistaTablet or VistaPhone device provided by your care team. Keep the VistaTablet device near you at all times during the monitoring period. Whenever possible, keep the device plugged into the Volume Status Power Key... - Page 4 Charging the Device VistaPhone Status Bar with Vital Signs) Use only the provided cable and charger to charge the Menu VistaTablet or VistaPhone. Keep the device plugged into the charger. You can use the device while it is charging. Volume • VistaTablet uses a micro-USB charging cable.
-
Page 5: Checking Device Battery Level And Patch Hours
Returning the Device should be cleaned and sanitized. Use the following procedure to clean and sanitize: After your monitoring period is complete, return the 1. Apply gloves before handling equipment. monitoring equipment to your care provider as soon as 2. Remove the tablet/phone from its protective case. possible. -
Page 6: Changing Patient Name And Device Name
Section 3: Changing Patient Name and Device Name The VistaTablet and VistaPhone display the following information on the dashboard. The location of these Patient Name items will vary by device type and configuration. Refer to the figure on the right. Organization • Patient Name. -
Page 7: Removing Previous Vitalpatch
Grasp a corner of the overlay and peel it off the skin. b. Continue pulling the overlay off. Stretch the overlay horizontally to help release it from the skin. VitalConnect Note: The VitalPatch may begin pulling off with the overlay. -
Page 8: Applying The Vitalpatch
Press and release the power button. See figure to the right. A green light below the logo flash to let you know the VitalPatch is powered on (the light will not stay illuminated). VitalConnect Press and release Light flashes ON power button... -
Page 9: Wearing The Vitalpatch
4. Hold Patch Against Chest Hold Against Chest LEFT Side Note: DO NOT remove the adhesive backings yet! Space two fingers below notch a. Hold the VitalPatch against the chest in the PRIMARY position. See figure to the right. Three Lines b. The top of the VitalPatch should be located two fingers below the jugular notch (dip at the Left... - Page 10 See figure to the right. b. Ensure the tab you created in the previous step is on the top side (pointing towards your head). VitalConnect 4. Remove Blue Liners a. Hold the overlay against your chest with one hand and peel away the lower blue liner.
-
Page 11: Pairing Vitalpatch With Vistapoint
Section 8: Pairing VitalPatch with VistaPoint After applying the VitalPatch biosensor to the chest, you must pair VitalPatch with VistaPoint. 1. Begin the Pairing Process Begin Pairing Section 1 on Unlock the VistaTablet or VistaPhone (see page 3). Tap Connect VitalPatch from the VistaPoint dashboard. Connect VitalPatch Note: If a previous VitalPatch is still paired with Section... - Page 12 4. Choose Pacemaker Status Choose Pacemaker Status The pacemaker status screen may appear during the pairing process. The screen will appear only once per patient (will not appear when replacing a VitalPatch). Connection Successful Choose one of the following: If you do not know, please ask your doctor. • Select YES if you have a pacemaker.
- Page 13 7. Calibrate Body Temperature If your configuration supports automatic body Calibrate Body Temperature temperature (requires VitalPatch firmware release 3.2.0.0 or later), a Temperature Calibration screen will appear, and you will be prompted to calibrate the body Temperature Calibration Required temperature. If the Temperature Calibration screen does The VitalPatch Biosensor requires temperature not appear, the VistaPoint dashboard will be displayed calibration.
-
Page 14: Using The Vistapoint Dashboard
Section 9: Using the VistaPoint Dashboard VistaTablet Main Menu Report Symptom Menu VistaPoint ™ Posture VitalPatch Heart Rate Posture Report a Symptom Heart Rate 109 hours VitalPatch ID b008bf_012792 has remaining Section 11 on pg 17 Live ECG Upright Fall Detection 2 mv VitalPatch Respiration Rate Fall Detection BrPM... - Page 15 Use the VistaPoint Application When pairing is complete, you will be shown the VistaPoint dashboard. Do the following, as directed by your care team: • Keep the device powered on and charged. Keep the device near you as much as possible (less than 30 feet) to ensure constant monitoring.
- Page 16 Dashboard Features • Live ECG (not displayed if a pacemaker is indicated). ECG is an optional feature and may not be displayed. • Heart Rate (BPM, beats per minute, not displayed if a pacemaker is indicated) • Respiration Rate (BrPM, breaths per minute, not displayed if a pacemaker is indicated.) • Body Temperature (Celsius or Fahrenheit) –...
-
Page 17: When Monitoring Is Complete
Section 10: When Monitoring is Complete 1. Disconnect VitalPatch in VistaPoint Disconnecting VitalPatch When monitoring is complete, select Disconnect VitalPatch from the menu. Select one of the following Menu options: Tap “Disconnect • Disconnect VitalPatch: Choose this option if you will Disconnect Patch Patch”... -
Page 18: Making A Video Call Or Appointment
Section 12: Making a Video Call or Appointment Your care team may offer the ability to make care-related Start a Video Call or Appointment video calls or appointments using your VistaPhone or VistaTablet. This feature is not available on all devices. To start a video call, tap Menu and then tap Applications. -
Page 19: Entering Body Temperature Manually
Section 15: Entering Body Temperature Manually Your care team may direct you to enter body temperature Entering Body Temperature Manually manually on a regular schedule (for example, one or more times per day). Body Temperature Manual Entry To enter body temperature manually: Tap Body Temperature --.-°... -
Page 20: Entering Blood Pressure Manually
Section 17: Entering Blood Pressure Manually Your care team may direct you to enter a blood pressure Entering Blood Pressure Manually reading manually on a regular schedule (for example, one or more times per day). This procedure is for manual entry only. If you are Tap Take BP or Take BP Take a Measurement... -
Page 21: Vitalpatch Off Body" Message
Section 19: “VitalPatch Off Body” Message If the screen displays the message “VitalPatch Off Body,” “VitalPatch Off Body” Message this indicates that the VitalPatch no longer detects proper skin contact. See figure to the right. VitalPatch b008bf_012345 Off Body • If removal was intentional, tap Disconnect Patch to end the monitoring session. -
Page 22: Other Vitalpatch Error Messages
Section 20: Other VitalPatch Error Messages The screen may display error messages related to the VitalPatch. These are routine events. If the event is not listed here, or if the device is not operating correctly, refer to “Troubleshooting” in Section 21 on page 23. Message: “VitalPatch Not Detected”... -
Page 23: Device Troubleshooting
Section 21: Device Troubleshooting Connection Error Messages Wireless Connection Error Messages See figure to the right. The VistaTablet or VistaPhone Cloud Service Down may display the following error messages that indicate a The cloud service is currently down. This problem with your wireless connection: problem will be resolved soon. - Page 24 Dashboard Stops Responding Dashboard Stops Responding If vital signs do not appear to be updating or the screen becomes unresponsive (for example, when pairing devices), you can refresh the current view by dragging your finger across the display and then releasing. Drag finger down display to refresh Cannot Connect to VitalPatch...
-
Page 25: Oxygen Saturation (Berry Bm1000 Fingertip)
Section 22: Oxygen Saturation (Berry BM1000 Fingertip) The Berry BM1000 is an optional pulse oximeter device Berry BM1000 Fingertip Pulse Oximeter that measures blood oxygen saturation (%SpO ) and uploads readings automatically using Bluetooth. The device is clipped onto the fingertip to take a reading. Your care team may direct you to take an oxygen saturation reading with the Berry BM1000A on a regular schedule (for example, one or more times per day). - Page 26 ID of the Berry device when it appears. Error Messages If more than one Bluetooth ID is shown, please ensure there are no other Berry devices powered on If “Low Quality Reading” is Low Quality Reading (but not paired with a VistaTablet) nearby. %SPO2 displayed, check finger is f. VistaPoint displays “Please wait connecting…”...
-
Page 27: Oxygen Saturation (Berry Bm2000A Wrist)
Section 23: Oxygen Saturation (Berry BM2000A Wrist) The Berry BM2000A is an optional pulse oximeter device Berry BM2000A Wrist Pulse Oximeter that measures blood oxygen saturation (%SpO ) and uploads readings automatically using Bluetooth. The %SpO2 device is worn on the wrist and uses a separate fingertip sensor. - Page 28 ID of the Berry device when it appears. Error Messages If more than one Bluetooth ID is shown, please ensure there are no other Berry devices powered on If “Low Quality Reading” is Low Quality Reading (but not paired with a VistaTablet) nearby. %SPO2 displayed, check finger is f. VistaPoint displays “Please wait connecting...”...
-
Page 29: Oxygen Saturation (Masimo Mightysat™ Fingertip)
Section 24: Oxygen Saturation (Masimo MightySat™ Fingertip) The Masimo MightySat™ is an optional pulse oximeter Masimo MightySat Pulse Oximeter device that measures blood oxygen saturation (%SpO and uploads readings automatically using Bluetooth. It is clipped onto your fingertip. Your care team may direct you to take an oxygen Masimo saturation reading with this device on a regular schedule MightySat... - Page 30 b. Swipe the touchpad until the About screen is Pair Device or Take a Reading displayed. Tap the touchpad to display the Insert finger information screen. See figure to the right. The Bluetooth ID is the number under “mac”. 3. Take a Reading in VistaPoint a. Apply Masimo MightySat device to the finger.
-
Page 31: Oxygen Saturation (Nonin 3150 Wrist)
Section 25: Oxygen Saturation (Nonin 3150 Wrist) Note: If the device has already been paired, go directly Nonin 3150 Pulse Oximeter Step 4 “Start Continuous Measurement” below. The Nonin Model 3150 is an optional pulse oximeter device that measures blood oxygen saturation (%SpO and uploads readings automatically using Bluetooth. It is worn continuously on the wrist and uses a separate fingertip sensor. - Page 32 ID of the Nonin 3150 when it appears. It should Pair Device or Take a Reading match the ID in Step 1 above. g. VistaPoint displays “Please wait connecting...” • If pairing, place in pairing mode If you see a message asking you to confirm the device pairing, tap Confirm.
-
Page 33: Oxygen Saturation (Nonin 3230 Fingertip)
Section 26: Oxygen Saturation (Nonin 3230 Fingertip) Note: If the device has already been paired, go directly Step 3 “Take a Reading” below. The Nonin Model 3230 is an optional pulse oximeter device that measures blood oxygen saturation (%SpO and uploads readings automatically using Bluetooth. It is clipped onto your fingertip. - Page 34 3. Take a Reading (After Pairing) Take a Reading a. Apply the Model 3230 to the finger. The unit will automatically turn on and being measuring. Apply to b. Tap Take SpO2 in the Oxygen Saturation tile. Finger c. Tap Use Bluetooth (if not already selected) and then tap Take Reading.
-
Page 35: Blood Pressure (A&D Ua-651 Arm)
Section 27: Blood Pressure (A&D UA-651 Arm) The A&D UA-651 is an optional blood pressure monitor A&D UA-651 that can upload blood pressure readings automatically using Bluetooth. Blood Pressure Cuff Model UA-651 Base Unit Your care team may direct you to take blood pressure readings with this device on a regular schedule (for example, one or more times per day). - Page 36 4. Take a Reading Take a Reading Refer to the A&D Model UA-651 Instruction Manual for cuff application instructions. Tap Take BP or Take BP Take a Measurement a. Tap Take BP in the Blood Pressure tile (or Take a Measurement on VistaPhone and then Take BP). Take b. Tap Use Bluetooth (if not already selected).
-
Page 37: Weight (A&D Uc-352)
Section 28: Weight (A&D UC-352) The A&D UC-352 is an optional weight scale that can A&D UC-352 upload weight readings automatically using Bluetooth. Use as directed by your care team. Press Label SET Button Refer to the A&D Model UC-352 Instruction Manual for Battery basic instructions on setting up the scale, including Compartment... - Page 38 224 Airport Parkway, Suite 300, San Jose, CA 95110 | (408) 963-4600 | www.vitalconnect.com | support@vitalconnect.com © 2021 VitalConnect. A list of our trademarks can be found at www.vitalconnect.com. All other marks may be trademarks of their respective companies. IFU-26 Rev. J | December 2021...
Need help?
Do you have a question about the VistaPoint 3.2 and is the answer not in the manual?
Questions and answers