
Subscribe to Our Youtube Channel
Related Manuals for VitalConnect Vista Solution VistaPoint 2.0


Summary of Contents for VitalConnect Vista Solution VistaPoint 2.0
- Page 1 VitalConnect Vista Solution ® ™ VistaPoint ™ IFU-08, Rev D | Date: November 2019 Page 1 of 39...
-
Page 2: Table Of Contents
Chapter 1 About This Document ......................3 Disclaimer ..............................3 Related Documents ........................... 3 Indications for Use ............................. 3 About VitalConnect, Inc..........................4 Chapter 2 Preparing for Monitoring ...................... 5 Chapter 3 Pairing VitalPatch to VistaPoint ................... 7 Chapter 4 Using the VistaPoint Dashboard .................. -
Page 3: Chapter 1 About This Document
Chapter 1 About This Document The VistaPoint™ 2.0 application is used to display physiological information received from the VitalPatch ® biosensor and select third-party devices via the VistaTablet™ 2.0 relay device. The data displayed in the VistaPoint application are intended for use by healthcare professionals as an aid to diagnosis and treatment. -
Page 4: About Vitalconnect, Inc
About VitalConnect, Inc. VitalConnect is a leader in wearable biosensor technology for wireless patient monitoring in both hospital and remote patient populations. VitalConnect leverages extensive expertise in biomedical engineering, data analytics, chip design, and mobile and cloud software to create technology that supports decision- making paradigms that achieve better health and economic outcomes. -
Page 5: Preparing For Monitoring
Chapter 2 Preparing for Monitoring This chapter describes the steps that must be performed before beginning a monitoring session with the VistaPoint application. Step 1: Set Up VistaTablet a. Unpack the VistaTablet device and become familiar with its parts. Keep the packaging that was provided with the VistaTablet. - Page 6 Step 3: Unlock VistaTablet and Start VistaPoint a. Press the Home Key on the VistaTablet. See Figure 2. b. Swipe finger across the screen. c. Enter PIN provided by your care team. d. Select the VistaPoint icon from the home screen to start the VistaPoint Application Figure 2: Unlock and Start VistaPoint Step 4: Remove Previous VitalPatch Biosensor...
-
Page 7: Chapter 3 Pairing Vitalpatch To Vistapoint
Chapter 3 Pairing VitalPatch to VistaPoint Use the following procedure to pair the VitalPatch to the VistaPoint application. Step 1: Begin the Pairing Process Select Connect VitalPatch from the VistaPoint dashboard. See Figure 3. If a previous VitalPatch is still connected, disconnect it before continuing (see “When Monitoring is Complete”... - Page 8 Step 3: Calibrate Posture The Posture Calibration screen appears. Select the location where the VitalPatch biosensor was applied: Primary Patch position (Top) or Secondary Patch position (Bottom) and select Next. Next, select the patient’s body position to calibrate posture: Standing or Sitting (preferred) – the patient •...
- Page 9 Step 5: Recalibrate Body Temperature (Scheduled) To ensure accuracy of the body temperature measurement and to accommodate natural variation in body temperature due to circadian rhythms, VitalConnect recommends the following schedule for recalibrating body temperature: a. Recalibrate body temperature at least 30 minutes after applying the VitalPatch biosensor.
-
Page 10: Using The Vistapoint Dashboard
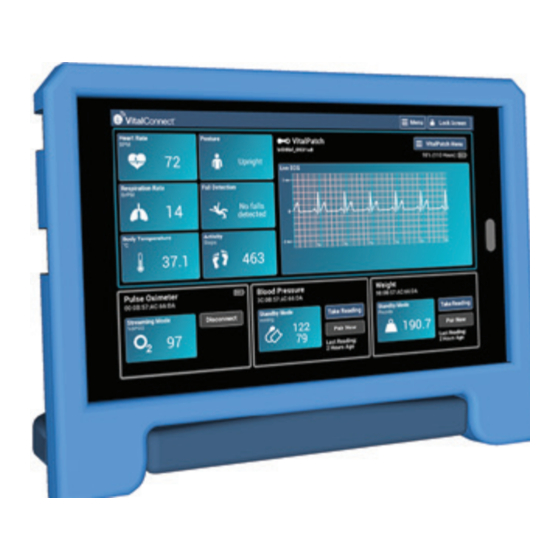
Chapter 4 Using the VistaPoint Dashboard When pairing is complete, you will be shown the VistaPoint dashboard with vital signs (see Figure 11 below). Do the following, as directed by your care team: • Keep the VistaTablet device powered on and charged. Keep the VistaTablet device near the VitalPatch biosensor much as possible (less than 30 feet) to ensure constant monitoring. -
Page 11: Using The Vistapoint Menu
Using the VistaPoint Menu The VistaPoint menu is found in the top right-hand corner of the application. From this menu you can: Start New Patient – This selection will discharge the previously paired • patient and allow a new patient to be connected. Discharge Patient –... -
Page 12: Dashboard Features
Dashboard Features Displayed data parameters include: • Heart Rate (BPM, beats per minute) Respiration Rate (BrPM, breaths per minute) • Temperature (Celsius or Fahrenheit) • If using a VitalPatch biosensor with firmware 1.4.0.x or • earlier, the Skin Temperature will be displayed. If using a VitalPatch biosensor with firmware 3.2.0.x or •... -
Page 13: Checking Vistatablet And Vitalpatch Battery Levels
Checking VistaTablet and VitalPatch Battery Levels VistaTablet Battery Level To check the VistaTablet battery level, look at the battery indicator in the status bar (see Figure 16). Do not let the battery run out. When the battery is low, the VistaTablet will sound a warning tone and then turn off. -
Page 14: When Monitoring Is Complete
Chapter 5 When Monitoring is Complete When the monitoring session is complete, use the following procedure to disconnect and remove the VitalPatch. Step 1: Disconnect VitalPatch in VistaPoint When monitoring is complete, select Disconnect VitalPatch from the VitalPatch menu. Select one of the following options: •... -
Page 15: Chapter 6 Troubleshooting
Chapter 6 Troubleshooting The chapter provides resolution procedures for the following issues: Message “VitalPatch Off Body” • • Message “VitalPatch Not Connected” Message “Patch Expires” or “Replace VitalPatch” • • Bluetooth Connection Issues Dashboard Stops Responding • • Cannot Power-On VistaTablet Message “VitalPatch Off Body”... -
Page 16: Message "Vitalpatch Not Connected
Replace the VitalPatch biosensor if any of the following occurs: The biosensor does not reconnect after several minutes. • • The “VitalPatch Off” message continues. The biosensor cannot be reapplied by pressing down to re-adhere. • The biosensor partially or completely falls off the skin. •... -
Page 17: Message "Patch Expires" Or "Replace Vitalpatch
Message “Patch Expires” or “Replace VitalPatch” The “WARNING: Patch Expires” message will be displayed when the battery life of the VitalPatch biosensor falls below 20 hours. Select OK to return to monitoring. The message will periodically reappear to display the time remaining. Replace the biosensor prior to the end of the battery life. -
Page 18: Cannot Power-On Vistatablet
Cannot Power-On VistaTablet If VistaTablet does not turn on, perform a restart as follows: 1. Plug VistaTablet into the charger. If the battery is completely discharged, the VistaTablet may need several minutes to recharge before you can restart the device (next step). 2. -
Page 19: Using The Nonin Model 3150 Pulse Oximeter
Chapter 7 Using the Nonin Model 3150 Pulse Oximeter This chapter describes how to use the Nonin Model 3150 Pulse Oximeter with the VistaPoint application for the purpose of monitoring oxygen saturation (%SpO ). The Model 3150 is a wrist-worn device that employs a replaceable, optical sensor worn on the fingertip. - Page 20 Figure 24: Confirm Model 3150 Operation Step 4: Pair New in VistaPoint Pair New a. In the Pulse Oximeter section of the VistaPoint display, tap the button. Figure 25: Begin Pairing Process for Pulse Oximeter b. VistaPoint prompts you to select the model of the Pulse Oximeter. Select Model 3150 (Wrist).
- Page 21 Figure 27: Select Bluetooth ID of the Pulse Oximeter d. VistaPoint displays the current oxygen saturation (%SpO ) value along with the Model 3150 battery status and Bluetooth ID in the Pulse Oximeter section: Figure 28: VistaPoint Displays Current Status from Model 3150 Operating the Model 3150 After the Model 3150 is paired with the VistaPoint application, it will continue to record and transmit the patient’s oxygen saturation as long as the patient is wearing the sensor and the batteries have not...
- Page 22 Figure 29: Low Battery Status and Indicator for Model 3150 After replacing the batteries, you will need to pair the Model 3150 to the VistaPoint application again. Pairing a New Model 3150 or Discontinuing Monitoring During normal operation it may be necessary to connect a different Model 3150 Pulse Oximeter to the VistaPoint application.
- Page 23 Status Recommended Action Low Battery Displayed when the Model 3150 batteries are near the end of their capacity. Refer to “Monitoring Battery Life” above for more information. Unexpected Disconnect Displayed when the Model 3150 is no longer connected to the VistaPoint application over Bluetooth: Unexpected disconnect will typically occur the Model 3150 is out of Bluetooth •...
-
Page 24: Using The Nonin Model 3230 Pulse Oximeter
Chapter 8 Using the Nonin Model 3230 Pulse Oximeter This chapter describes how to use the Nonin Model 3230 Pulse Oximeter with the VistaPoint application for the purpose of monitoring oxygen saturation (%SpO ). The Model 3230 is a self-contained pulse oximeter device that is clipped onto the patient’s fingertip. - Page 25 Step 3: Pair New in VistaPoint a. In the Pulse Oximeter section of the VistaPoint display, tap the Pair New button. Figure 32: Begin Pairing Process for Pulse Oximeter b. VistaPoint prompts you to select the model of the Pulse Oximeter. Select Model 3230 (Fingertip).
- Page 26 d. The Pulse Oximeter section of VistaPoint displays the current oxygen saturation (%SpO ) value along with the Model 3230 Bluetooth ID. The Model 3230 may now be used to upload oxygen saturation spot-check readings to the VistaPoint application. Refer to the following figure. Figure 35: VistaPoint Displays Current Status from Model 3230 Taking a Spot-Check Reading with the Model 3230 Use the following procedure to take a spot-check oxygen saturation (%SpO...
- Page 27 Figure 36: Model 3230 Spot Check Displayed on VistaPoint application Once the oxygen saturation (%SpO ) value has stabilized, the Model 3230 may be removed from the patient’s finger. After a short delay, the Model 3230 automatically turns off after the spot check is complete.
- Page 28 If oxygen saturation monitoring is no longer required, no additional action is necessary. Clean and store the Model 3230 per the instructions in the Nonin Medical Model 3230 Instructions for Use. Model 3230 Status Alerts During normal operation of the Model 3230, the screen of the device may display alerts that indicate device status or measurement status (for example, a low-quality reading or improper application).
-
Page 29: Chapter 9 Using The A&D Medical Ua-651 Blood Pressure Monitor
Chapter 9 Using the A&D Medical UA-651 Blood Pressure Monitor This chapter describes how to use the A&D Medical Model UA-651 Blood Pressure Monitor with the VistaPoint application for the purpose of monitoring blood pressure. The Model UA-651 is a self- contained blood pressure monitor that is applied to the patient’s arm on an as-needed basis. - Page 30 Figure 38 : Select Blood Pressure Monitor Model UA-651 c. On the Model UA-651, hold down the Start button until “Pr” is displayed. The device enters Bluetooth pairing mode: Figure 39:Placing the Model UA-651 in Pairing Mode d. VistaPoint scans for devices and displays a list of valid Bluetooth IDs. Select the Bluetooth ID that is printed on the bottom of the Model UA-651 above the battery compartment: Figure 40: Select Bluetooth ID of the Model UA-651 IFU-08, Rev D | Date: November 2019...
- Page 31 e. When pairing is complete, the Blood Pressure section on the VistaPoint application displays the paired Bluetooth ID. The Model UA-651 screen displays “End” before shutting off. The Model UA- 651 may now be used to upload blood pressure readings to the VistaPoint application. Figure 41: Pairing Complete on the Model UA-651 and the VistaPoint application Taking a Spot-Check Reading with the Model UA-651 Use the following procedure to take a spot-check blood pressure reading with a Model UA-651 that has...
- Page 32 Figure 42: Starting a Blood Pressure Reading Important: Cuff application and placement are critical for an accurate blood pressure reading. Refer to the A&D UA-651 Instruction Manual for application instructions. Note: If “Taking Reading” is not displayed on VistaPoint, you will need to repeat the pairing process.
- Page 33 Operating the Model UA-651 Refer to the following topics for routine operating procedures: Monitoring Battery Life and Replacing Batteries • Pairing a New Model UA-651 • • Model UA-651 Status Messages Monitoring Battery Life The VistaPoint application does not provide an indication of Model UA-651 battery status. Battery status is monitored from indicators provided on the Model UA-651 screen.
-
Page 34: Chapter 10 Using The A&D Medical Uc-352 Scale
Chapter 10 Using the A&D Medical UC-352 Scale This chapter describes how to use the A&D Medical Model UC-352 Scale with the VistaPoint application on the VistaTablet device for the purpose of monitoring weight. The UC-352 operates as a “spot check” device, meaning that it is suitable for taking a single measurement of weight at regular intervals (for example, once a day or on a schedule as directed by clinical personnel. - Page 35 Figure 45: Select Scale Model UC-352 c. On the Model UC-352, ensure the scale is off (front display is blank). Flip the scale over and hold down the button until “Pr” is displayed on the front screen. The device is now in Bluetooth pairing mode.
- Page 36 Figure 48: Pairing Complete on the Model UC-352 Scale and the VistaPoint application Taking a Weight Reading with the Model UC-352 Use the following procedure to take a weight reading with a Model UC-352 scale that has previously been paired with the VistaPoint application. Step 1: Launch VistaPoint If it is not currently running, launch the VistaPoint application.
- Page 37 Figure 49: Taking a Weight Reading Note: If “Taking Reading” is not displayed, you will need to repeat the pairing process. When the reading is complete, check that the measured weight is displayed in the Weight section of the VistaPoint application: Figure 50: Measured Weight Displayed on VistaPoint application Operating the Model UC-352 Refer to the following topics for routine operating procedures:...
- Page 38 Monitoring Battery Life The VistaPoint application does not provide an indication of Model UC-352 battery status. Battery status is monitored from indicators provided on the Model UC-352 screen. For information about checking the Model UC-352 battery status and replacing batteries, refer to the A&D Model UC-352 Instruction Manual. After replacing the batteries, you will need to pair the Model UC-352 to the VistaPoint application again.
-
Page 39: General Symbols
Federal (U.S.A.) law restricts this device to sale by or on the order of a physician. Legal Information © 2019 VitalConnect, Inc. A list of our trademarks can be found at www.vitalconnect.com. All other marks mentioned herein may be trademarks of their respective companies. Contact Information VitalConnect, Inc.
Need help?
Do you have a question about the Vista Solution VistaPoint 2.0 and is the answer not in the manual?
Questions and answers