Table of Contents
Advertisement
Quick Links
Advertisement
Table of Contents

Related Manuals for QYSEA FIFISH


Summary of Contents for QYSEA FIFISH
- Page 1 FIFISH Onshore Power Supply System Quick Start Guide V1.0...
-
Page 2: Table Of Contents
Contents Safety and Regulations………..............………...1 Introduction…………..................………2 FIFISH Onshore Power Supply System (OPSS) Protecting Box…..…......…2 FIFISH Onshore Power Supply System (OPSS)……….....………....…3 FIFISH OPSS Power Management (OPSS-PM)…….....………....……4 Electric Power Tank (E-Tank)…………….............……5 FIFISH Onshore Power Supply System (OPSS)Spool………........………5 Preparation……………...................……6 Connection……................……………7-10 Maintenance………................…………11-12 The indication of the led colors on OPPSS-PM……......……………13... -
Page 3: Safety And Regulations
Safety and Regulations Operating FIFISH products requests training and practice. Please read through this document before operating in water. 1. Unauthorized disassembly of any parts is prohibited. 2. Please ensure that you install and connect the AC power system after the ROV is powered off. -
Page 4: Introduction
Introduction FIFISH Onshore Power Supply System (OPSS) Protecting Box 1.Protecting Box 2.Protecting Box Button 3.Protecting Box Handle... -
Page 5: Fifish Onshore Power Supply System (Opss)
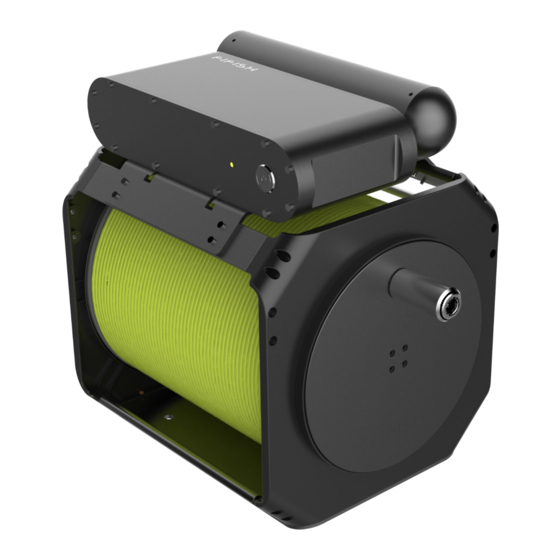
Introduction FIFISH Onshore Power Supply System (OPSS) 1.OPSS Power Management (OPSS-PM) 2.OPSS ROV Mount 3.The AC input cable for OPSS-PM 4.OPSS Spool(200M) 5.Electric Power Tank (E-Tank) - Page 6 Introduction FIFISH OPSS Power Management (OPSS-PM) 1.AC power output interface 2.AC power input interface 3.Switch Key 4.Power Indicator Normal work (no charging): green light Normal work (in charging): red light Other colors: Abnormal working condition (refer to the power indicator...
- Page 7 Introduction Electric Power Tank (E-Tank) ①Electric Power Tank (E-Tank) ② Tether ③ ROV Plug FIFISH 岸上供电线盘 OPSS Spool ④ AC Plug ⑤ RC Plug ⑥ Tether(200M)...
-
Page 8: Preparation
Preparation 1.Check the accessories are whether complete in Protecting Box 2.Check the appearance of all accessories for damage (1)Check OPSS Power Management (OPSS-PM) (2)Check OPSS ROV Mount (3)Check Onshore Power Supply System (OPSS)。 (4)Check OPSS Spool 3.Check each connection plug for damage or water ingress (1)Check each connection plug for damage (2)Check each connection cable for damage... - Page 9 Preparation 1.Connect the AC output plug and input plug(E-Tank) to correct AC interface.(OPSS-PM). AC output plug AC input plug Notice: Please ensure that you install and connect the AC power system after the ROV is powered off 2.Plug the AC input plug into the designated power socket. 3.Turn off the OPSS-PM, and cut off the AC power supply.
-
Page 10: Connection
Connection 1.Unfasten and take off the 4 fixing screws (NOT the 2 screws side) 2.Position the OPSS ROV mount on the top of ROV, and the side has 2 screws shall facing forward (the same with heading), the bracket end shall snap on horizontal thrusters 3.Fasten the 4 screws and the back (stern side) to secure the OPSS ROV mount, and twist to open the dowel pin... - Page 11 Connection 4.Pull out the dowel pin to unlock the E-Tank from OPSS Spool 5.Slid the E-Tank on OPSS ROV Mount, twist the dowel pin by 45° to secure the E-Tank Installation steps: (1) Align the E-tank to the end of the OPSS ROV mount. (2) Lock the dowel pin on OPSS ROV mount by pushing right and rotating counterclockwise 45°。...
- Page 12 Connection Plug the 3.5 mm end of OPSS Spool to FIFISH RC 2.Connect the AC input cable and Output tether on the OPSS-PM Twist the caps to secure the water-proof 3.Slid the E-Tank on OPSS ROV Mount(refer to the E-Tank installation description of on pages P9 and P10)...
-
Page 13: Maintenance
Maintenance After-Dive: 1.Please turn off the OPPSS-PM first, then unplug the AC Plug, finally power off the RC. 2.Unplug the connecting tethers from corresponding socket. 3.Take off the E-tank from ROV. (You can keep the OPSS ROV mount installing for next diving. 4.Check if there any connectors got water ingress or damage, make it dry and clean and then put on the special waterproof cap if everything normal. - Page 14 Maintenance 1. Check each connection plug for damage or water ingress after every dive. 2. Check O-ring for damage after every dive. 3. Check the tether after every dive. 4. Clean Electric Power Tank with clean fresh water after every dive. 5.
-
Page 15: The Indication Of The Led Colors On Oppss-Pm
The indication of the led colors on OPPSS-PM Green: Fully charged or no charging Yellow: Overheat alarm Red: Normal charging Purple: Overloading alarm Blue: Leakage alarm White: Overvoltage or under voltage alarm...
Need help?
Do you have a question about the FIFISH and is the answer not in the manual?
Questions and answers