Table of Contents
Advertisement
Quick Links
Advertisement
Table of Contents

Subscribe to Our Youtube Channel
Related Manuals for QYSEA FIFISH PRO


Summary of Contents for QYSEA FIFISH PRO
- Page 1 FIFISH PRO OPSS (Onshore Power Supply System) Quick Start Guide V1.2...
-
Page 2: Table Of Contents
Contents Safety and Regulations Introduction OPSS Protective Box Inside Box OPSS Spool OPSS Power Management (OPSS-PM) Electric Power Tank (E-Tank) Preparation Set-up 7-10 Packing After Dive Maintenance LED color index on OPSS-PM... -
Page 3: Safety And Regulations
Please read through this document before operating in water. 1. Unauthorized disassemble may cause the leakage problem, and damages on OPSS. Such type of safety issues is not responded to QYSEA’s legal liability. In addition, the warranty will not valid for unauthorized disassembled products. -
Page 4: Introduction
Introduction, Package OPSS Protective Box 1. Top Cap 2. Travel Lock Button 3. Handle Note: The travel lock button shall be locked when moving. -
Page 5: Inside Box
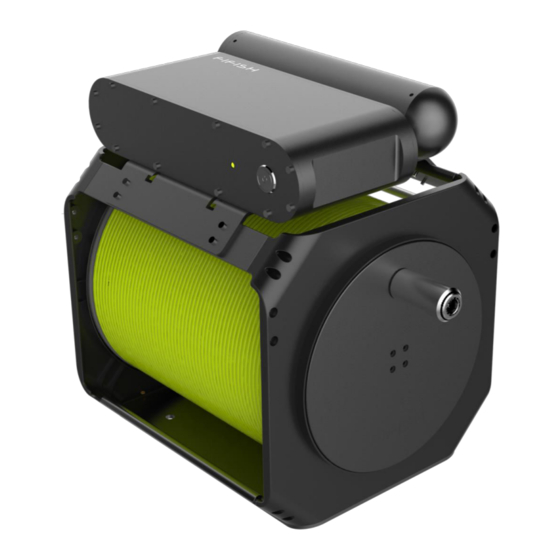
Introduction, Inside Box Inside Box 1. OPSS Spool (200 meters or 656 feet) 2. OPSS Power Management (OPSS-PM) 3. AC Input Cable for OPSS-PM 4. E-Tank Mount on ROV 5. Electric Power Tank (E-Tank) - Page 6 Introduction, OPSS Spool OPSS Spool 1. AC Input Plug (to OPSS-PM’s AC input socket) 2. AC Power input socket (190~265 V in AC) 3. Tether (200 meters or 656 feet)
- Page 7 Introduction, OPSS-PM OPSS Power Management (OPSS-PM) 1. AC Input socket (190~265 V in AC) 2. AC Output socket 3. ON/OFF 4. Status Indicator LED (Green: ready to charge, Red: charging battery) Other colors please check the LED color index on OPSS-PM in page 16...
-
Page 8: Electric Power Tank (E-Tank)
Introduction, E-Tank Electric Power Tank (E-Tank) 1. E-Tank 2. Securing Loop 3. ROV Plug... -
Page 9: Preparation
4. Check the remote controller and ROV 5. Check the cell phone, tablet, and laptop’s battery Note, run a test before dive (Power ON less than 3min). Set-up (OPSS set-up overview) For example, Outdoor power bank and FIFISH PRO V6 PLUS... -
Page 10: Set-Up
Set-up 1. Cable connection on OPSS-PM spool’s reel) 1.1. Plug AC output on OPSS-PM (another end to 1.2. Plug AC input on OPSS-PM (another end to Scoket) - Page 11 Set-up 2. Secure the E-Tank Mount on ROV 2.1. Unfasten and take off just one side of fixing screws. The stern side has 4 screws, and the 2 screws in bow side. Unfasten either side will work similar results. 2.2. Position E-Tank Mount on ROV (the E-Tank Mount shall LOCK on the middle thrusters and attach against the back of ROV)
- Page 12 Set-up 2. Secure the E-Tank Mount on ROV 2.3. Fasten the fixing screws 3. Lock the E-Tank on E-Tank Mount 3.1. PULL out, and ROTATE 45° the Dowel Pin on E-Tank Mount...
- Page 13 Set-up 3. Lock the E-Tank on E-Tank Mount 3.2. SLID the E-Tank on E-Tank Mount, then rotate Dowel Pin to lock E-Tank on Mount 4. Securing loop and ROV Plug 4.1. Knot the Securing Loop on ROV’s rear wing...
- Page 14 Set-up 4. Securing loop and ROV Plug 4.2. FASTEN the Securing Loop on rear wing 4.3. PLUG the ROV plug (Black color) in ROV tether connector and FASTEN the cap on ROV plug.
- Page 15 Set-up 5. Connect to RC 6. Plug to the AC socket (outdoor power bank or generator) 7. Power ON...
-
Page 16: Packing After Dive
Packing After Dive 1. Power OFF steps, 1.1. OPSS-PM OFF 1.2. Unplug from AC power socket 1.3. RC Power OFF 2. Disconnect the connectors and fasten the protective caps. Wipe out the water residues if necessary. 3. Unlock the E-tank from mount (the E-tank Mount is not necessary to take off for day-to-day use scenario) 4. -
Page 17: Maintenance
5. Check the ON/OFF button on OPSS-PM, get rid of the dust or sand if necessary. Contact our authorized service center or authorized dealer if you need help on repair or replacing. Email us: support@qysea.com Note: Do NOT rinse or wash the OPSS Spool with water. -
Page 18: Led Color Index On Opss-Pm
LED color index on OPSS-PM Green: Fully charged or no Yellow: Overheat alarm charging Red: Normal charging Purple: Overloading alarm Blue: Leakage alarm White: Overvoltage or under voltage alarm...
Need help?
Do you have a question about the FIFISH PRO and is the answer not in the manual?
Questions and answers