Sony PS-LX300USB Operating Instructions Manual
Stereo turntable system
Hide thumbs
Also See for PS-LX300USB:
- Specifications (2 pages) ,
- Operating instructions manual (73 pages) ,
- Service manual (14 pages)
Table of Contents
Advertisement
Advertisement
Table of Contents

Related Manuals for Sony PS-LX300USB


Summary of Contents for Sony PS-LX300USB
-
Page 2: Important Safety Instructions
WARNING To reduce the risk of fire or electric shock, do not expose this apparatus to rain or moisture. To prevent fire, do not cover the ventilation of the apparatus with news papers, table-cloths, curtains, etc. And don’t place lighted candles on the apparatus. - Page 3 The manufacturer of this product is Sony Corporation, 1-7-1 Konan Minato-ku, Tokyo, 108-0075 Japan. The Authorized Representative for EMC and product safety is Sony Deutschland GmbH, Hedelfinger Strasse 61, 70327 Stuttgart, Germany. For any service or guarantee matters, please refer to the addresses given in separate service or guarantee documents.
-
Page 4: Table Of Contents
Troubleshooting ... 17 Specifications ... 20 Parts and Controls ... 21 About This Manual Thank you for purchasing the Sony Stereo Turntable System. Before operating the unit, please read this manual thoroughly and retain it for future reference. IBM and PC/AT are registered trademarks of ... -
Page 5: Getting Started
Getting Started Unpacking Check that you received the following items with your turntable: Platter (with drive belt) (1) Rubber mat (1) 45 r/min adaptor (1) USB cable (1) CD-ROM, “Sound Forge Audio Studio LE” included (1) Operating Instructions (this manual) ... -
Page 6: To Instal/Remove Dust Cover
Carefully place the platter on the spindle. Use the ribbon to hook the drive belt around the motor pulley. Make sure not to twist the drive belt. After looping the belt, do not forget to remove the ribbon. Place the rubber mat on the platter. Turntable assembly is complete. -
Page 7: Connecting An Audio Device
Connecting an Audio Device The phono cable comes attached to the rear of the cabinet. Set the PHONO/LINE switch (on the rear of the turntable) according to the jacks of your stereo system (amplifier). • When your stereo system (amplifier) has PHONO input jacks (connect to PHONO input jacks) set to PHONO. -
Page 8: Operations
Operations Playing a Vinyl Record 45 r/min adaptor STOP Place a vinyl record on the platter. Note Place only one vinyl record on the platter at a time. If two or more vinyl records are stacked on the platter, the stylus will not make proper contact with the grooves and the quality of reproduction will be impaired. -
Page 9: Recording Audio Tracks On Your Computer
To pause playing Press the UP/DOWN button to raise the stylus off the vinyl record. To play a different part of the vinyl record After performing step 4, press the UP/ DOWN button, then lift the tone arm. Move the tone arm to the position you desire. - Page 10 Notes • For the operating environment mentioned above, the turntable is not guaranteed to operate with all computers. • The turntable is not guaranteed to operate with home built computers, operating systems that are personally up-graded or multiple operating systems. •...
- Page 11 Notes The turntable is not guaranteed to operate with a USB hub or USB extension cable. Use the supplied USB cable. Connect the USB cable into the USB jack/USB port securely, or may cause a malfunction. Disconnect the USB cable when it is not in use , or it ...
-
Page 12: Setting Up Computer: Windows 7
Setting up your computer: Windows 7 ([Control Panel] is in the [Category] view) Select [Control Panel] from the [Start] menu. Click [Hardware and sound]. Click [Manage audio devices] in [Sound]. Click the [Recording] tab, and check if [Default device] is set for [USB Audio CODEC]. - Page 13 Outputting audio through your computer’s speakers When first connecting the turntable and computer using the USB cable, [Speaker USB Audio CODEC] is automatically added to [Playback device], and set to [Default device]. In this state, audio is not output through your computer speakers. Set the computer according to the operating system you use as follows: Setting your default playback device using Windows XP...
- Page 14 Setting the default playback device in Sound Forge Audio Studio LE Start the Sound Forge Audio Studio LE software. Select [Preferences] from the [Options] menu. Select the [Audio] tab. Select [Microsoft Sound Mapper] from the [Audio device type] drop-down list. Click [Apply], and then click [OK] to close the [Preferences] screen.
-
Page 15: Additional Information
If you have any question or problem concerning your unit that is not covered in this manual, please consult your nearest Sony dealer. Note on recording The recorded music is limited to private use only. -
Page 16: Replacing Stylus
For a replacement stylus, consult your nearest Sony dealer. To remove the stylus Turn off and unplug the AC power cords of the turntable and amplifier. -
Page 17: Troubleshooting
The speaker cords are securely connected. Should any problem persist after you have made these checks, consult your nearest Sony dealer. Playing a vinyl record The tone arm skips, skates or does not advance. The turntable is not level. Place the turntable ... - Page 18 The drive belt is twisted. Straighten the belt. The drive belt is deteriorated. Replace the drive belt. For details, consult your nearest Sony dealer. Platter does not rotate. Make sure the power cord is inserted all the way into an AC wall outlet.
- Page 19 Notes For details on the operation of your computer, refer to the operating instructions of your computer. There can be some breakdowns that cannot be solved even with Troubleshooting. In such cases, contact your nearest Sony dealer.
-
Page 20: Specifications
Specifications Motor and Platter Drive system: Belt-drive Motor: DC motor Platter: 295 mm dia. (aluminum die-cast) Speeds: and 45 r/min, 2 speed Wow and flutter: Less than 0.25% (WRMS) Signal to noise ratio: More than 50 dB (DIN-B) Tone Arm Type: Dynamic balanced straight-shaped with soft damping control Effective arm length: 195 mm... -
Page 21: Parts And Controls
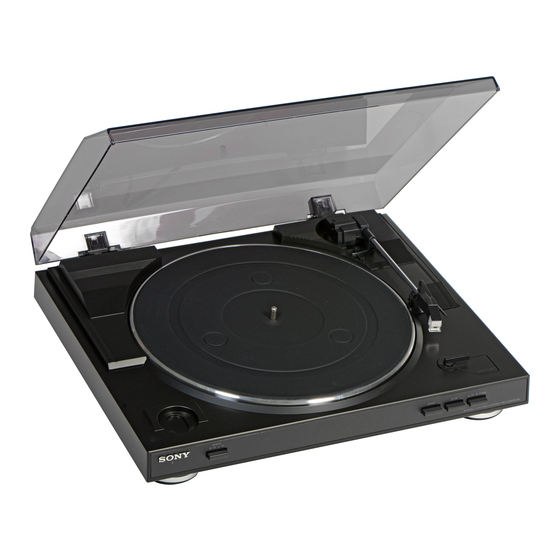
Parts and Controls Spindle 45 r/min adaptor Speed select button Rubber mat Platter Cartridge and headshell START button Insulator Dust cover Front Rear Hinge Tone arm Arm stand Finger lift SIZE SELECTOR STOP button...
Need help?
Do you have a question about the PS-LX300USB and is the answer not in the manual?
Questions and answers