Table of Contents
Advertisement
Advertisement
Table of Contents

Related Manuals for EDAN H10


Summary of Contents for EDAN H10
- Page 2 It is reminded that the product shall be used strictly complying with this manual. User’s operation failing to comply with this manual may result in malfunction or accident for which EDAN INSTRUMENTS, INC. (hereinafter called EDAN) cannot be held liable.
- Page 3 EDAN owns the copyrights of this manual. Without prior written consent of EDAN, any materials contained in this manual shall not be photocopied, reproduced or translated into other languages. Materials protected by the copyright law, including but not limited to confidential...
- Page 4 Assembly operations, extensions, re-adjustments, modifications or repairs are carried out by persons authorized by EDAN, The electrical installation of the relevant room complies with national standards, and The instrument is used in accordance with the instructions for use.
- Page 5 repairable by service personnel. Terms Used in this Manual This guide is designed to give key concepts on safety precautions. WARNING A WARNING label advises against certain actions or situations that could result in personal injury or death. CAUTION A CAUTION label advises against actions or situations that could damage equipment, produce inaccurate data, or invalidate a procedure.
-
Page 6: Table Of Contents
Table of Contents 1 Intended use/Indications for Use ....1 2 Precautions for Use ....... 2 3 Symbols ..........15 4 Installing Batteries ......19 5 Operation Instructions ......22 6 SpO Functional Test ......34 7 Assessing the Validity of a SpO Reading ........... - Page 7 A1.2 Specification ....... 59 A1.2.1 Size and Weight ....59 A1.2.2 Environment ......59 A1.2.3 Display ........ 60 A1.2.4 Batteries ......60 A1.2.5 Measurement Wavelengths . 61 A1.3 Displayed Parameters Specification ............. 62 Appendix II EMC Information ..... 64 A2.1 Electromagnetic Emissions ..64 A2.2 Electromagnetic Immunity ..
-
Page 8: Intended Use/Indications For Use
H10 Finger Oximeter User Manual 1 Intended use/Indications for Use The device is a small, lightweight, portable device intended for use in measuring and displaying functional oxygen saturation of arterial haemoglobin (%SpO ) and pulse rate (PR). The oximeters are intended for use by trained healthcare professionals in hospital environments. -
Page 9: Precautions For Use
H10 Finger Oximeter User Manual 2 Precautions for Use WARNING Do not use the device in an MRI or CT environment. Do not use the device in situations where alarms are required. The device has no alarms. Explosion hazard: Do not use the device in an explosive atmosphere. - Page 10 H10 Finger Oximeter User Manual WARNING Do not stretch the adhesive tape while applying the oximeter sensor. This may cause inaccurate readings or skin blisters. Carefully read the manual and check the device before using it. In some circumstances, the device may interpret motion as good pulse quality.
- Page 11 H10 Finger Oximeter User Manual WARNING 10 Significant concentration dysfunctional hemoglobins (such as carbonxy-hemoglobin methemoglobin) may affect the accuracy of the SpO measurement. 11 Intravascular dyes such indocyanine green or methylene blue may affect the accuracy of the measurement. 12 Batteries may leak or explode if used or disposed of improperly.
- Page 12 H10 Finger Oximeter User Manual WARNING 14 Don’t use different types of batteries at the same time. Don’t mix fully charged partially charged batteries at the same time. These actions may cause batteries to leak. 15 Fingernail polish or false fingernails...
- Page 13 H10 Finger Oximeter User Manual WARNING 18 Follow local governing ordinances and recycling instructions regarding disposal or recycling of the device and device components, including batteries. 19 The simultaneous use of cardiac pacemaker other patient-connected equipment may cause safety hazard.
- Page 14 H10 Finger Oximeter User Manual WARNING 22 If several items medical equipment are interconnected, pay attention to the sum of the leakage currents, otherwise it may cause shock hazard. Consult your service personnel. 23 Before using device, equipment and accessories should be checked.
- Page 15 H10 Finger Oximeter User Manual WARNING 25 Ensure that the environment in which the oximeter is used is not subject to any sources of strong electromagnetic interference, such radio transmitters, mobile telephones, microwaves, etc. 26 As with all medical equipment,...
- Page 16 H10 Finger Oximeter User Manual WARNING 29 Periodically check the battery for corrosion. Remove the batteries from the battery tray if the oximeter will not be used for a long time. 30 The equipment needs special precautions regarding EMC and...
- Page 17 H10 Finger Oximeter User Manual WARNING 32 The equipment should not be used adjacent to or stacked with other equipment. If adjacent or stacked use is necessary, you must check that normal operation is possible in the necessary configuration before you start monitoring patients.
- Page 18 H10 Finger Oximeter User Manual WARNING 35 Correct proper sensor application: if the sensor is too loose, it might compromise the optical alignment, and even cause the sensor to fall off. If the sensor is too tight, (such as the application site is...
- Page 19 H10 Finger Oximeter User Manual patient's condition and pressure sensor, inspect if there is sign of stress-related damage surrounding tissue, and regularly change the application site. For the patients whose fluid is easy to transfer and/or the patients with systemic or localized edema, users should inspect the skin and change application site more frequently.
- Page 20 H10 Finger Oximeter User Manual WARNING 38 Inspect the application site every two to three hours to ensure skin quality and correct optical alignment. If the skin quality changes, move the equipment to another site. Change the application site at least every four hours.
- Page 21 H10 Finger Oximeter User Manual WARNING 40 No modification of this equipment is allowed without authorization of the manufacturer. If this equipment is modified, appropriate inspection and testing must be conducted to ensure continued safe operation. 41 Operation equipment exceeding specified physiological...
-
Page 22: Symbols
H10 Finger Oximeter User Manual 3 Symbols Symbol Definition of Symbol SERIAL NUMBER Caution Disposal method No SpO Alarms Low battery indication Hemoglobin saturation Heart rate(BPM) - 15 -... - Page 23 H10 Finger Oximeter User Manual Symbol Definition of Symbol Battery orientation TYPE BF APPLIED PART Date of manufacture MANUFACTURER CE marking AUTHORISED REPRESENTATIVE IN THE EUROPEAN COMMUNITY Part Number - 16 -...
- Page 24 H10 Finger Oximeter User Manual Symbol Definition of Symbol Warning (Background: yellow; Symbol and outline: black) Operating instructions Refer User Manual (Background: blue; Symbol: white) General symbol for recovery/recyclable This way up Fragile - 17 -...
- Page 25 H10 Finger Oximeter User Manual Symbol Definition of Symbol Keep away from rain Ingress Protection IP22 (Protected against access to hazardous parts with a finger; Protected against solid foreign objects of 12.5 mm Ø and greater; Protected against vertically falling water drops when enclosure tilted up to 15°...
-
Page 26: Installing Batteries
H10 Finger Oximeter User Manual 4 Installing Batteries When the batteries are low, the low battery indication flashes once per second. Replace low batteries as soon as possible, following the instructions below. Hold the device as shown below, press upward and then pull outward slightly with your thumb to release the device’s... - Page 27 H10 Finger Oximeter User Manual Carefully guide the battery tray back onto the device, press downward and push inward slightly to re-secure the battery tray. Figure 1 Batteries Installation - 20 -...
- Page 28 H10 Finger Oximeter User Manual WARNING Battery polarities must be correctly installed. Otherwise, the device might be damaged. - 21 -...
-
Page 29: Operation Instructions
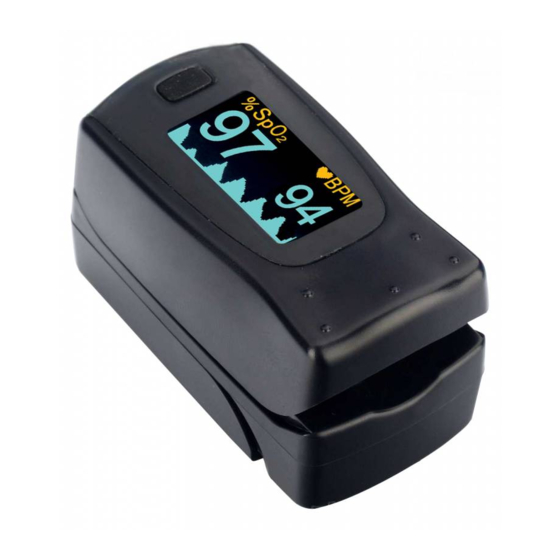
H10 Finger Oximeter User Manual 5 Operation Instructions Display Screen Low Batteries Indication Switch Button Figure 2 Front Panel Instruction The OLED display screen of the device displays blood oxygen saturation (SpO ) and - 22 -... - Page 30 H10 Finger Oximeter User Manual pulse rate (BPM) and provides a visual indication of the pulse signal. The displayed results of SpO and PR are refreshed every second. Stable measurement is obtained in approximately 30 seconds. The values of and pulse rate can be displayed properly when pulse saturation is at 0.6%.
- Page 31 H10 Finger Oximeter User Manual Press the switch button on front panel to turn on the device (The device will automatically shut off if the screen displays “ERR1” or “ERR2” signal for more than three seconds). Movement is not recommended during measurement.
- Page 32 H10 Finger Oximeter User Manual Figure 3 Six Display Modes You can press the switch button to turn on/off the PR tone in every display mode. When you press and hold the switch button for more than one second, the brightness of the device will change gradually.
- Page 33 H10 Finger Oximeter User Manual “No Finger”. device will automatically shut off when the signal of “No Finger” lasts for more than eight seconds. CAUTION The loss of pulse signal may occur when patient poor peripheral perfusion, screen will display “---”. When...
- Page 34 H10 Finger Oximeter User Manual CAUTION Do not touch accessible parts of medical or non-medical electrical equipment patient environment patient simultaneously. Clean and remove any substances such as nail polish from the application site. Periodically check to ensure that the sensor remains properly positioned on the patient.
- Page 35 H10 Finger Oximeter User Manual NOTE: The pictures and interfaces in this manual are for reference only. A Functional tester or simulator can not be used to assess the SpO accuracy. However, it can be used to demonstrate that a particular...
- Page 36 H10 Finger Oximeter User Manual intravascular venous infusion line, or inflated NIBP cuff. If the surrounding temperature increases, the operator should pay attention to the site of poor perfusion, increase frequency of checking the skin and changing the measurement site to prevent burns.
- Page 37 H10 Finger Oximeter User Manual Inspect the sensor to ensure that the light emitter and receiver are aligned with each other and there is no gap between the sensor and the finger. All the light emitted by the light emitter must pass through the patient's tissue.
- Page 38 H10 Finger Oximeter User Manual infrared heating lamps, and direct sunlight failure to cover the sensor with opaque material in high levels of ambient light conditions dysfunctional hemoglobins low peripheral perfusion excessive or violent patient movement ...
- Page 39 H10 Finger Oximeter User Manual arterial catheter, or intravascular line electromagnetic interference Low perfusion Loss of pulse signal can occur for the following reasons: a blood pressure cuff is inflated on the same extremity as the one with the sensor attached ...
- Page 40 H10 Finger Oximeter User Manual Adjacent sensors interfere with each other (eg, multiple SpO measurements in the same patient). Be sure to cover the sensor with opaque material to reduce cross-interference. Move the sensor to a less active site, and keep the patient still, if possible.
-
Page 41: Spo Functional Test
H10 Finger Oximeter User Manual 6 SpO Functional Test This test checks the function of the SpO measurement. Tools required: SpO simulator (Provided with a calibration curve approved by EDAN). Procedure: Connect the device and the SpO simulator. Switch on the device and the simulator. -
Page 42: Assessing The Validity Of A Spo Reading
H10 Finger Oximeter User Manual 7 Assessing the Validity of a Reading You can check the quality of the pleth wave and the stability of the SpO values to assess whether the sensor functions properly and whether the SpO readings are valid. Always... - Page 43 H10 Finger Oximeter User Manual unstable SpO readings are resulted from the sensor’s receiving signals with interference. The problems mentioned above may be caused by patient movement, wrong sensor placement or sensor malfunction. To obtain valid SpO readings, try to limit patient...
- Page 44 H10 Finger Oximeter User Manual fall within the specified accuracy compared CO-oximeter measurements. volunteer population studies are composed of healthy men and women from age 19 to 37, with various skin pigmentations. Note that the study population was healthy adults and not in the actual intended use population.
- Page 45 H10 Finger Oximeter User Manual disturbed, resulting inaccurate reading. In this case, the artifact can disguise as a similar reading, causing oximeter to fail to send an alarm. In order to ensure reliable monitoring, it is necessary to regularly check...
-
Page 46: Installing String
If the string use is desired, thread the string as shown below. Figure 4 String Installation WARNING Only the string provided by EDAN can be used. Other or longer ones may have risks for users, especially for children. - 39 -... -
Page 47: Maintenance
H10 Finger Oximeter User Manual 9 Maintenance The oximeter does not require calibration. Maintenance shall be carried out at least once every two years, or as specified by local regulations. If service is necessary, contact qualified service personnel or your local EDAN representative. - Page 48 H10 Finger Oximeter User Manual The overall check of the oximeter, including the safety check, should be performed only by qualified personnel once every 6 to 12 months, and each time after fix up. Periodic Safety Checks It is recommended that the following checks should be performed every 24 months: ...
- Page 49 H10 Finger Oximeter User Manual service contract from the local company’s office. If the hospital or agency that is responding to using the oximeter does not follow a satisfactory maintenance schedule, oximeter may become invalid, and the human health may be endangered.
- Page 50 H10 Finger Oximeter User Manual no visible contamination then daily cleaning and disinfection is appropriate. The validated cleaning agents for cleaning the oximeter and accessories are: Mild near neutral detergent Ethanol (75%) Isopropanol (70%) Cleaning agents should be applied and removed using a clean, soft, non-abrasive cloth or paper towel.
- Page 51 H10 Finger Oximeter User Manual Switch off the oximeter and take out the batteries. Wipe the entire exterior surface, including the screen, of the equipment using a soft cloth dampened with the cleaning solution thoroughly until visible contaminants remain. After cleaning, wipe off the cleaning...
- Page 52 H10 Finger Oximeter User Manual accessories before disinfecting. validated disinfectants for cleaning the oximeter and accessories are: Ethanol (75%) Isopropanol (70%) If Ethanol or Isopropanol is used for both cleaning and disinfecting, then a new cloth is required to be used for the disinfection step.
- Page 53 H10 Finger Oximeter User Manual CAUTION Although the oximeter chemically resistant to most common hospital cleaners, disinfectants non-caustic detergents, different cleaners or disinfectants are not recommended and may stain the oximeter, such disinfectant didecyl dimethyl ammonium bromide which contains quanternary ammonium salt.
- Page 54 H10 Finger Oximeter User Manual Disinfecting the Oximeter: WARNING Before disinfecting the oximeter, make sure that the oximeter is switched off and batteries are taken out. To disinfect the oximeter, follow these steps: Switch off the oximeter and take out the batteries.
- Page 55 H10 Finger Oximeter User Manual Dry the oximeter for at least 30 minutes in a ventilated and cool place. WARNING Sterilization may cause damage to the equipment therefore recommended for this oximeter unless otherwise indicated in your hospital’s servicing schedule.
-
Page 56: Accessories
H10 Finger Oximeter User Manual 10 Accessories Part Number Accessories 01.50.109744 One hang string 01.21.064111 1.5V AAA-size alkaline batteries 01.54.109755 One user manual NOTE: The part name may vary depending on context, but the part number is constant. - 49 -... -
Page 57: Troubleshooting
H10 Finger Oximeter User Manual 11 Troubleshooting Problems Possible Solutions Reason Device can’t Critical Please powered battery replace batteries Batteries might Please installed reinstall incorrectly batteries Please Device might contact be damaged local customer service centre “ERR 1” Drive circuit... - Page 58 H10 Finger Oximeter User Manual Problems Possible Solutions Reason “ERR 2” Drive circuit Please displayed on might contact OLED screen damaged local customer service centre Photoelectric Please sensor might be check damaged photoelectri shielded c sensor and remove the shielding...
- Page 59 H10 Finger Oximeter User Manual Problems Possible Solutions Reason or PR The sensor is Re-apply value can’t be applied the sensor shown incorrectly. Don’t normally There is very device bright light environmen t with high Patient is in low ambient...
-
Page 60: Warranty And Service Policy
H10 Finger Oximeter User Manual 12 Warranty and Service Policy 12.1 Warranty EDAN warrants that EDAN’s products meet the labeled specifications of the products and will be free from defects in materials workmanship that occur within warranty period. The warranty period begins on the date the products are shipped to distributors. - Page 61 EDAN will, at its discretion, repair or replace the defective part(s) free of charge. EDAN will not provide a substitute product for use when the defective product is being repaired.
-
Page 62: Service Policy
H10 Finger Oximeter User Manual 12.2 Service Policy All repairs on products must be performed or approved by EDAN. Unauthorized repairs will void the warranty. In addition, whether or not covered under warranty, any product repair shall be exclusively be performed by EDAN certified service personnel. - Page 63 Freight policy: Under warranty: the service claimer is responsible for freight & insurance charges when a return is shipped to EDAN for service including custom charges. EDAN is responsible for freight, insurance & custom charges from EDAN to service claimer.
- Page 64 H10 Finger Oximeter User Manual custom charges for product. Contact information: If you have any question about maintenance, technical specifications or malfunctions of devices, contact your local distributor. Alternatively, you can send an email to EDAN service department support@edan.com.cn. - 57 -...
-
Page 65: Appendix I Product Specification
H10 Finger Oximeter User Manual Appendix Product Specification A1.1 Classification Type of Protection Internally powered equipment (two 1.5V AAA alkaline batteries) Degree of Protection Type BF-Applied part Mode of operation Continuous working Enclosure Degree of IP22 ingress Protection Degree of Safety in... -
Page 66: A1.2 Specification
H10 Finger Oximeter User Manual ISO 80601-2-61: 2011 A1.2 Specification A1.2.1 Size and Weight Size 57 (L)×32 (W)×31 (H) (mm) Weight 57 (g) (Including battery) A1.2.2 Environment Temperature 5 C ~ 40 C (41 ℉~104 ℉) Working -25 C ~ 70 C (-13 ℉~158 ℉) -
Page 67: A1.2.3 Display
H10 Finger Oximeter User Manual Atmospheric pressure Working 70 kPa ~ 106 kPa Transport 70 kPa ~ 106 kPa and Storage A1.2.3 Display OLED display OLED display Bar graph 10-segment, OLED display Data update period one second A1.2.4 Batteries Power supply two 1.5V AAA -size alkaline... -
Page 68: A1.2.5 Measurement Wavelengths
H10 Finger Oximeter User Manual -size alkaline batteries Battery status symbols on screen Battery power symbol level High level Medium level Low level (Batteries are almost depleted and need to be replaced immediately. The device will turn off after 40 s when battery low symbol appears.) -
Page 69: A1.3 Displayed Parameters Specification
H10 Finger Oximeter User Manual Emitted light <15 mW energy NOTE: The information about wavelength range can be especially useful to clinicians (for instance, when photodynamic therapy is performed). A1.3 Displayed Parameters Specification Displayed range 35% ~ 99% 30 BPM ~ 240 BPM Accuracy 80%~99%, ±... - Page 70 H10 Finger Oximeter User Manual Resolution 1 BPM - 63 -...
-
Page 71: Appendix Ii Emc Information
A2.1 Electromagnetic Emissions Guidance and manufacturer’s declaration – electromagnetic emissions H10 is intended for use in the electromagnetic environment specified below. The customer or the user of H10 should assure that it is used in such an environment. Emissions test Compliance... - Page 72 H10 Finger Oximeter User Manual H10 uses RF energy only for its internal function. Therefore, its RF emissions RF emissions are very Group 1 CISPR11 low and are not likely cause interference in nearby electronic equipment. RF emissions Class B...
-
Page 73: A2.2 Electromagnetic Immunity
A2.2 Electromagnetic Immunity Guidance and manufacturer’s declaration – electromagnetic immunity H10 is intended for use in the electromagnetic environment specified below. The customer or the user of the oximeter should assure that it is used in such an environment. Immunity... - Page 74 H10 Finger Oximeter User Manual Surge environment. 1 kV for line IEC/EN61 to line 000-4-5 Mains power quality should be that of a 0 % U typical cycle At 0° , 45° , commercial Voltage 90° , 135° , hospital dips, short 180°...
-
Page 75: A2.3 Electromagnetic Immunity
A2.3 Electromagnetic Immunity Guidance and manufacturer’s declaration – electromagnetic immunity H10 is intended for use in the electromagnetic environment specified below. The customer or the user of H10 should assure that it is used in such an environment. Emissions IEC/EN 60601... - Page 76 H10 Finger Oximeter User Manual separation distance calculated from equation applicable the frequency transmitter. Recommende Conducted 3Vrms separation 150KHz distance IEC/EN 80MHz 61000-4-6 6Vrms in ISM bands between 0.15 MHz and 80 MHz 10 V/m 10 V/m Radiated 80MHz to 2.7...
- Page 77 H10 Finger Oximeter User Manual at RF wireless communicatio equipment bands (Portable communicatio equipment (including peripherals such antenna cables external antennas) should be used no closer than inches) to any part oximeter, including cables specified manufacturer). where p is the...
- Page 78 H10 Finger Oximeter User Manual rating of the transmitter watts(W) according the transmitter manufacturer and d is the recommended separation distance meters (m). Field strengths from fixed RF transmitters, as determined by electromagneti c site survey, should be less than...
- Page 79 RF transmitters, an electromagnetic site survey should be considered. If the measured field strength in the location in which H10 is used exceeds the applicable RF compliance level above, H10 should be observed to verify normal operation.
- Page 80 H10 Finger Oximeter User Manual 14 MHz to 14.2 MHz, 18.07 MHz to 18.17 MHz, 21.0 MHz to 21.4 MHz, 24.89 MHz to 24.99 MHz, 28.0 MHz to 29.7 MHz and 50.0 MHz to 54.0 MHz. Table 1 Test specifications for ENCLOSURE PORT IMMUNITY to...
- Page 81 H10 Finger Oximeter User Manual 800/9 TETR 800, Pulse 800-9 iDEN modul 820, ation 18 Hz 850, Band 1800; 1720 1900; Pulse modul 1700- 1900; ation 1990 DECT ; LTE 1845 Band 1, 3, 4, 25; 1970 - 74 -...
- Page 82 H10 Finger Oximeter User Manual Bluet ooth, Pulse 802.1 modul 2400- 2450 ation 2570 b/g/n, RFID 2450, Band Pulse 5240 modul 5100- ation 5500 5800 802.1 1 a/n 5785 NOTE If necessary to achieve the IMMUNITY TEST LEVEL, the distance between the transmitting antenna and the ME EQUIPMENT or ME SYSTEM may be reduced to 1 m.
-
Page 83: A2.4 Recommended Separation
RF communications equipment and H10 H10 is intended for use in an electromagnetic environment in which radiated RF disturbances are controlled. The customer or the user of H10 can help prevent electromagnetic interference by maintaining a minimum distance between portable and mobile RF communications equipment (transmitters) and H10 as recommended below, according to the maximum output power of the communications equipment. - Page 84 H10 Finger Oximeter User Manual For transmitters rated at a maximum output power not listed above, the recommended separation distance d in metres (m) can be estimated using the equation applicable to the frequency of the transmitter, where P is the maximum output power rating of the transmitter in watts (W) according to the transmitter manufacturer.
Need help?
Do you have a question about the H10 and is the answer not in the manual?
Questions and answers