Table of Contents
Advertisement
Quick Links
Advertisement
Chapters
Table of Contents

Related Manuals for Fora 6 Plus


Summary of Contents for Fora 6 Plus
- Page 1 Multi-Functional Monitoring System Owner's Manual 2020/03 311-0000000-043...
-
Page 2: Table Of Contents
Safety Information Important Information Introduction Intended Use Test Principle Product Overview Screen Display Getting Started Initial Setup Before Testing Calibration How to Code Your Meter (for β-ketone/ Total cholesterol/ Uric acid test) 10 Checking the Code Number Testing With Blood Sample Test Strip Appearance Inserting a Test Strip Preparing the Lancing Device... - Page 3 Transferring Data Data Transmission Via USB/ Strip_Port_ Comm Cable (FORA 6 Plus) Data Transmission Via Bluetooth (FORA 6 Connect) Maintenance Changing Battery Caring for Your Device Device Storage Meter Disposal Caring for Your Test Strips Important Control Solution Information Detailed Information...
-
Page 4: Safety Information
Safety Information Read the following Safety Information thoroughly before using the device. • Use this device ONLY for the intended use described in this manual. • Do NOT use accessories which are not specified by the manufacturer. • Do NOT use the device if it is not working properly or damaged. •... -
Page 5: Important Information
Important Information • Severe dehydration and excessive water loss may cause readings which are lower than actual values. If you believe you are suffering from severe dehydration, consult a healthcare professional immediately. • If your test results are lower or higher than usual, and you do not have symptoms of illness, first repeat the test. -
Page 6: Introduction
Home use is limited to capillary blood from the finger tip and the approved sites. Test Principle With different types of test strips, your FORA 6 Plus / Connect Multi-functional Monitoring System allows you to measure the amount of blood glucose, hematocrit, hemoglobin, β-Ketone, total cholesterol and uric acid levels in whole... -
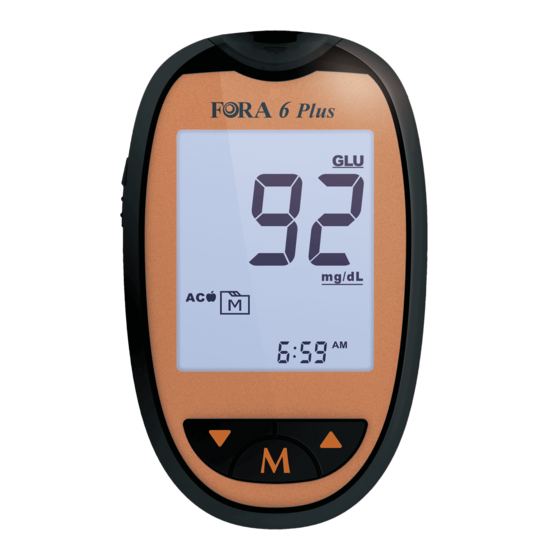
Page 7: Product Overview
Product Overview 1. Test Strip Slot / Strip Port Comm (FORA 6 Plus) 9. Bluetooth Indicator 2. Strip Indication Light (FORA 6 Connect) 3. Test Strip Ejector 4. Battery 5. Display Screen 8. UP Button Compartment 7. MAIN Button 6. Down Button... -
Page 8: Screen Display
Screen Display 1. Ketone Symbol / Ketone 8. Warning Symbol Warning 9. Hemoglobin Symbol 2. Total Cholesterol Symbol 10. Date & Time 3. Test Result 11. Hematocrit Level 4. QC Mode 12. Measurement Unit QC – control solution testing 13. Uric Acid Symbol 5. -
Page 9: Getting Started
Getting Started Initial Setup Please follow the initial setup procedure before using the device for the first time or after you have replaced the battery. When the battery power is extremely low and “ & ” appears on the screen, the meter cannot be turned on. Step 1: Enter the Setting Mode 1. - Page 10 Set [Reminder Set [Alarm Set [Alarm Alarm] Time (Hour)] Time (Minute)] Note: • Press to select Beep On, Universal Tone On or Beep Off. Press MAIN button to confirm. • When Universal Tone is turned on, the meter guides you through the blood glucose test using beep tones;...
-
Page 11: Before Testing
Before Testing Calibration You must calibrate the meter every time you begin to use a new vial of β-ketone/ Total cholesterol/ Uric acid test strips by setting the meter with the correct code. Test results may be inaccurate if the code number displayed on the monitor does not match the number printed on the strip label or strip foil pack. -
Page 12: Testing With Blood Sample
Testing With Blood Sample Test Strip Appearance Absorbent Hole Apply a drop of blood Confirmation Window here. The blood will be This is where you confirm automatically absorbed. if enough blood has been applied to the absorbent hole in the strip. Test Strip Handle Hold this part to insert Contact Bars... -
Page 13: Inserting A Test Strip
Inserting a Test Strip Insert the test strip into its slot. Important! The front side of test strip should face up when inserting the test strip. Test results might be wrong if the contact bar is not fully inserted into the test slot. Important! To reduce the chance of infection: •... -
Page 14: Obtaining The Blood Sample
Obtaining the Blood Sample Please follow the suggestions below before obtaining a drop of blood: • Wash and dry your hands before starting. • Select the puncture site either on your fingertips or other body parts. • Rub the puncture site for about 20 seconds before penetration. Blood from the fingertip 1. - Page 15 Alternative site testing (AST) is when individuals check their blood glucose levels using other areas of the body other than the fingertips. The FORA test strips allow AST to be performed on sites other than the fingertips. Please consult your health care professional before you begin AST.
-
Page 16: Performing A Test
Important! • Do not use results from alternative site samples to calibrate continuous glucose monitoring systems (CGMS), or for insulin dose calculations. • Choose a different spot each time you test. Repeated punctures at the same spot may cause soreness and calluses. •... - Page 17 3. Obtain a blood sample. Use the pre-set lancing device to puncture the desired site. Wipe off the first appeared drop of blood with a clean cotton swab. Gently squeeze the punctured area to obtain another drop of blood. Be careful NOT to smear the blood sample.
-
Page 18: Ketone Warning
5. Read your result. The results of your test will appear after the meter counts down to 0. The results will be stored automatically in the meter memory. Uric Acid Blood Glucose / Hematocrit/ Hemoglobin Blood Glucose -Ketone Total cholesterol Ketone Warning •... -
Page 19: Announcement Of Test Result By Universal Tone
Announcement of Test Result by Universal Tone The blood glucose results will be broken down into individual digits and each digit represents the corresponding number of beeps. The result is announced three times in succession and each time is preceded by two quick beeps. -
Page 20: Control Solution Testing
Control Solution Testing Our Control Solution contains a known amount of substance that reacts with test strips and is used to ensure your device and test strips are working together correctly. Test strips, control solutions, or sterile lancets may not be included in the kit (please check the contents on your product box). -
Page 21: Reviewing Test Results
Note: To avoid contaminating the control solution, do not directly apply the control solution onto a strip. 4. Read and compare the result. After counting down to 0, the test result of the control solution will appear on the display. Compare this result with the range printed on the test strip vial or individual foil pack and it should fall within this range. - Page 22 To review the day-average test results, do the following: 1. Press and release to enter memory mode for average results with “ ” and displayed on the screen. And then your 7-day average result measured in general mode will appear on the display. 2.
-
Page 23: Announcement Of Memory Result By Universal Tone
Connect the USB/ Strip_Port_Comm cable to a USB port on your computer. With FORA 6 Plus switched off, connect the other end of the USB/ Strip_Port_Comm cable to the FORA 6 Plus data port. “PC” will appear on the meter display, indicating that the meter is in communication mode 3. -
Page 24: Data Transmission Via Bluetooth (Fora 6 Connect)
1. Install the software (iFORA HM) to your device with an iOS or Android system. 2. Every time the FORA 6 Connect is turned off, the Bluetooth will be initiated for data transmission. The Bluetooth indicator flashes in blue. 3. Make sure your FORA 6 Connect is already paired with your device with an iOS, Android system or PC by following the instructions as below. -
Page 25: Maintenance
FORA 6 Connect will automatically switch off. 5. If your device with an iOS, Android system or PC is not within the receiving range, the FORA 6 Connect will automatically switch off in 2 minutes. Note: • While the meter is in transmission mode, it will be unable to perform a blood glucose test. -
Page 26: Caring For Your Device
Note: • Replacing the battery does not affect the test results stored in memory. • Keep away the battery from small children. If swallowed, promptly seek medical assistance. • Battery may leak chemicals if unused for a long time. Remove the battery if you are not going to use the device for an extended period. -
Page 27: Caring For Your Test Strips
Caring for Your Test Strips • Storage conditions: 2ºC to 30ºC (35.6ºF to 86ºF) and below 85% relative humidity for all test strips (blood glucose, blood glucose/hematocrit/hemoglobin, β-ketone, total cholesterol, uric acid). Do NOT freeze. • Store your test strips in their original vial only. Do not transfer to another container. -
Page 28: Detailed Information
Detailed Information The meter provides you with plasma equivalent results. Desirable ranges: Fasting and < 5.6 mmol/L(100 mg/ Normal plasma before meal glucose range for people without 2 hours after < 7.8 mmol/L (140 diabetes * meals mg/dL) < 200 mg/dL (5.17 Total cholesterol * mmol/L) 3.5 ~ 7.2 mg/dL (0.208 ~... -
Page 29: Symbol Information
*1. American Diabetes Association. Standards of Medical Care in Diabetes- 2018 Jan; 41(Supplement 1): S1-S2. *2. Third Report of the National Cholesterol Education Program (NCEP) Expert Panel on Detection, Evaluation, and Treatment of High Blood Cholesterol in Adults (Adult Treatment Panel III) final report(2002).Circulation106: 3143–3421 *3. -
Page 30: Troubleshooting
Troubleshooting If you follow the recommended steps but the problem persists, or error messages other than the ones below appear, please call your local customer service. Do not attempt to repair the device yourself and never try to disassemble the device under any circumstances. -
Page 31: Error Message
Total Cholesterol Test: Message What it Means < 100 mg/dL (2.65 mmol/L) > 400 mg/dL (10.4 mmol/L) Uric Acid Test: Message What it Means < 3 mg/dL (0.179 mmol/L) > 20 mg/dL (1.190 mmol/L) Error Message Error Message Cause What To Do There is insufficient power Replace the batteries immediately and in the batteries to perform... - Page 32 Meter calibration data error. The component of the Review the instructions and repeat device might be broken. the test with a new strip and using the correct technique. If the problem persists, contact your local customer service for Meter malfunction due to assistance.
-
Page 33: Announcement Of Error Message By Universal Tone
Announcement of Error Message by Universal Tone • Hi or Lo Blood Glucose Result: - Results larger than 33.3 mmol/L (600 mg/dL) are represented as 999, i.e. three groups of nine short beeps with pauses between the groups. - Results lower than 0.5 mmol/L (10 mg/dL) are represented as 000, i.e. three long beeps. - Page 34 Error in performing Read instructions thoroughly and the test. repeat the test again. Shake the control solution Control solution vial vigorously and repeat the test was poorly shaken. again. Expired or Check the expiration date of the contaminated control solution. The control solution control solution.
-
Page 35: Specifications
89.8 (L) x 54.9 (W) x 18 (H) mm Power Source One 1.5V AAA alkaline battery Weight 46.1 g (without battery) USB/ Strip_Port_Comm Cable (FORA 6 Plus) External output Bluetooth (FORA 6 Connect) Auto electrode insertion detection Auto sample loading detection... - Page 36 Blood Glucose Test: 0 ~ 70% Blood Glucose/Hematocrit/Hemoglobin Test: 0 ~ 70% Hematocrit range ß-ketone Test: 10 ~ 70% Uric Acid Test: 20 ~ 60% Total Cholesterol Test: 20 ~ 60% Blood Glucose Test: Capillary/ Venous/ Neonatal/ Arterial Blood Glucose/Hematocrit/Hemoglobin Test: Capillary/ Venous/ Neonatal/ Arterial Test Sample ß-ketone Test: Capillary/ Venous...
-
Page 37: Warranty Terms And Conditions
Warranty Terms and Conditions With respect to disposable products, ForaCare Suisse warrants to the original purchaser that, at time of delivery, each standard product manufactured by ForaCare Suisse shall be free from defects in material and workmanship and, when used for the purposes and indications described on the labeling, is fit for the purposes and indications described on the labeling. - Page 38 福爾旗艦6合1測試系統 Multi-Functional Monitoring System 使用說明書...
- Page 39 目錄 使用之前 前言 效能 注意事項 健康資訊 認識產品 系統組成內容 採血器具 採血深度選擇 按鍵功能及外觀 螢幕顯示說明 試片簡介 安裝及設定 電池安裝 機器設定 開始測量 採血器具準備 血糖測量步驟 血糖/紅血球容積比/血紅素測量步驟 酮體測量步驟 膽固醇測量步驟 尿酸測量步驟 測量結果輔助指示 提示音播報量測結果...
- Page 40 品管液測試 使用時機 血糖品管液測量步驟 酮體品管液測量步驟 膽固醇品管液測量步驟 尿酸品管液測量步驟 數值範圍 檢閱記憶資料 在機器上看記憶結果 提示音播報記憶結果 在應用程式上看記憶結果 清潔與保存 清潔 保存 故障排除指引 故障訊息解讀 提示音播報錯誤訊息 異常狀況排除指引 包裝標示說明 產品規格...
-
Page 41: 使用之前
使用之前 前言 感謝您選用福爾旗艦6合1測試系統產品。 請使用包裝內所附的保證卡與經銷商註冊,以便日後維修與售後服務。 在使用本產品之前,請您先詳讀本說明書並遵照指示進行量測。 效能 本產品為體外診斷醫療器材,用於定量檢測血液中葡萄糖、紅血球容積比、酮體、 總膽固醇及尿酸含量。葡萄糖、紅血球容積比及酮體測量需使用新鮮的微血管全血 或靜脈全血。總膽固醇及尿酸測量需使用新鮮的微血管全血。提供專業醫護人員或 個人自我測試使用,不適用於疾病的診斷及篩查。本產品亦可顯示血紅素計算值。 注意事項 ˙本產品所測量出來的數值僅供參考。請聽從醫師指示用藥,切勿自行診斷及改變 用藥。 ˙當您的測試結果過低、過高或異於平常量測結果,或您感覺身體狀況和測試數值 不符合時,請諮詢醫師。 ˙嚴重脫水或過量流失水份,可能會造成錯誤的測試結果。若您確定有脫水情況, 請諮詢醫師。 ˙請勿使用過期的品管液與試片,否則將會產生錯誤的測試結果。 ˙試片請存放於兒童無法取得之處,防止兒童誤食。 ˙丟棄採血針、使用過的試片或使用過的電池時,請遵守當地的法令規定。 ˙請使用拋棄式採血器具,並限單次使用。 ˙每一次測試結果後,應適當的清潔機器,去除感染源。 ˙專業醫護人員為病患進行檢測時,請全程配戴手套;為不同病患進行檢測時,應 更換手套。請遵循所在機構的感染控制程序或消毒常規操作。 ˙本產品亦供自我測試使用。... -
Page 42: 健康資訊
健康資訊 血糖 依據美國糖尿病學會建議,應盡量將血糖控制在標準血糖值範圍: 時段狀態 正常人血糖值範圍 < 5.6 mmol/L 空腹或餐前 < 7.8 mmol/L 飯後2小時 資料來源: American Diabetes Association. Standards of Medical Care in Diabetes- 2018 Jan; 41(Supplement 1): S1-S2. 血酮 血液中β-酮體(β-OHB)濃度應低於0.6mmol/L。 血酮濃度升高可能由疾病、節制飲食、劇烈運動或是血糖濃度控制不好所引起的。 當血酮濃度介於0.6~1.5mmol/L時,表示可能發生了需要就醫的問題,請遵循醫療 保健人員的建議;當血酮濃度高於1.5mmol/L時,表示您可能患有糖尿病酮酸中毒 (DKA)的風險,請立即尋求專業醫護人員協助。 資料來源: Wiggam MI, O’Kane MJ, Harper R, Atkinson AB, Hadden Dr, Trimble ER, Bell PM. Treatment of diabetic ketoacidosis using normalization of blood 3-hydroxybutyrate concentration as the endpoint of emergency man- agement. -
Page 43: 認識產品
認識產品 系統組成內容 完整的系統包括下列物件: 以下產品可另外選購: 1. 測試儀 1. 血糖試片 6. 尿酸試片 2. 使用說明書 2. 3合1試片 7. 血糖品管液 3. 收納袋 3. 採血針 8. 酮體品管液 4. 簡易操作指南 4. 酮體試片 9. 膽固醇品管液 5. 血糖記錄本 5. 總膽固醇試片 10.尿酸品管液 6. 保證卡 7. 採血筆 8. 1.5V AAA鹼性電池 採血器具... -
Page 44: 按鍵功能及外觀
按鍵功能及外觀 電池蓋 試片插入後進入測量模式 向下鍵 M鍵(記憶鍵) 開機、進入記憶瀏覽和設定機器參數 向上鍵 藍牙指示燈(FORA 6 Connect) 試片指示燈 試片插孔/ 資料埠 (FORA 6 Plus) 試片插入後進入測量模式 退片鍵... -
Page 45: 螢幕顯示說明
螢幕顯示說明 酮體符號/酮體警示 血紅素(Hb)測量結果顯示區/ 時間/日期 膽固醇符號 血球容積比(HCT)測量結果顯示區 血糖/酮體/膽固醇/尿酸 測量單位 測量結果顯示區 尿酸符號 測量模式(品管) 血糖符號 測量模式(一般/飯前/飯後) 低電量符號 記憶符號 提示音符號 平均值符號 試片符號 錯誤訊息符號 血滴符號 血紅素(Hb)符號 密碼... -
Page 46: 試片簡介
試片簡介 試片利用電化學原理提供定量的生理參數檢測。當試片上的吸入口和血液接觸後, 由於毛細管作用,血液會自動充滿反應區。血液中之檢測標的與反應區內所含之化 學試劑進行反應後,其所產生之電流藉由機器測得訊號強弱,進而換算成數值,於 機器螢幕上顯示出來。 血糖試片 3合1試片 酮體試片 膽固醇試片 尿酸試片 1. 吸入口:將血滴靠近此區域,血液可自動被吸入反應區。 2. 反應區:血液中的檢測標的與試劑產生反應的區域。 3. 手持區:拿取試片的部位。 4. 電極接受區:插入機器的區域,可接受反應後所產生的電流。 請注意:試片詳細說明請見試片說明書。 使用注意: 反應區必須完全蓋滿血液。 吸血量不足或失敗時 試片插入機器時,請以正 (未一次吸取完成),請勿 面置入。 再使用,請丟棄試片,並 試片之電極接受區必須完 使用新試片再測一次。 全插入插孔,否則測試可 能會出現錯誤果。... -
Page 47: 安裝及設定
安裝及設定 電池安裝 本產品使用1顆1.5V AAA鹼性電池。 當螢幕出現 ,代表電量過低,請立即更換電池。 更換前,請確認機器於關機狀態。 安裝步驟 步驟1 推一下電池蓋上面凸起的部分,將蓋子往上拉。 步驟2 放入新電池,請注意正負極位置。 步驟3 電池位置安裝正確後,再蓋上電池蓋。 請注意: ˙電池應遠離幼小的孩童,避免吞食。如不幸吞食,請立即尋求醫生的協助。 ˙請勿使用劣質或過期電池,以避免造成量測誤差。 ˙長時間不使用機器,建議您將電池取出,以免電池內的化學物質滲漏。 ˙丟棄使用過的電池時請遵守當地的法令規定。 機器設定 本機器可設定:日期(年/日/月)、時間(小時/分鐘)、量測結果提示音(Ut)/蜂鳴提示 音、刪除記憶、及鬧鈴等。上下鍵 與M鍵為設定之主要按鍵。 步驟與螢幕顯示順序如下: 請於關機狀態下(無插入試片),同時長按向上鍵 及向下鍵 進入設定模式。... - Page 48 1.西元年份首先出現並閃 2.設定月份 3.設定日期 爍,按上下鍵 調整數 按 上 下 鍵 調 整 數 字 按 上 下 鍵 調 整 數 字 字後,再按M鍵至下一步。 後,再按M鍵至下一步。 後,再按M鍵至下一步。 4.設定小時 5.設定分鐘 按上下鍵 調整數字 按上下鍵 調整數字 後,再按M鍵至下一步。 後,再按M鍵至下一步。 6.設定量測結果提示音(Ut)/蜂鳴提示音 按上鍵 選擇開啟或關閉量測結果提示音(Ut)及蜂鳴提示音,再按M鍵至下一 步。 當量測結果提示音(Ut)功能開啟後,測量結果會以蜂鳴聲播報。 關閉蜂鳴提示音不影響鬧鈴功能。...
- Page 49 7.刪除記憶 若欲刪除全部記憶資料,按上鍵 選擇yes,再按下M鍵,此時”---“出現在畫面, 即代表全部記憶已被刪除;若您不想刪除記憶,按M鍵選擇no,再按M鍵繼續下 一步。 8.設定鬧鈴 本機器可設定四組鬧鈴,按上下鍵 進行選擇,再按M鍵確認。 請注意: ˙參數的設定只能在設定模式下進行。 ˙按住上下鍵 不放,數字會跑得比較快。 ˙閒置超過3分鐘,機器會自動關機。...
-
Page 50: 開始測量
開始測量 測量小叮嚀 ˙採血部位請選擇有肉處,避免接近骨頭。並避免同一部位重複採血。 ˙罐裝試片開封後,請先於瓶身記下首次開瓶日期。開封後於90天內使用完畢。 ˙鋁箔紙試片開封後,請盡速使用該試片。 ˙試片必須完全插入插槽,否則可能會出現錯誤結果。插入時請注意方向及正反面。 ˙機器執行倒數時,表示反應正在進行。此時若發覺反應區內並沒有完全被血液充 滿,請不要嘗試補充血液。請丟棄此試片,並使用新試片再測一次。 ˙將試片插入機器後,如果3分鐘內未置入血液檢體,機器將會自動關機。此時請將 試片取下並重新插入,並再進行一次採血。 ˙丟棄採血針時,請將針頭刺入採血針針頭護蓋後再行丟棄,避免刺傷人。 ˙關於本產品的血糖測量追溯以ISO 15197作為標準。 採血器具準備 步驟1 旋轉採血筆蓋後取下採血筆蓋。 步驟2 請用大拇指輕掐住「採血針置入處」凹槽 部位,再將採血針『完全套入到底』,確 定緊固。... - Page 51 步驟3 旋轉取下採血針針頭護蓋。 步驟4 將採血筆蓋套回並固定。 步驟5 ˙選擇採血深度。 ˙採血深度說明請見“採血器具”。 步驟6 雙手握住筆身及筆桿並往後拉,使產生 喀一聲。此時,按鈕內的顏色會發生變 化,代表設定完成,請置於一旁備用。...
-
Page 52: 血糖測量步驟
血糖測量步驟 步驟1 插入試片 血糖試片完全插入後,機器將自動啟動 並執行自我檢測約1秒。 正常狀況下,將依序顯示右圖畫面。 步驟2 按上下鍵 選擇測量模式。 測量模式 螢幕同時伴隨的標示 選擇條件參考 一般 在無法確定是飯前或飯後的情況下選擇。 飯前 空腹8小時候所量測的血糖值。 飯後 餐後2小時後所量測的血糖值。 步驟3 採血 1. 清洗雙手,使其保持乾燥。 2. 輕輕按摩採血部位使其充血。 3. 以酒精棉片消毒後,待酒精揮發完全。 4. 將採血筆牢牢抵住採血部位,按下採血筆側 面的按鈕。 5. 聽到喀聲時代表採血動作已經完成。 6. 輕輕擠壓穿刺的周邊部位以取得足夠的血量。... - Page 53 步驟4 吸入血液 將試片吸入口以45度靠近手指上的血液,血液會被自動吸入,待反應區內吸滿血量 後再移開。 請注意: ˙請不要用手指壓在試片上,或使用散開的血液樣本。 ˙請不要將血液直接滴在吸入口上,此舉會造成錯誤的 測試結果。 步驟5 得到結果 待機器倒數至0後,測量結果會出現於螢幕上。 測試結果會自動儲存於機器記憶中。 血糖測試結果會以mmol/L為單位顯示。 步驟6 關機 輕推退片鈕,即可自動將試片自機器中退出,或用手將試片取下,機器將會自動 關機。請將採血針頭刺入採血針針頭護蓋後再行丟棄。...
-
Page 54: 血糖/紅血球容積比/血紅素測量步驟
血糖/紅血球容積比/血紅素測量步驟 步驟1 插入試片 3合1試片完全插入後,機器將自動啟動 並執行自我檢測約1秒。 正常狀況下,將依序顯示右圖畫面。 步驟2 按上下鍵 選擇測量模式。 測量模式 螢幕同時伴隨的標示 選擇條件參考 一般 在無法確定是飯前或飯後的情況下選擇。 飯前 空腹8小時候所量測的血糖值。 飯後 餐後2小時後所量測的血糖值。 步驟3 採血 1. 清洗雙手,使其保持乾燥。 2. 輕輕按摩採血部位使其充血。 3. 以酒精棉片消毒後,待酒精揮發完全。 4. 將採血筆牢牢抵住採血部位,按下採血筆側 面的按鈕。 5. 聽到喀聲時代表採血動作已經完成。 6. 輕輕擠壓穿刺的周邊部位以取得足夠的血量。... - Page 55 步驟4 吸入血液 將試片吸入口以45度靠近手指上的血液,血液會被自動吸入,待反應區內吸滿血量 後再移開。 請注意: ˙請不要用手指壓在試片上,或使用散開的血液樣本。 ˙請不要將血液直接滴在吸入口上,此舉會造成錯誤的 測試結果。 步驟5 得到結果 待機器倒數至0後,測量結果會出現於螢幕上。 測試結果會自動儲存於機器記憶中。 血糖測試結果會以mmol/L為單位顯示。 紅血球容積比測試結果會以%為單位顯示。 血紅素計算值則會以g/dL為單位顯示。 Hb(血紅素)= HCT(血球容積比)*0.34[1] 步驟6 關機 輕推退片鈕,即可自動將試片自機器中退出,或用手將試片取下,機器將會自動 關機。請將採血針頭刺入採血針針頭護蓋後再行丟棄。 資料來源 [1] Effect of Protein on Hemoglobin and Hematocrit Assays with a Conductivity-Based Point-of-Care Testing Device: Comparison with Optical Methods. Annals of Clinical & Laboratory Science, 34: 75-82.”.
- Page 56 酮體測量密碼校對 酮體試片包裝會提供1支密碼卡,它具有校正功能。 當您使用新的一批試片時,必須先執行密碼校正,其步驟與螢幕顯示順序如下: 步驟1 於關機狀態下,插入密碼卡,機器螢幕 上會出現一組號碼,此數字即為密碼。 步驟2 請確認螢幕上顯示的號碼、密碼卡及試 Code 片包裝上所標示的相同。 步驟3 確認後,即可取出密碼卡,此時螢幕顯 示”OFF”字樣,即完成校對工作。 酮體測量步驟 步驟1 插入試片 酮體試片完全插入後,機器將自動啟動 並執行自我檢測約1秒。 正常狀況下,將依序顯示右圖畫面。 請注意: 623僅為示意圖,不一定是您所使用機器的真正號碼。機器上顯示的號碼與試片 包裝上的密碼須一致,若不相同,請停止測量步驟,並請與當地經銷商聯繫。 步驟2 採血 1. 清洗雙手,使其保持乾燥。 2. 輕輕按摩採血部位使其充血。 3. 以酒精棉片消毒後,待酒精揮發完全。 4. 將採血筆牢牢抵住採血部位,按下採血筆側 面的按鈕。 5. 聽到喀聲時代表採血動作已經完成。 6. 輕輕擠壓穿刺的周邊部位以取得足夠的血量。...
- Page 57 步驟3 吸入血液 將試片吸入口以45度靠近手指上的血液,血液會被自動吸入,待反應區內吸滿血量 後再移開。 請注意: ˙請不要用手指壓在試片上,或使用散開的血液樣本。 ˙請不要將血液直接滴在吸入口上,此舉會造成錯誤的 測試結果。 步驟4 得到結果 待機器倒數至0後,測量結果會出現於螢幕上。 測試結果會自動儲存於機器記憶中。 酮體測試結果會以mmol/L為單位顯示。 步驟5 關機 輕推退片鈕,即可自動將試片自機器中退出,或用手將試片取下,機器將會自動 關機。請將採血針頭刺入採血針針頭護蓋後再行丟棄。...
- Page 58 膽固醇測量密碼校對 膽固醇試片包裝會提供1支密碼卡,它具有校正功能。 當您使用新的一批試片時,必須先執行密碼校正,其步驟與螢幕顯示順序如下: 步驟1 於關機狀態下,插入密碼卡,機器螢幕 上會出現一組號碼,此數字即為密碼。 步驟2 請確認螢幕上顯示的號碼、密碼卡及試 Code 片包裝上所標示的相同。 步驟3 確認後,即可取出密碼卡,此時螢幕顯 示”OFF”字樣,即完成校對工作。 膽固醇測量步驟 步驟1 插入試片 膽固醇試片完全插入後,機器將自動啟 動並執行自我檢測約1秒。 正常狀況下,將依序顯示右圖畫面。 請注意: 854僅為示意圖,不一定是您所使用機器的真正號碼。機器上顯示的號碼與試片 包裝上的密碼須一致,若不相同,請停止測量步驟,並請與當地經銷商聯繫。 步驟2 採血 1. 清洗雙手,使其保持乾燥。 2. 輕輕按摩採血部位使其充血。 3. 以酒精棉片消毒後,待酒精揮發完全。 4. 將採血筆牢牢抵住採血部位,按下採血筆側 面的按鈕。 5. 聽到喀聲時代表採血動作已經完成。 6. 輕輕擠壓穿刺的周邊部位以取得足夠的血量。...
- Page 59 步驟3 吸入血液 將試片吸入口以45度靠近手指上的血液,血液會被自動吸入,待反應區內吸滿血量 後再移開。 請注意: ˙請不要用手指壓在試片上,或使用散開的血液樣本。 ˙請不要將血液直接滴在吸入口上,此舉會造成錯誤的 測試結果。 步驟4 得到結果 待機器倒數至0後,測量結果會出現於螢幕上。 測試結果會自動儲存於機器記憶中。 膽固醇測試結果會以mg/dL為單位顯示。 步驟5 關機 輕推退片鈕,即可自動將試片自機器中退出,或用手將試片取下,機器將會自動 關機。請將採血針頭刺入採血針針頭護蓋後再行丟棄。...
- Page 60 尿酸測量密碼校對 尿酸試片包裝會提供1支密碼卡,它具有校正功能。 當您使用新的一批試片時,必須先執行密碼校正,其步驟與螢幕顯示順序如下: 步驟1 於關機狀態下,插入密碼卡,機器螢幕 上會出現一組號碼,此數字即為密碼。 步驟2 請確認螢幕上顯示的號碼、密碼卡及試 Code 片包裝上所標示的相同。 步驟3 確認後,即可取出密碼卡,此時螢幕顯 示”OFF”字樣,即完成校對工作。 尿酸測量步驟 步驟1 插入試片 尿酸試片完全插入後,機器將自動啟動 並執行自我檢測約1秒。 正常狀況下,將依序顯示右圖畫面。 請注意: 813僅為示意圖,不一定是您所使用機器的真正號碼。機器上顯示的號碼與試片 包裝上的密碼須一致,若不相同,請停止測量步驟,並請與當地經銷商聯繫。 步驟2 採血 1. 清洗雙手,使其保持乾燥。 2. 輕輕按摩採血部位使其充血。 3. 以酒精棉片消毒後,待酒精揮發完全。 4. 將採血筆牢牢抵住採血部位,按下採血筆側 面的按鈕。 5. 聽到喀聲時代表採血動作已經完成。 6. 輕輕擠壓穿刺的周邊部位以取得足夠的血量。...
- Page 61 步驟3 吸入血液 將試片吸入口以45度靠近手指上的血液,血液會被自動吸入,待反應區內吸滿血量 後再移開。 請注意: ˙請不要用手指壓在試片上,或使用散開的血液樣本。 ˙請不要將血液直接滴在吸入口上,此舉會造成錯誤的 測試結果。 步驟4 得到結果 待機器倒數至0後,測量結果會出現於螢幕上。 測試結果會自動儲存於機器記憶中。 尿酸測試結果會以mg/dL為單位顯示。 步驟5 關機 輕推退片鈕,即可自動將試片自機器中退出,或用手將試片取下,機器將會自動 關機。請將採血針頭刺入採血針針頭護蓋後再行丟棄。...
- Page 62 測量結果輔助指示 隨測量結果出現的「輔助指示標誌」僅用於提示作用,其所代表的範圍如下。 相關正確的血糖、酮體、膽固醇及尿酸控制範圍請參考「健康資訊」。 圖 示 血糖值範圍 血糖值<0.5 mmol/L,超出量測範圍。 13.3≦血糖值≦33.3 mmol/L 血糖值>33.3 mmol/L,超出量測範圍。 圖 示 酮體值範圍 酮體值<0.1 mmol/L,超出量測範圍。 酮體值>8.0 mmol/L,超出量測範圍。 圖 示 膽固醇值範圍 膽固醇值<100 mg/dL,超出量測範圍。 膽固醇值>400 mg/dL,超出量測範圍。 圖 示 尿酸值範圍 尿酸值<3 mg/dL,超出量測範圍。 尿酸值>20 mg/dL,超出量測範圍。...
- Page 63 提示音播報量測結果 血糖測試結果會以提示音進行三次重複播報,每次播報間隔可以聽到兩次快速的嗶嗶 聲。即使測試結果小於十,仍會播報十位數。小數點以一次快速的嗶聲表示。 例如:6.0 mmol/L 表示方式為一聲長嗶(0)-一次暫停-六次嗶嗶聲(6)-一次暫停-一次快 速嗶聲(.)-一次暫停-一聲長嗶(0) 請注意: 提示音僅播報測試數值,不播報螢幕上其他訊息。 品管液測試 藉由品管液測試出來的數值會落在試片包裝上所標示的容許範圍內,用來檢視機器 和試片之間的運作是否正常,以及操作是否正確。 使用時機 在您遇到下列情況時,請先使用品管液測試。當連續三次測試結果皆落在容許範圍 內,再開始進行測試。 ˙當您感覺檢測結果與患者的身體狀況不同時,或懷疑測試結果不正確時。 ˙當機器掉落或遭受外力撞擊時。 ˙當懷疑試片可能受潮或受熱過久時。 請注意: ˙請使用本公司出品的品管液。 ˙試片包裝上標示的品管液容許範圍是搭配試片所做出的結果,與人體正常數值 範圍無關。 ˙品管測試結果會自動儲存在機器記憶中,並會有『QC』的標示。 ˙倘若品管測量過程中3分鐘內未執行品管測試,機器將會自動關機。 ˙避免品管液瓶口沾到其他雜質或灰塵,使用後,請以乾淨紙巾清潔瓶口後再鎖 緊瓶蓋。 ˙機器具有品管模式自動偵測功能,試片吸入品管液後,機器將自動判定為品管 模式(QC),不須由使用者切換成品管模式(QC)。...
- Page 64 血糖品管液測量步驟 步驟1 血糖或3合1試片完全插入後,機器將自動啟動並執行自我檢測約1秒。 正常狀況下,將依序顯示以下畫面。 血糖試片 3合1試片 步驟2 搖勻血糖品管液,擦掉第一滴,再將 第二滴滴在品管液瓶蓋上。 步驟3 將試片吸入口靠近瓶蓋上的品管液, 品管液將自動被吸入反應區內。請勿 直接將品管液滴到吸入口。 步驟4 待機器倒數至0後,測量結果會出現於螢幕上。測試結果會自動儲存於機器記憶中。...
- Page 65 酮體品管液測量步驟 步驟1 酮體試片完全插入後,機器將自動啟動 並執行自我檢測約1秒。 正常狀況下,將依序顯示右圖畫面。 請注意: 623僅為示意圖,不一定是您所使用機器的真正號碼。機器上顯示的號碼與試片 包裝上的密碼須一致,若不相同,請停止測量步驟,並請與當地經銷商聯繫。 步驟2 搖勻酮體品管液,擦掉第一滴,再將 第二滴滴在品管液瓶蓋上。 步驟3 將試片吸入口靠近瓶蓋上的品管液, 品管液將自動被吸入反應區內。請勿 直接將品管液滴到吸入口。 步驟4 待機器倒數至0後,測量結果會出現於螢幕上。測試結果會自動儲存於機器記憶中。...
- Page 66 膽固醇品管液測量步驟 步驟1 膽固醇試片完全插入後,機器將自動啟 動並執行自我檢測約1秒。 正常狀況下,將依序顯示右圖畫面。 請注意: 854僅為示意圖,不一定是您所使用機器的真正號碼。機器上顯示的號碼與試片 包裝上的密碼須一致,若不相同,請停止測量步驟,並請與當地經銷商聯繫。 步驟2 搖勻膽固醇品管液,擦掉第一滴,再 將第二滴滴在品管液瓶蓋上。 步驟3 將試片吸入口靠近瓶蓋上的品管液, 品管液將自動被吸入反應區內。請勿 直接將品管液滴到吸入口。 步驟4 待機器倒數至0後,測量結果會出現於螢幕上。測試結果會自動儲存於機器記憶中。...
- Page 67 尿酸品管液測量步驟 步驟1 尿酸試片完全插入後,機器將自動啟動 並執行自我檢測約1秒。 正常狀況下,將依序顯示右圖畫面。 請注意: 813僅為示意圖,不一定是您所使用機器的真正號碼。機器上顯示的號碼與試片 包裝上的密碼須一致,若不相同,請停止測量步驟,並請與當地經銷商聯繫。 步驟2 搖勻尿酸品管液,擦掉第一滴,再將 第二滴滴在品管液瓶蓋上。 步驟3 將試片吸入口靠近瓶蓋上的品管液, 品管液將自動被吸入反應區內。請勿 直接將品管液滴到吸入口。 步驟4 待機器倒數至0後,測量結果會出現於螢幕上。測試結果會自動儲存於機器記憶中。...
- Page 68 數值範圍 品管液測試結果應落在試片包裝上所標示的容許範圍內。若測試結果超出範圍,請 先確認以下幾點: • 溶液是否完全覆蓋試片上的反應區? • 試片及品管液是否在保存期限內? • 機器顯示的號碼與試片包裝上的密碼是否相同? • 品管液是否已回溫,不過冷或過熱? • 是否將第一滴品管液捨去,並將品管液瓶口擦乾淨? • 品管液是否已搖勻? 確認以上皆為“是”後,請使用新試片再測一次。若測試結果仍超出容許範圍,可 能是機器出問題,請勿使用此機器測試血糖,並請與經銷商連絡維修事宜。...
- Page 69 檢閱記憶資料 在機器上看記憶結果 機器可儲存1000組含日期及時間的測試結果,並提供7天、14天、21天、28 天、60天、90天的血糖測試結果平均值。 請注意: ˙進入記憶模式後,您可以選擇插入試片開啟測量模式。 ˙進入記憶模式後,若出現”---“表示無任何記憶資料。 ˙當記憶結果超過1000組,最新加入的記憶會自動取代最舊的記憶。 ˙您若想離開記憶模式,長按M鍵直到OFF出現,機器將會自動關機。 ˙進入記憶模式後,若3分鐘內未按任何鍵,螢幕會出現OFF,機器將會自動關機。 ˙機器僅有計算血糖平均值的功能,紅血球容積比、血紅素、酮體、膽固醇、尿酸 及品管液的測試結果並不會顯示平均值。 ˙關於記憶刪除的方法,請見”機器設定”。 查看單筆測試結果 1. 在關機狀態下,按M鍵或上鍵 進入記憶模式。 2. 按上下鍵 ,將依序顯示測試結果,並伴隨顯示測量參數:血糖(GLU)、 紅血球容積比(HCT)、血紅素(Hb)、酮體(KETONE)、膽固醇(CHOL)或尿酸(UA)及 測量模式符號:一般(GEN)、飯前(AC)或飯後(PC);品管測試結果則會顯示QC。 4. 長按M鍵,機器立即自動關機。...
- Page 70 查看血糖平均值 1. 在關機狀態下,按下鍵 進入記憶模式。 2. 進入記憶模式後,螢幕上會出現平均值符號( )。 3. 首先出現一般(GEN)模式的7天內機器紀錄的血糖測試結果平均值。您可以繼續按 上下鍵 查看14天、21天、28天、60天及90天的血糖平均值。以此類推出現飯 前(AC)及飯後(PC)模式。 4. 長按M鍵,螢幕顯示OFF,機器回到關機狀態。 提示音播報記憶結果 在記憶模式下,提示音僅會播報最近的一筆測量紀錄,以及7天的量測平均值。 在應用程式上看記憶結果 透過傳輸線傳輸 (FORA 6 Plus) 使用本公司發行的〝Health Care System Software〞可以讓您在個人裝置上觀看及 分析機器記憶的測試結果。 步驟1 請經由下列路徑下載及安裝軟體至個人電腦上: • 進入網站(http://www.foracare.com.tw) • 依照指示下載專用軟體。 步驟2 啟動您的電腦,並開啟軟體「Health Care Software System」。 步驟3 於機器關機狀態下,將傳輸線兩端分別接在機器的資料埠與個人電腦的連接埠,機 器會自動顯示「PC」,代表機器已與電腦連結,進入傳輸模式。此時即可依照軟...
- Page 71 請注意: • 當機器進行資料傳輸時,無法執行測量。 • 資料傳輸所用的傳輸線必須另外購買。 透過藍牙傳輸 (FORA 6 Connect) 使用本公司發行的iFORA HM App在個人行動裝置上觀看及分析機器記憶的測試結 果。 步驟1 在您的iOS或Android行動裝置上安裝iFORA HM App。 步驟2 依照下列圖示進行行動裝置與機器的藍牙配對。建議您的機器與新的藍牙設備連接 時,先進行藍牙配對。 Search Bluetooth Smart Meter Bluetooth Smart Meter...
- Page 72 步驟3 當機器位於行動裝置的傳輸範圍內,資量將自動傳送到行動裝置。傳送完畢後,機 器將會自動關機。(若兩者無法連接,機器將於兩分鐘後自動關機)。 請注意: •機器關機時會啟動藍牙傳輸資料,同時藍牙指示燈呈現藍色閃爍狀態。 • 當機器進行資料傳輸時,無法執行測量。 •請確認您的行動裝置在傳輸資料前已開啟藍牙功能,並位於機器的傳輸範圍內。 清潔與保存 清潔 • 請用布沾水或使用中性清潔劑輕輕擦拭即可,請勿將機器直接浸泡在任何液體內 清洗或使用有機溶劑。 • 資料傳輸埠部份應避免潮濕。 保存 機器的保存 • 請存放在-20℃至60℃,相對溼度95%以下。 • 請勿將機器掉落地面,並避免碰撞。 • 請盡量以原廠所附的收納袋攜帶或存放,避免碰撞。 • 請勿放置於陽光直射或高溫潮濕的場所。 • 切勿嘗試分解機器。...
- Page 73 試片的保存 • 請按照試片說明書及包裝上所標示的儲存環境儲存試片。 • 鋁箔紙試片包裝開封後,請盡速使用該試片。 • 請用原裝的試片瓶儲存試片。請勿將試片移至其它容器。 • 拿取試片前,請拭乾雙手。請勿用濕手碰觸試片。 • 將試片從瓶中取出後請盡速使用。取出試片後應立即蓋好試片瓶。 • 請勿彎折或切割試片。 • 請將試片保存在乾燥及涼爽的環境,避免潮濕及陽光直射,不要冷藏。 品管液的保存 • 品管液請保存在2℃~30℃之下,請勿冷凍。 • 品管液開瓶後90天內有效,過期請丟棄。建議您打開後將開瓶日期標註在瓶身上。 • 品管液測試須在室溫下進行。...
- Page 74 故障排除指引 若您依據解決方法執行仍無法排除問題時,或機器所顯示的訊息不在下列表中,請 勿嘗試自行解決,請直接與經銷商聯絡。 故障訊息解讀 螢幕顯示 可能原因 解決方法 電量不足 請更換新電池。 環境溫度超出範圍 請在合適的操作溫度下重新測試。 試片請勿重複使用,請使用新的試片 使用已用過之試片 重新測試。 請詳細閱讀說明書並使用新的試片重 機器倒數時拔出試片 新測試。 密碼錯誤 請聯繫當地經銷商。 請詳細閱讀說明書並用新的試片重新測 操作發生問題 試一次,若仍無法解決問題,請聯絡當 地經銷商,切勿將機器寄回製造廠。 提示音播報錯誤訊息 •血糖測量結果超出量測範圍 - 測量結果大於33.3 mmol/L時,螢幕顯示"Hi",提示音將以999的數值播報 -量測結果小於0.5 mmol/L時,螢幕顯示"Lo",提示音將以000的數值播報 •電池電量不足警告:當電池即將耗盡,關機時,會連續三次發出兩聲快速的嗶聲。 •其他錯誤訊息:當有其他錯誤消息時,會連續四次發出兩聲快速的嗶聲。...
- Page 75 異常狀況排除指引 1. 插入試片後,機器未顯示任何訊息 ● 電力耗盡:請更換電池。 ● 電池裝置錯誤:檢查電池安裝是否正確。 ● 試片插入方向錯誤:檢查試片插入方向。 ● 機器故障:請連絡經銷商。 2. 血液或品管液進入試片反應區後,機器並未執行測試 ● 檢體量不足:重新採血並使用新試片。 ● 試片損壞:使用新試片。 ● 機器故障:請連絡經銷商。 3. 測試結果與平常量測值差別太大 ● 操作不正確:請詳閱操作步驟,並使用品管液測試後,重新採血再測1次。 ● 試片損壞:請確認試片在保存期限,重新採血再測1次。 ● 機器故障:請連絡經銷商。 4. 品管液測試結果,不在容許範圍內 ● 使用前未搖勻:請重新搖勻品管液。 ● 品管液過熱或過冷:測試前請放置品管液於室溫下(20℃至25℃)至少30分鐘。 ● 試片損壞:使用新試片再測1次。 ● 試片密碼不符:確認試片包裝上密碼與螢幕顯示號碼相同。...
- Page 76 包裝標示說明 體外診斷試劑 請勿重複使用 使用前,請詳細閱 溫度限制 讀彩盒內所附的 說明書 使用期限 CE符號 批號 製造廠 序號 使用後妥善處理 包裝 禁止高溫/直接太 注意,請參閱隨 陽曝曬 附文件 保持乾燥 使用輻射滅菌 型號 如果包裝破損請 勿使用 適當處理廢棄物 濕度限制 直流電1.5伏特 電池 1.5V 數量...
- Page 77 89.8 (L) x 54.9 (W) x 18 (H) mm , 46.1g(不含電池) 大小及重量 1顆1.5V AAA鹼性電池 電源 1000筆包括時間和日期的測量結果 記憶空間 3分鐘未使用即自動關機 省電模式 資料傳輸 傳輸線 (FORA 6 Plus) / 藍牙 (FORA 6 Connect) -20℃至60℃,相對溼度95%以下 機器儲存環境 血糖:0.55 ~ 33.3 mmol/L ; 酮體:0.1~8.0mmol/L; 系統測量範圍 膽固醇:100~400 mg/ dL; 尿酸:3~20 mg/ dL 請注意: 本產品的系統準確性、精密度、操作環境、限制及其他重要資訊請參考試片說...
- Page 78 福爾旗艦6合1測試系統 Multi-Functional Monitoring System 製造廠名稱:ForaCare Suisse AG 製造廠地址:Neugasse 55, CH9000, St. Gallen, Switzerland...
Need help?
Do you have a question about the 6 Plus and is the answer not in the manual?
Questions and answers